How to Access the Vaccination Administration Page?
Follow the above mentioned workflow to land on the Vaccine Administration Page.
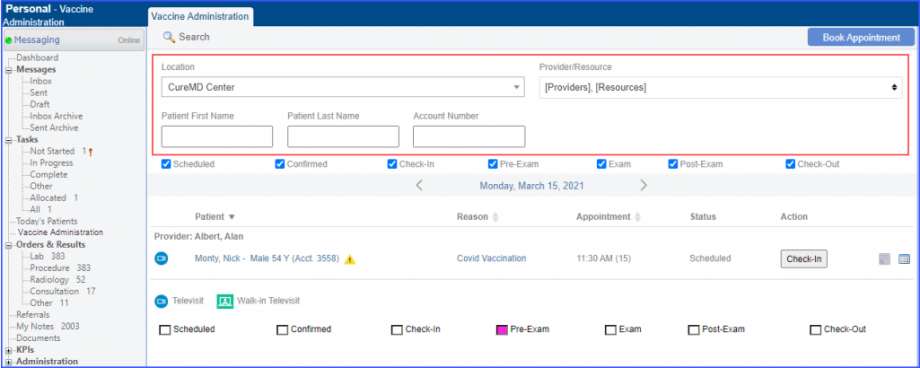
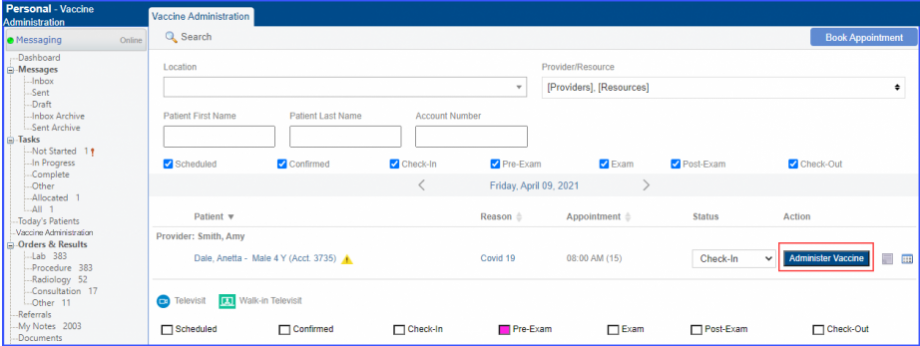
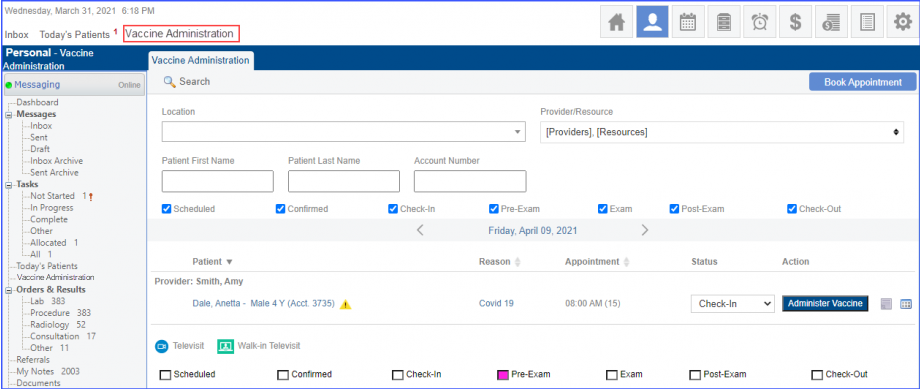
Users can search patients who have appointments scheduled for vaccinations.
The following search filters are available to search patient scheduled for a vaccination:
- Practice location
- Provider/Resource
- Patient First/Last Name
- Account Number
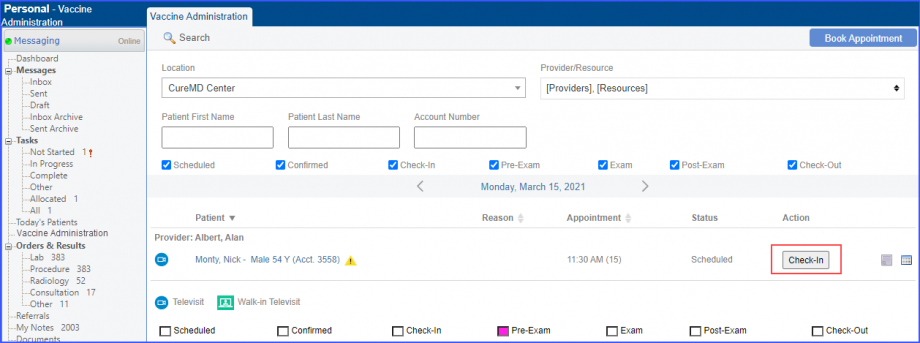
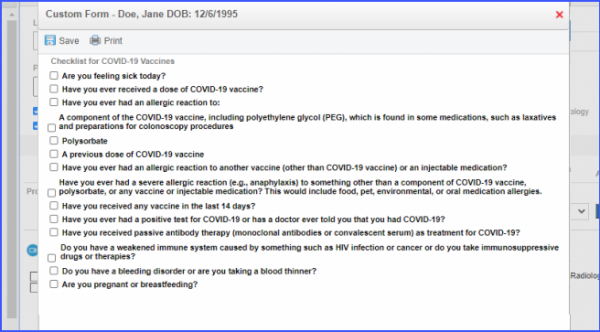
Once user clicks on the Check-In button to check-in a patient, the custom form option appears.
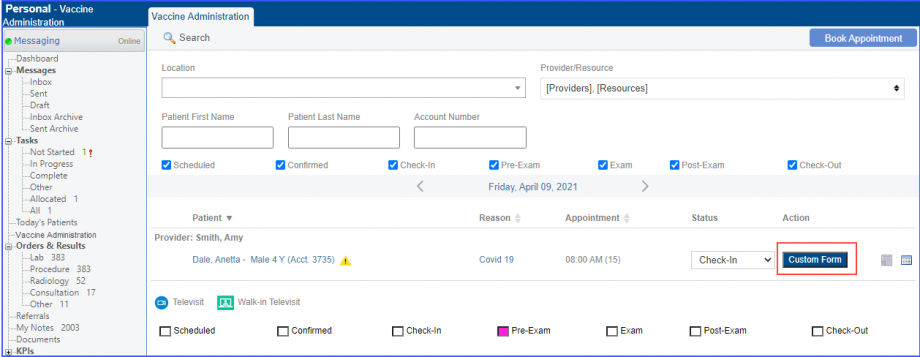
Click on Custom Form to view the custom form popup.
Users can fill out the custom form then click ‘Save’ to save these changes.
Once the custom form has been saved the ‘Administer Vaccine’ option appears.
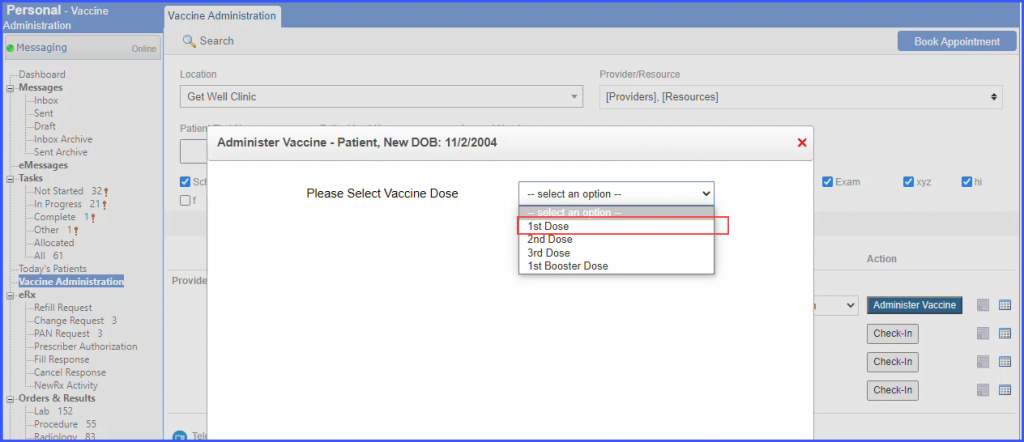
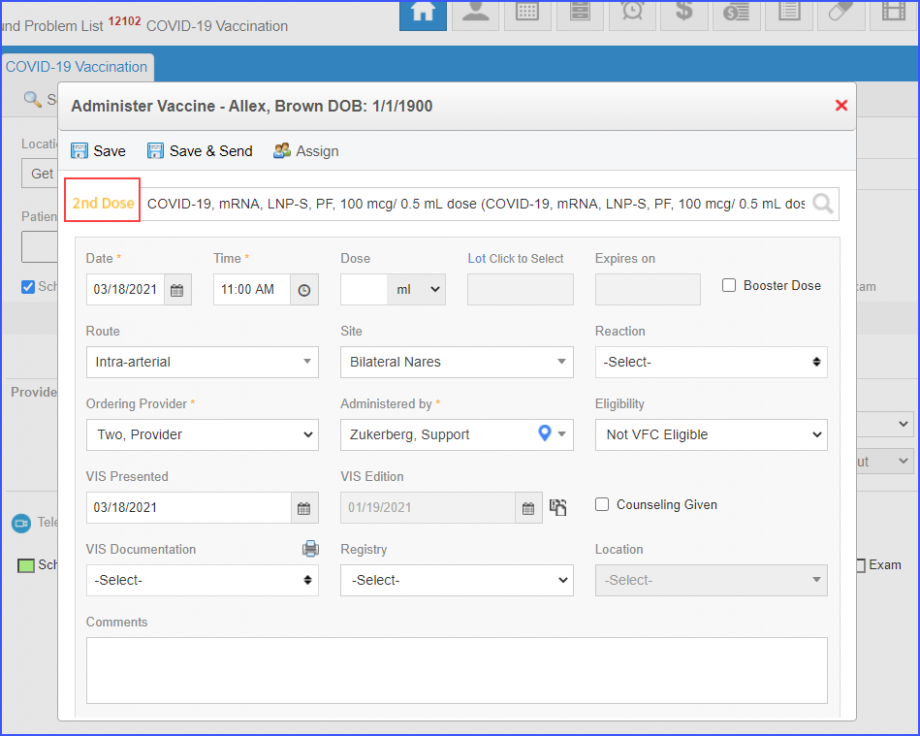
Once user clicks on ‘Administer Vaccine’, they have the option to administer 1st Dose, 2nd Dose, 3rd Dose, and 1st Booster Dose.
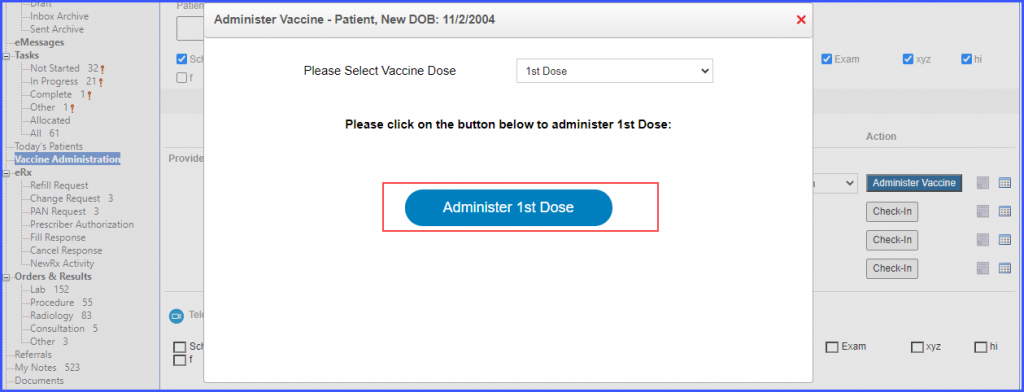
- To administer 1st dose of Covid-19 vaccination, select ‘1st Dose’ from the dose selection dropdown. The ‘1st Dose’ option is not displayed in the dropdown if the system has a record of the 1st dose of vaccine administration for a patient.
Then, click the ‘Administer 1st Dose’ button.
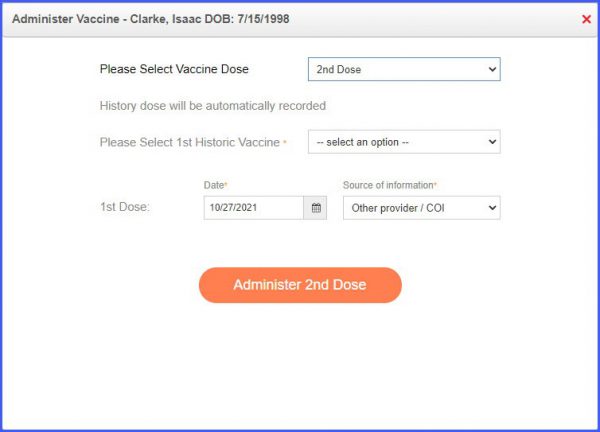
- To administer 2nd dose of Covid-19 vaccination, select ‘2nd Dose’ from the dose selection dropdown. Also, select the ‘Date’ and ‘Source of information’ for the 1st dose. Then, click the ‘Administer 2nd Dose’ button.
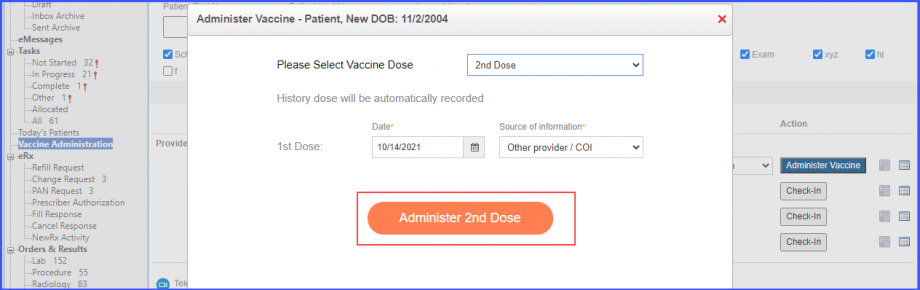
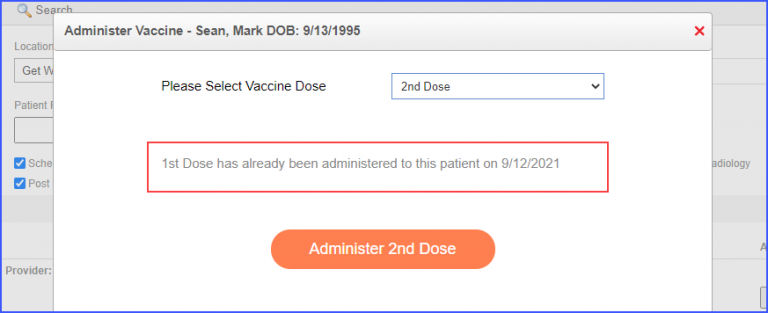
The date of administration of the 1st dose is automatically displayed on the ‘Administer Vaccine’ pop-up, if the system has a record of the 1st dose of vaccination for the patient.
-
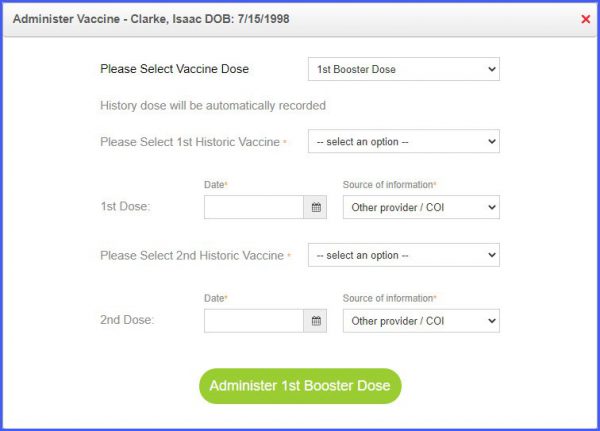
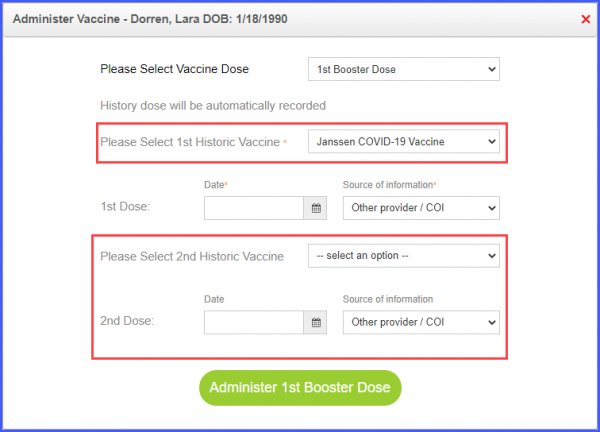
1st Dose Administration Date To administer 1st booster dose of Covid-19 vaccination, select ‘1st Booster Dose’ from the dose selection dropdown. Then, select the ‘Historic Vaccine’, and ‘Date’ and ‘Source of information’ for the 1st and 2nd doses. Once done, click the ‘Administer 1st Booster Dose’ button.
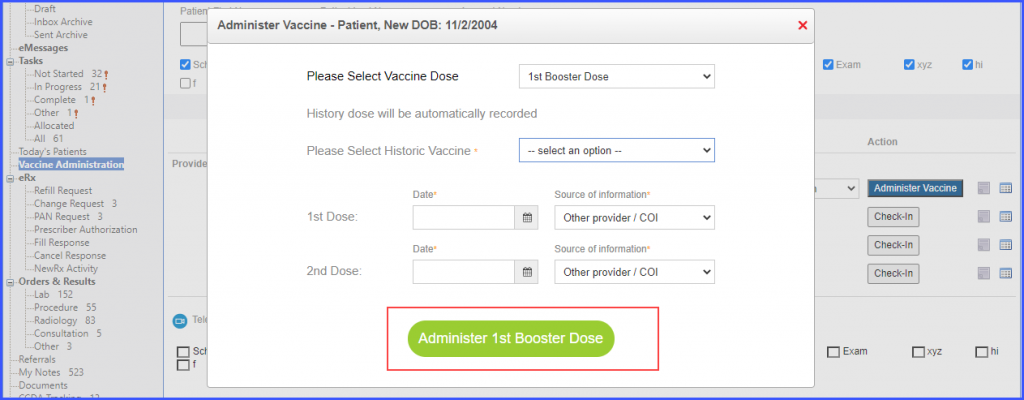
In case, a record of the 1st dose exists in the system, the date of 1st dose of vaccination is automatically displayed on the administer vaccine pop-up. The user should select the date for the 2nd dose of the vaccination. Then, click the ‘Administer 1st Booster Dose’ button.
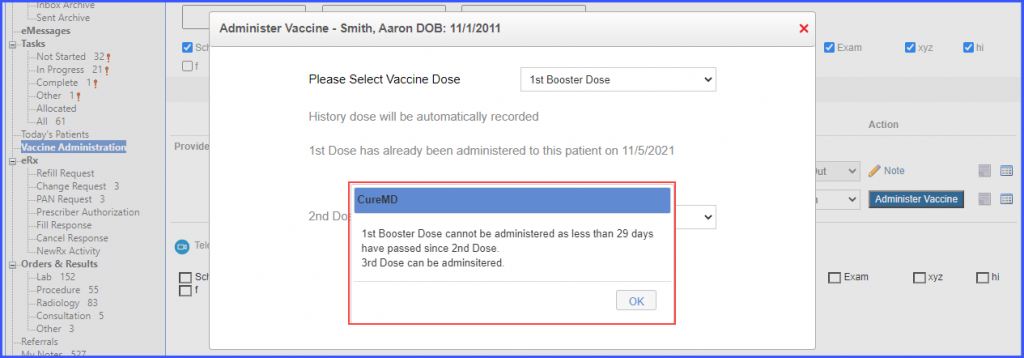
If the days passed between the 1st and 2nd doses are lesser than 28 and the user clicks ‘Administer 1st Booster Dose’ button, the system displays a prompt. 1st Booster dose cannot be administered if the duration between 1st dose and 2nd dose is less than 28 days.
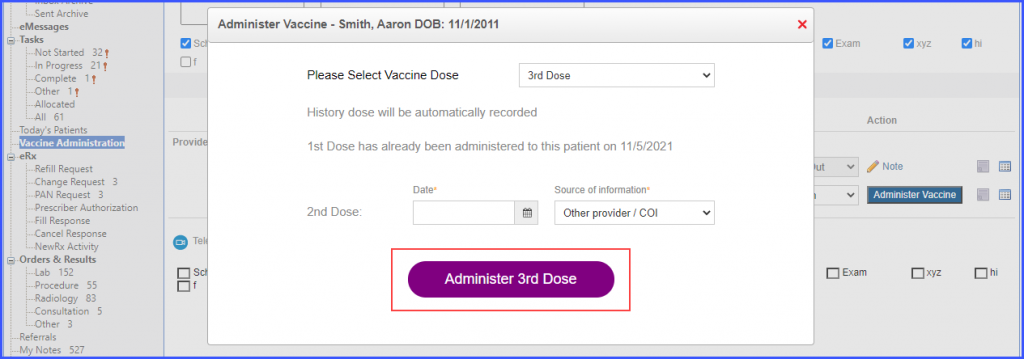
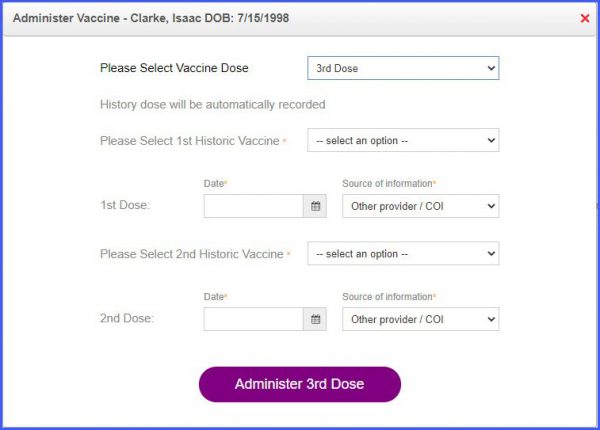
- To administer 3rd dose of Covid-19 vaccination, select ‘3rd Dose’ from the dose selection dropdown. Then, select the ‘Historic Vaccine’, and ‘Date’ and ‘Source of information’ for the 1st and 2nd doses. Once done, click the ‘Administer 3rd Dose’ button.
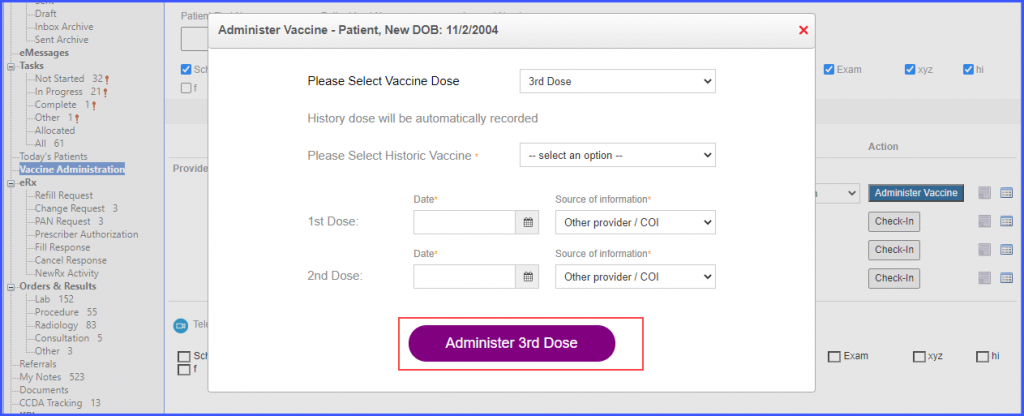
In case, a record of the 1st dose exists in the system, the date of 1st dose of vaccination is automatically displayed on the administer vaccine pop-up. The user should select the date for the 2nd dose of the vaccination. Then, click the ‘Administer 1st Booster Dose’ button.
If the days passed between the 1st and 2nd doses are greater than 28 and the user clicks ‘Administer 3rd Dose’ button, the system displays an error message. 3rd dose cannot be administered if the duration between 1st dose and 2nd dose is more than 28 days.
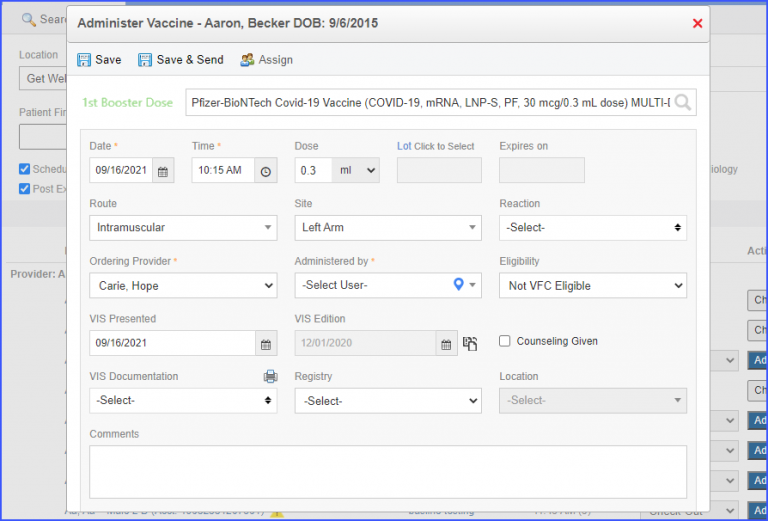
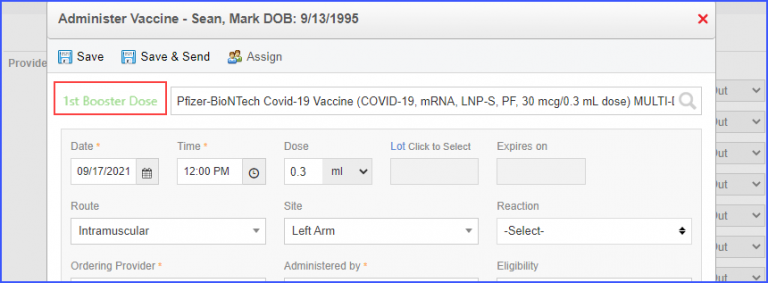
Once the user has selected the dose, they are required to record the details of the vaccine.
Additionally, if a record of 1st dose and 2nd dose exists in the system and the user clicks ‘Administer Vaccine’ button, the user is directly navigated to the screen for:
- ‘1st Booster Dose’ if the duration between 1st dose and 2nd dose is more than 28 days.
- ‘3rd Dose’ if the duration between 1st dose and 2nd dose is less than 28 days.
The historic vaccine is also recorded automatically.
Users can also access the Vaccination Administration page by clicking on its quick link.
In order to see how to add this quick link, click here.
In order to see how to configure these COVID Vaccine Settings click here.
Once a vaccine has been administered, the provider note of the patient is automatically created and the eSuperbill is automatically signed. To see more, click here.
Dose number is also displayed on the vaccine administration form. This ensures that correct dose is recorded for the patient.
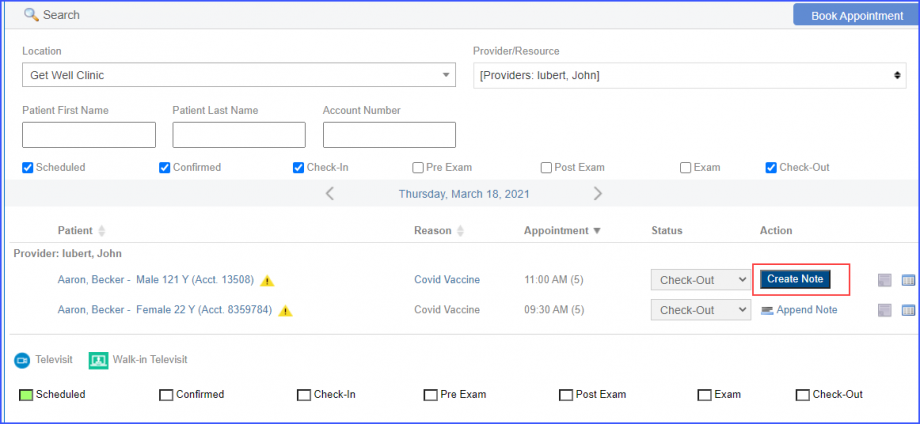
The system automatically creates provider note and eSuperbill once a vaccine administration information is saved. The user can manually generate them in case the automated workflow breaks.
Click ‘Create Note’ to manually generate provider note and eSuperbill.
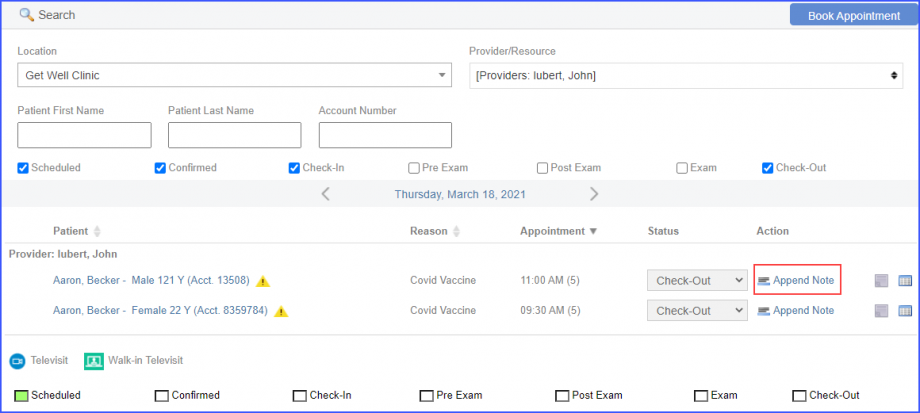
Then click ‘Append Note’.
The user is directed to the provider note for the patient. To view provider note, click here.
The eSuperbill created for home administered Covid-19 vaccination includes the CPT code ‘M0201’.
This ensures that the Covid-19 vaccinations are billed correctly.
Users must select ‘Place of Service’, ‘12. Home’ for the practice from Settings. To see how to select a place of service for home administered Covid-19 vaccination, click here.
To see how the CPT code ‘M0201’ is displayed on the eSuperbill, click here.
The dose number of the influenza vaccination is not displayed on the provider note.
This ensures that the patients do not confuse their actual dose number with their dose number record in CureMD’s application.
After a patient is administered influenza vaccination, click ‘Append Note’ to see that the dose number is not displayed on the provider note. Click here, to view the provider note.
A patient can now be administered the Janssen vaccine before or after any other vaccine.
The vaccine for the 1st historic dose is not automatically recorded based on the vaccine administered in the 2nd dose.
In case the user selects the 3rd Dose in the dose selection dropdown, the options for choosing historic doses appear for the user to choose.
If the 1st Booster Dose is selected in the dose selection dropdown, the options for choosing historic doses appear for the user to choose.
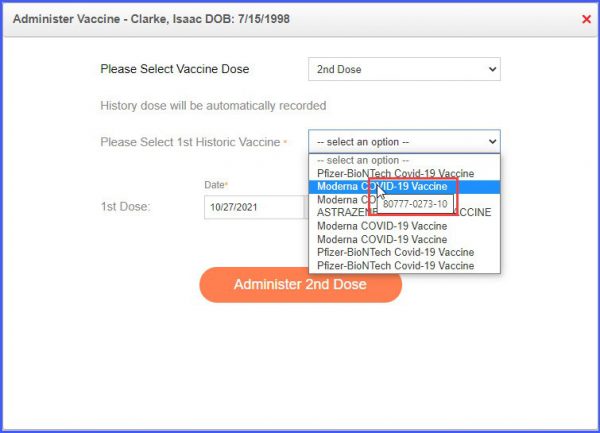
The NDC is displayed in a tooltip when the user hovers on a vaccine name.
Similarly, users can administer any vaccine as a subsequent dose to the patient from their Immunization Chart after a dose of the Janssen vaccine. Click here to see more.
Users have the option to administer 2nd, 3rd or 1st booster dose of Janssen.
If the user selects ‘1st Booster Dose’ from the vaccine dose selection dropdown and Janssen is the first historic vaccine, then the ‘2nd Historic Vaccine’ fields are not disabled. They are also not mandatory.
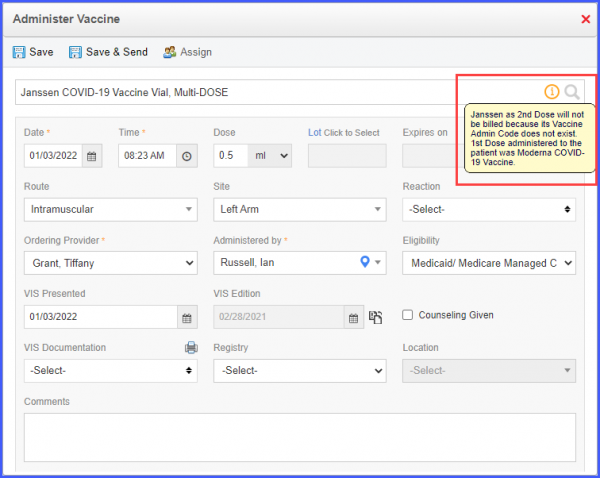
When the 2nd or 3rd dose of Janssen is being administered, the system displays a warning next to the selected vaccine with the following message:
‘Janssen as 2nd Dose will not be billed because its Vaccine Admin Code does not exist. 1st Dose administered to the patient was Moderna COVID-19 Vaccine’
Similar enhancement has been made on the ‘Immunization Chart’. Click here, to view the change.
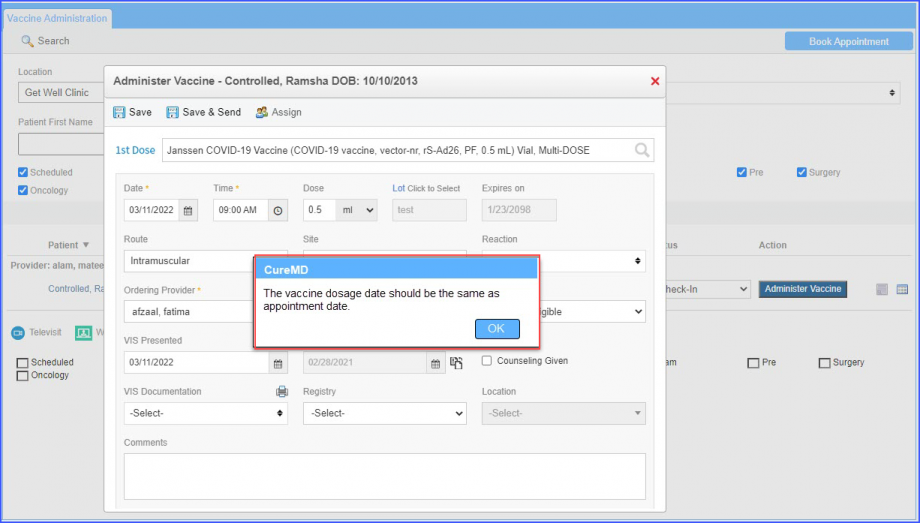
A prompt is displayed when the dosage date and appointment date of a vaccine don’t match in the VMS workflow. ![]()
This ensures that no problems are faced while creating eSuperbill as the different dates are not populated into it.
The user has navigated to the Vaccine Administration page through VMS.
On the ‘Administer Vaccine’ screen, the user adds the vaccine dosage date that is different from the appointment date, and clicks either on the ‘Save’ button or the ‘Save & Send’ button.
The system displays a prompt stating:
‘The vaccine dosage date should be the same as appointment date’