How to Add Patient Advances without Any Appointment?
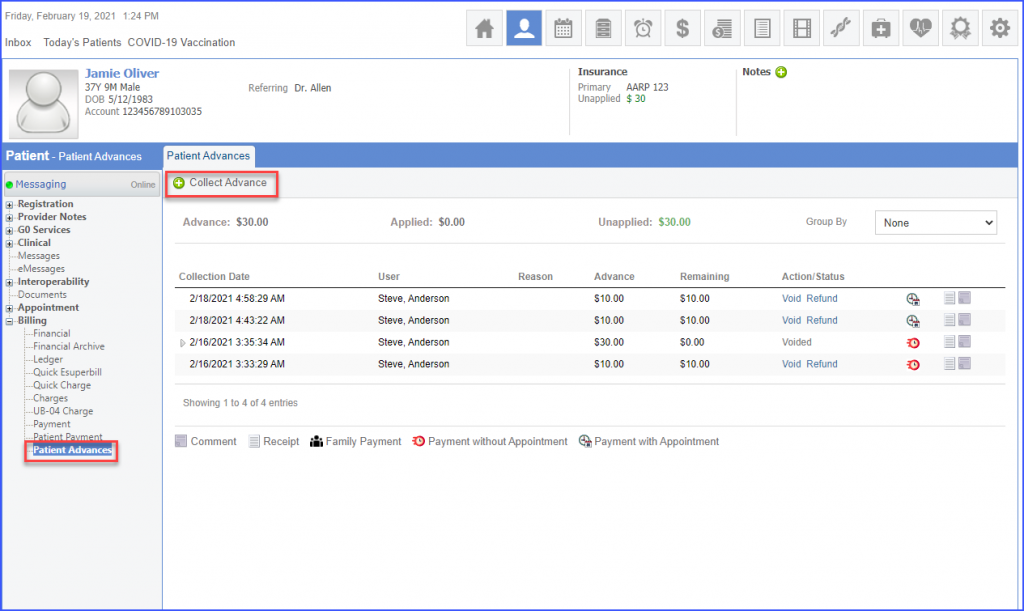
Follow the above-mentioned workflow to land on the ‘Patient Advances’ page.
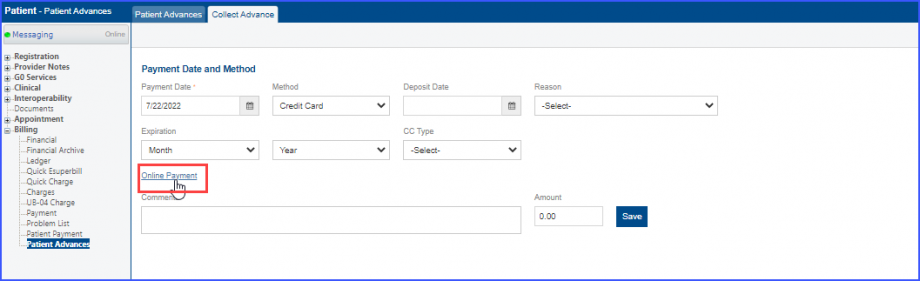
Patient advance is a payment collected from the patient to cover the cost of an appointment with a provider.
Users can collect patient advance without a patient’s appointment with a provider.
Patient advances added from Charges or Scheduler are also displayed here.
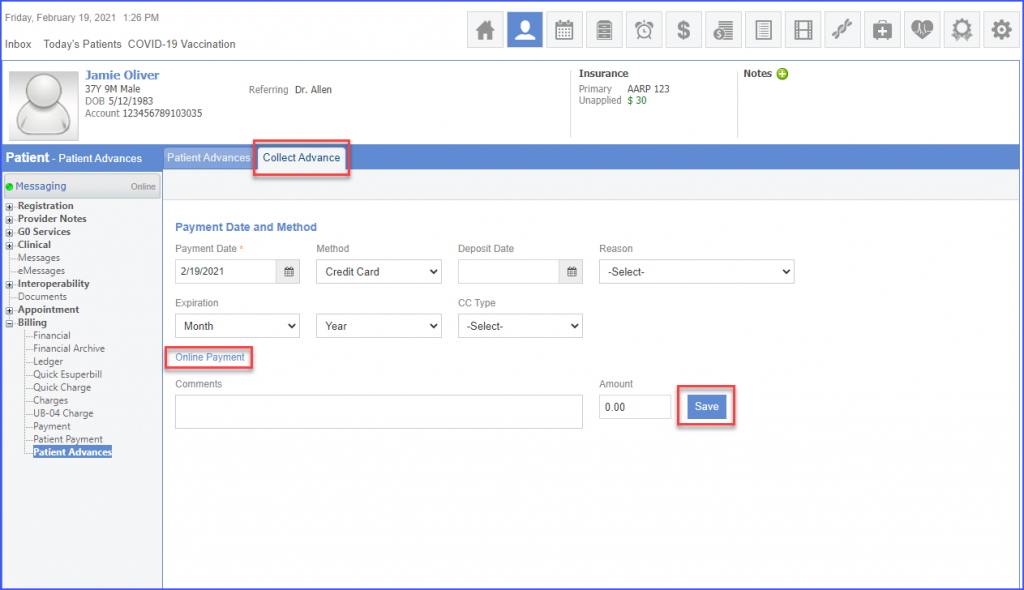
Click on the ‘Collect Advance’ button and ‘Collect Advance’ tab opens.
Patient advances can be collected via ‘Online Payment’ and ‘Offline Payment’ method.
Click ‘Online Payment’ to make a payment online.
In case of ‘Offline Payment’, following payment methods are available:
- ACH
- Cash
- Check
- Credit Card
- Other
Once all the required information has been entered for collecting an advance, click ‘Save’.
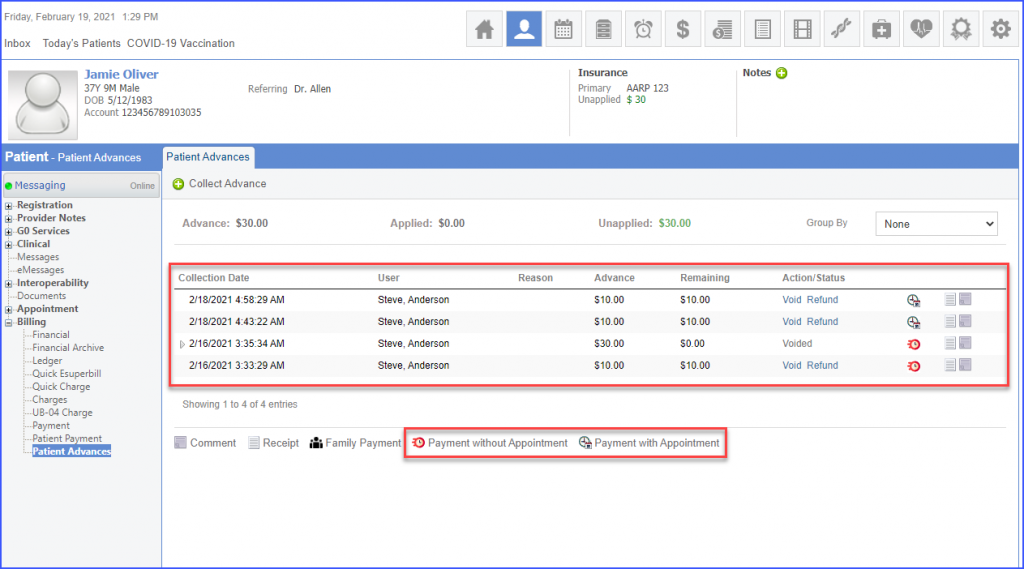
After clicking ‘Save’ the user is navigated back to the ‘Patient Advances’ page. The system displays a list of advances that have been collected with and without appointments from the patient.
‘Payment without Appointment’ and ‘Payment with Appointment’ icons are displayed for all transactions.
Users can filter patient advances based on various criterion. Click on the ‘Group By’ dropdown.
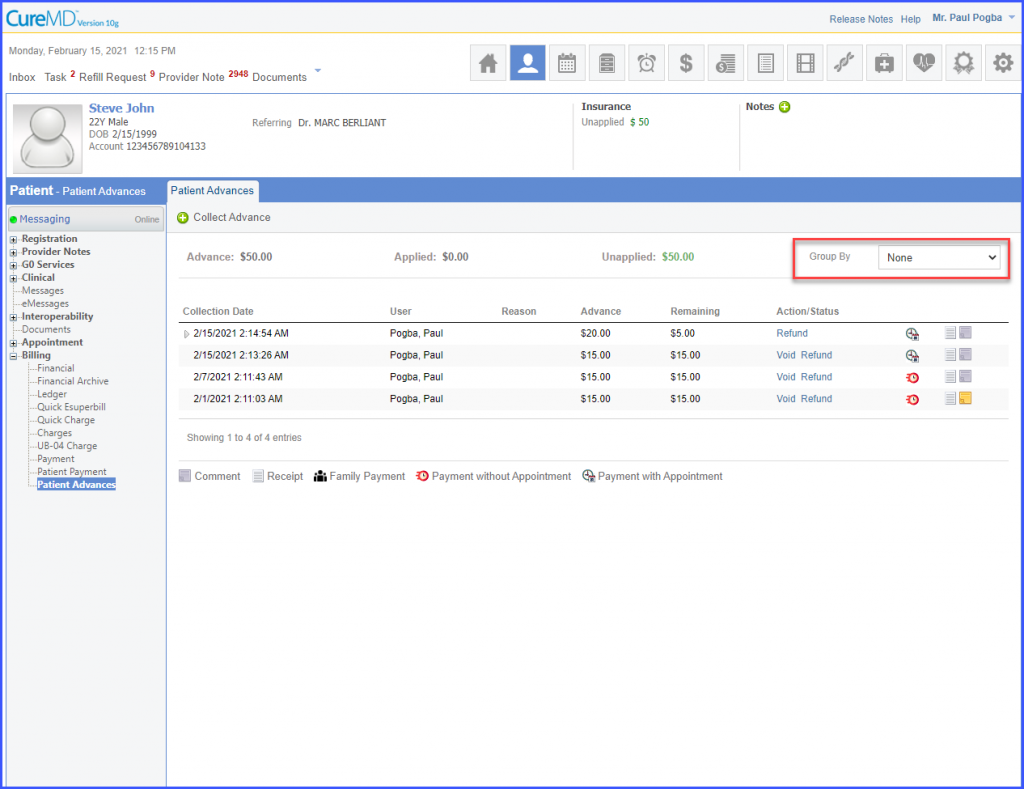
The dropdown displays the different options based on which the patient advances can be segregated.
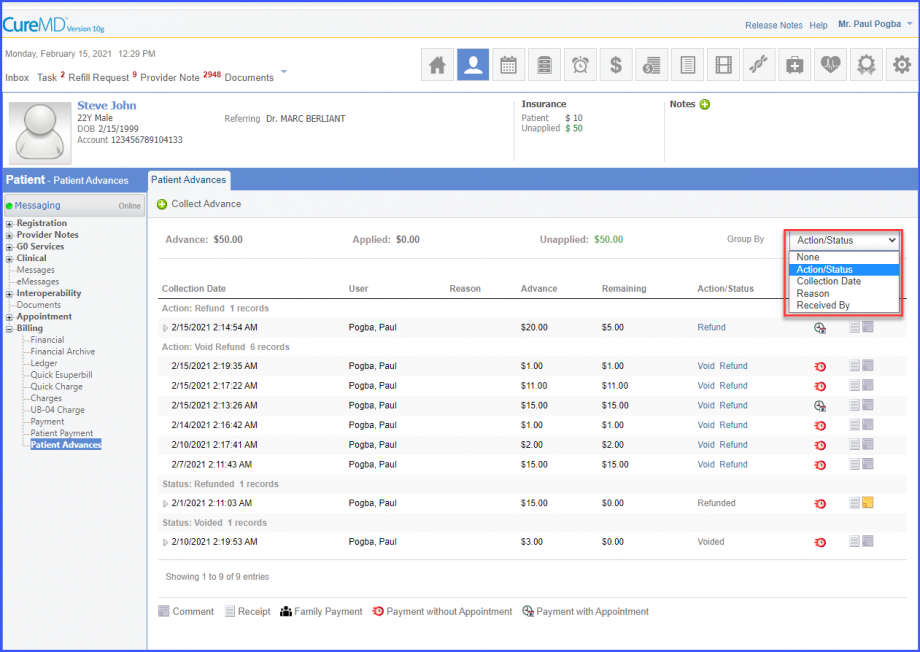
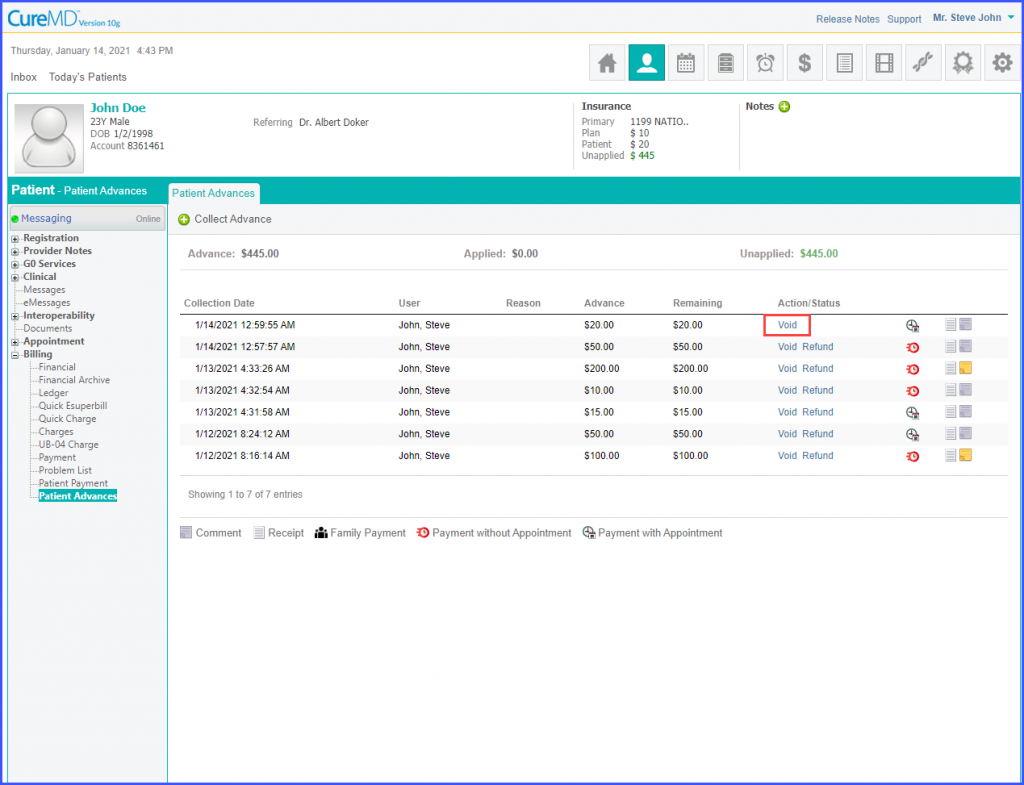
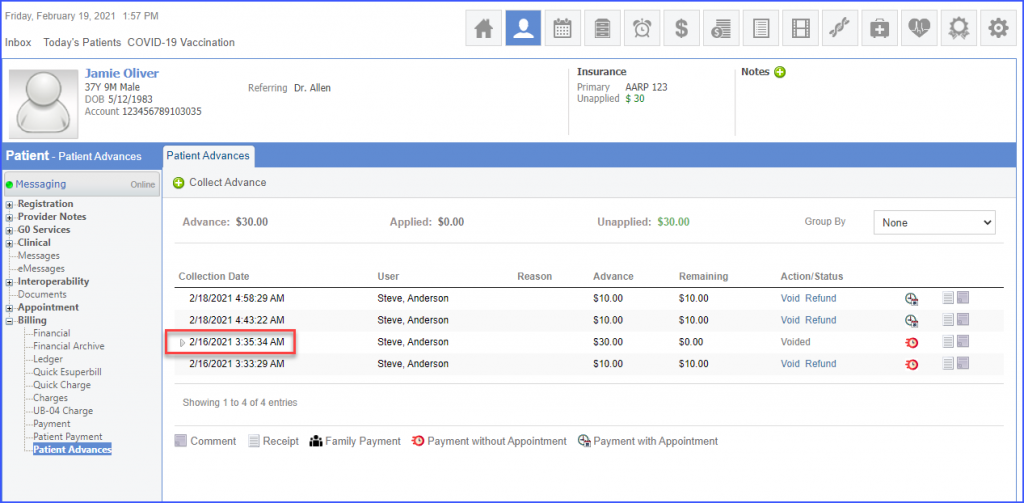
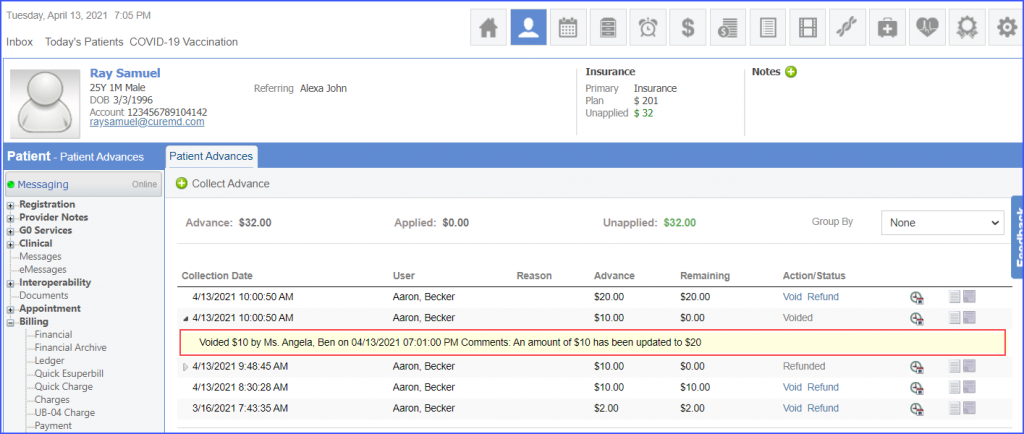
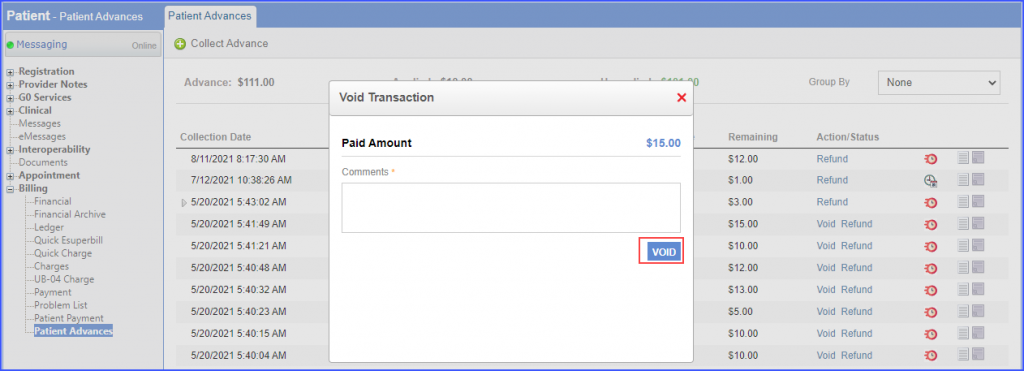
Patient advances can be voided. A payment can be cancelled before the patient’s account is charged for it.
Both online and offline payments can be voided.
The system displays the ‘Void’ and ‘Refund’ buttons according to the rules set by the payment gateway.
Once a payment is eligible to get voided the ‘Void’ button appears under the Action/Status column for that payment.
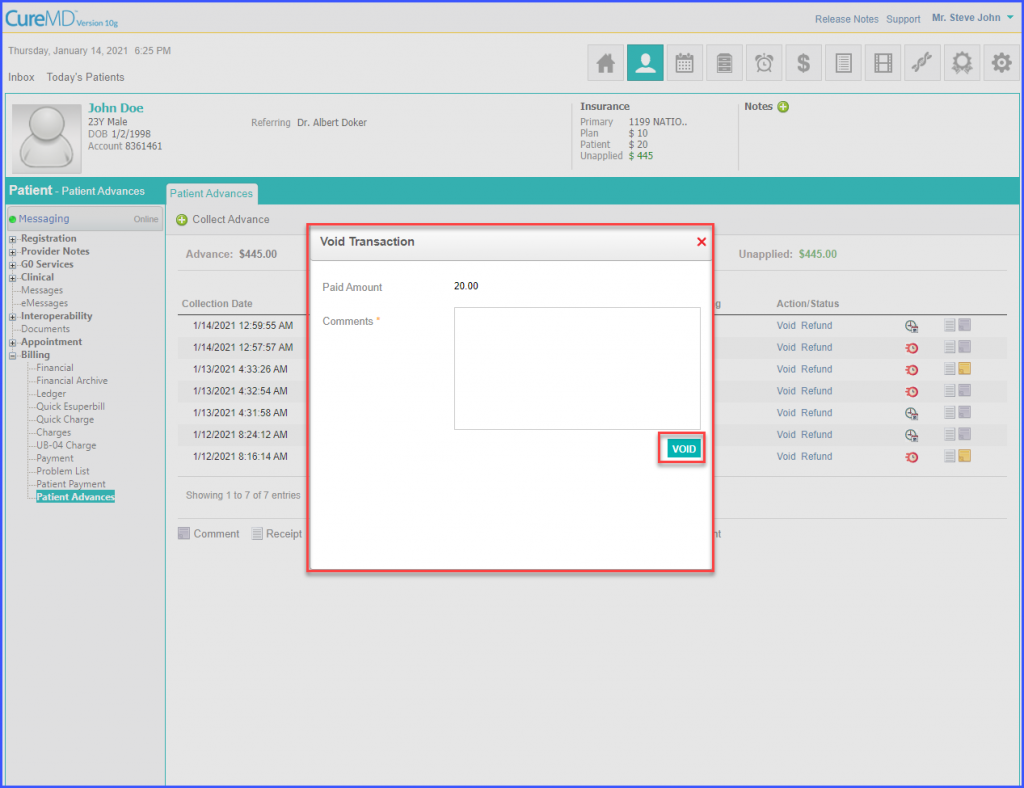
Once the user clicks on the ‘Void’ icon for a transaction, a ‘Void Transaction’ popup appears. The user should enter a reason for voiding the payment in the ‘Comments’ textbox and click ‘VOID’.
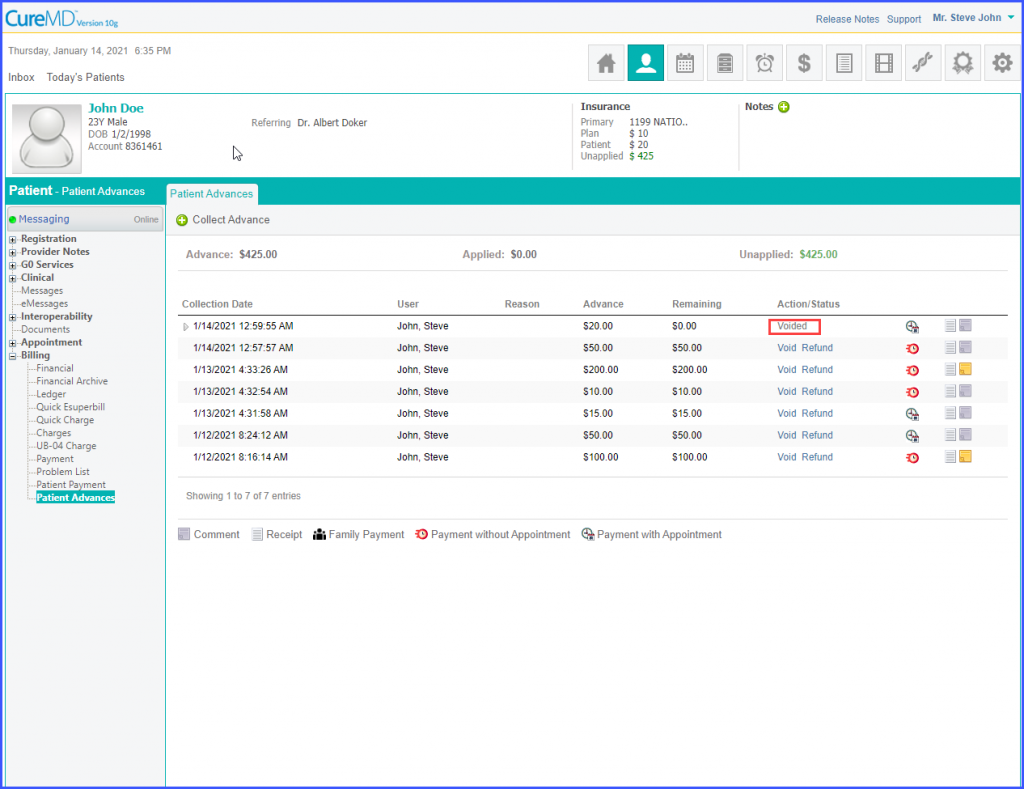
System marks the payment as ‘Voided’.
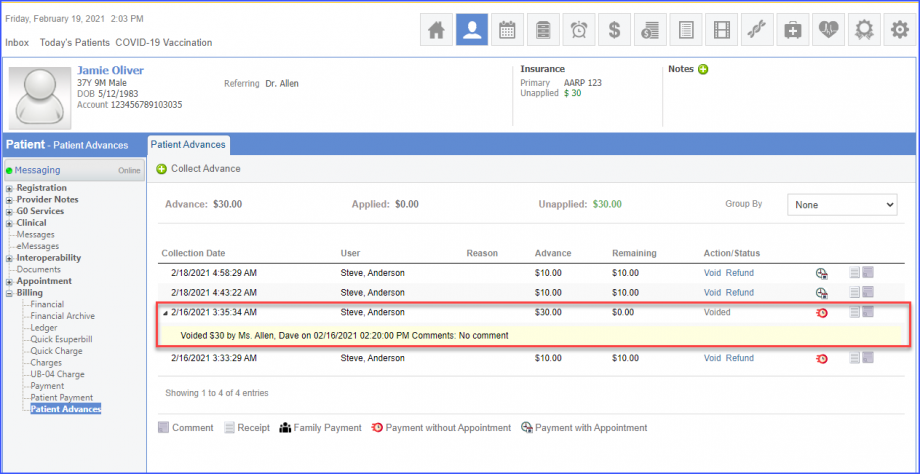
Users can view record of the voided advance payments in case a voided payment exists for a patient.
Expand collection date of the voided transaction.
The system displays the payment log.
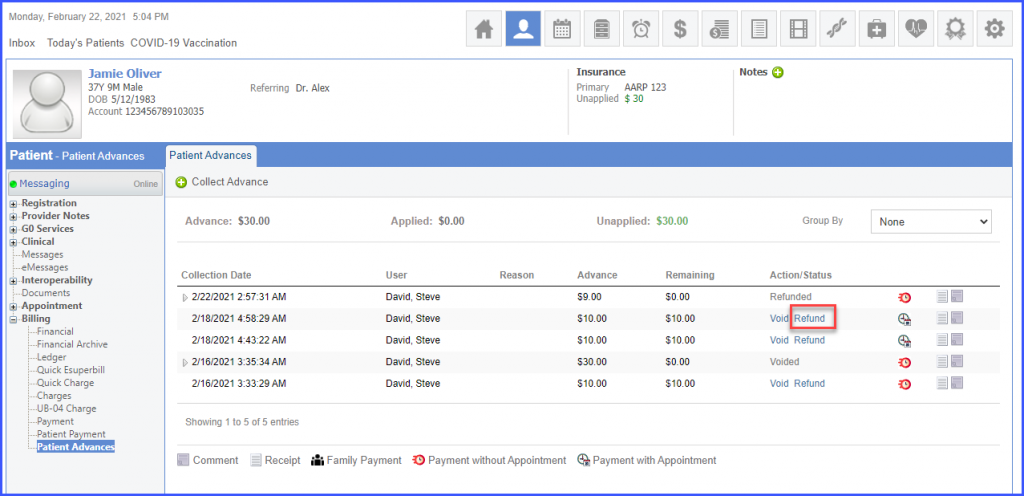
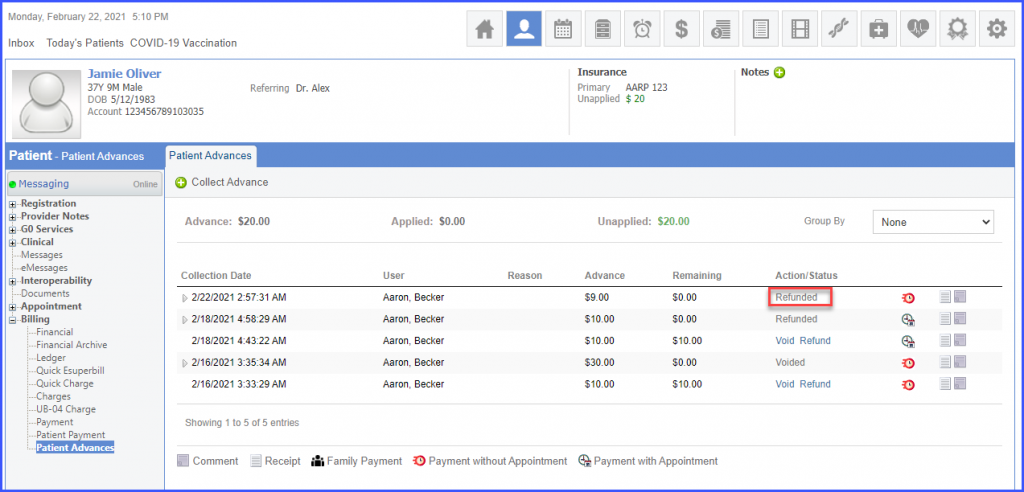
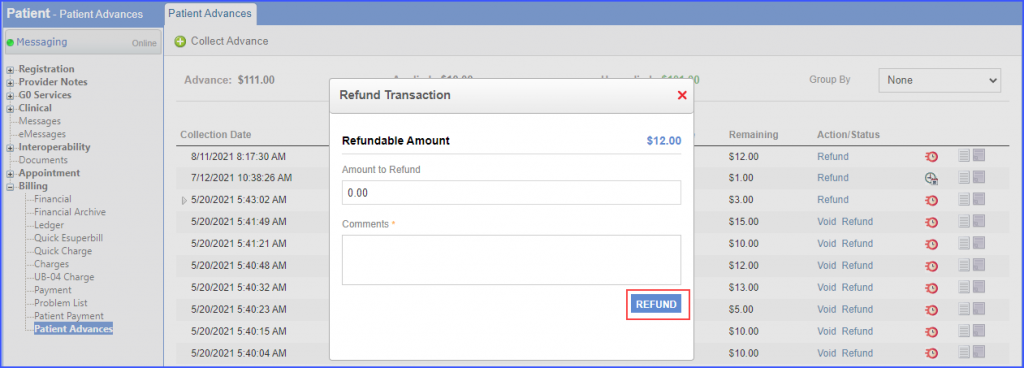
Patient advances can also be refunded. An advance can be paid back to the patient.
Once a payment is eligible to get refunded the ‘Refund’ button appears under the Action/Status column for that payment.
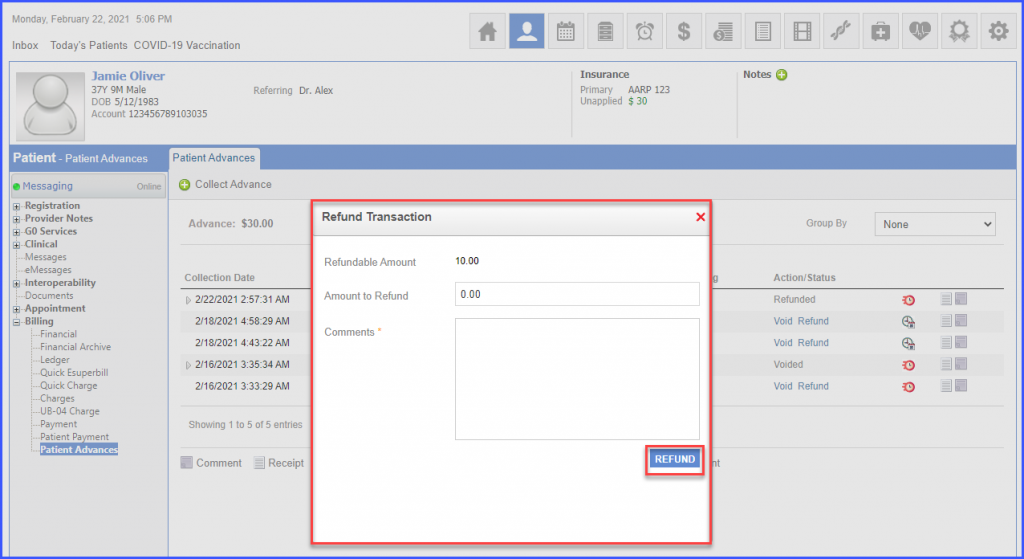
Once the user clicks on the ‘Refund’ icon for a transaction, a ‘Refund Transaction’ popup appears. The user should enter a reason for refunding the payment in the ‘Comments’ textbox and click ‘Refund’.
System displays the payment as ‘Refunded.’
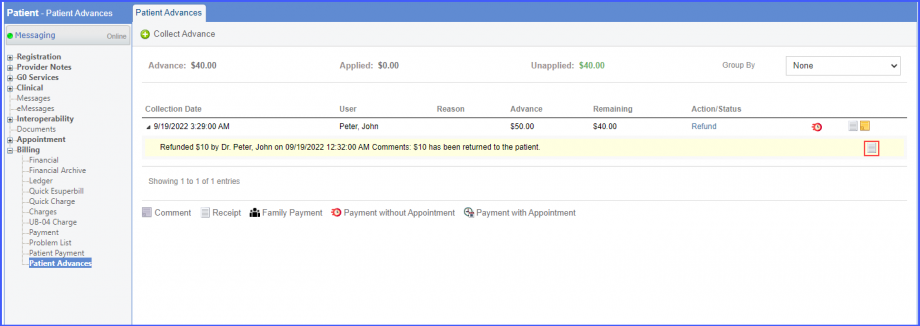
Users can view record of the refunded advance payments in case a refunded payment exists for a patient.
Expand collection date of the refunded transaction.
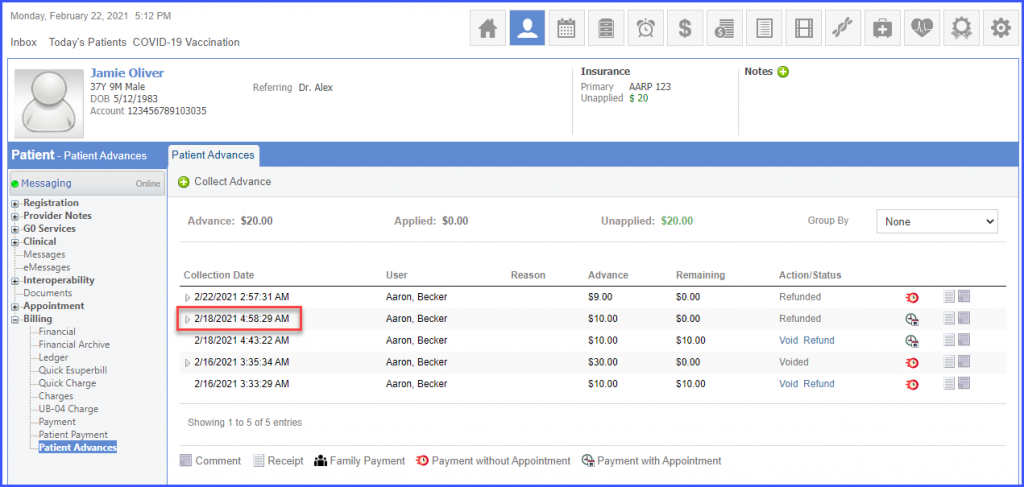
The system displays the payment log.

On the payment log bar, the system displays the ‘Receipt’ icon.
Clicking on the ‘Receipt’ icon displays the refund receipt.
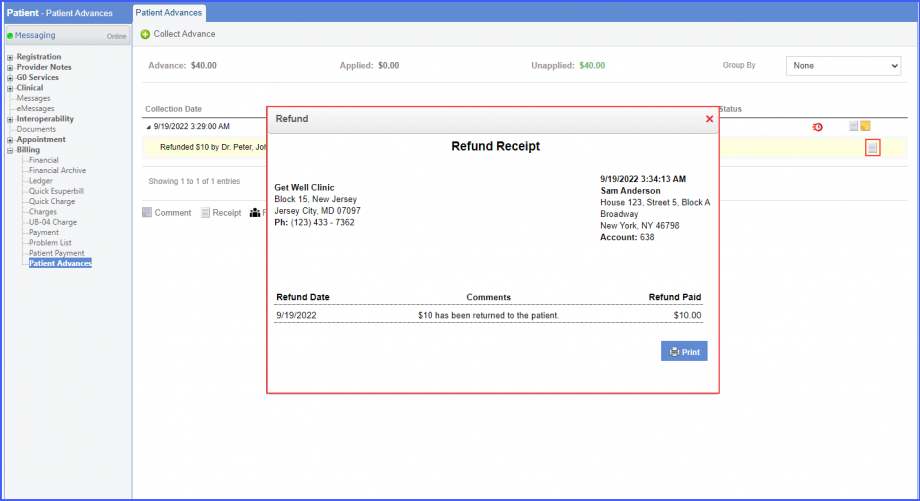
Here, users can view and the details of the refunded payment and can print the receipt by clicking on the ‘Print’ button.
If the user edits the patient advance from the Charges, Quick Charge or Scheduler pages and enters another advance amount, the system maintains a log for it.
Support users cannot void or refund an online payment.
If a support user attempts to void or refund an online payment, the system displays a ‘Support users cannot void/refund online payments’ tooltip.
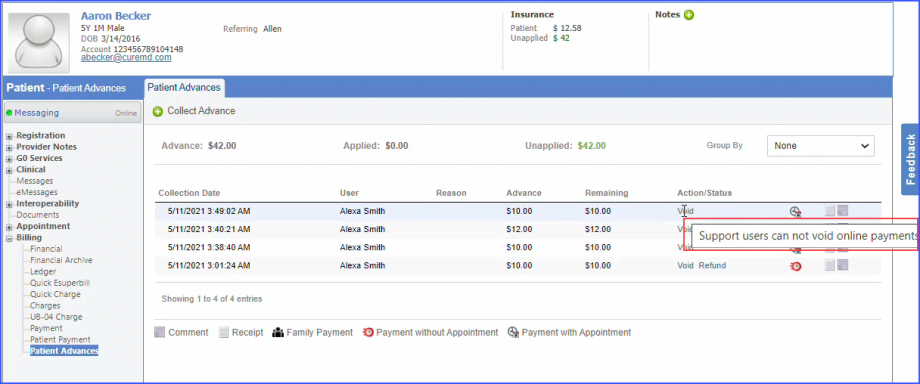
However, offline payments can be voided/refunded by the support users.
Similar change has been made on the ‘Online Payments Log’ page. To view the change, click here.
The system facilitates gathering feedback from users about their patient advances collection experience.
To provide feedback, users can click on the ‘Feedback’ button.
Once the ‘Feedback’ button is clicked, a feedback overlay is displayed. Users can rate their experience by clicking on the desired star.

After a star is clicked, further feedback options appear. Click ‘Submit’ to submit the feedback.
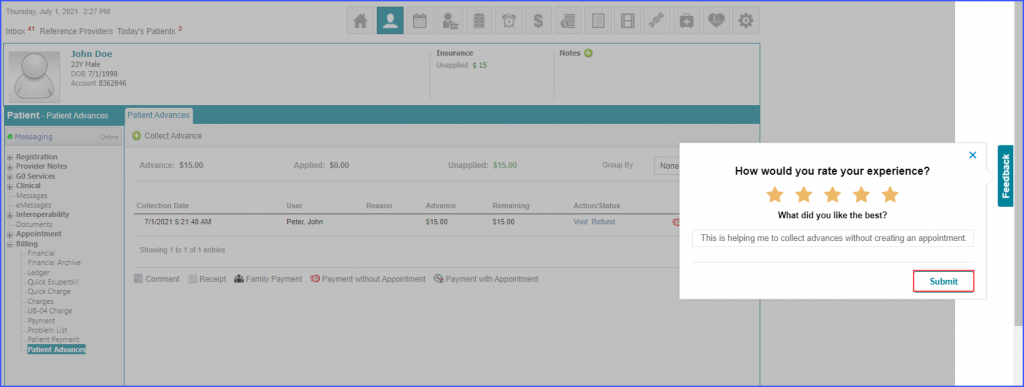
The system automatically displays the feedback overlay after the fifth time a patient advance is collected.
The payment screens have been enhanced for global payment gateway users.
Improved UI contributes to a positive user experience.
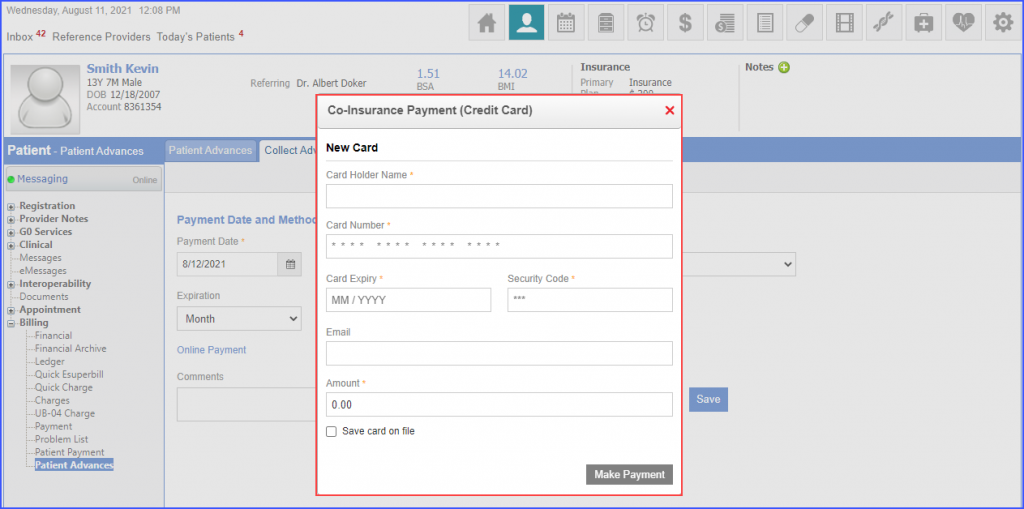
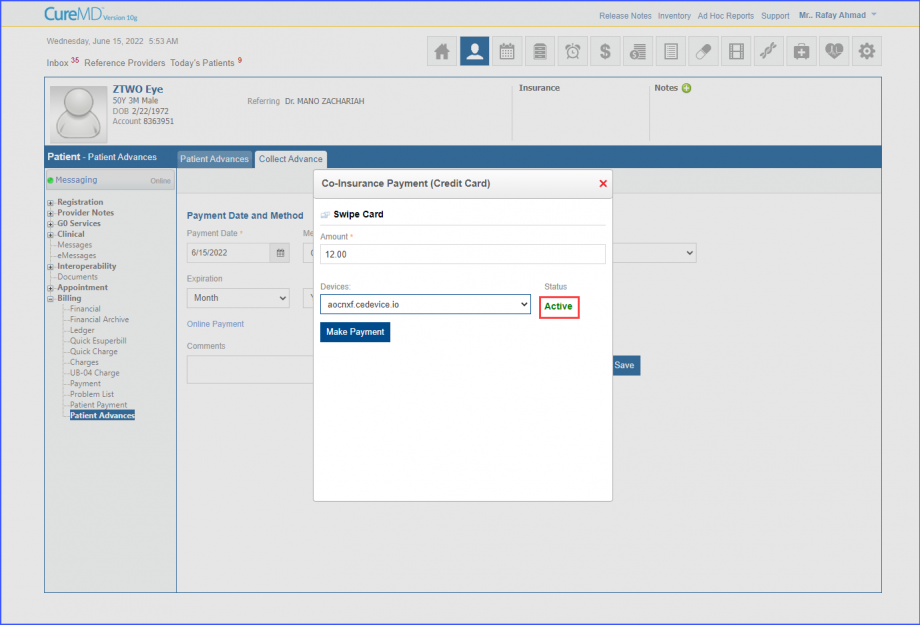
When the user clicks ‘Online Payment’ with ‘Credit Card’ method selected, the system displays ‘Co-Insurance Payment (Credit Card)’ pop-up. The new card details and an advance amount can be entered here. Then click ‘Make Payment’.
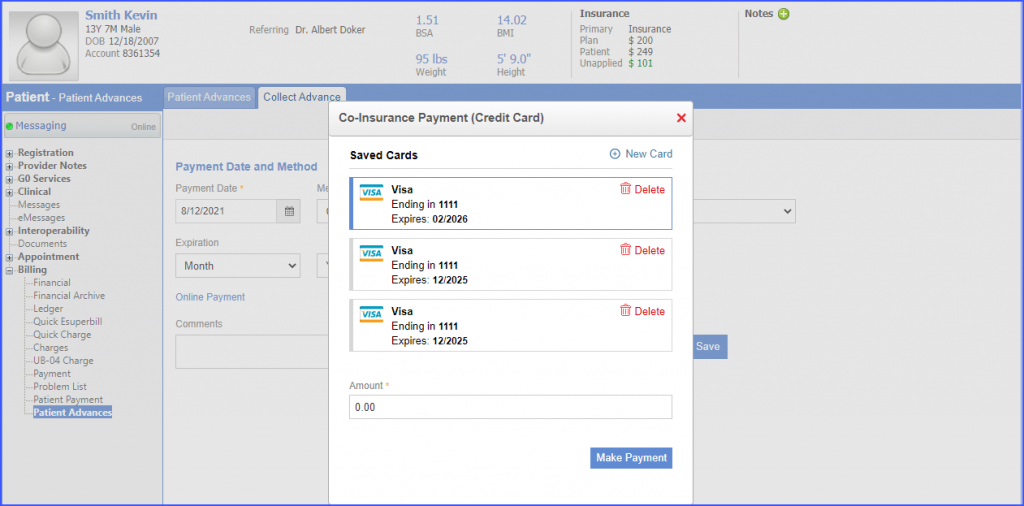
In case, saved cards exist for a patient, the system displays the ‘Saved Cards’ details. User can select a saved card, enter a patient advance amount in the ‘Amount’ field and then click the ‘Make Payment’ button.
To void a patient advance, the users can click ‘Void’ for the desired patient advance and enter comments in the ‘Void Transaction’ pop-up. Then click ‘VOID’.
To refund a patient advance, the users can click ‘Refund’ for the desired patient advance and enter comments in the ‘Refund Transaction’ pop-up. Then click ‘REFUND’.
Similar enhancement has been made on the ‘Charges’ page. To view the change, click here.
Multiple GlobalPay devices can be used to make payment.
Users can easily make payments through their desired GlobalPay device.
User clicks on ‘Online Payment’ hyperlink from the ‘Collect Advance’ tab.
The user then clicks on the ‘Swipe Card’ icon to view the payment devices.

When the user selects a device, the status of the device is displayed under the ‘Status’ Tag.
The system auto selects the device in the ‘Devices’ when there is only one device in the dropdown in the ‘Co-Insurance Payment (Credit Card)’.
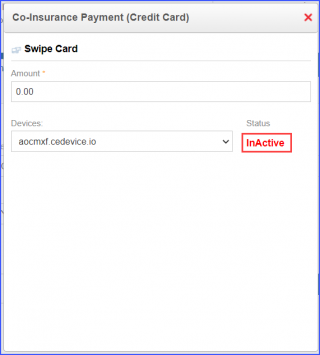
Users are not able to make payments if the device status is ‘InActive’.
Therefore, when the Device Status is not ‘Active’, the ‘Make Payment’ button is not displayed.
Note:
- Status field is empty when no device is selected.
- ‘Make Payment’ button is only visible when a device is selected.
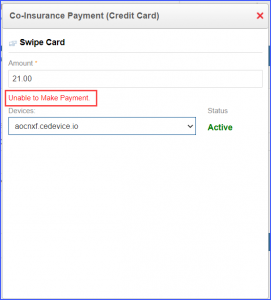
Incase an error occurs while making payment, the payment is cancelled and the following message is displayed:
“Unable to Make Payment”.
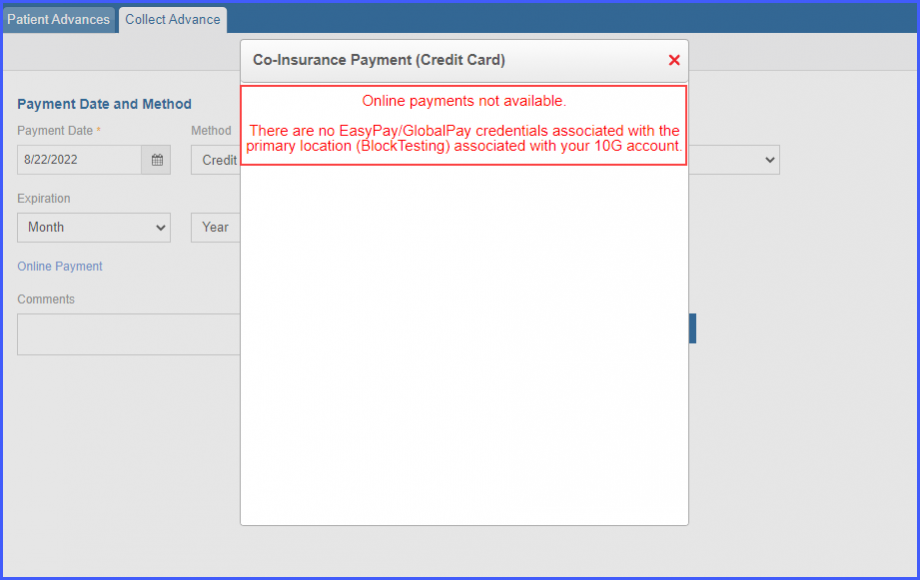
An error screen is displayed when payment is being made from a location having partially configured EasyPay/GlobalPay credentials.
This ensures that payments are only made from locations that are completely configured.
The error is displayed on the ‘Co-Insurance Payment (Credit Card)’ pop-up. The error message states:
‘Online payments not available. There are no EasyPay/GlobalPay credentials associated with the primary location (Block Testing) associated with your 10G account.’
Click here to see a similar enhancement made in the ‘Scheduler’ module.
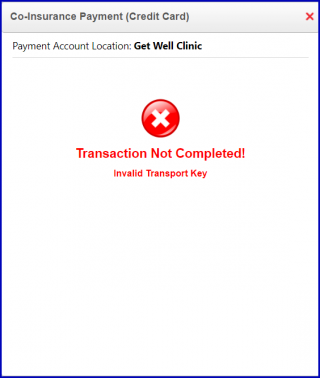
The user is notified of online payment related errors when a GlobalPay card is not recognized by the device.
This allows for ease of billing and ensures that payments are processed correctly.
The user selects a device that is marked ‘Active’.
When the user clicks the ‘Make Payment’ button, the system may display a ‘Transaction Not Completed’ alert message that reads:
“Invalid Transport Key”.
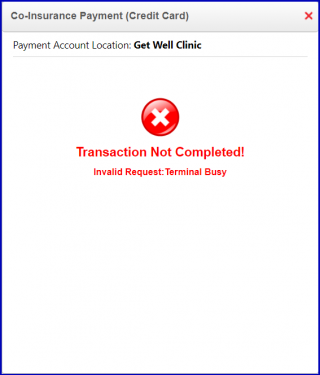
Similarly, when the user clicks the ‘Make Payment’ button, the system may display a ‘Transaction Not Completed’ alert message that reads:
“Invalid Request: Terminal Busy”.
A consent prompt is displayed when an online payment is being made through Global Pay.
This ensures user’s consent is recorded for the card being used.
The user clicks on the ‘Online Payment’ hyperlink.
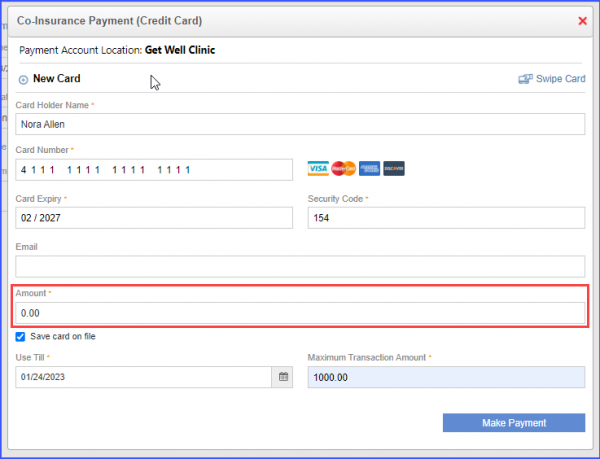
The user fills in the mandatory fields and then clicks on the ‘Save Card on File’ checkbox.
Clicking on the ‘Save Card on File’ displays two mandatory fields which include:
- Use Till
- Maximum Transaction Amount
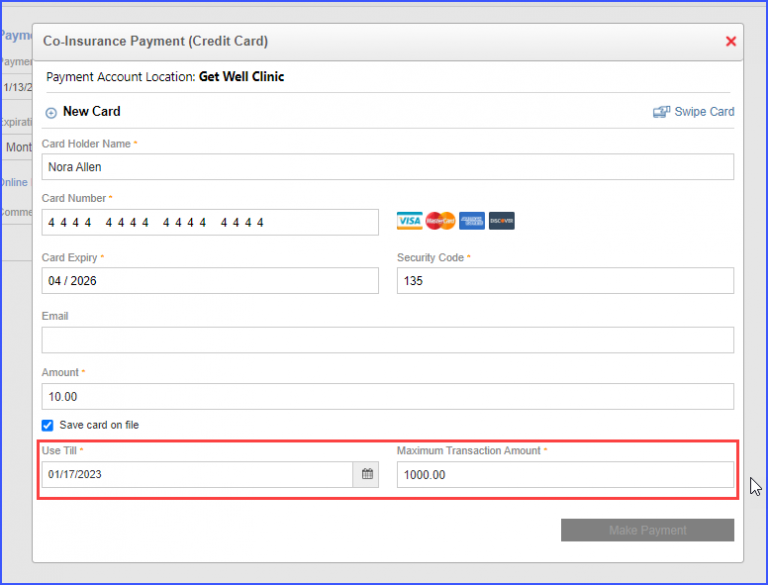
Once the mandatory fields are filled, click on the ‘Make Payment’ button.
Here, the user can enter their signature and click on ‘Continue’ to complete the payment process.
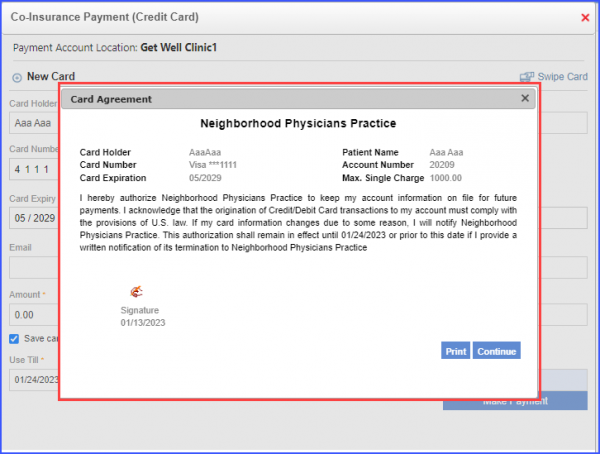
A similar Consent Form is displayed to the user once a card is swiped and a payment is successfully made.
Users can manually save a card for GlobalPay by making $0 payment.
This ensures the new card is saved without paying any billing amount.
Click on the ‘Make Payment’ button to save the card.
A consent prompt is displayed when a saved card without a signed consent form is selected for payment.
The user has clicked on the ‘Online Payment’ hyperlink, and selected a saved card with pending consent form.
A prompt is displayed to the user that states:
“Consent Form for the card is pending. Do you want to sign it?”
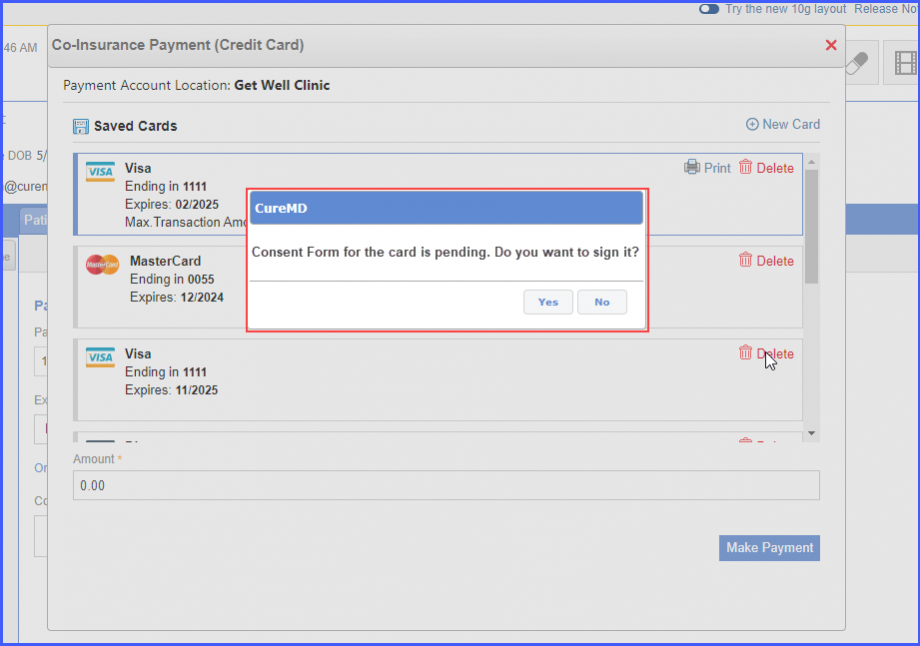
If the user has clicked on ‘Yes’, the system displays the consent form for the user to fill-out.
User can proceed towards making the payment with and without having the consent form signed.
However, the consent form is displayed whenever the user selects an unsigned saved card.
Billers can now set a default ‘Maximum transaction amount’, eliminating the need to enter it repeatedly while processing each online transaction. This happens when a default amount is mentioned in the ‘Billing Settings’, click here to view how to do that.![]()
Additionally, the status of ‘Use till’ field has been changed from mandatory to option and it now gets automatically populated with the card’s expiry date. When the user enables the ‘Save card on file’ checkbox, the system populates the “Use Till’ field with the expiry date specified in the ‘Card Expiry’ field.
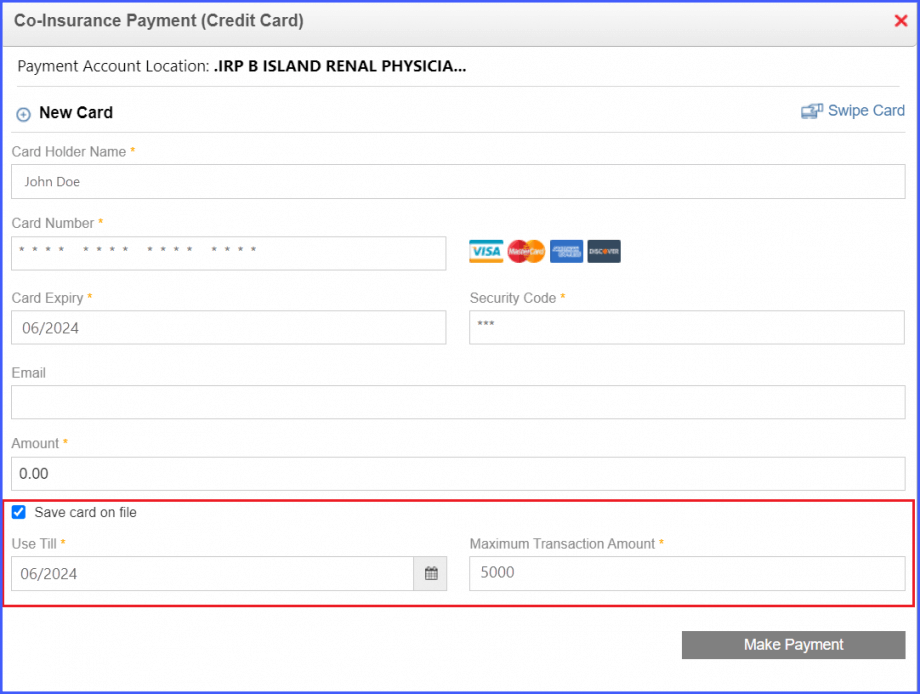
Both these changes eliminate the need for billers to repeatedly populate these field when an online transaction is being processed.
