What is the Flowsheet?
The flowsheet allows the users to create treatment plans for the patients. It can be accessed via the ‘Flowsheet’ hyperlink that appears when the user selects a patient from the left tree menu of the Chemotherapy Manager.
Once a patient is selected, click on the ‘Flowsheet’ hyperlink to access the flowsheet.
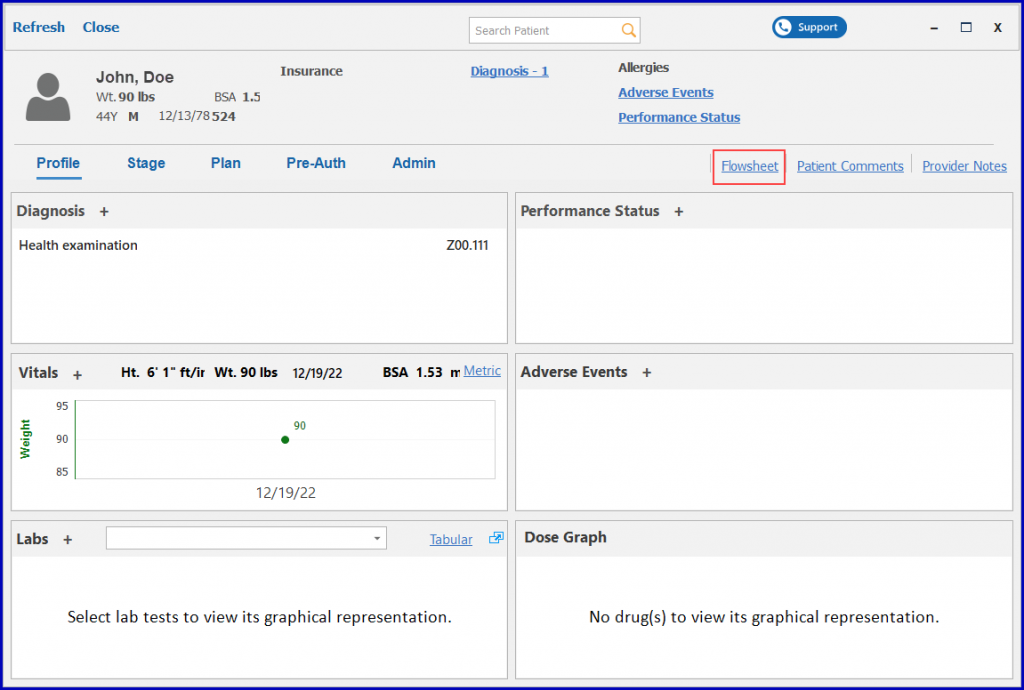
The system displays the flowsheet in a separate window.
How to Create a New Plan
From Flowsheet, users can create a new plan for the patient by clicking on the ‘Plan’ or diagnosis ‘Dx’ hyperlinks present below the flowsheet tab.

The hyperlinks take users to the ‘Plan Detail’ window where they can add the following information to create a new plan:
- Order Information
- Vital Information
- Diagnosis
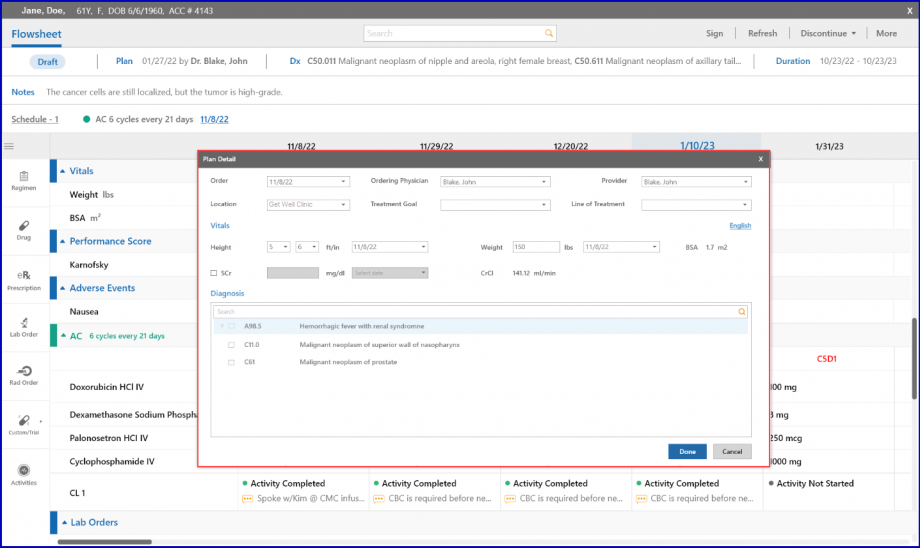
The Plan Detail window can be used to add a new plan or edit details for an already created plan.
Once a plan is created, the flowsheet screen can be used to place orders for labs or radiology, e-prescribe drugs to patients, and much more. Following are the items that can be added in the Flowsheet through the navigation bar present on the left side of the window:
- Regimen
- Drug
- Prescription
- Lab Order
- Rad Order
- Custom/Trial Drug
- Activities
How can the Flowsheet be customized?
The Flowsheet display can be customized by clicking on the ‘Duration’ hyperlink present next to Diagnosis hyperlink.

When the user clicks on the ‘Duration’ hyperlink, a ‘Customize Flowsheet’ window appears on the screen.
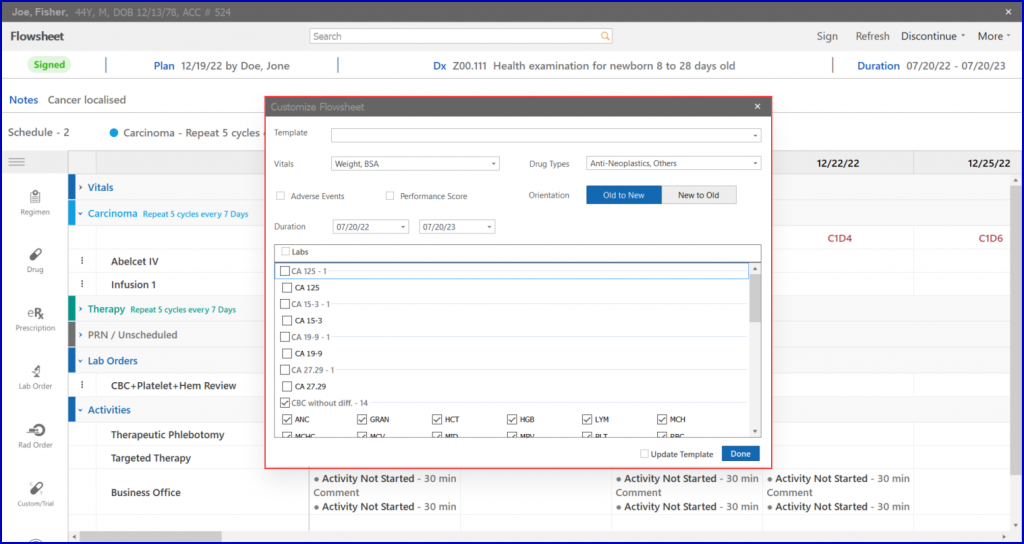
From this window, users can customize the display of the following items on Flowsheet:
- Duration, Orientation, Procedures, Adverse Events, Performance Score, Vitals, Drugs, Lab Results
Enable the checkboxes for ‘Adverse Events’ and ‘Performance Score’ to view associated information on the flowsheet. Once enabled, the flowsheet includes the ‘Adverse Events’ and ‘Performance Score’ sections on the flowsheet window.
Enable the ‘Update Template’ checkbox if changes are made in the template, then click ‘Done’ to implement the changes.
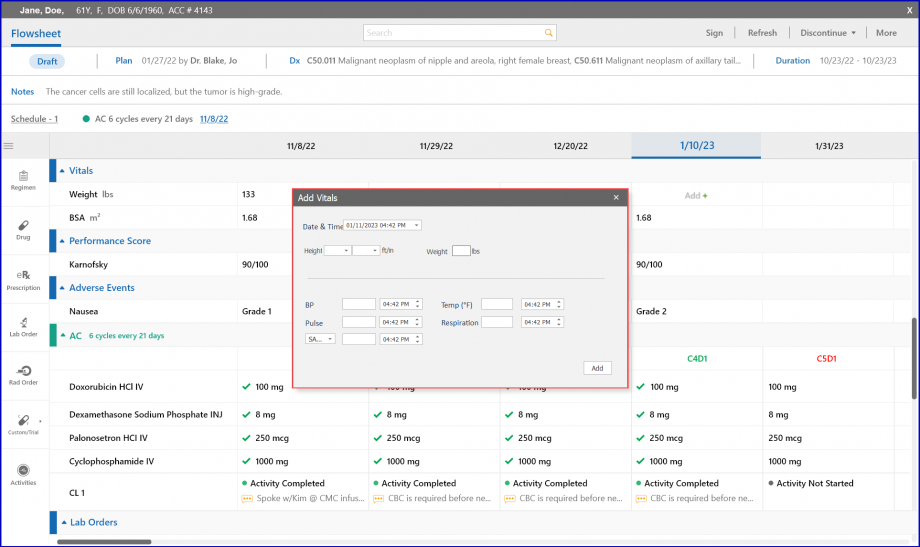
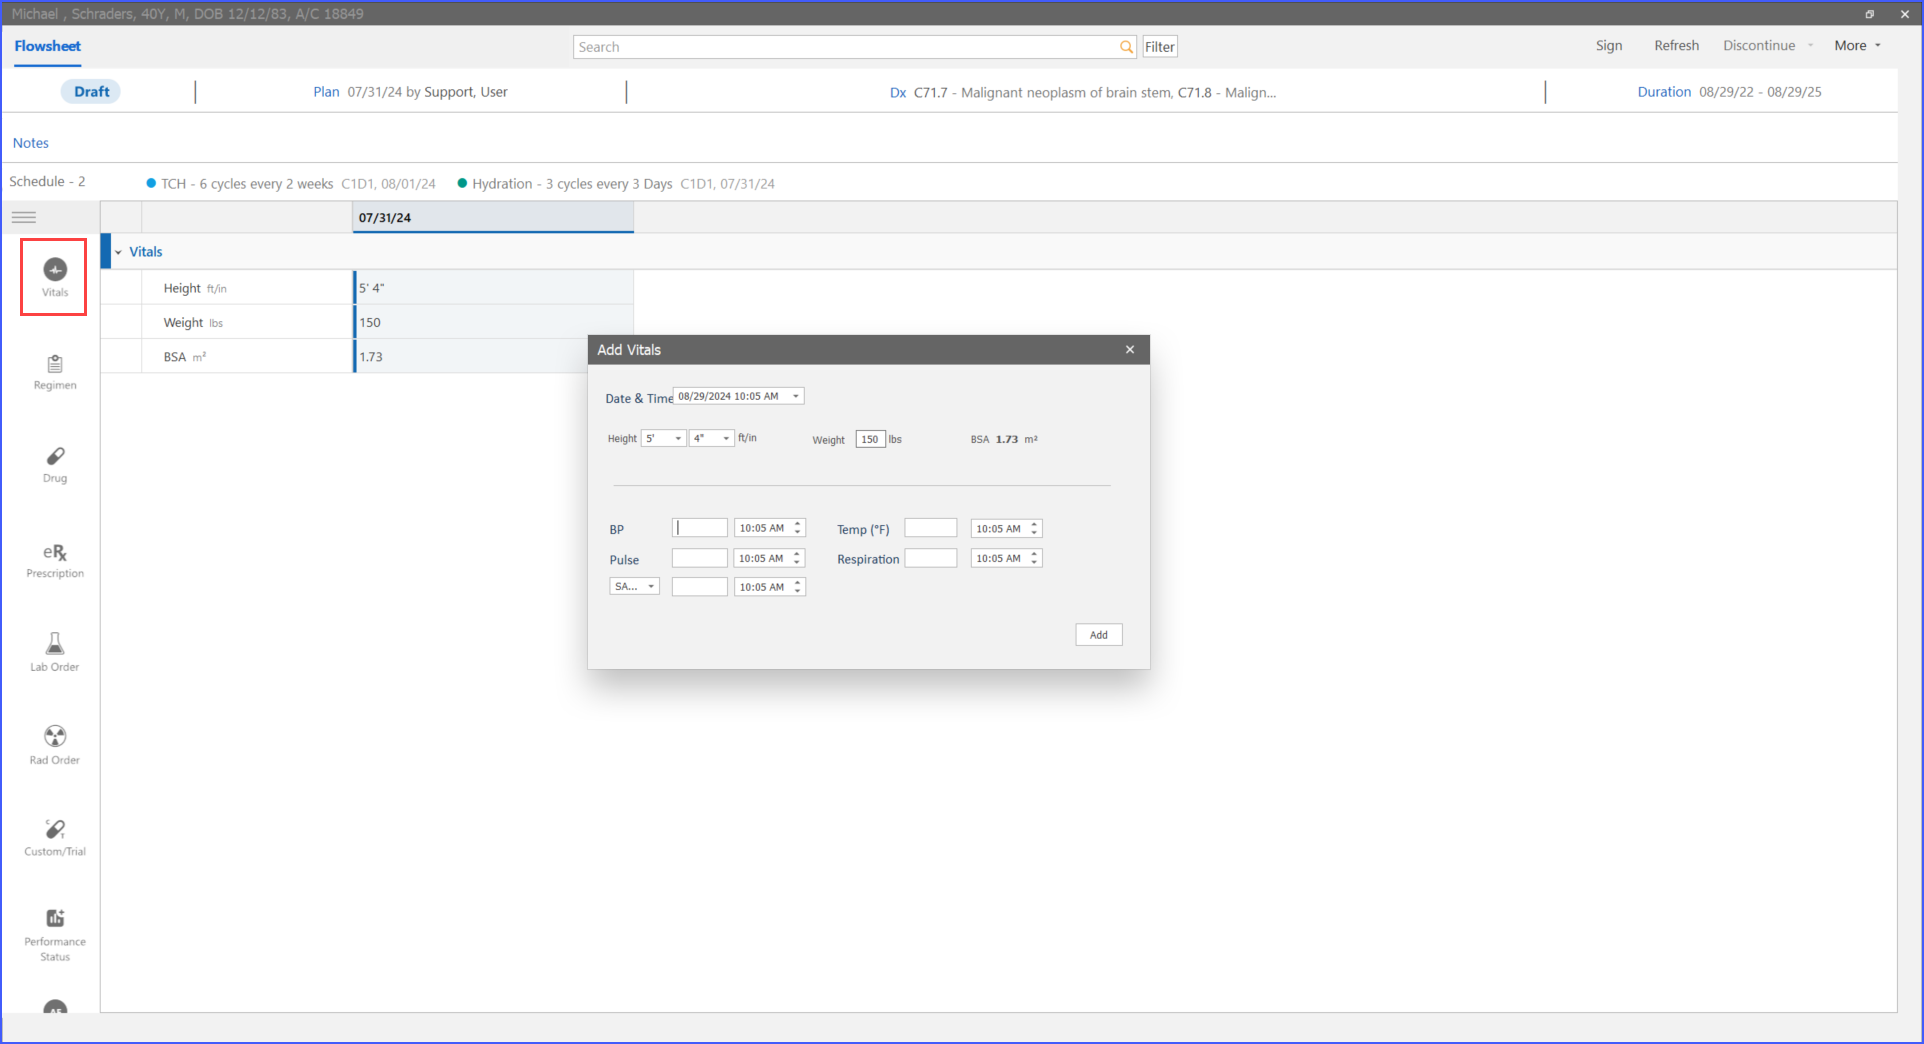
How to Add Vitals?
To add vitals in the flowsheet, expand the ‘Vitals’ section by clicking on the caret icon in the vital’s tile, then click on any of the cell in the expanded view.

A window titled ‘Add Vitals’ is displayed where the user can input data in the categories of vitals that they selected from the customize flowsheet window.
How to Add Notes to the Treatment Plan?
Notes can be added by clicking on the ‘Notes’ hyperlink, which displays the ‘Notes’ textbox.

How to Search for treatment details?
The user can search for details of the patient’s treatment in the flowsheet using the ‘search’ bar at the top.
How to Sign the therapy?
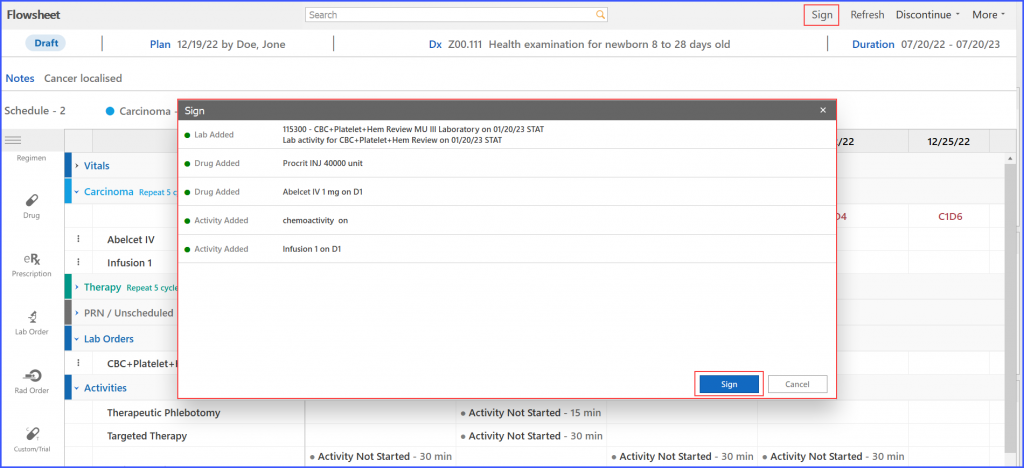
Click on the ‘Sign’ button to access a sign off screen where all changes to the plan are displayed. Click ’Sign’ to sign the plan.
How to Discontinue a Therapy or Plan?
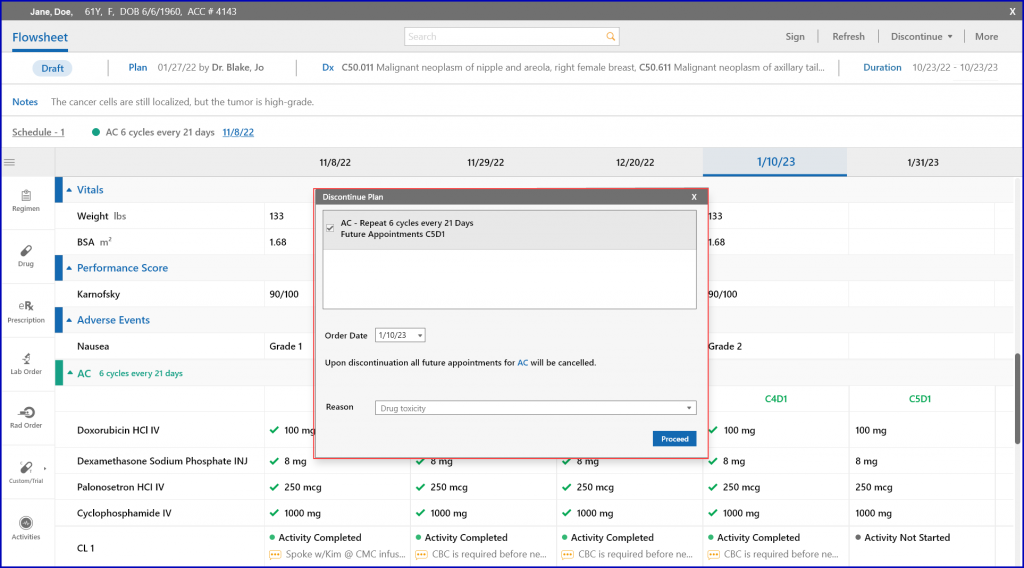
To discontinue a therapy or the plan, click the ‘Discontinue’ dropdown and select ‘Therapy’ or ‘Plan’ to proceed.

Once an option is selected, a ‘Discontinue’ popup appears where the users can choose which plan or therapy to discontinue. After selecting the required options, click on the ‘Proceed’ button to cancel a plan or a therapy.
What is the ‘More’ Dropdown?
To print, customize the flowsheet, or to assign tasks, click on the ‘More’ dropdown at the top right corner of the screen.
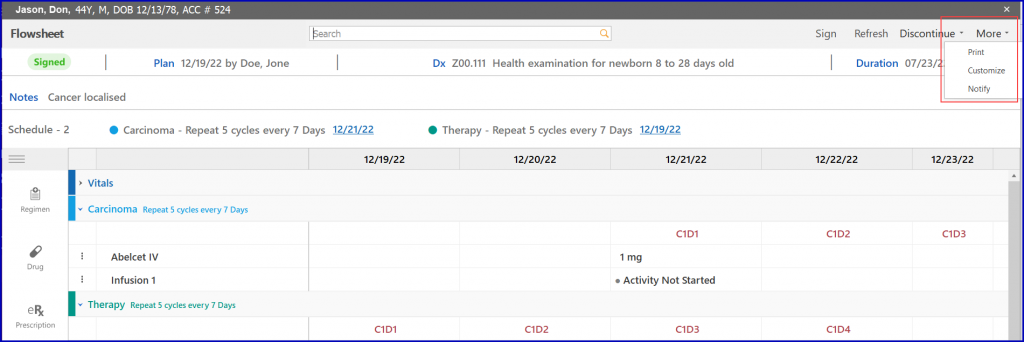
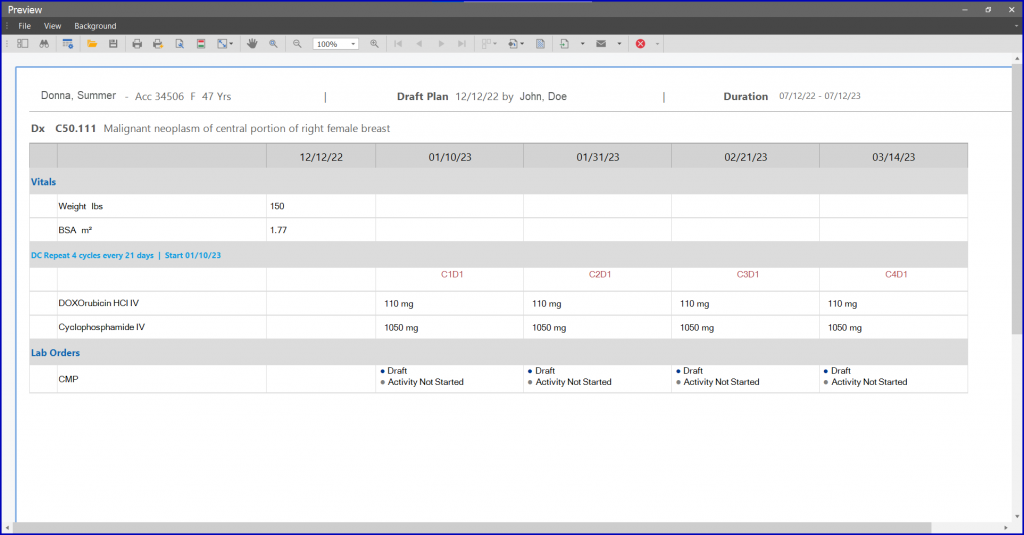
Click on ‘Print’ to print complete flowsheet or a selected duration on flowsheet. Clicking on ‘Print’ displays a preview window.
Click on ‘Notify’ to assign tasks on the flowsheet to a selected user.
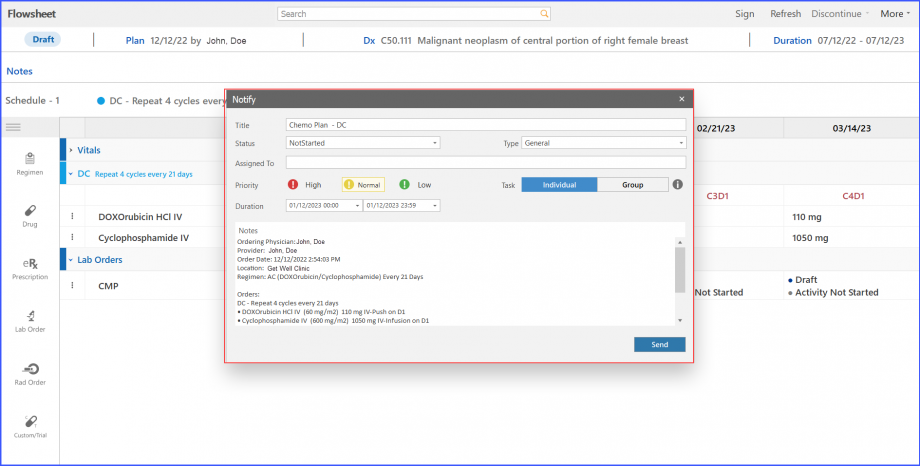
The task can be specified as a ‘Group’ Task or an ‘Individual’ Task. Click on the ‘Group’ button to assign a task to multiple users and allow a user from the group to close tasks.
The user can label the task as ‘High’, ‘Medium’ or a ‘Low’ priority one.
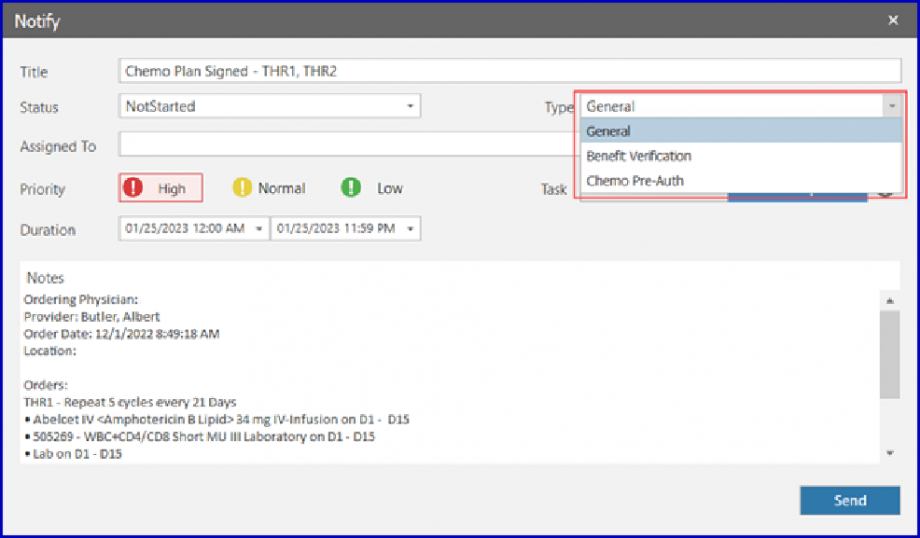
The notify window also allows the user to specify the type of the task. Click on the ‘Type’ dropdown to select one of the following:
- General
- Benefit Verification
- Chemo Pre-Auth
How to Edit Therapy Schedule?
Users can add or edit therapy schedule from the flowsheet. Click on the ‘Schedule’ hyperlink above the navigation bar to view schedule details.
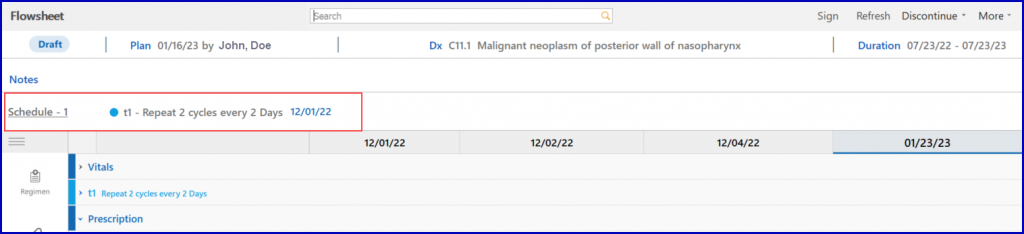
Clicking on the ‘Schedule’ hyperlink leads to a ‘Schedule’ window.
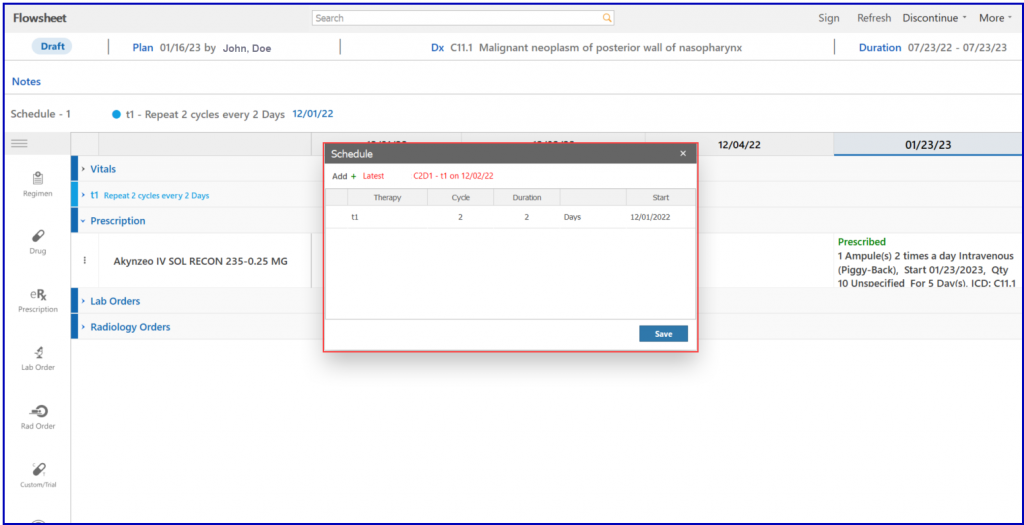
Users can delete a schedule as well by clicking on the ‘Delete’ icon. Moreover, they can edit details of the schedule if it has not been performed or signed.
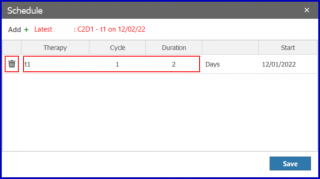
The ‘Start Date’ is mandatory and can be edited if the activities associated with the schedule are not initiated.
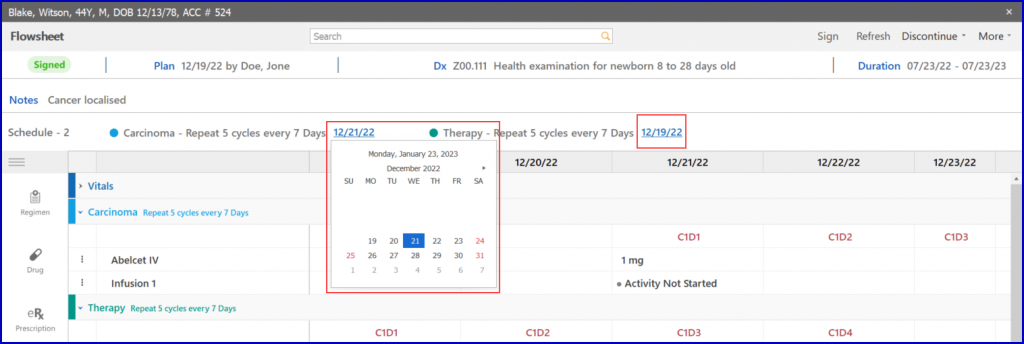
If the activities associated with the schedule are not initiated, the user can specify a different start date. To do that, click on the date listed after the schedule to open a calendar.
Here, the user can select a new start date for the therapy.
The following change is for practices who have ‘Activity-Based Scheduling’ enabled.
After dropping the chosen regimen into the patient’s plan, the ‘Missing Treatment Details’ screen appears, displaying therapy headers that require additional information. To specify the necessary treatment details, users click on the “Specify start date and cycle-day” hyperlink within this screen.

This action opens a pop-up where users can enter the start date, start cycle, and day for the therapy.
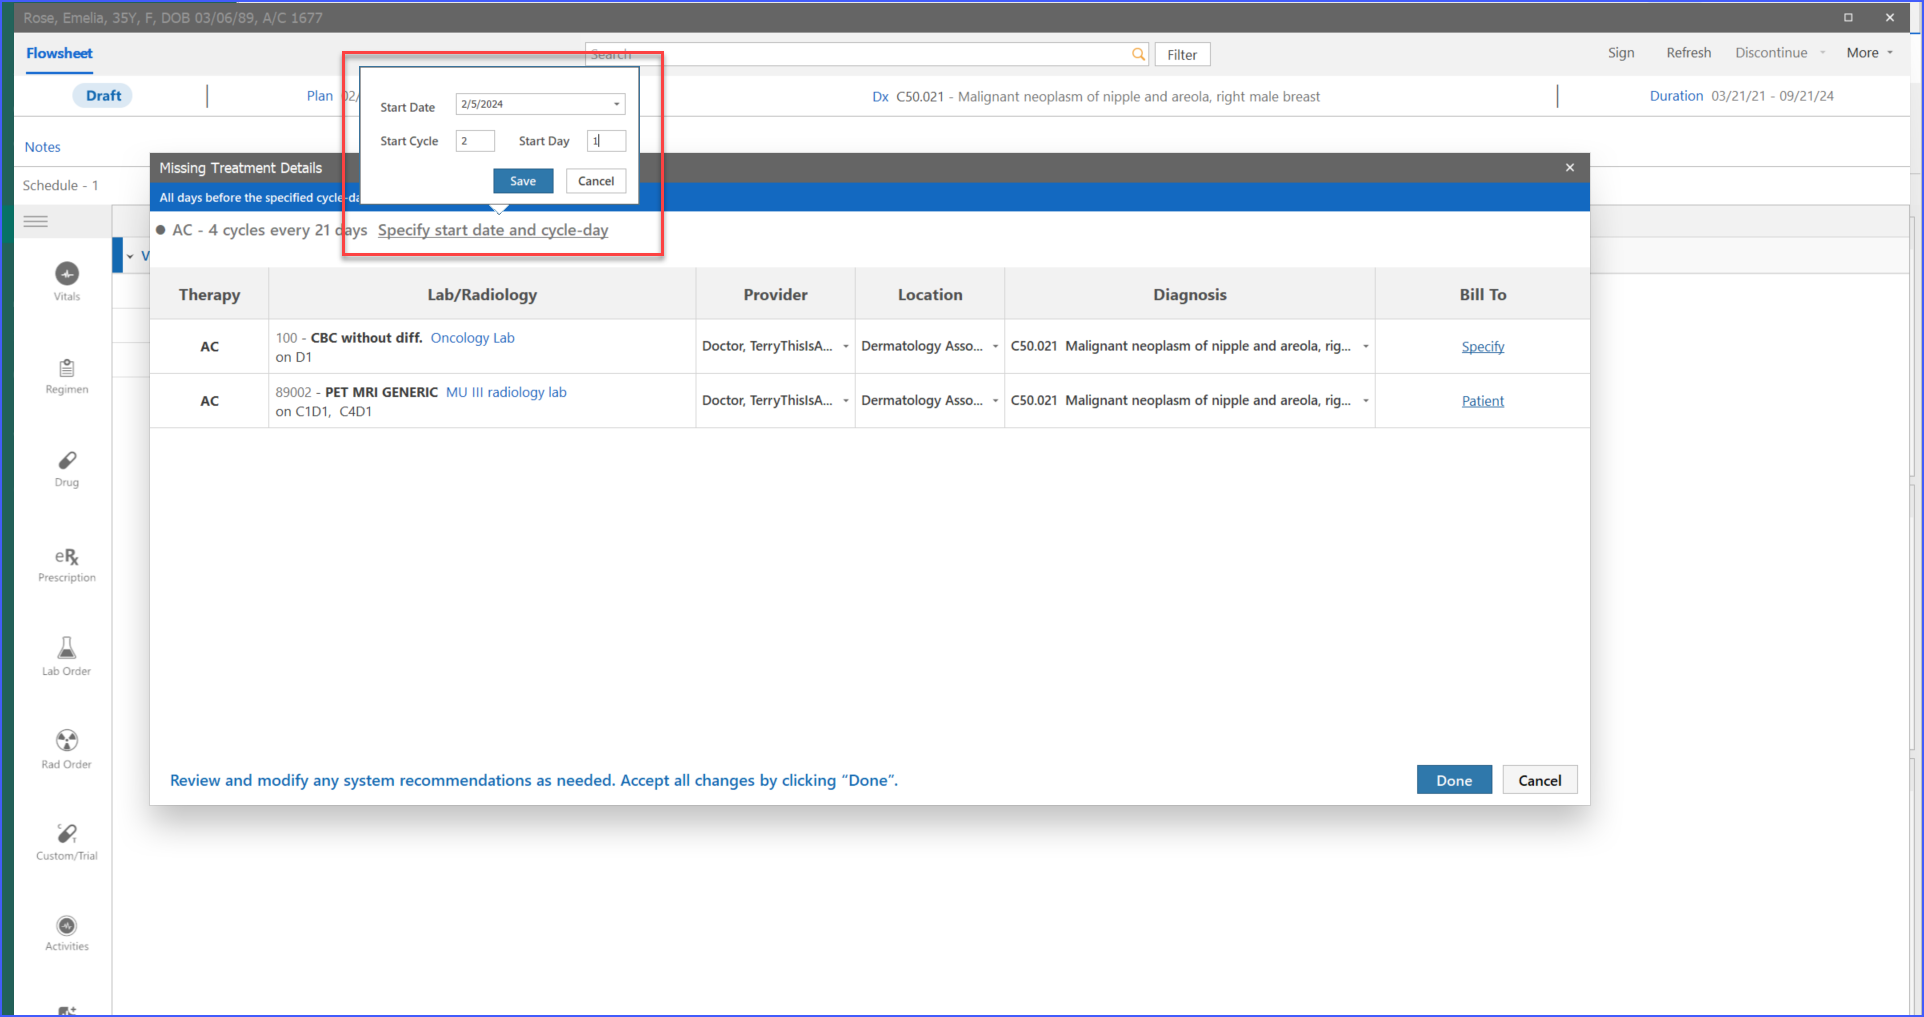
Upon completing these fields and clicking the “Done” button, the specified therapy context is plotted directly onto the patient’s flowsheet.
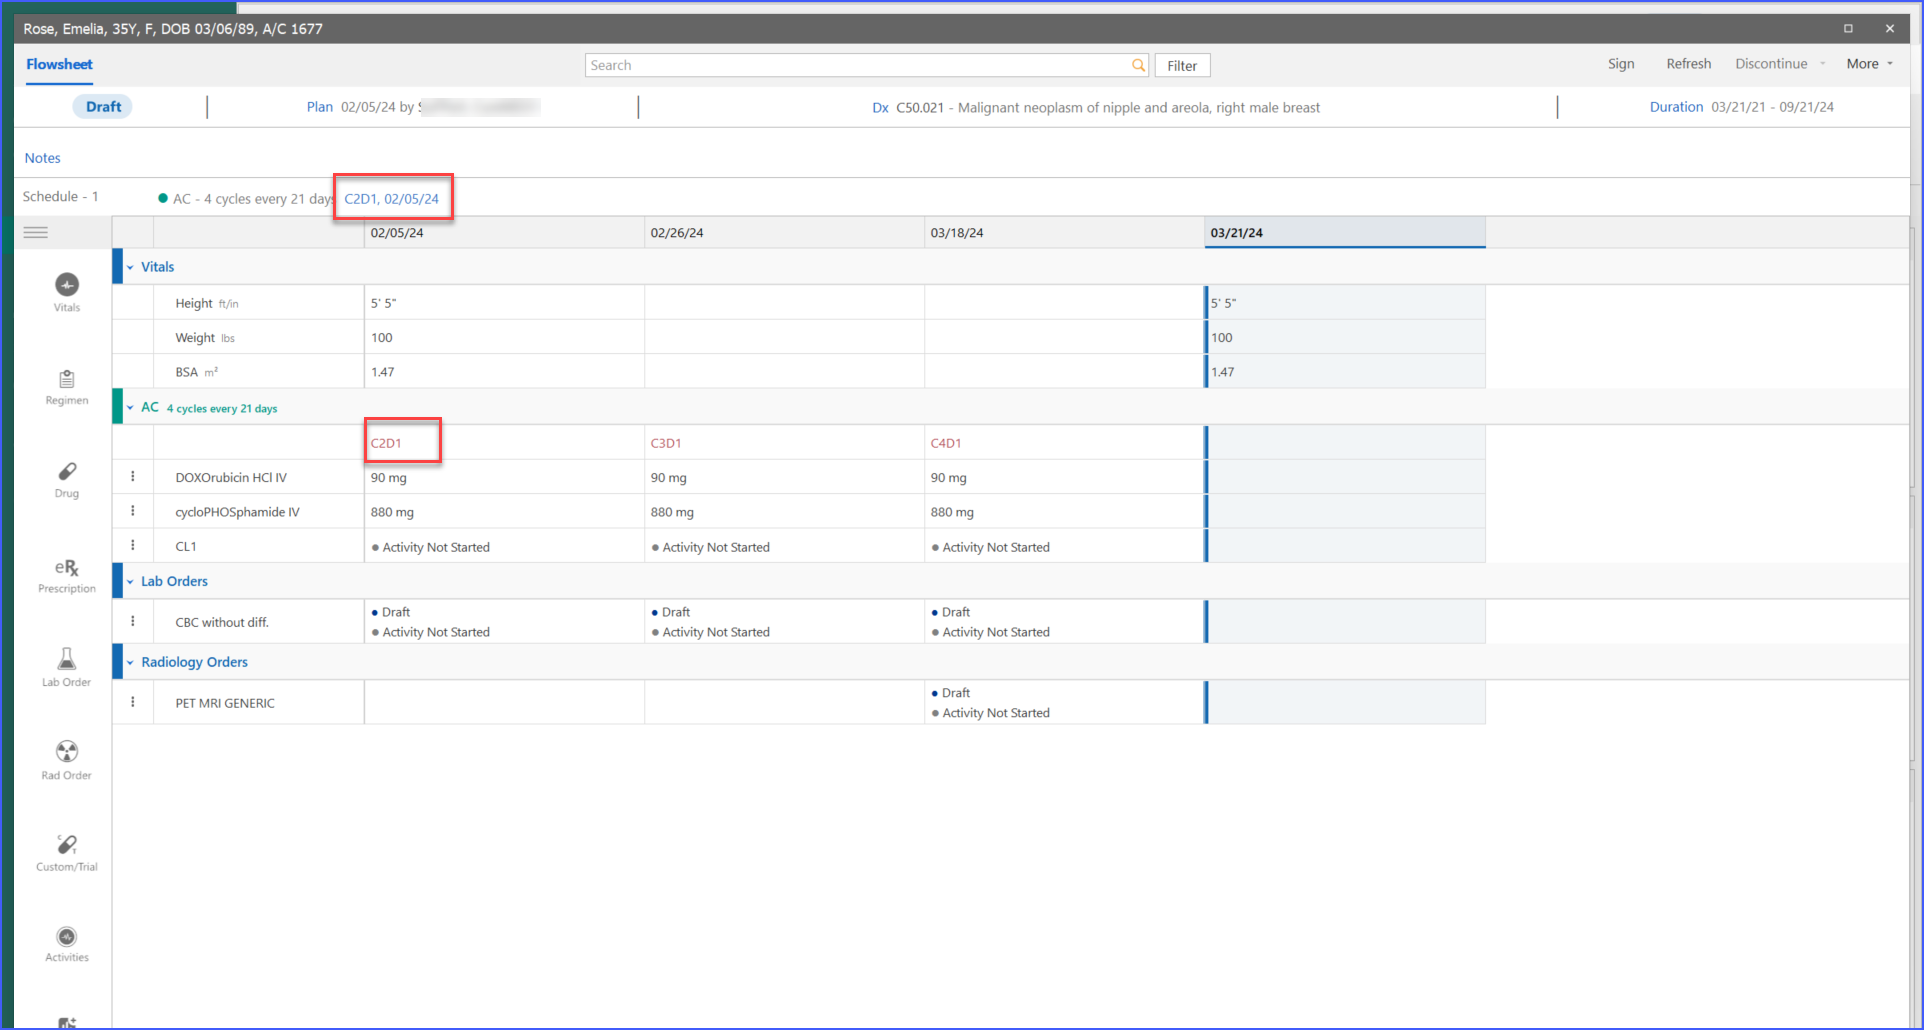
Furthermore, users have direct access to scheduling controls from within the flowsheet to schedule therapy sessions. This is done by clicking the ‘Schedule’ hyperlink. Clicking this hyperlink opens a schedule pop-up, displaying two fields: “Start Cycle” and “Start Day.”
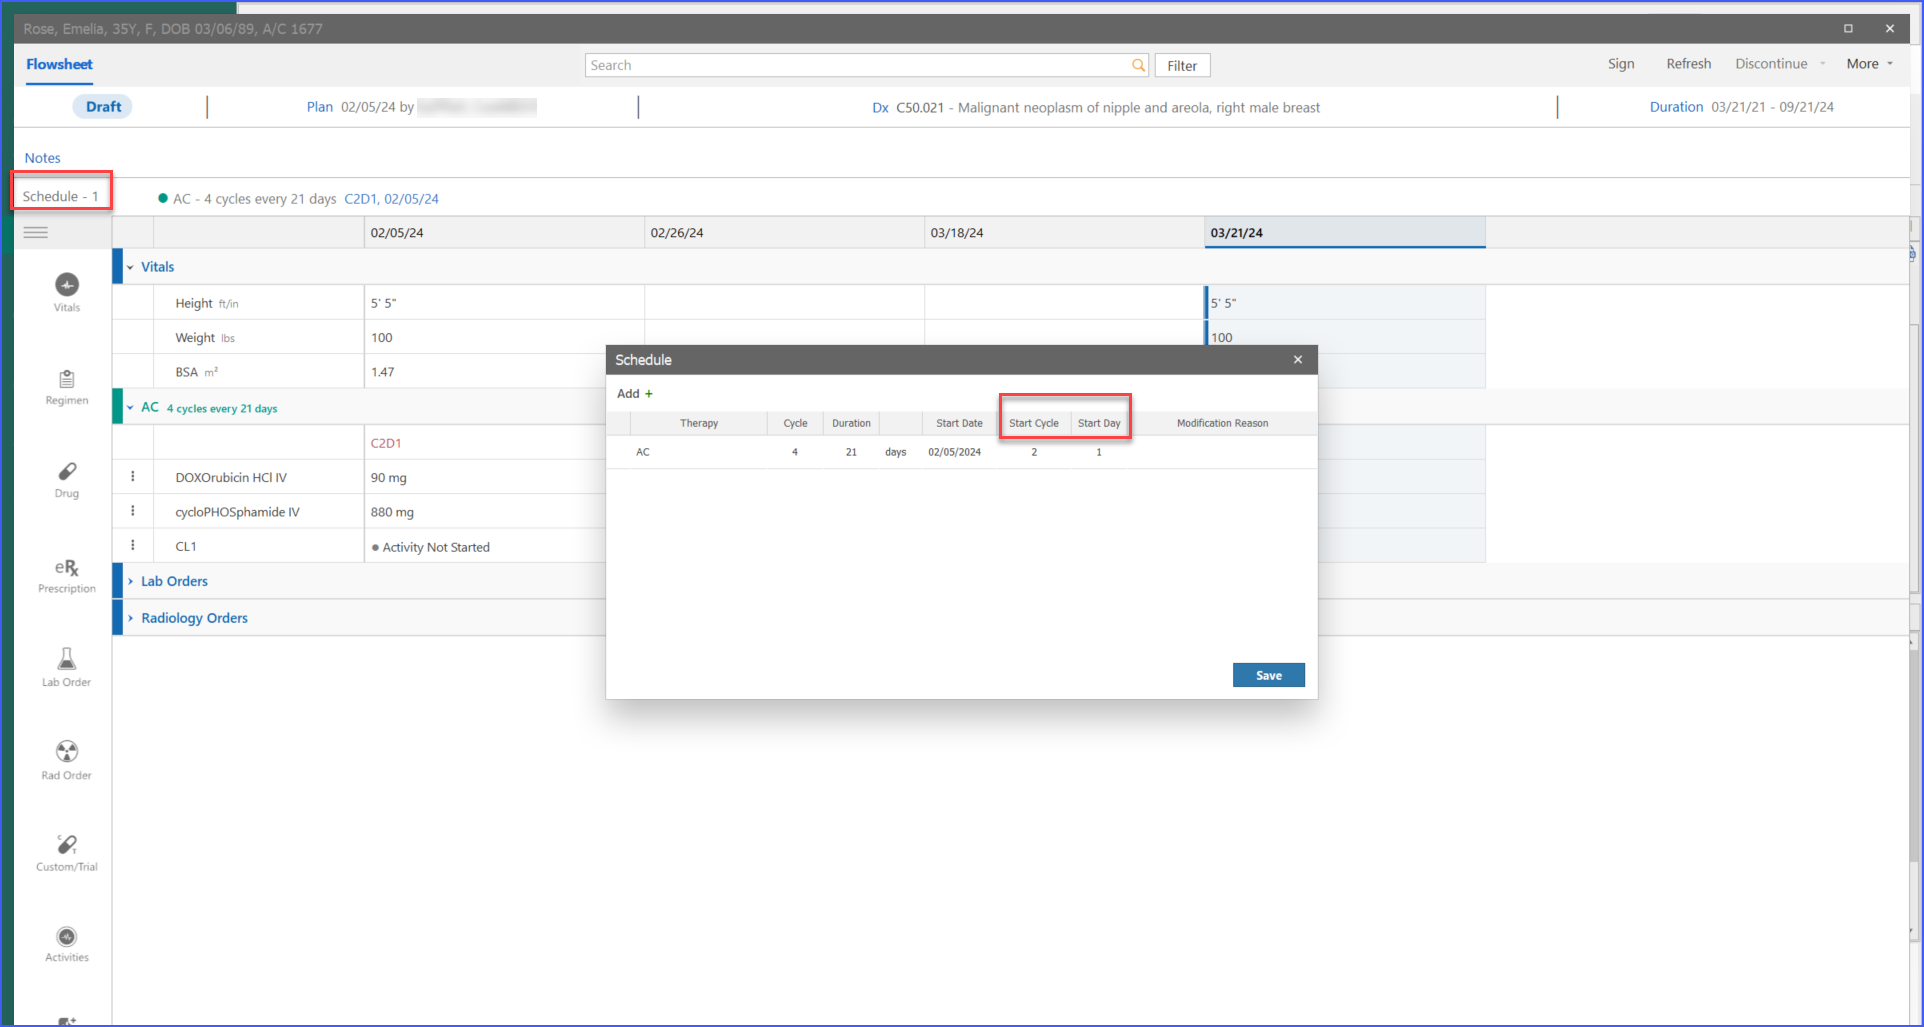
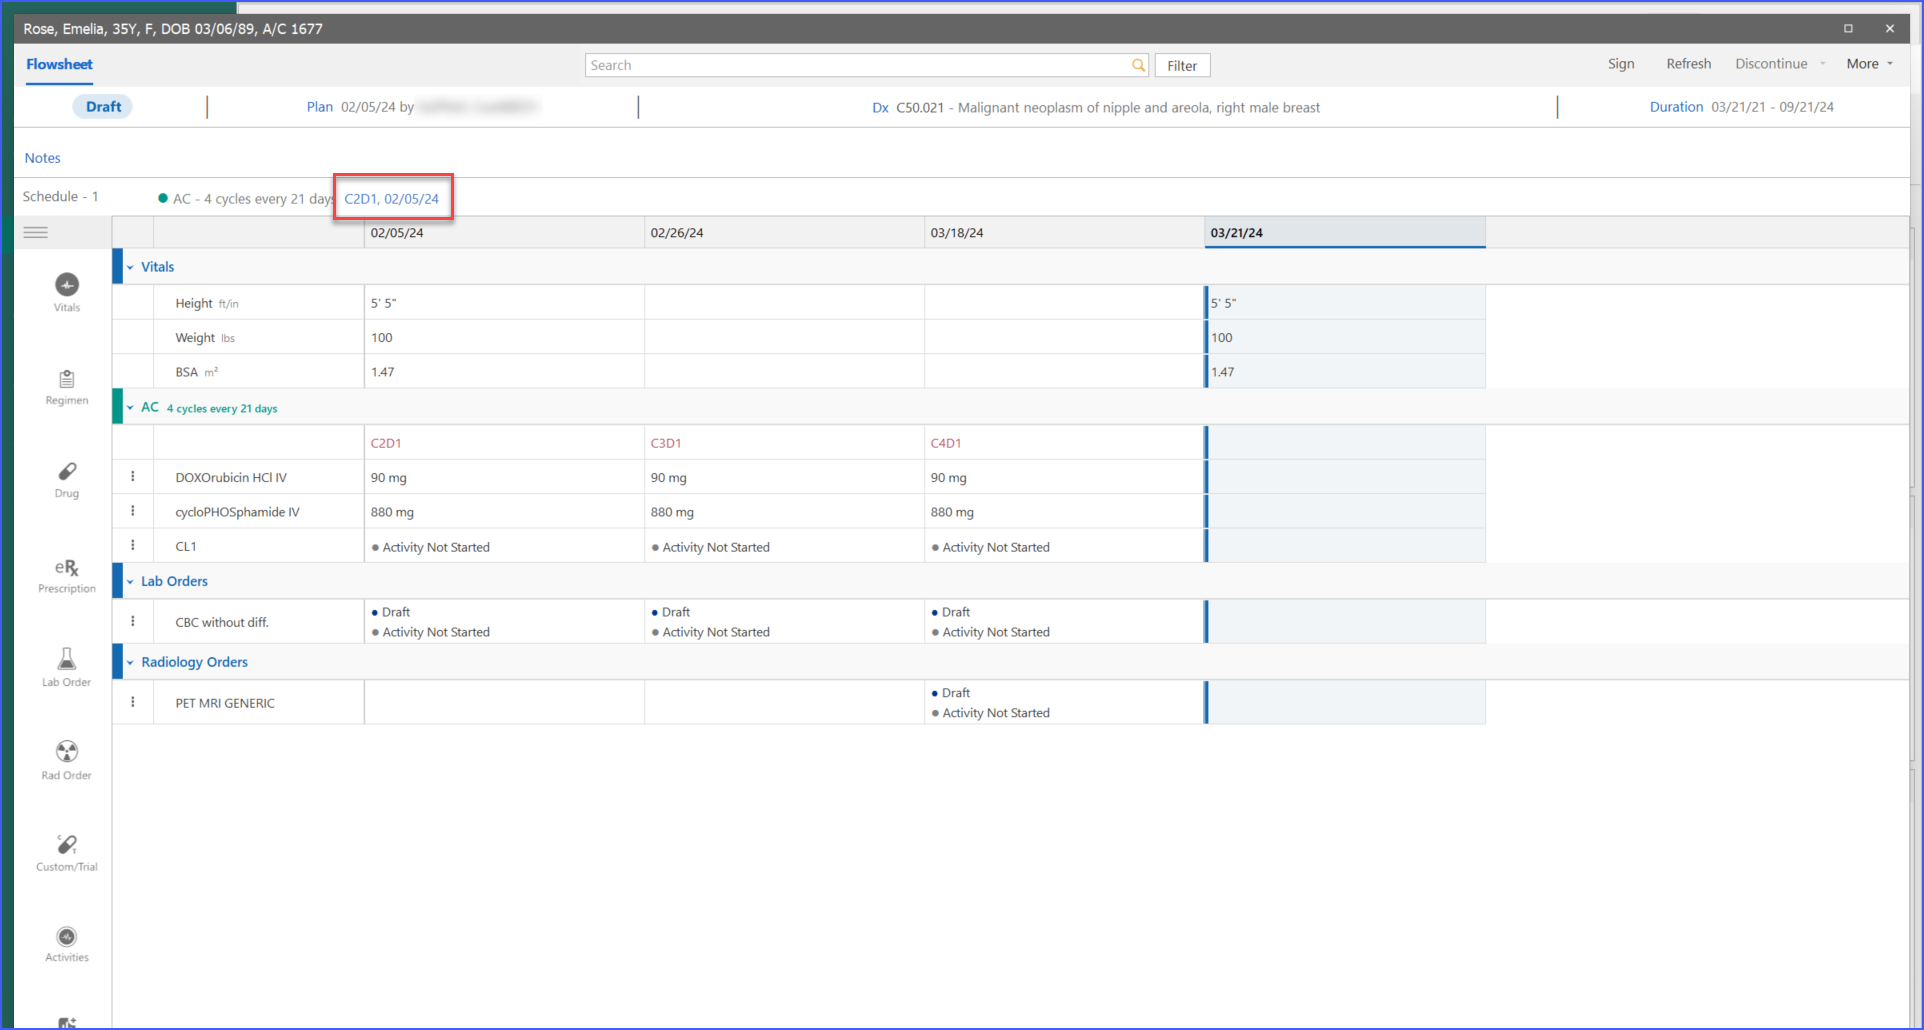
These fields are designed to allow users to set the commencement of the therapy accurately. Once the start cycle and day are specified, these details are reflected on the flowsheet’s therapy band as well as on the patient’s plan drug strip, providing a clear visual representation of when the therapy will begin.
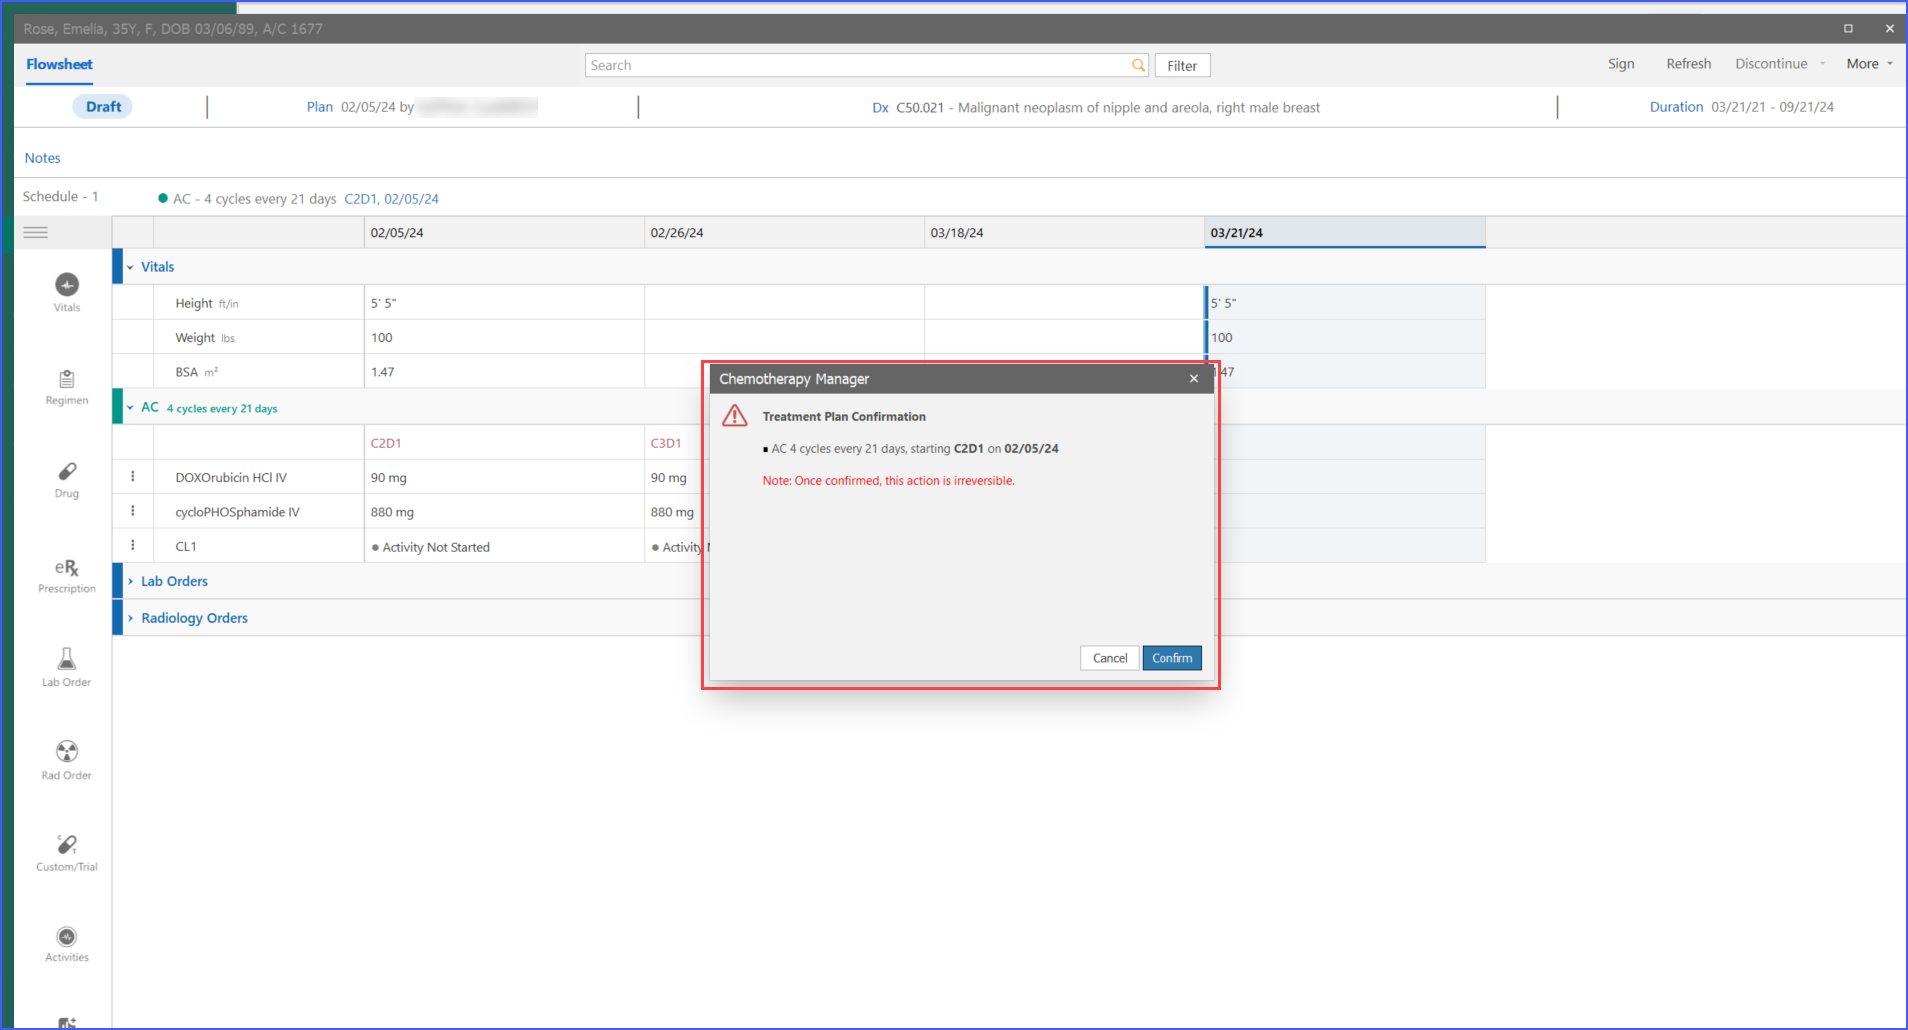
Users can adjust the therapy start day until they sign the treatment plan. After clicking “Sign,” an acknowledgment pop-up appears with all details for final confirmation. Clicking “Confirm” locks in the start cycle day for subsequent plans, ensuring the treatment schedule remains secure and minimizing discrepancies.
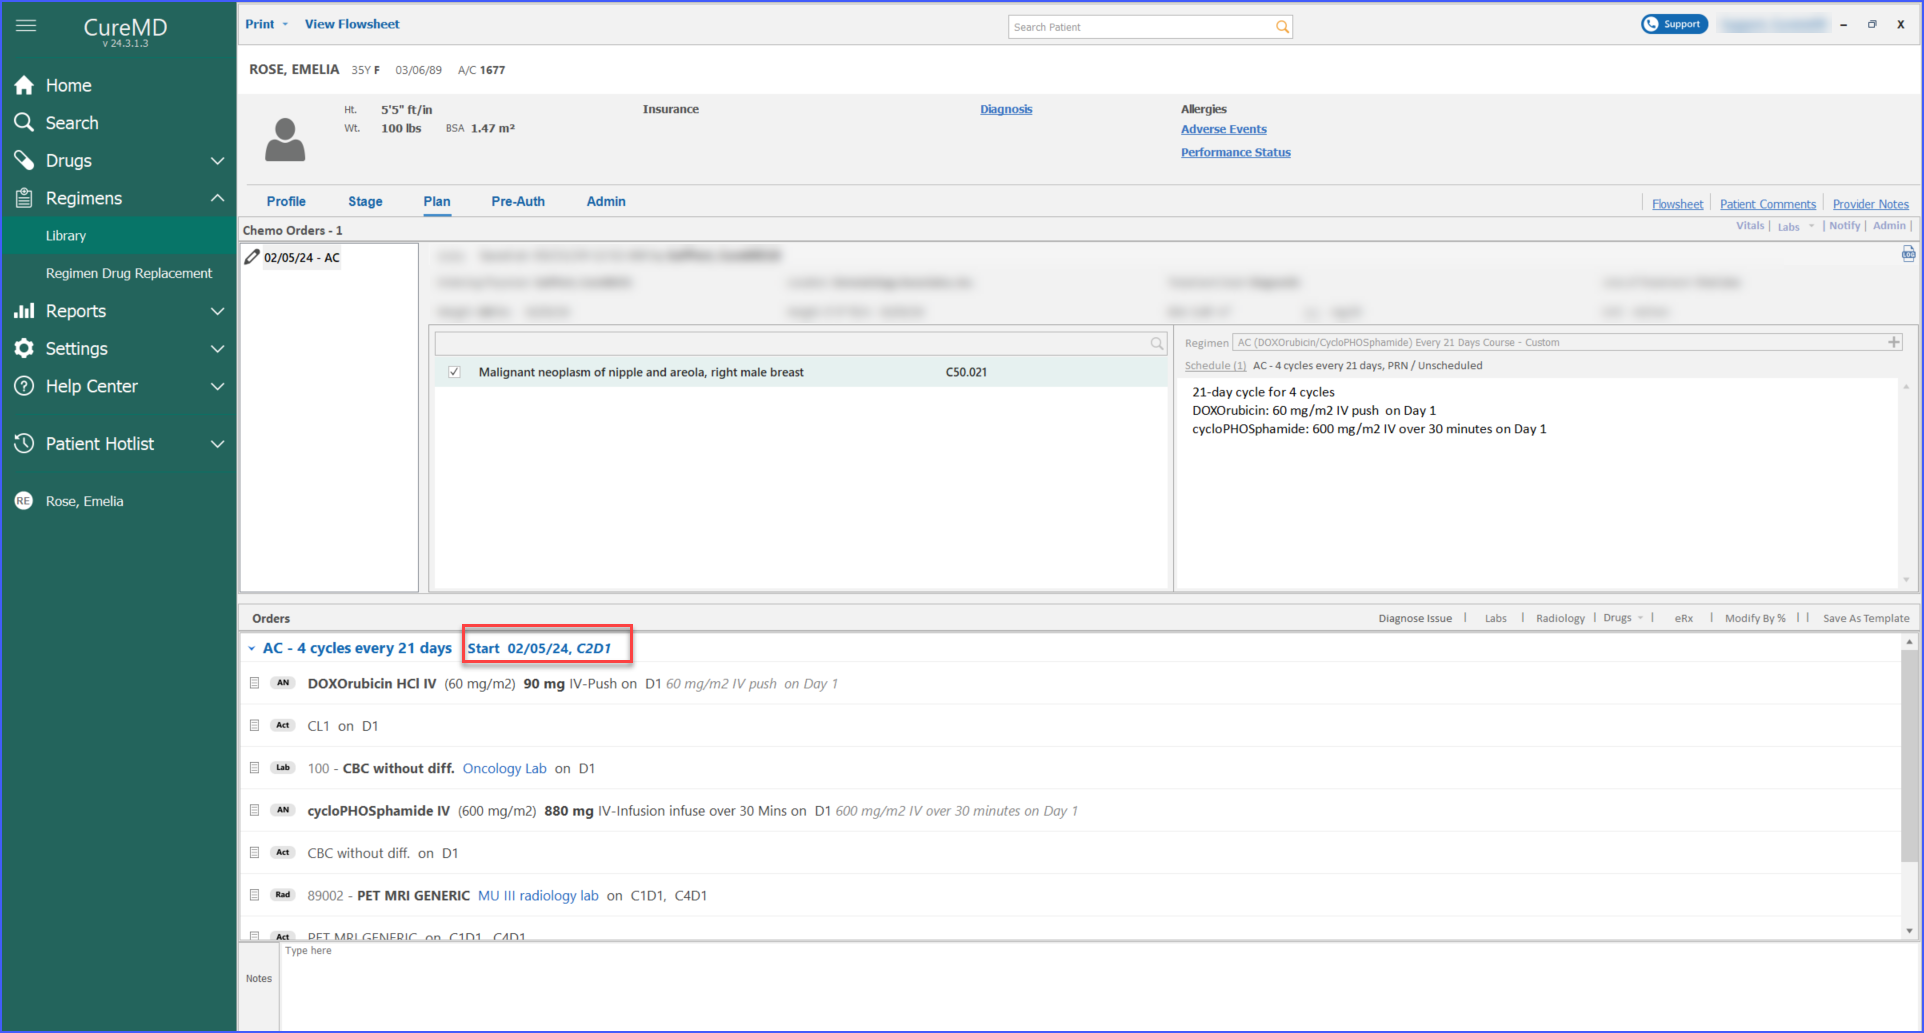
A similar enhancement has been made in the ‘Plan’ section of the patient module. Click here to view this change.
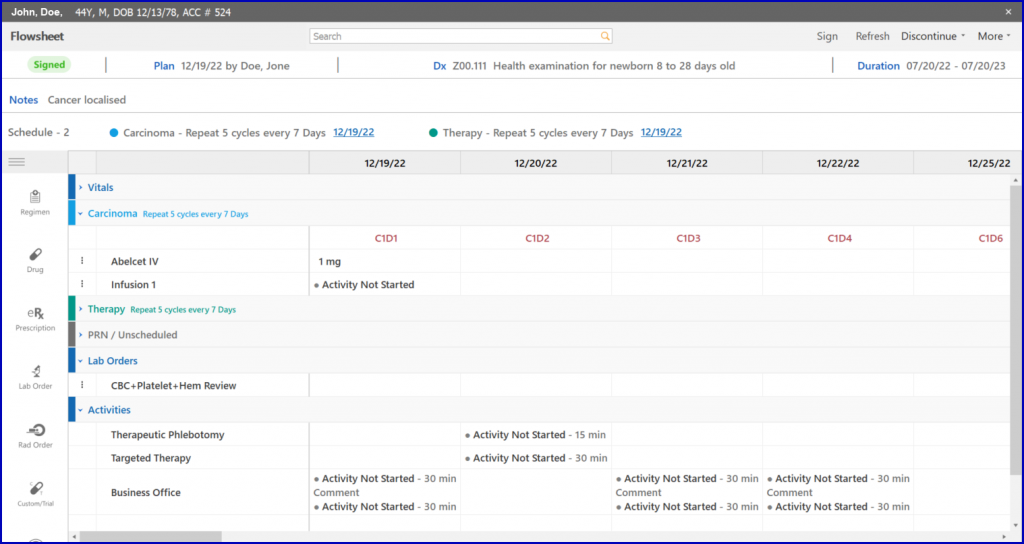
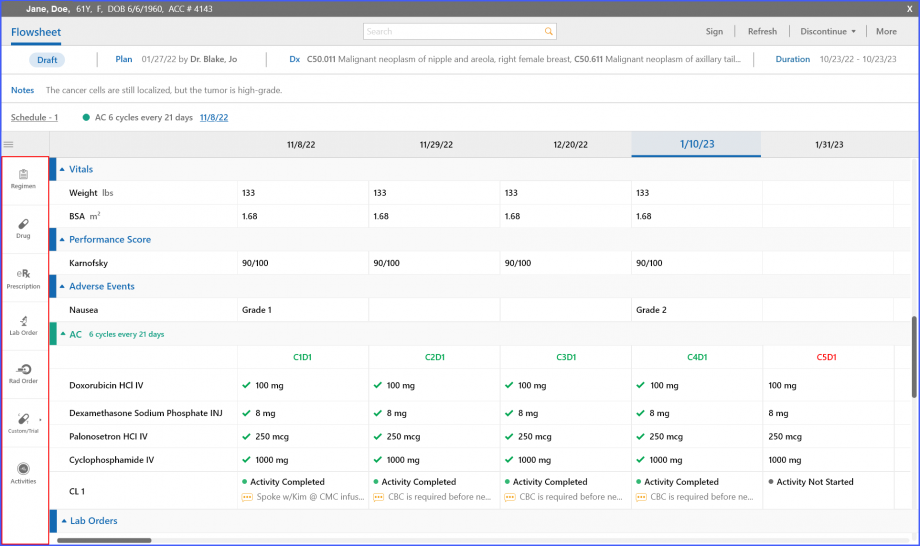
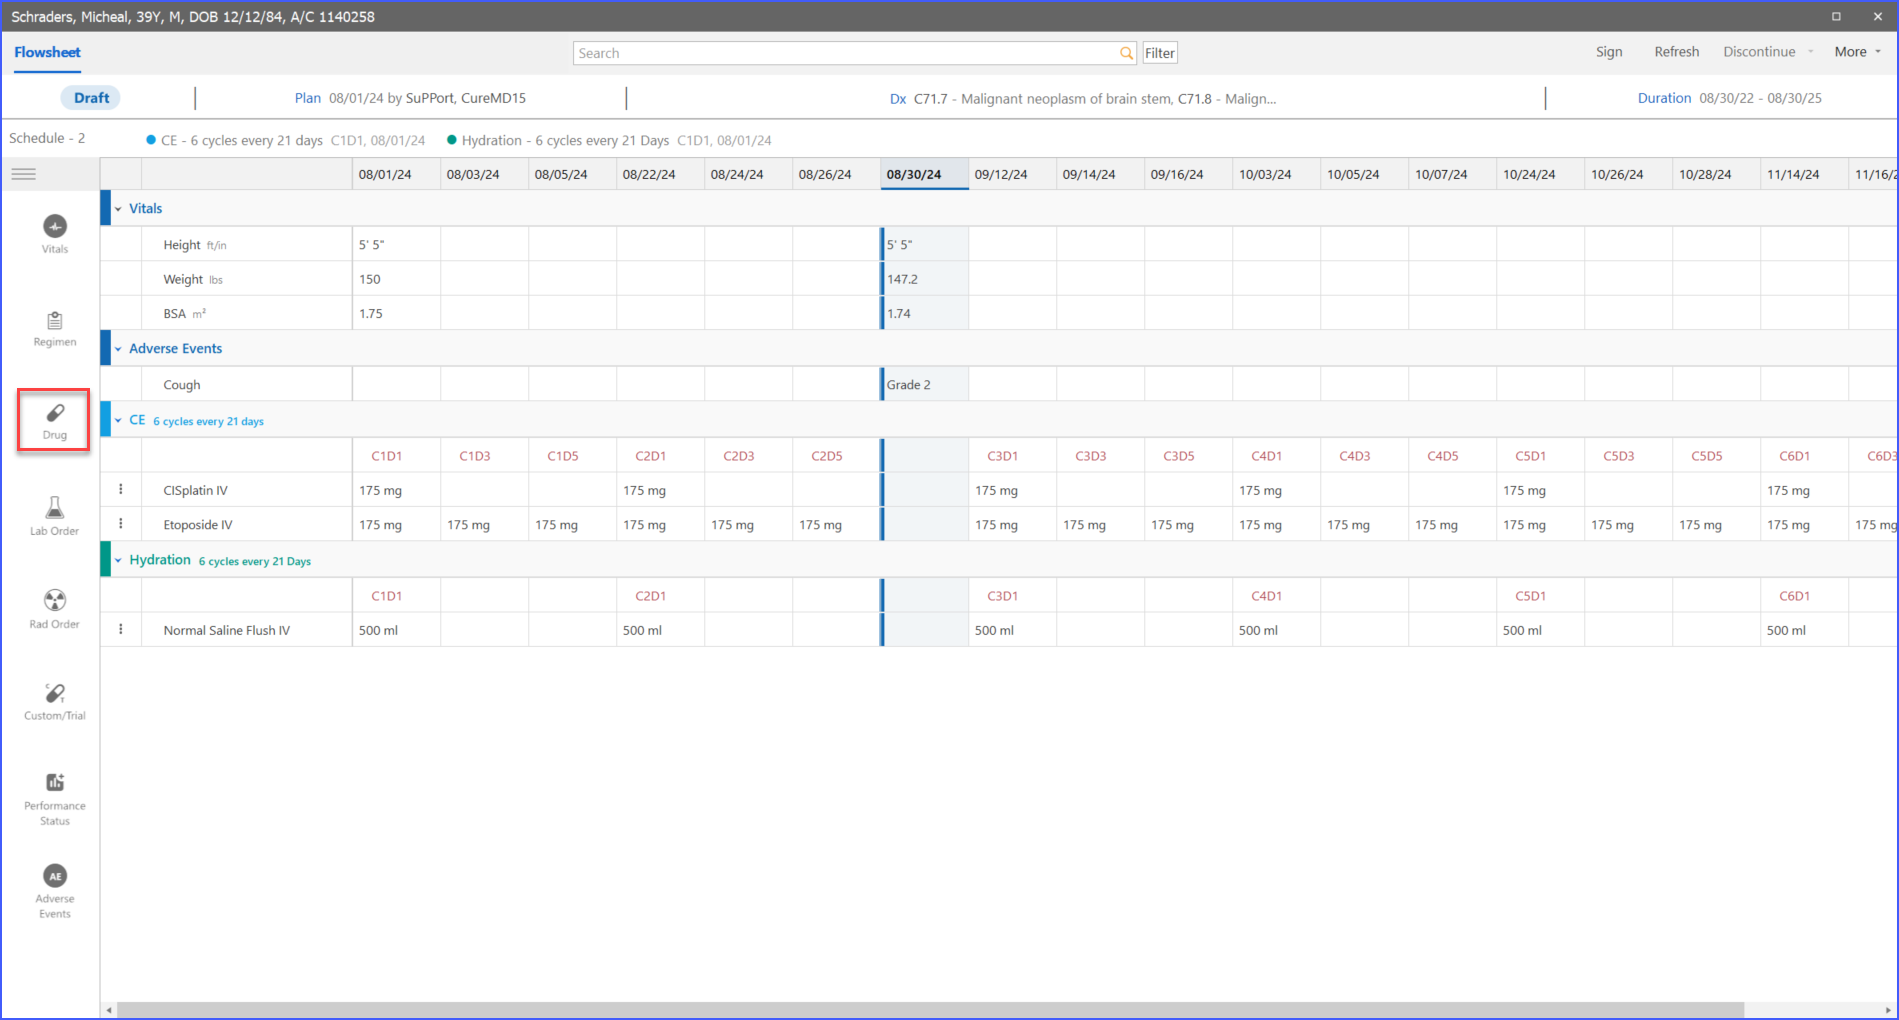
The Flowsheet interface displays essential patient information and with further enhancements, users can perform several actions directly from the flowsheet. ![]()
The user can also add notes about the chemotherapy plan in the Notes section and modify therapies using the Add Schedule option.
On the left panel, the user finds options to add orders like drugs, labs, and radiology. This panel can be collapsed or expanded according to the user’s needs.
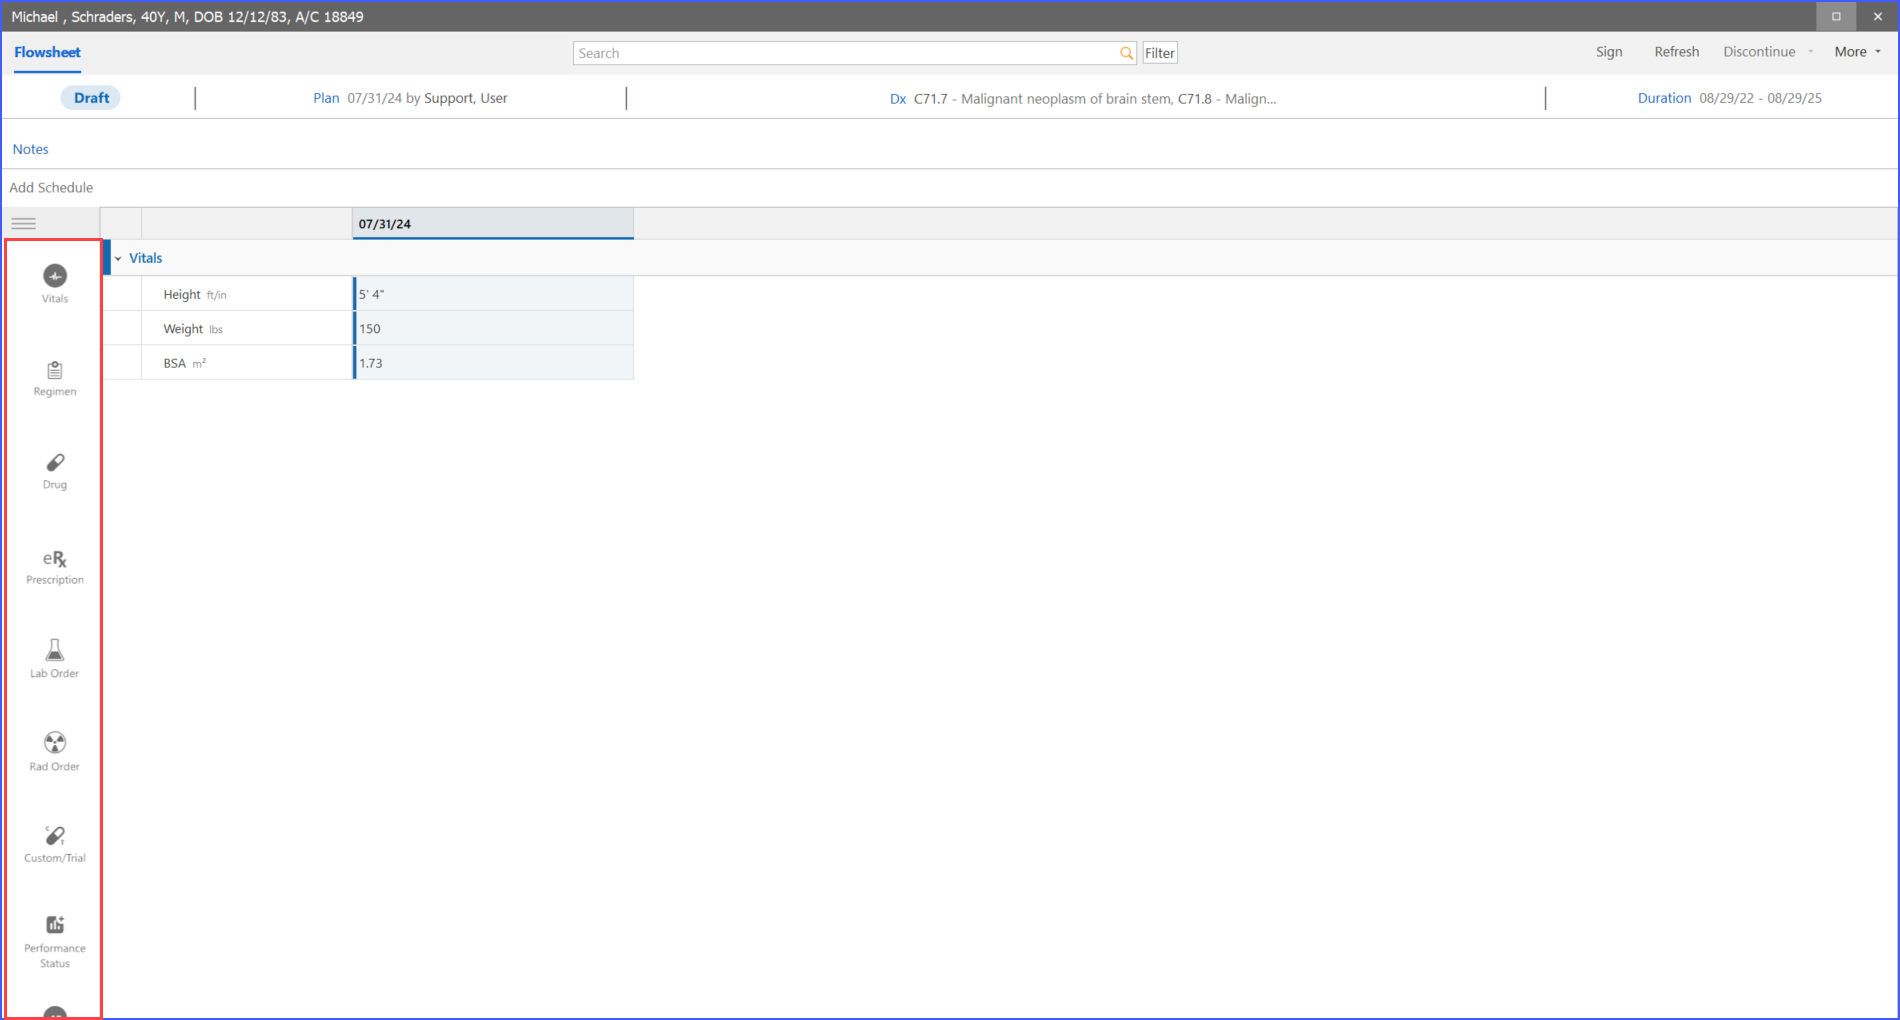
To add patient vitals, the user clicks on the Vitals option.
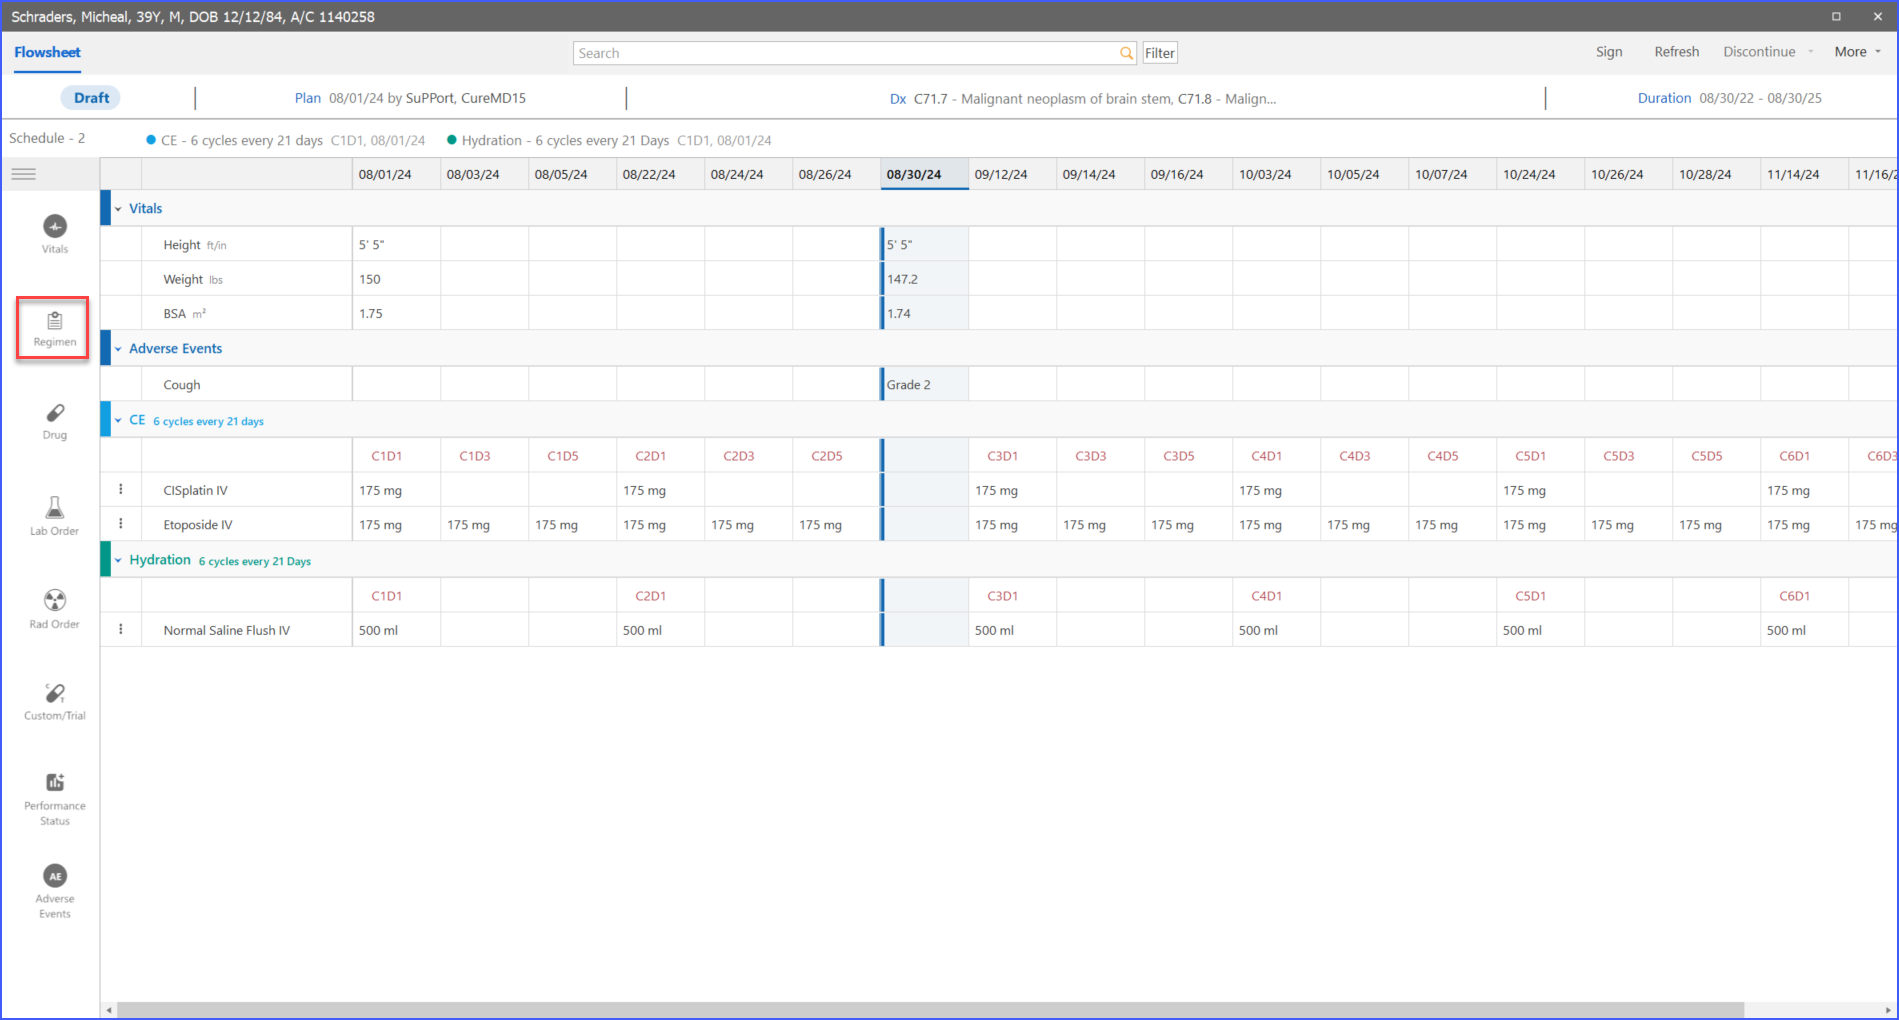
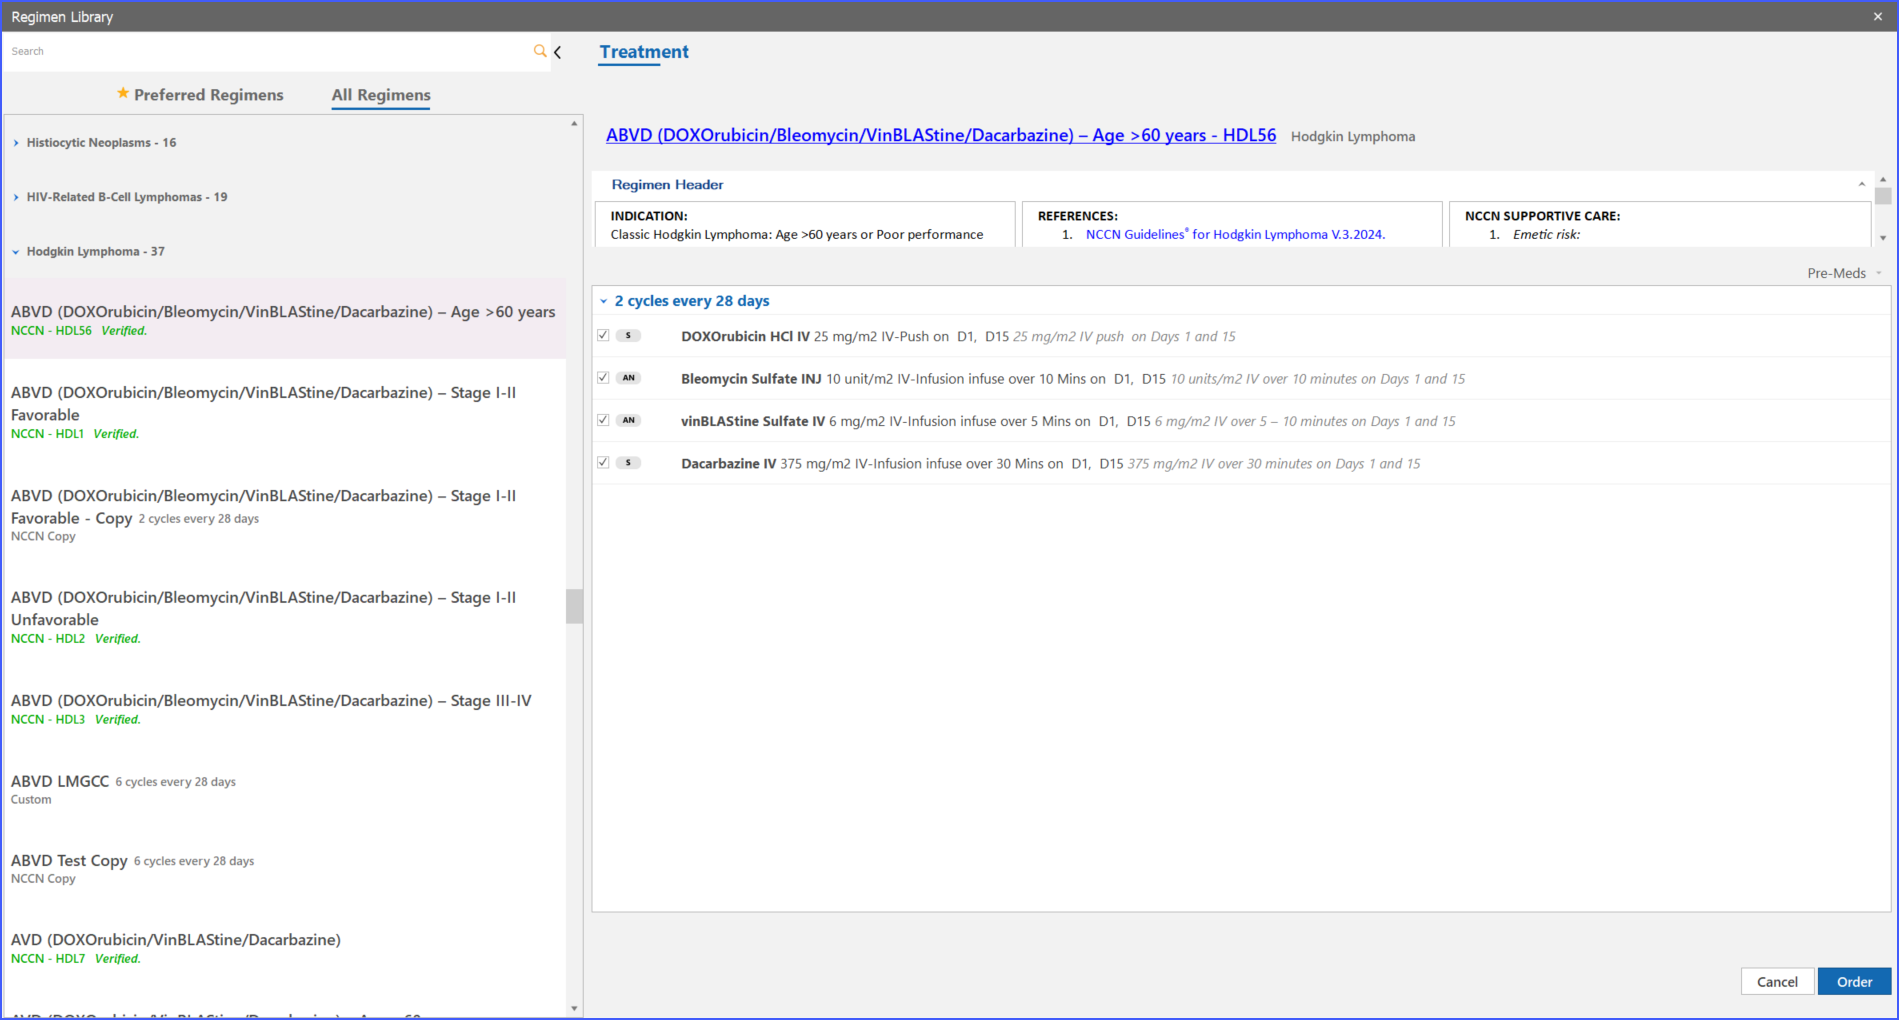
The Regimen option allows for adding regimens to the plan, including NCCN Templates, Premedication Regimens, Clinical Trial Regimens, or Custom Regimens.
When adding drugs, users can click on the Drug option, which opens a Quick Order screen where they can modify doses, add notes, specify mixing solutions, and attach the drugs to a therapy schedule. Once added, the drugs appear on the Flowsheet.
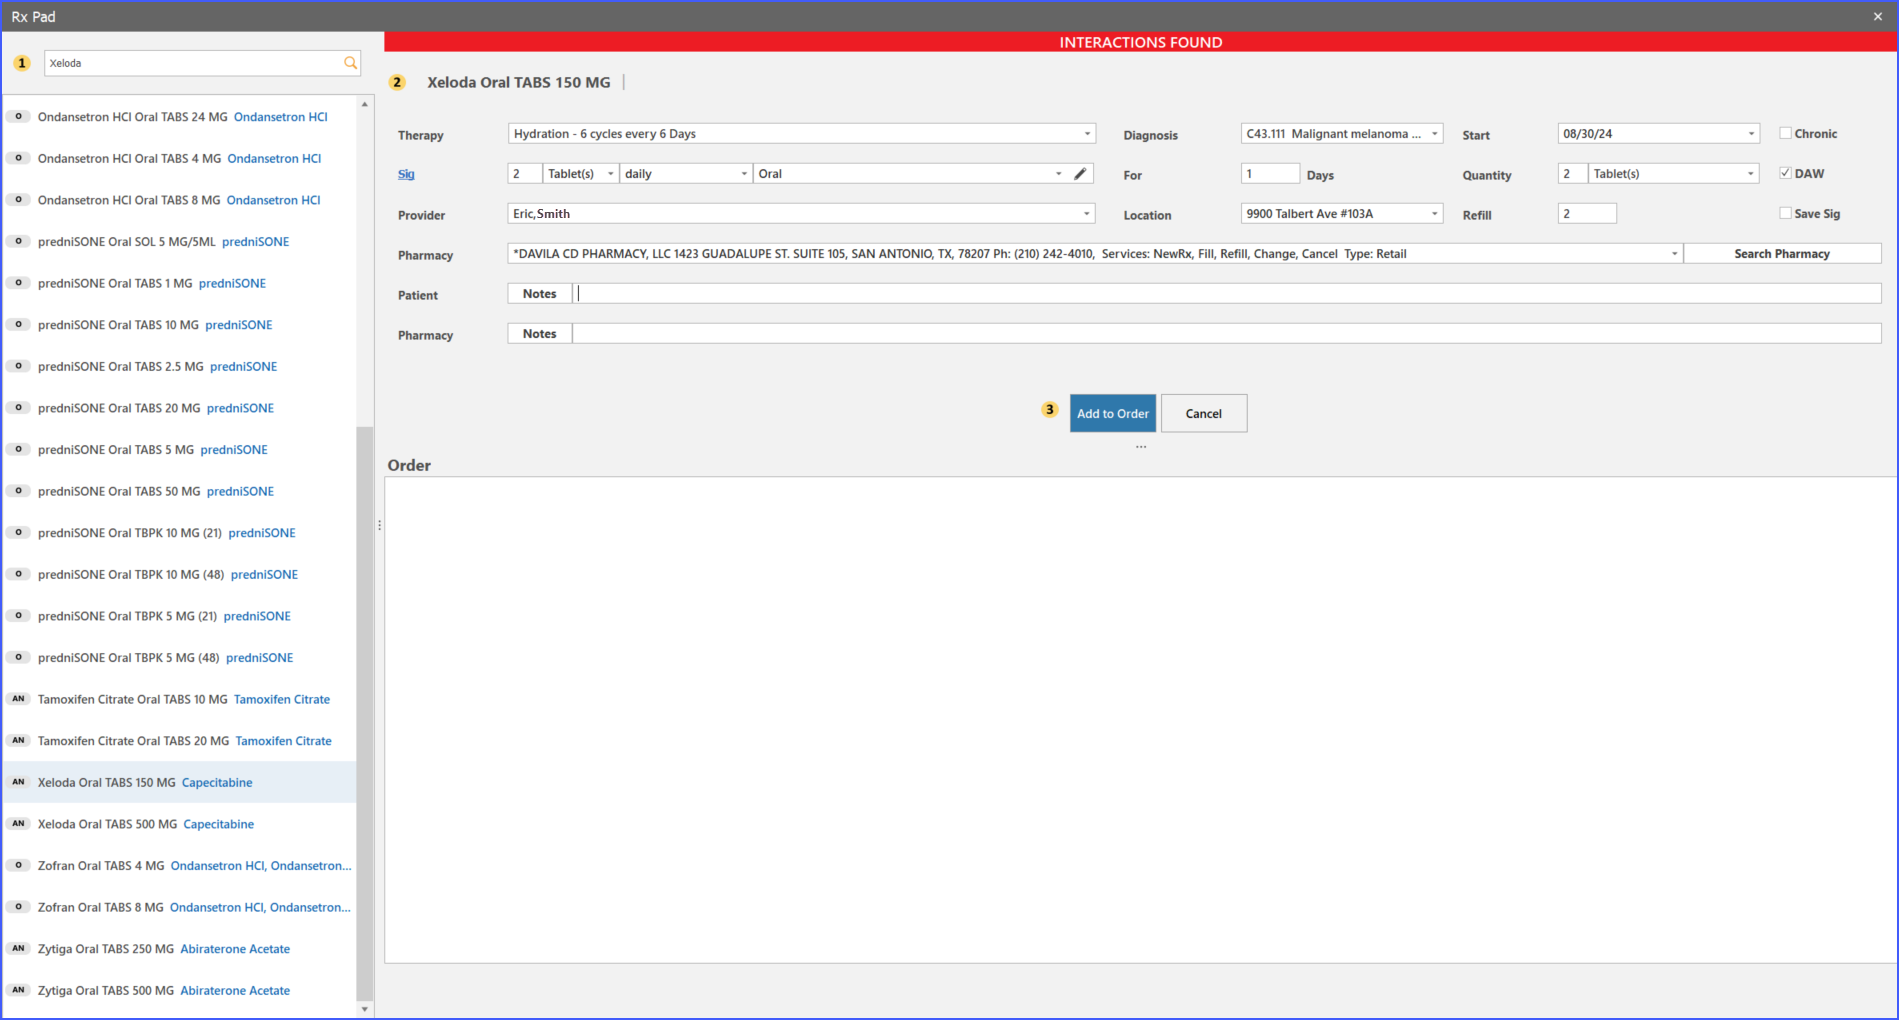
For prescriptions, the user can click on the eRx icon to access the Rx Pad, where they specify the drug, sig, quantity, notes, and pharmacy. These prescriptions appear on a separate band and are signed when the Flowsheet is signed.
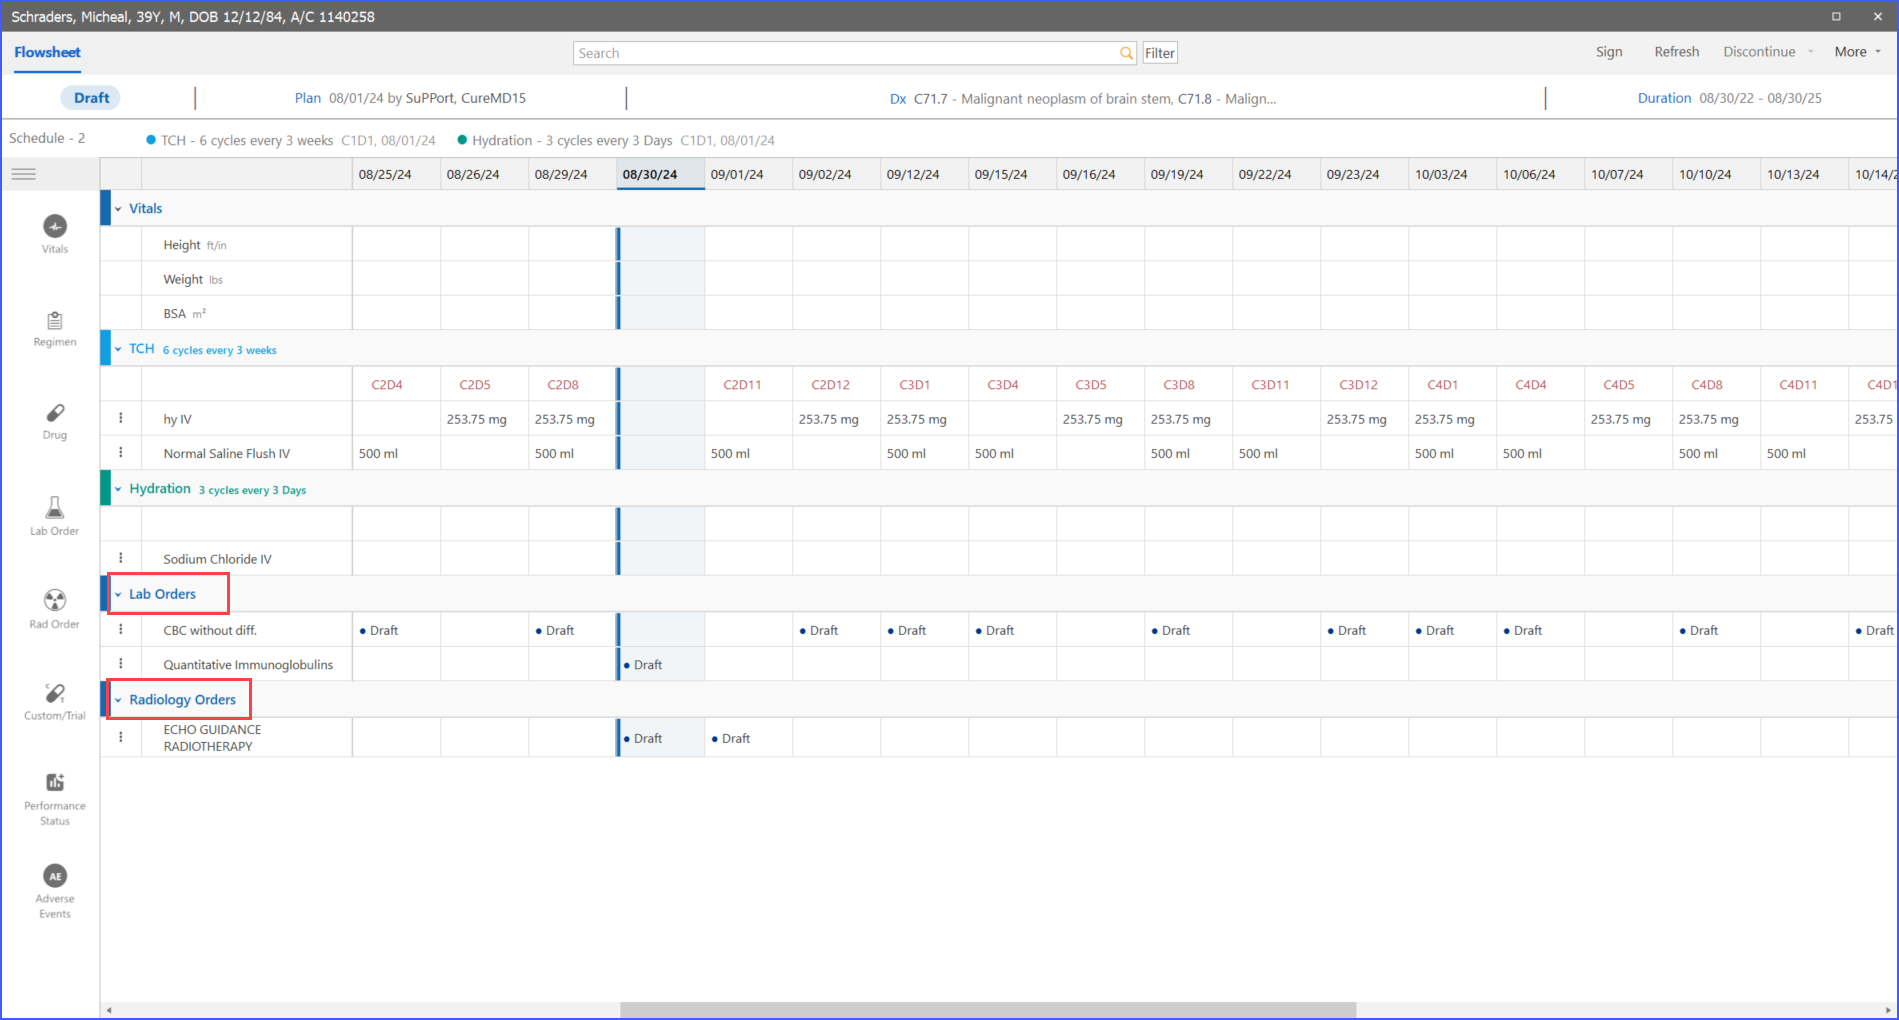
Users can also add lab orders directly by clicking the labs icon in the left panel, selecting the laboratory, and adding the desired lab. These lab orders can be added to therapy or marked as stat, and they will appear on a separate band on the Flowsheet.
Radiology orders are similarly added by clicking the rad icon in the left panel, selecting the radiology service, and adding the desired lab. These orders will also appear on a separate band on the Flowsheet.
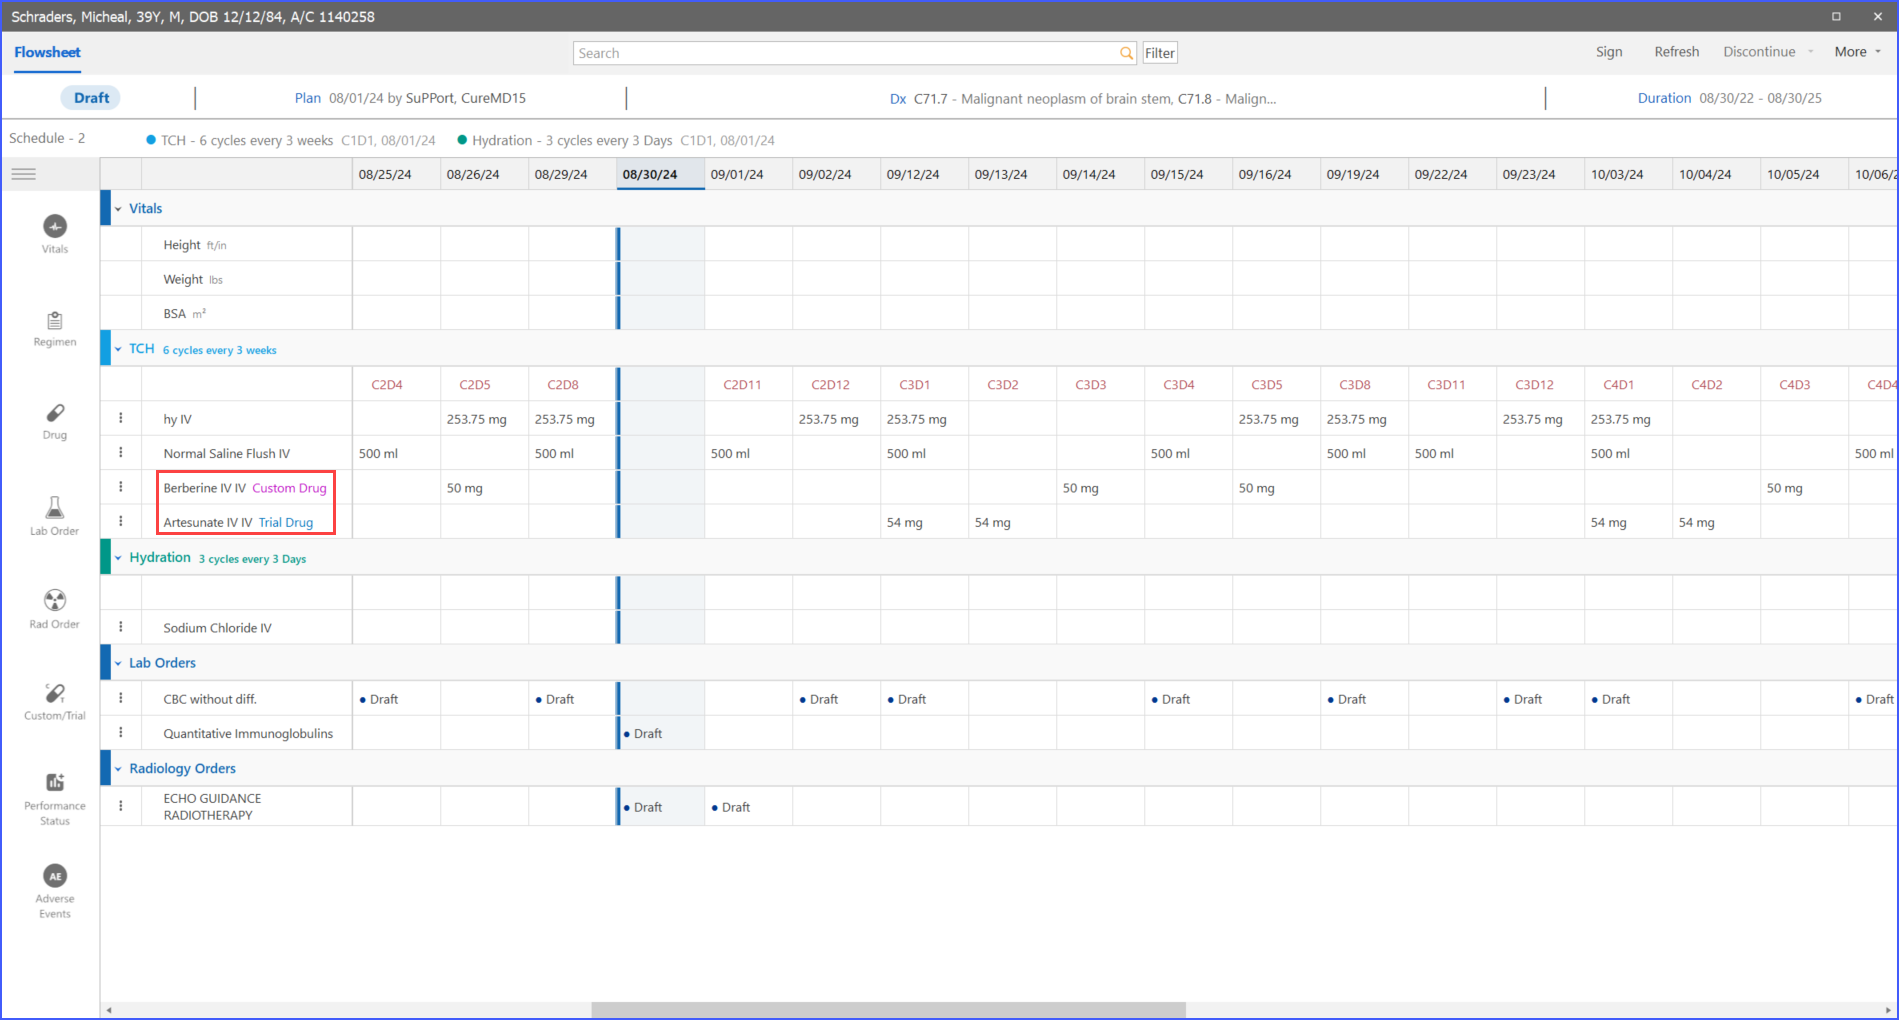
Custom and Trial Drugs can be added by clicking the custom and trial drug icon. Schedules can be assigned to these drugs, and they will be shown under their relevant therapy on the Flowsheet.
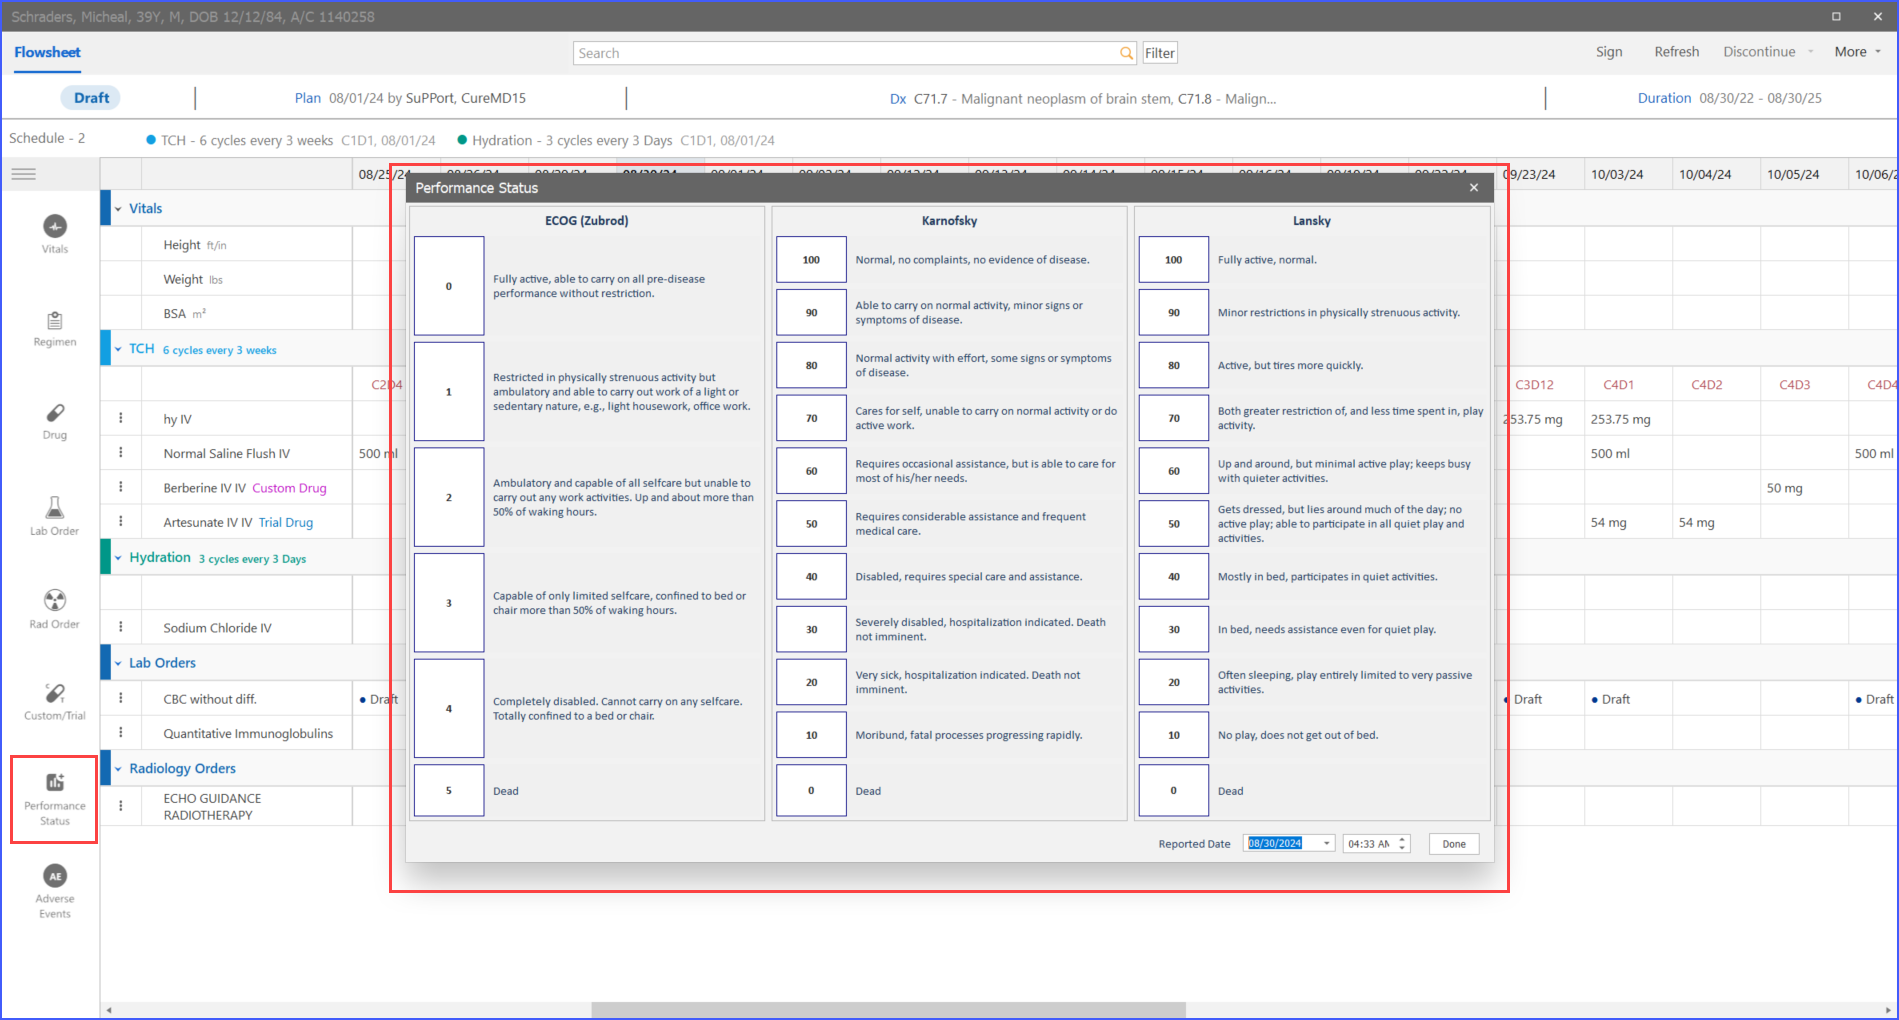
The Flowsheet also allows users to add Performance Status directly.
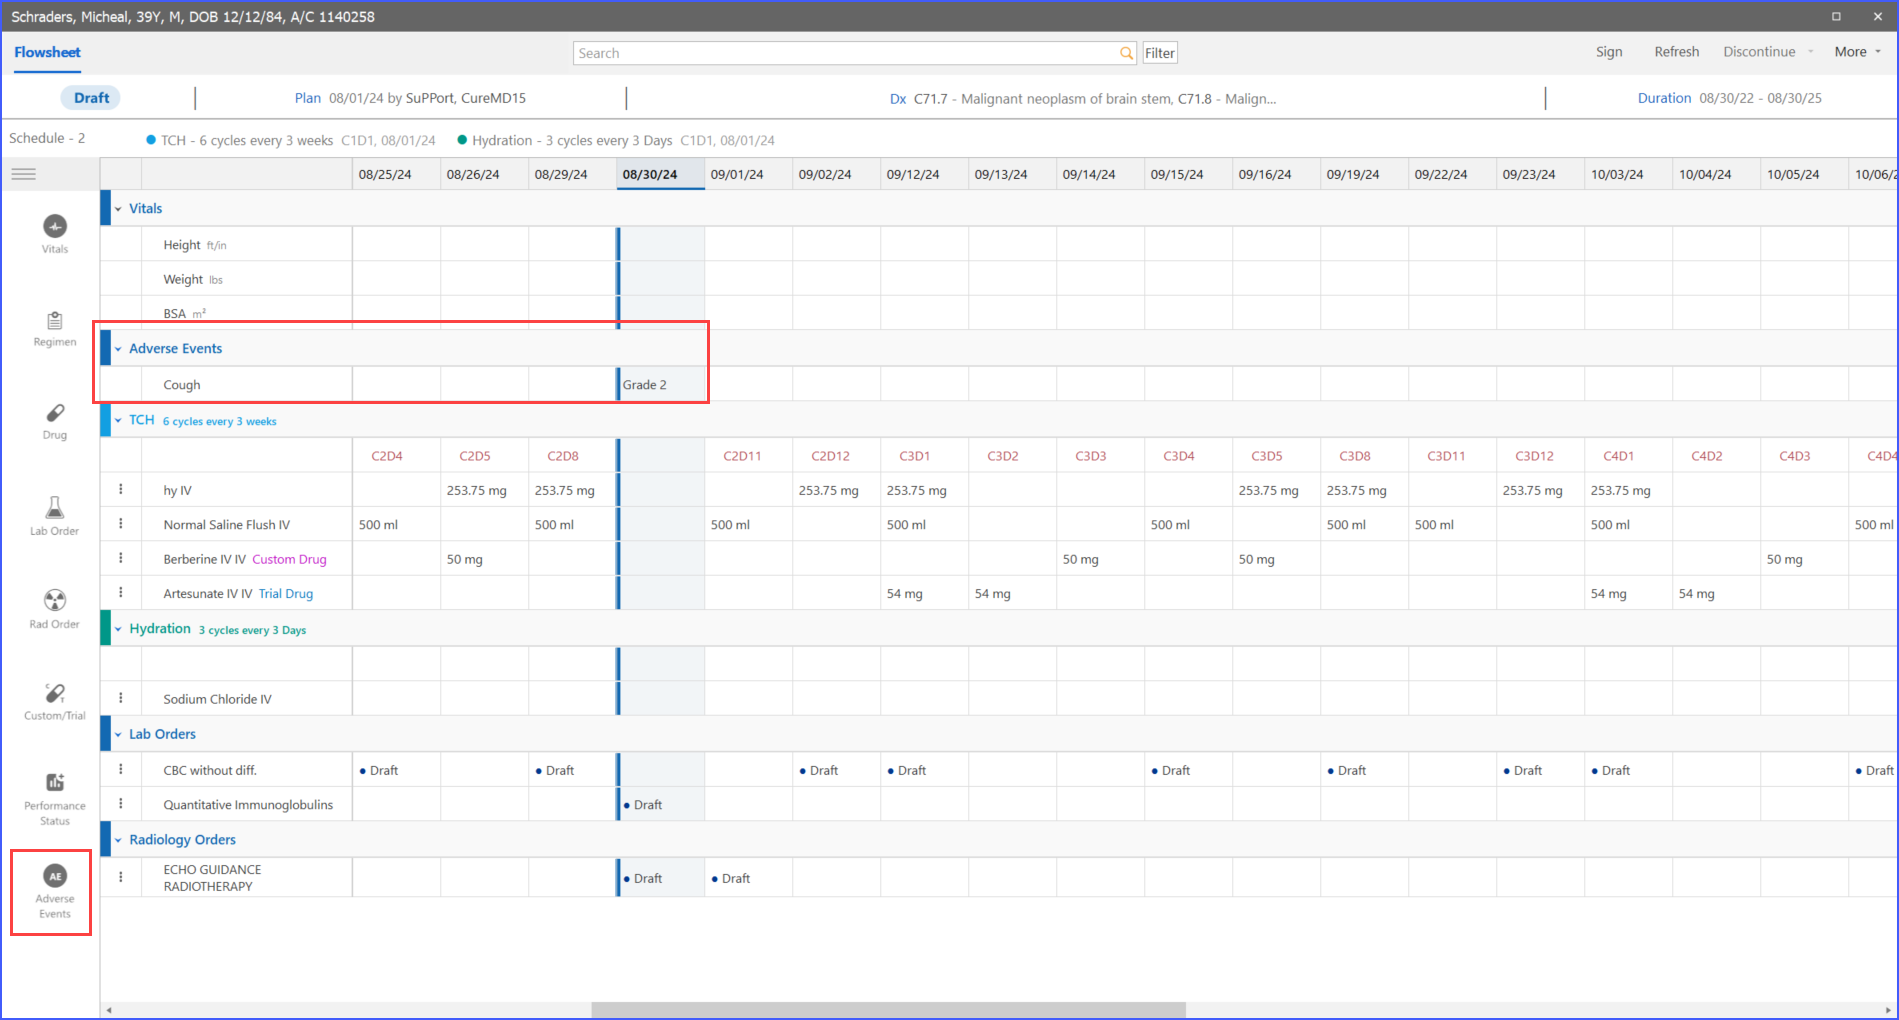
Additionally, users can record adverse events, which will appear along with their grades on the Flowsheet.
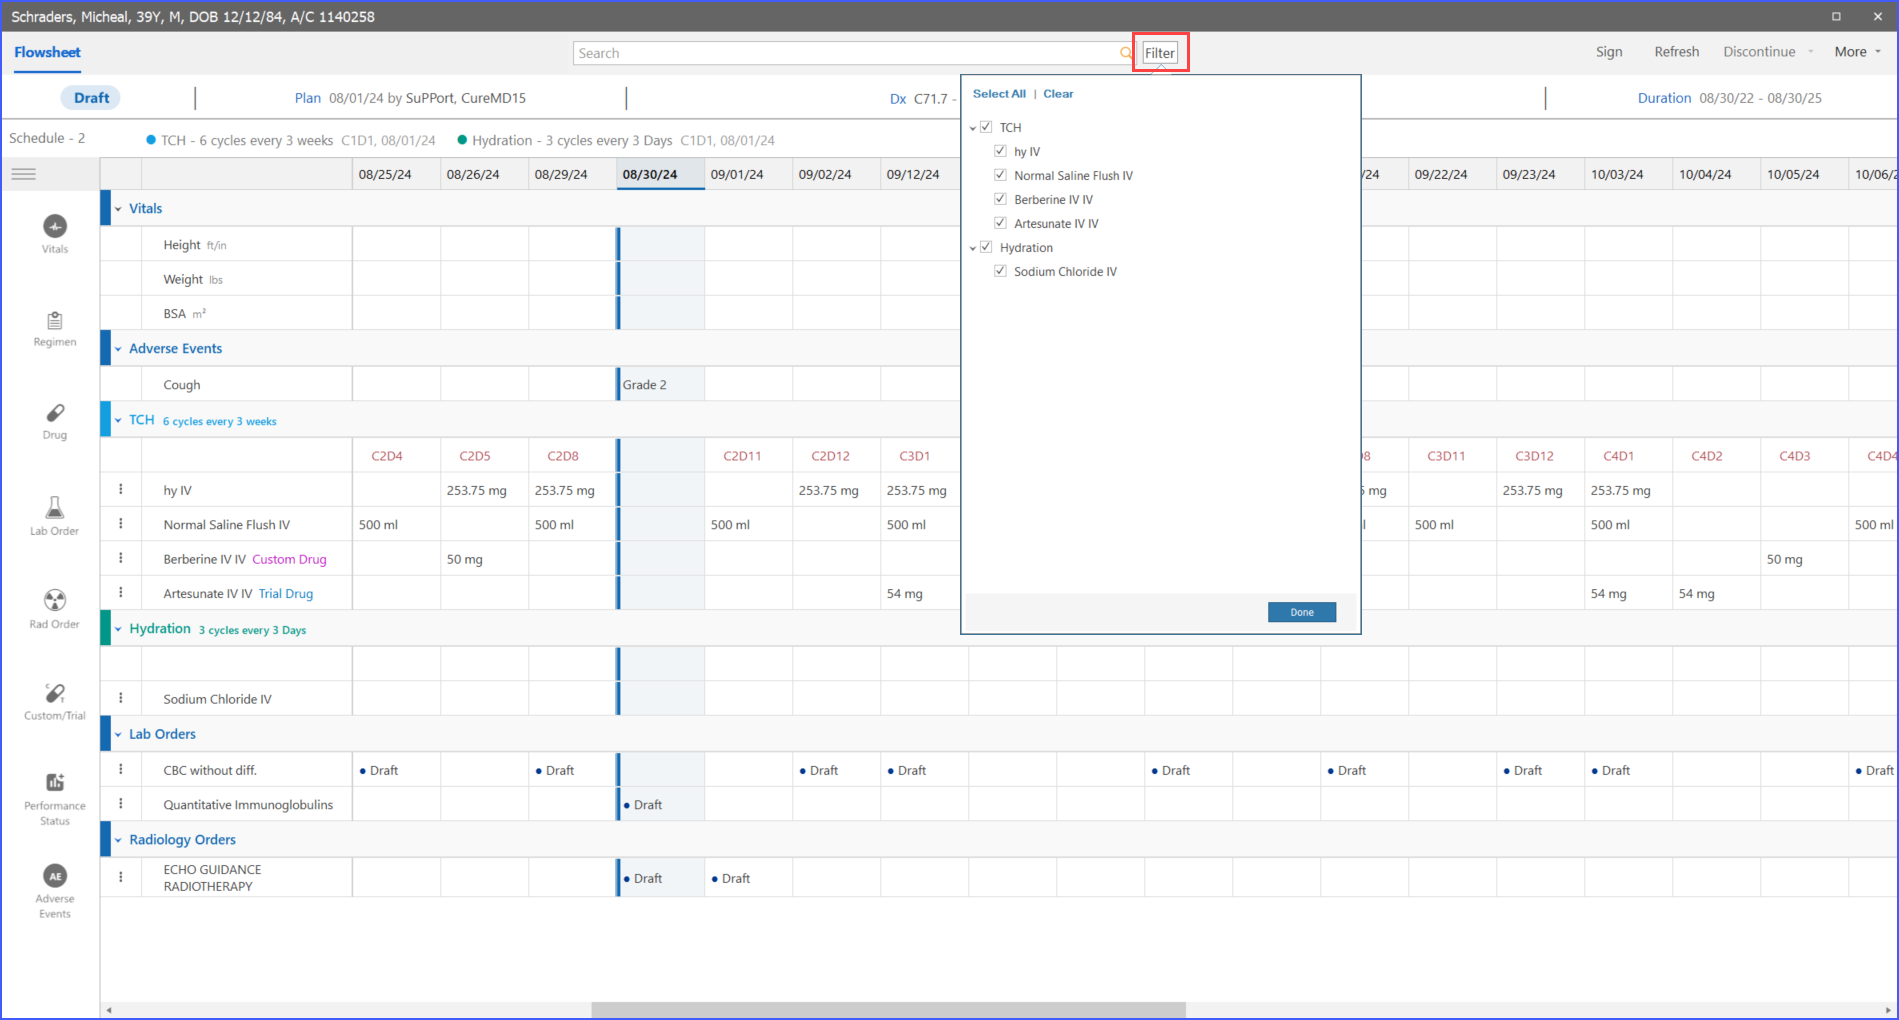
Lastly, users can customize the view of the Flowsheet by using the filter option, allowing them to display therapies and bands according to their needs.
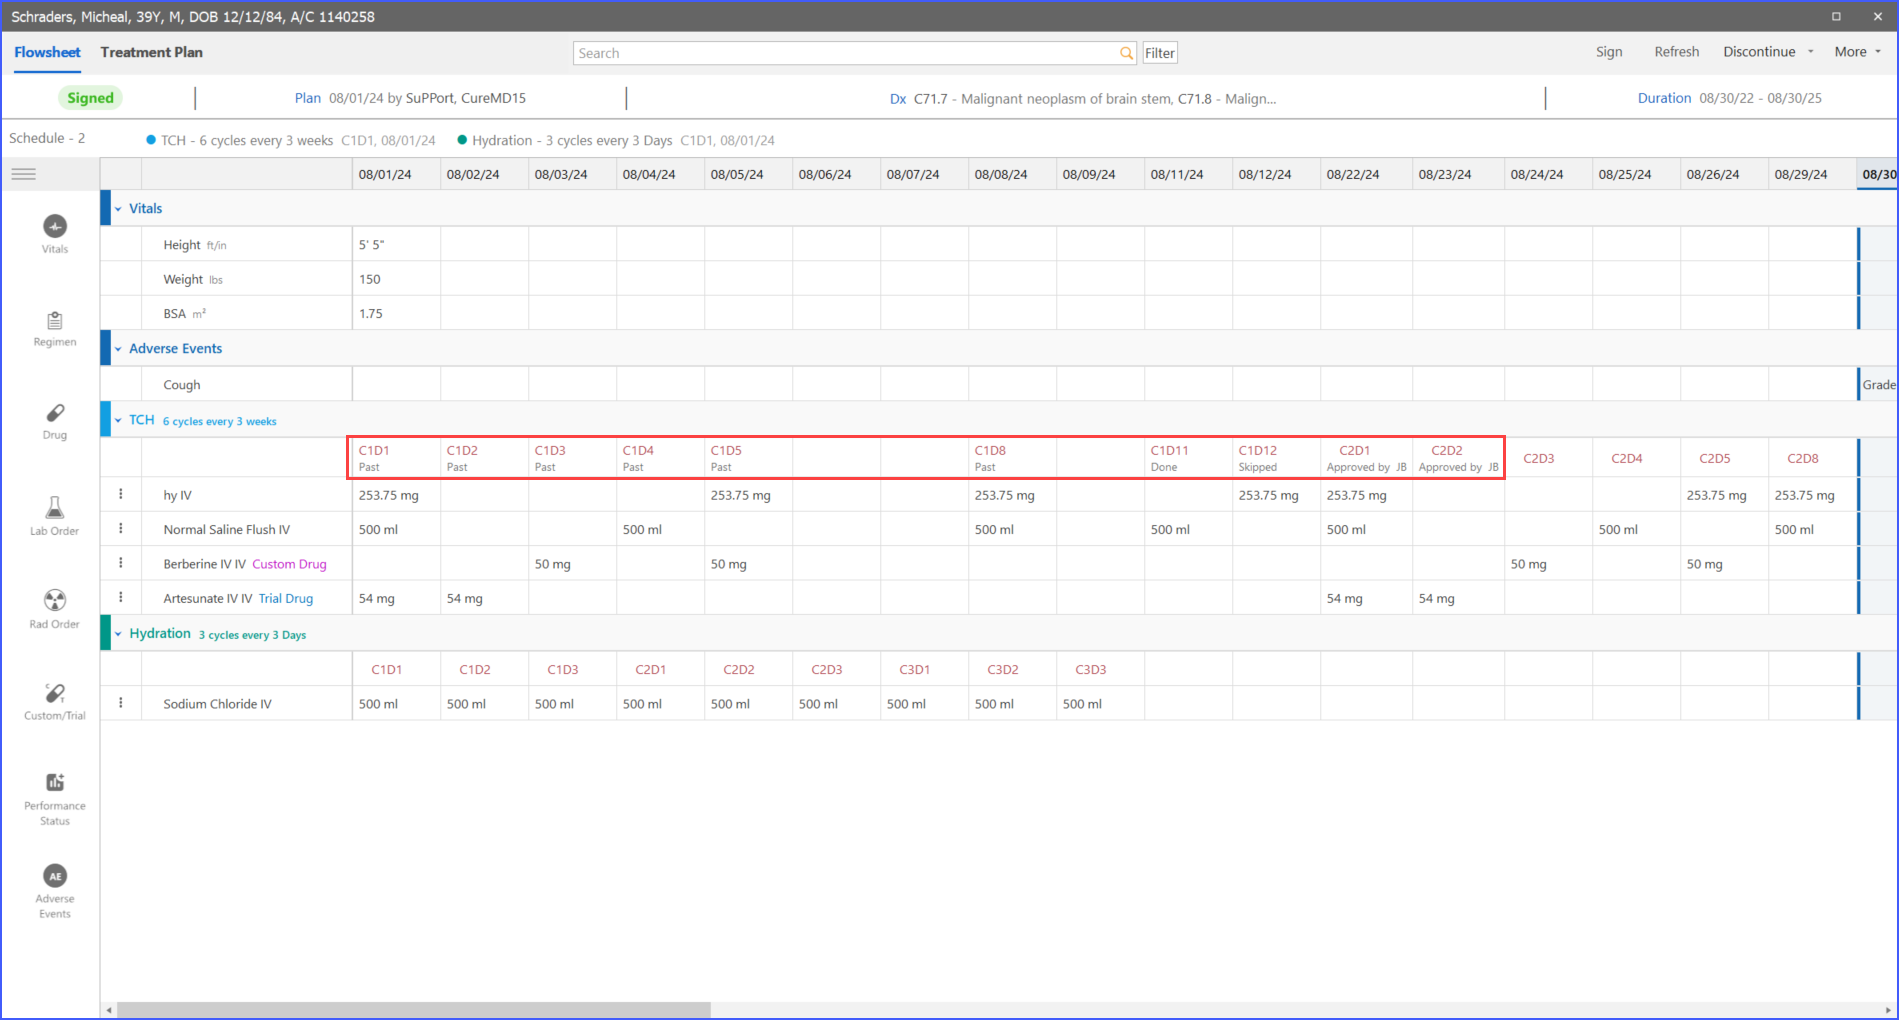
When the user navigates to the Flowsheet after signing a plan and clicks on a specific treatment day, a menu appears. This menu allows the user to mark the treatment day as Past, Done, Skipped or Approved.
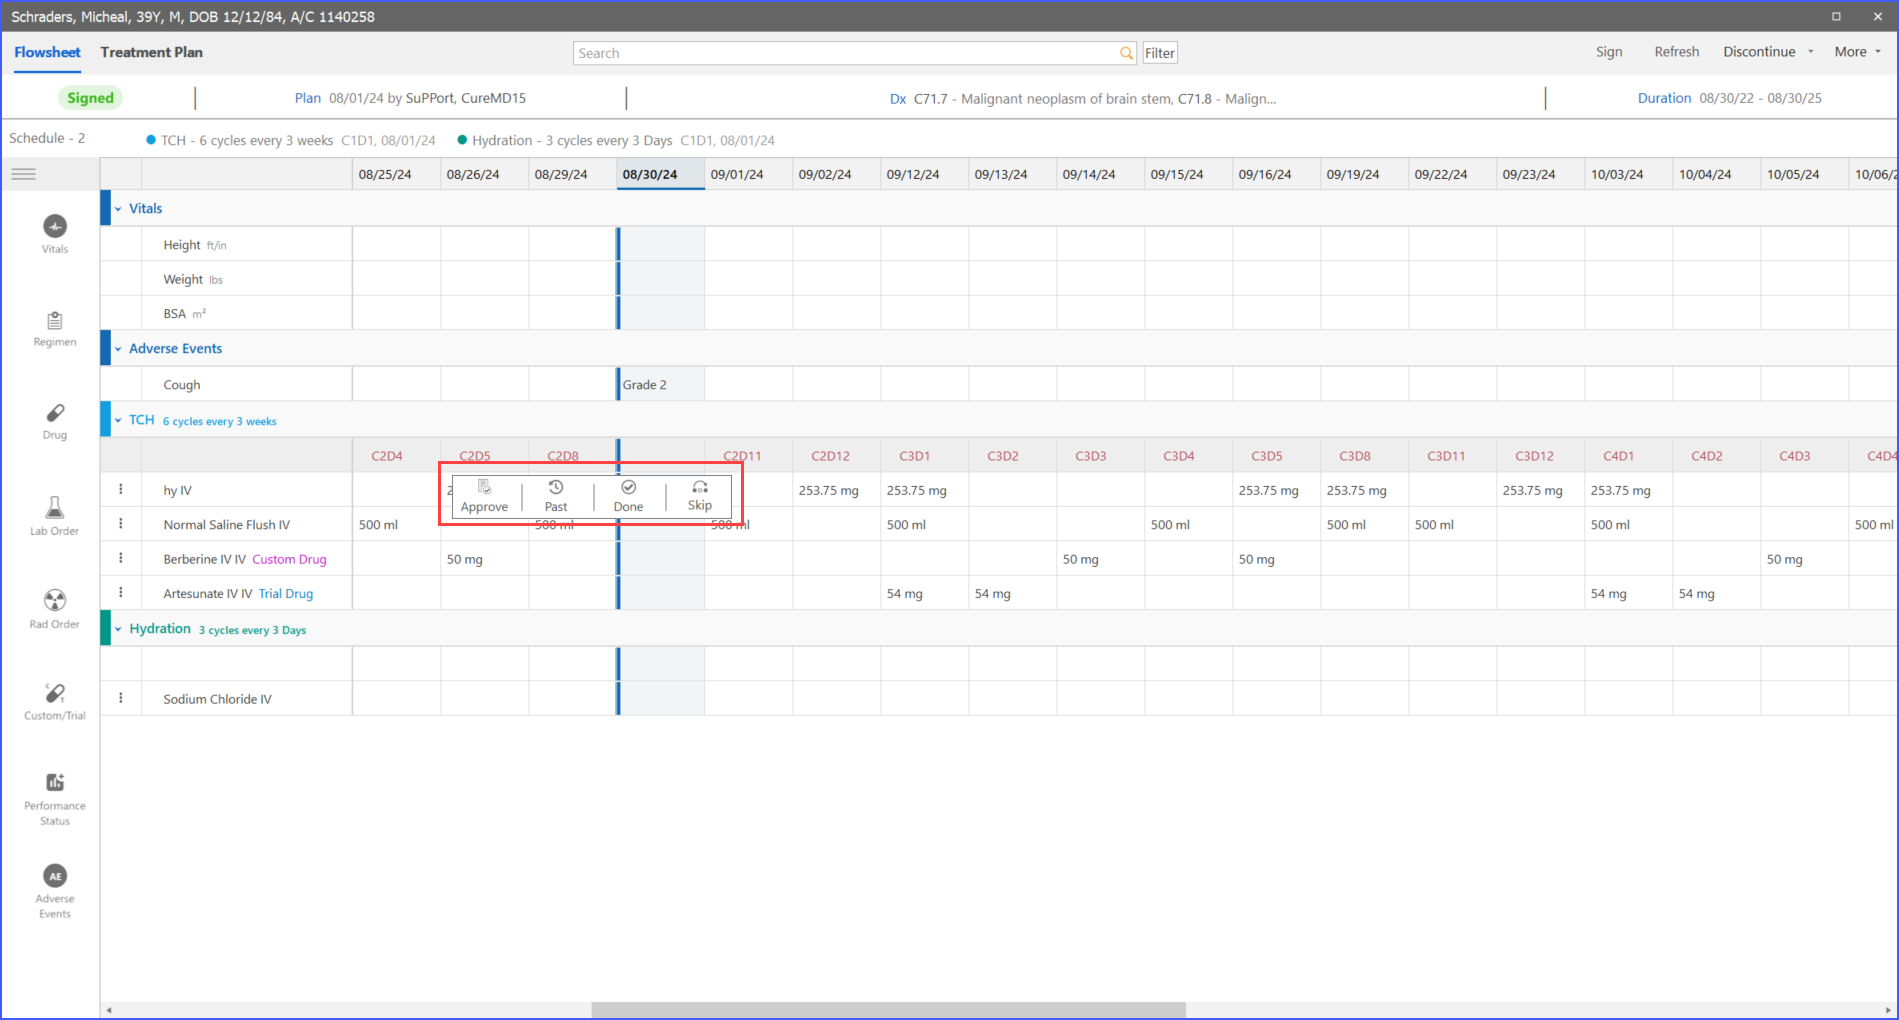
The status of each treatment day is visibly updated on the Flowsheet, ensuring clear communication of the treatment progress.
Skipping a day delinks it from the associated therapy, and the skipped status is updated on the appointment dashboard. The corresponding appointment remains available, but its drugs are removed, and the appointment’s comments are hidden.
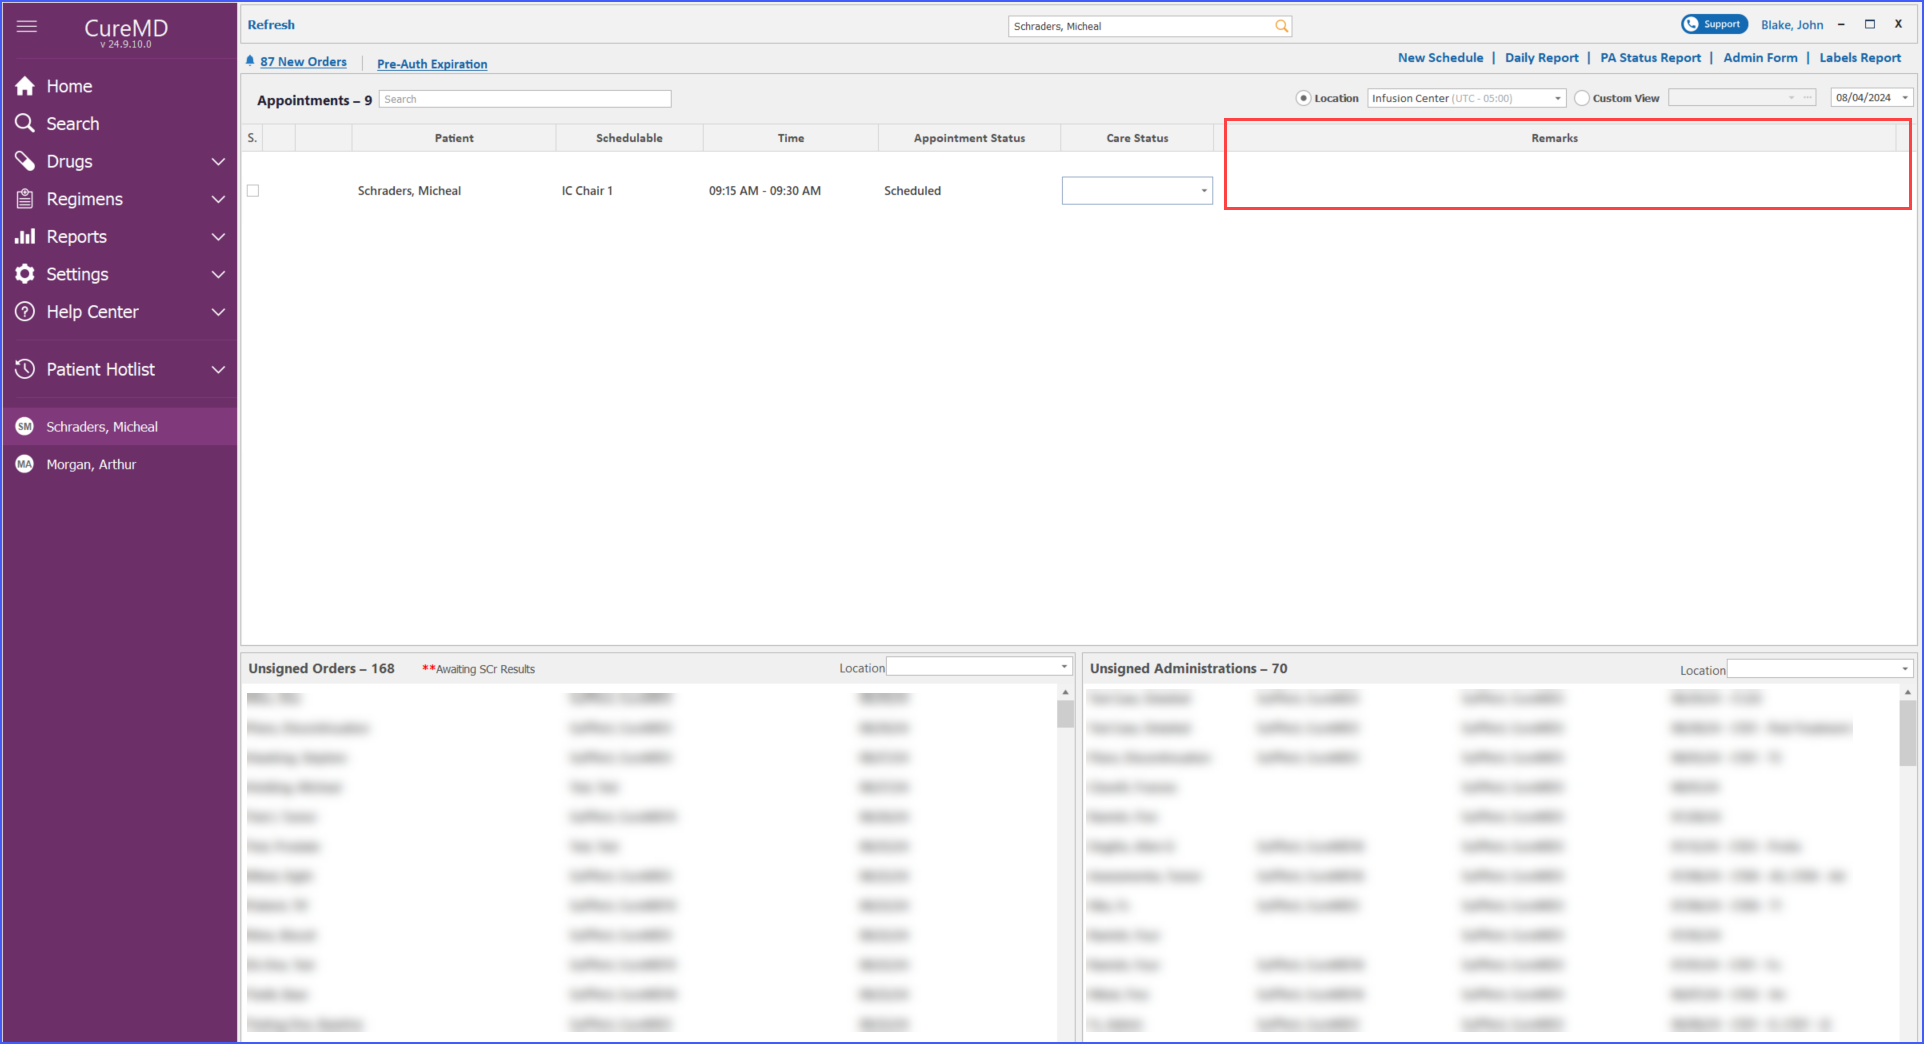
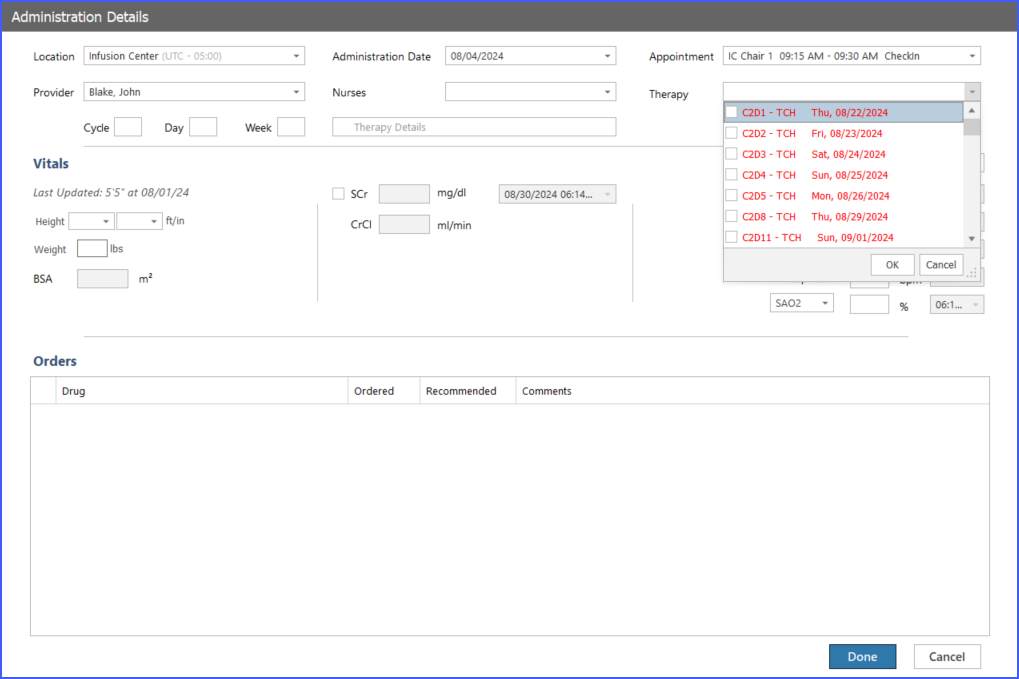
The skipped day is also removed from the therapy dropdown, and any associated drugs will be marked as PRN/Unscheduled. The user retains the ability to create an administration for the appointment if needed.
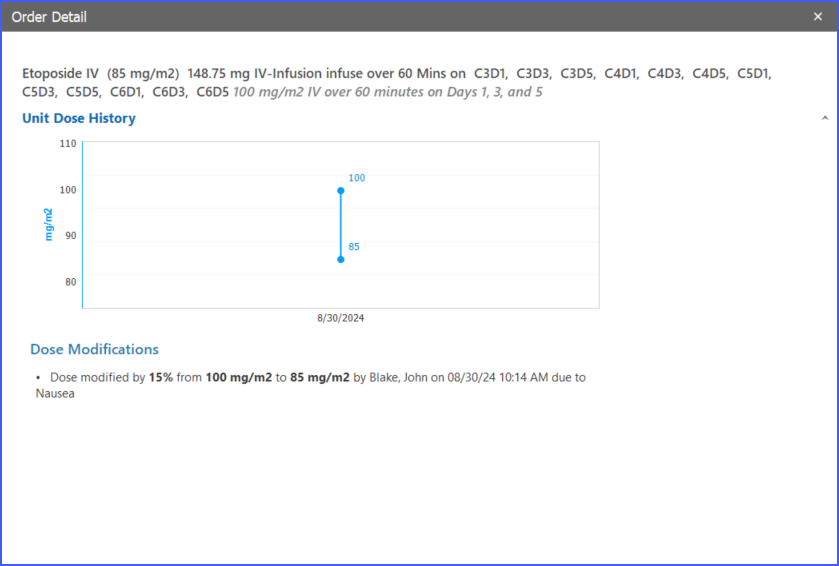
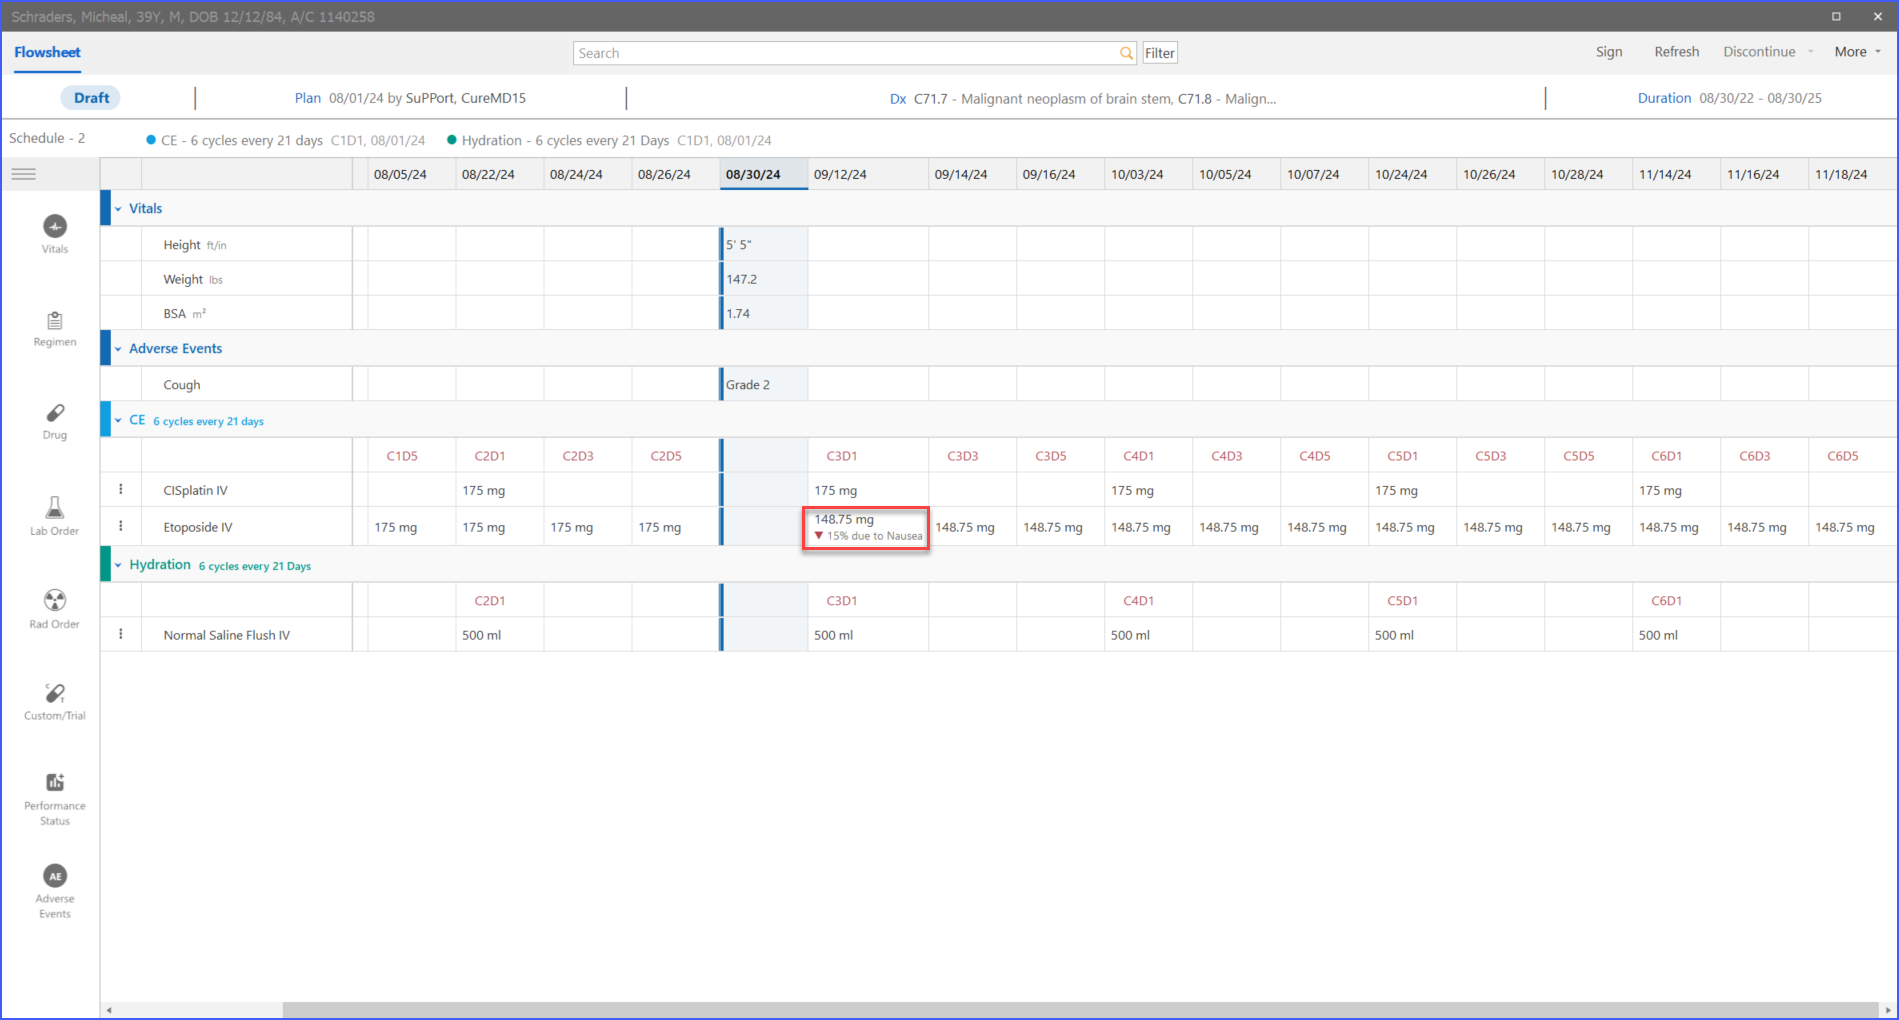
Users can also modify doses directly from the Flowsheet view.
By clicking on an unconsumed treatment day, the user opens a dose modification form, which displays critical information such as the cycle and day, drug name, unit dose, and total dose. Adjustments can be made by altering the dose percentage, unit, or total dose, with each change automatically recalculating the corresponding values for accuracy.

If the user needs to apply these changes across multiple treatment days, a checkbox labeled “Apply on subsequent days” is available.
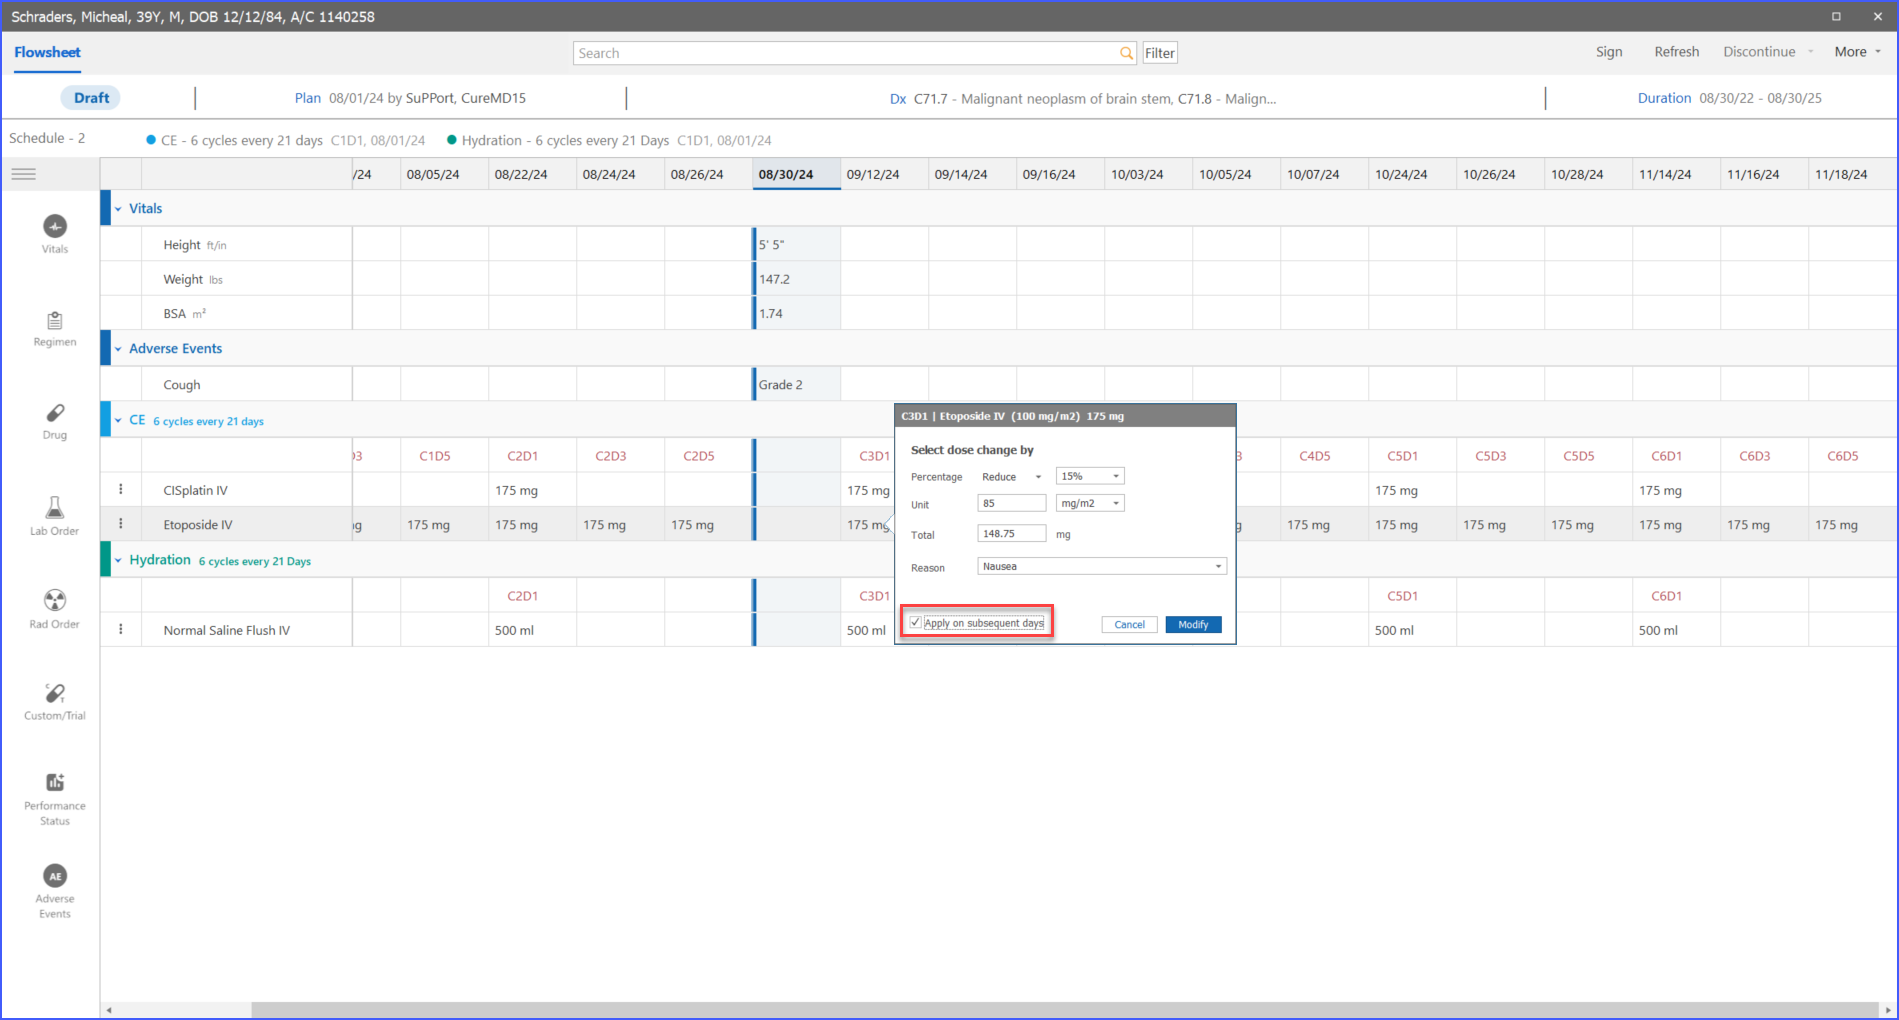
The system alerts the user if any changes cannot be applied to certain days, ensuring clear communication. These modifications are visually represented directly on the Flowsheet, particularly when the total dose is overridden, where the system narrates the reason for the adjustment.
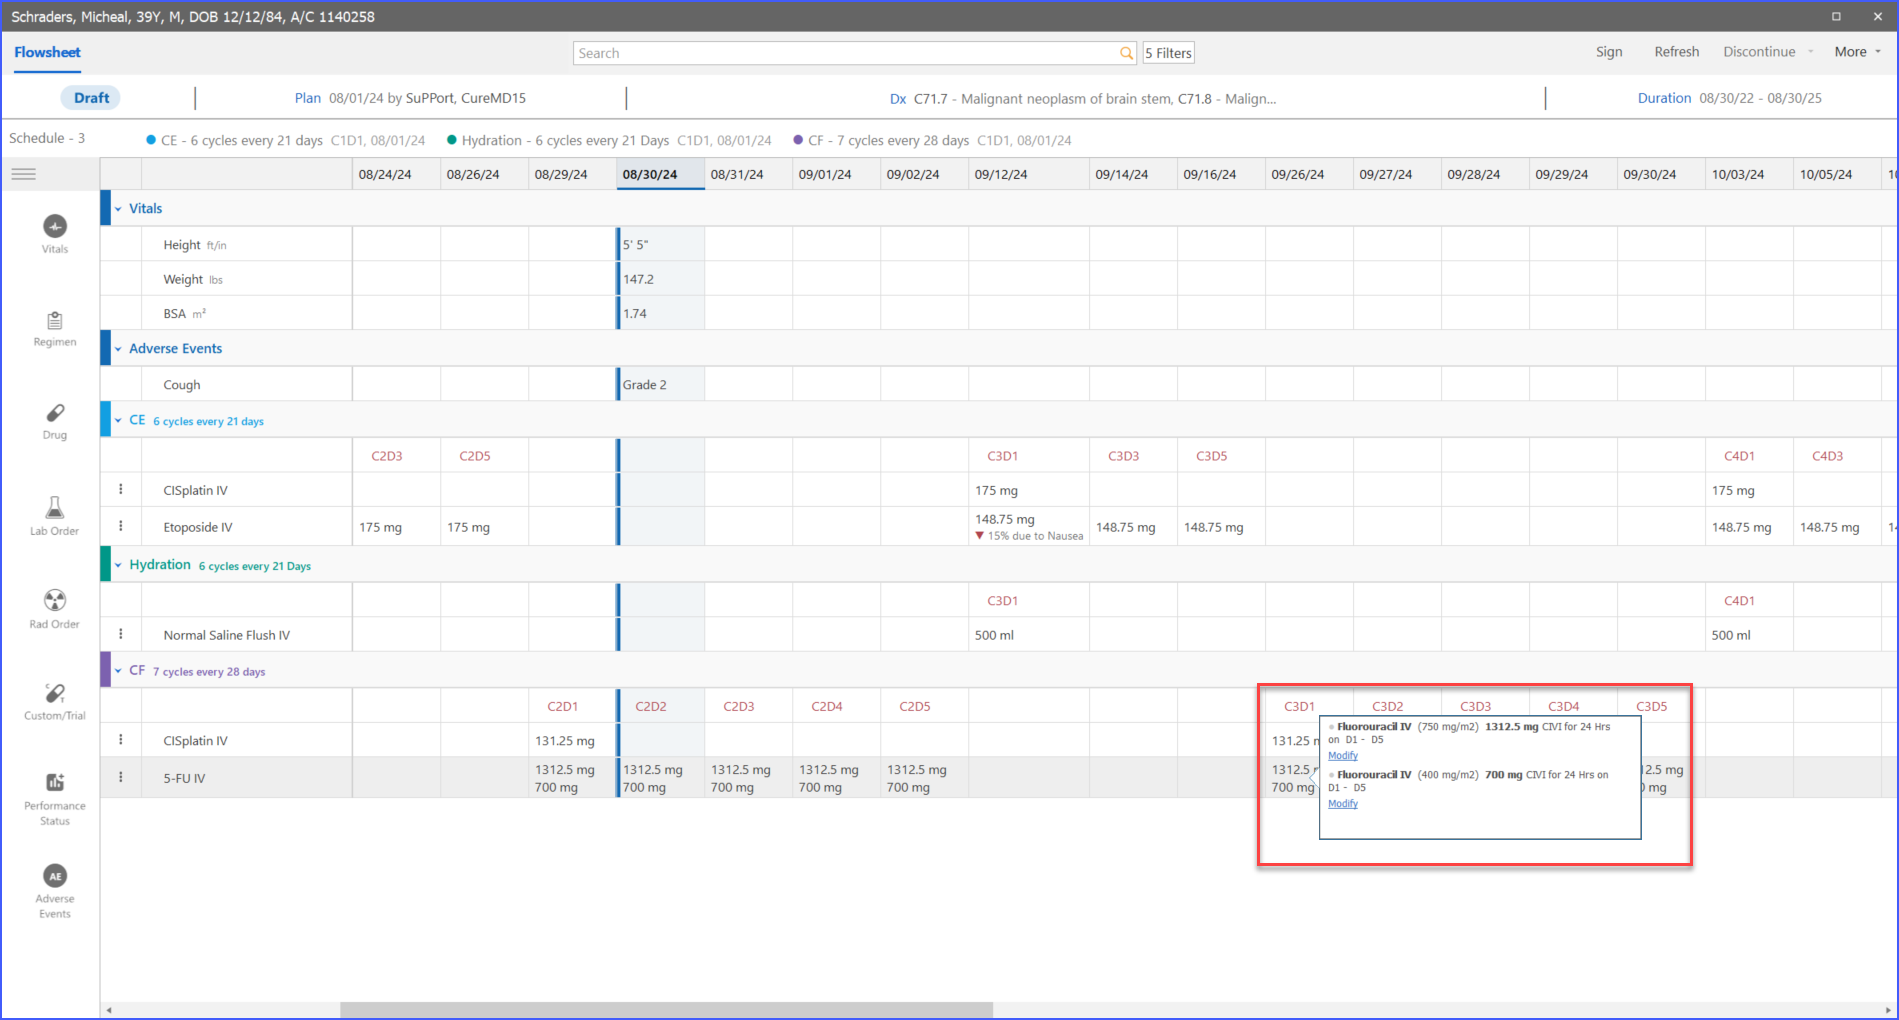
For multi-dose treatments on a single day, the user can select the specific dosage before accessing the modification form, allowing for precise changes.
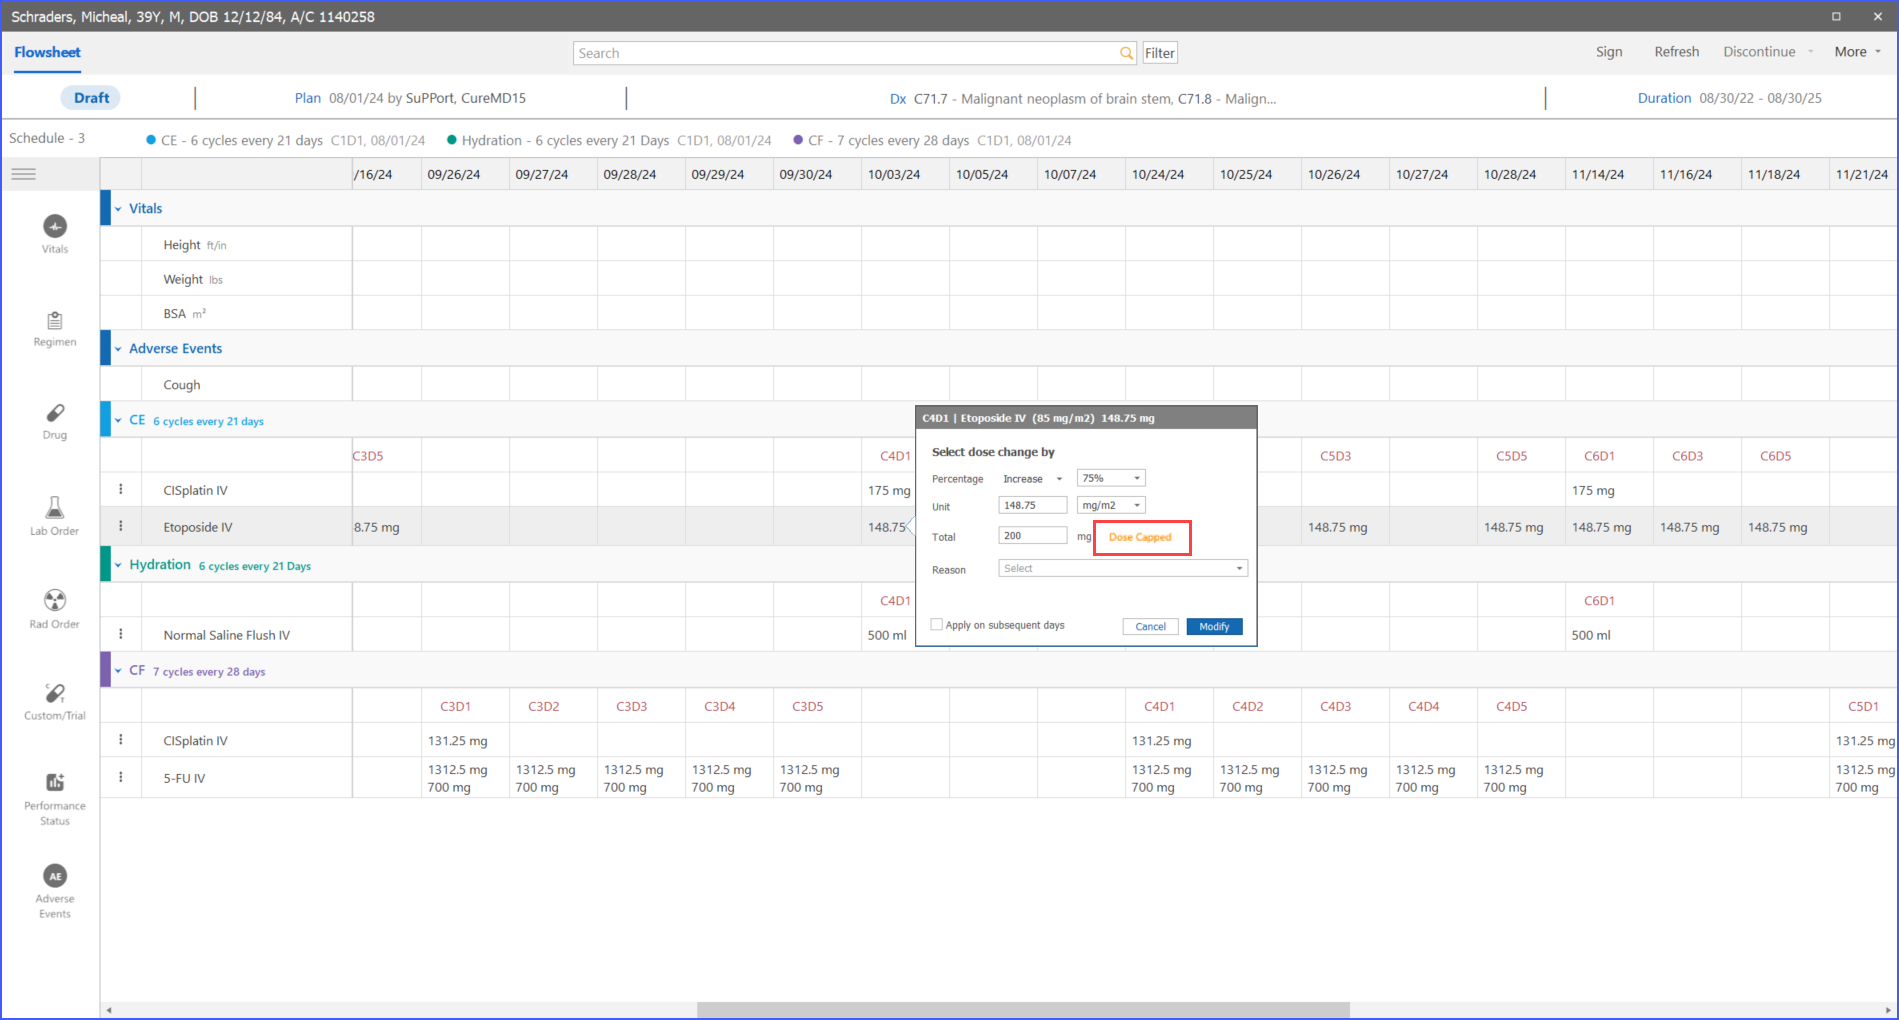
Additionally, if a modified dose exceeds the maximum daily limit, the system automatically caps the dose and displays a “Dose Capped” indicator next to the total dose, ensuring patient safety.
After making dose modifications, the user can review a comprehensive history of these changes by navigating to the patient’s plan and clicking on the order detail icon. This history includes initial and modified doses, reasons for changes, and logs of sequential modifications within a single transaction.