Flowsheet
The flowsheet component, where users are able to create treatment plans for patients, can be accessed via the ‘Patient’ module.
Select a patient from the patient hotlist and click on the ‘Flowsheet’ hyperlink to access the flowsheet component.
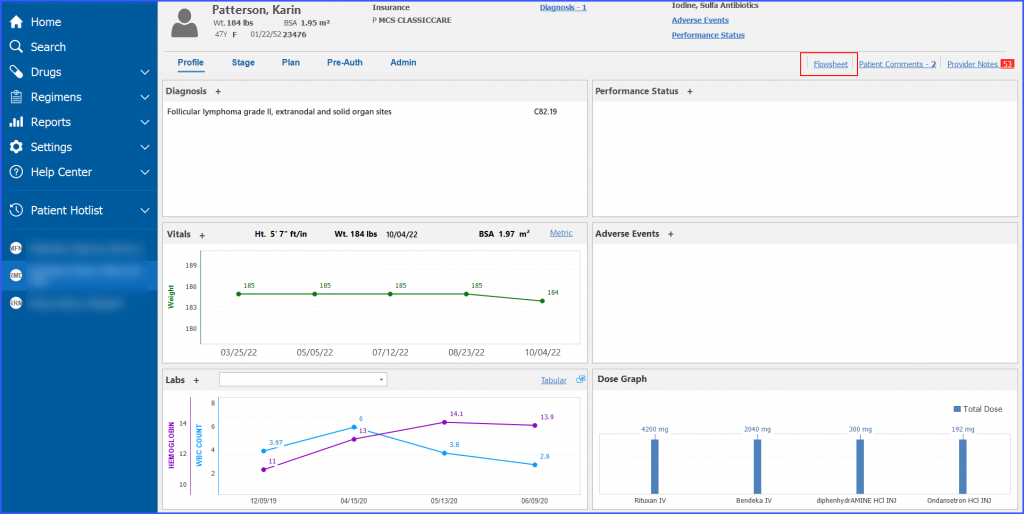
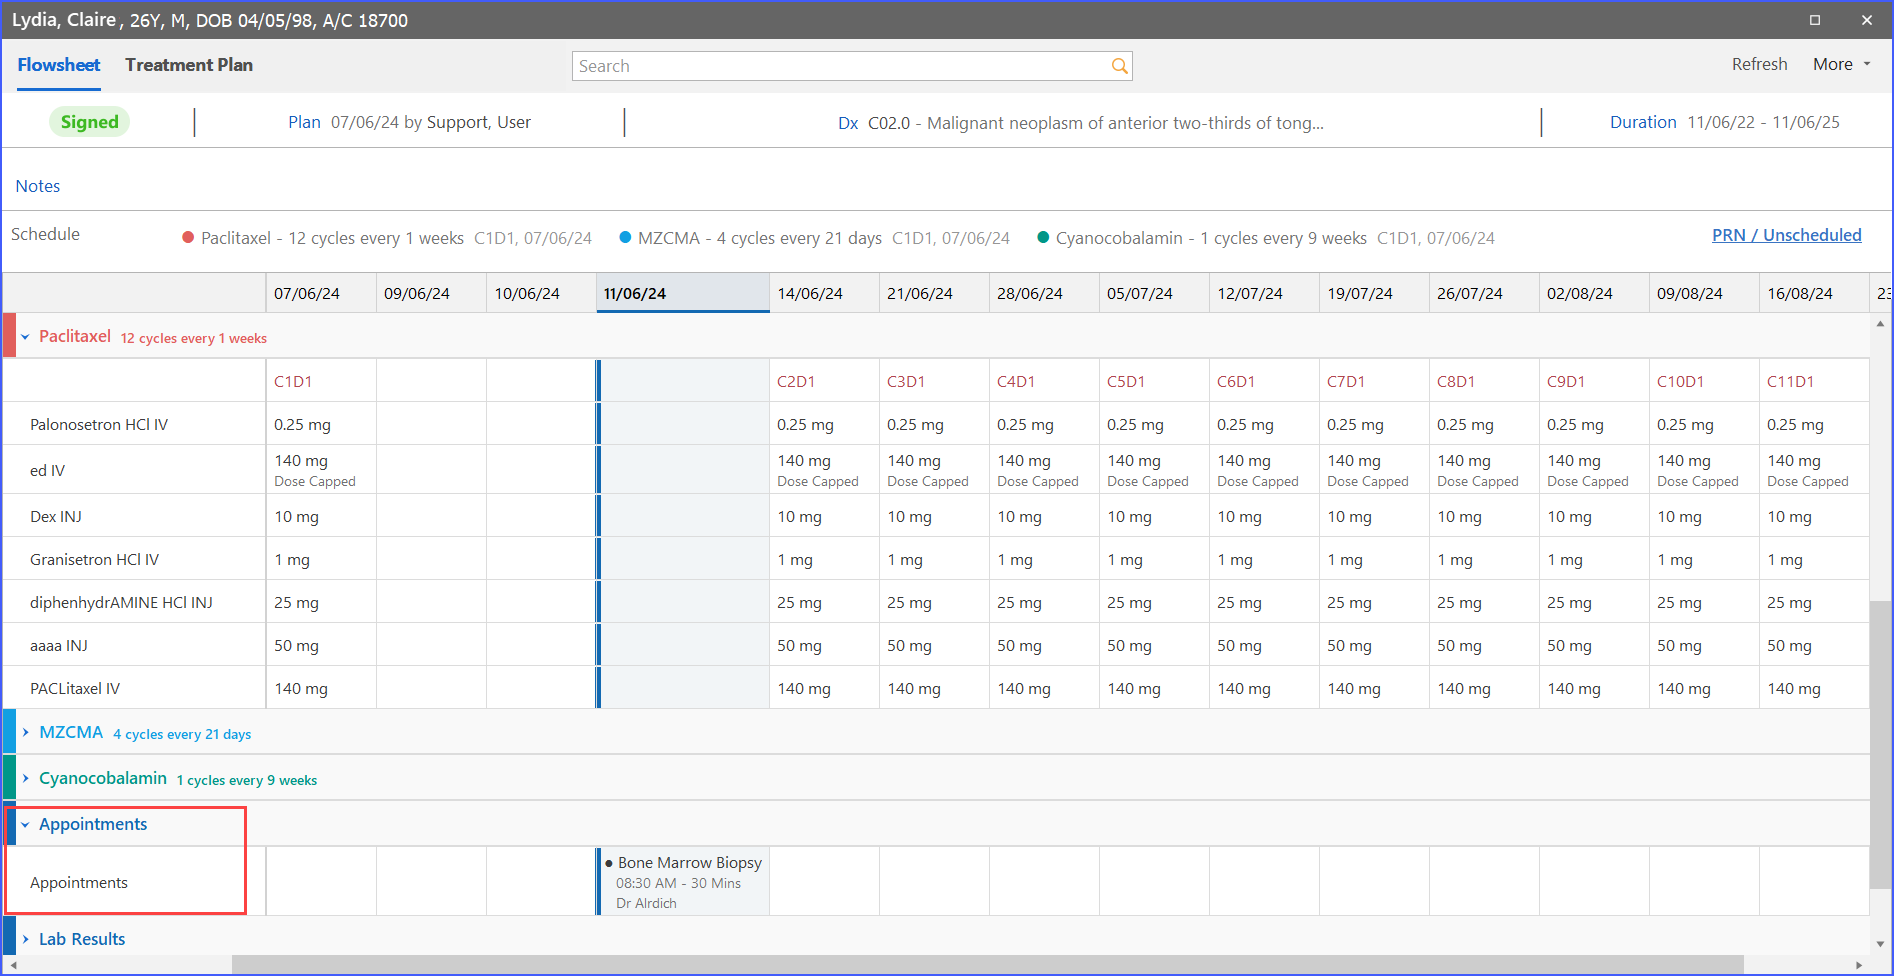
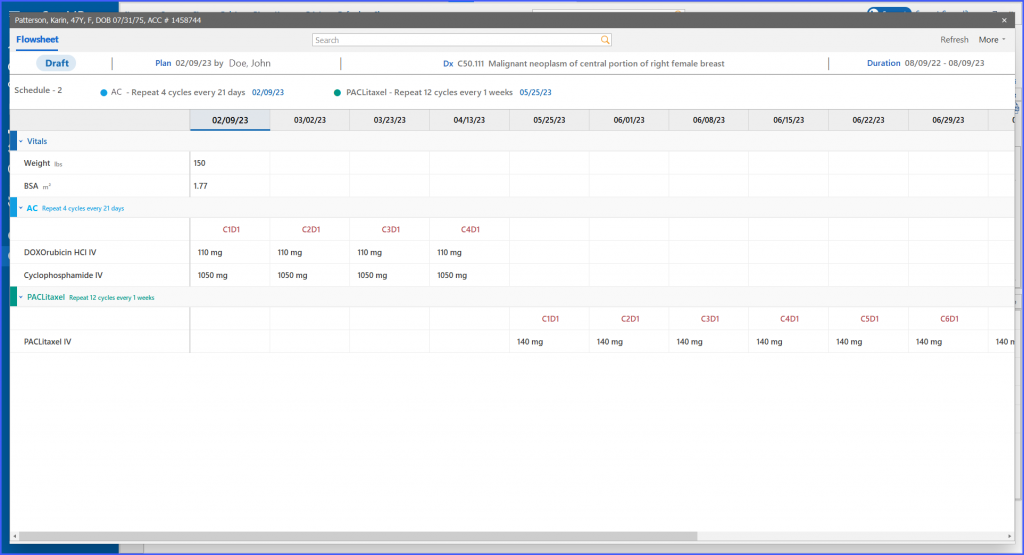
When the user clicks on ‘flowsheet’, the system displays the flowsheet component in a separate window.
Lab and Radiology Orders
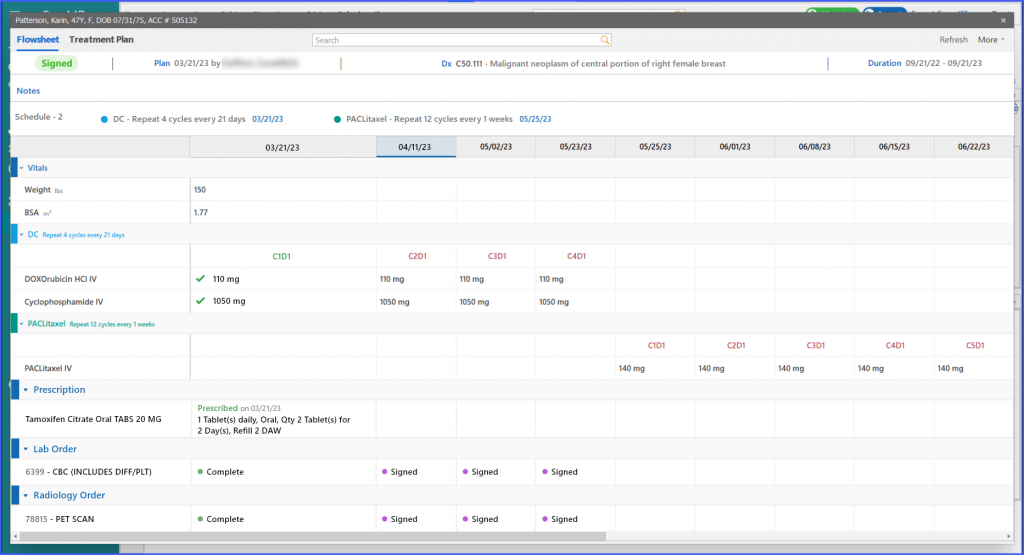
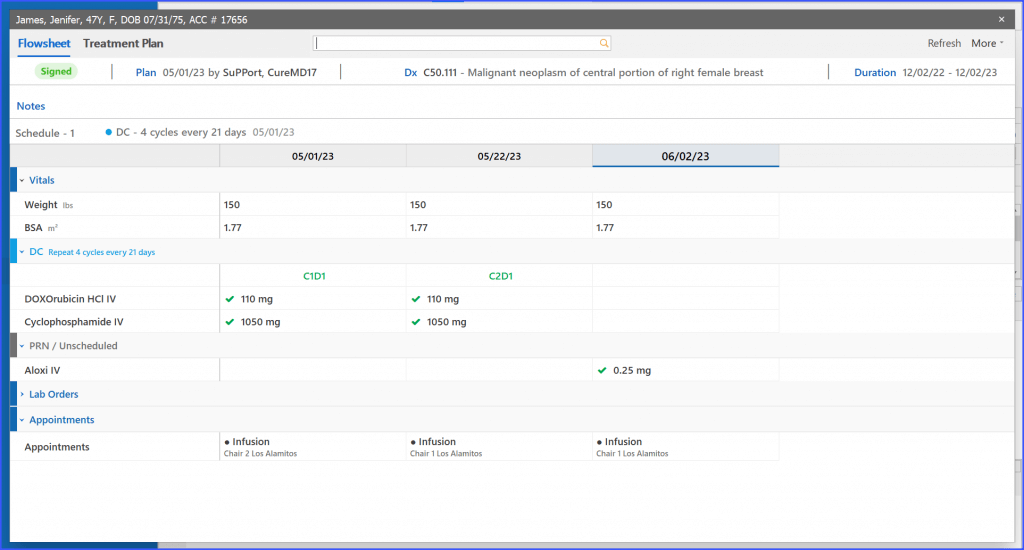
Users can view lab and radiology orders added from the EHR on the flowsheet. These orders are displayed under their respective order bands on the flowsheet screen.
Prescriptions
Similar to lab and radiology orders, the prescriptions added from the EHR ae displayed on the flowsheet under the ‘Prescription’ band, as shown in the image above.
Flowsheet Search
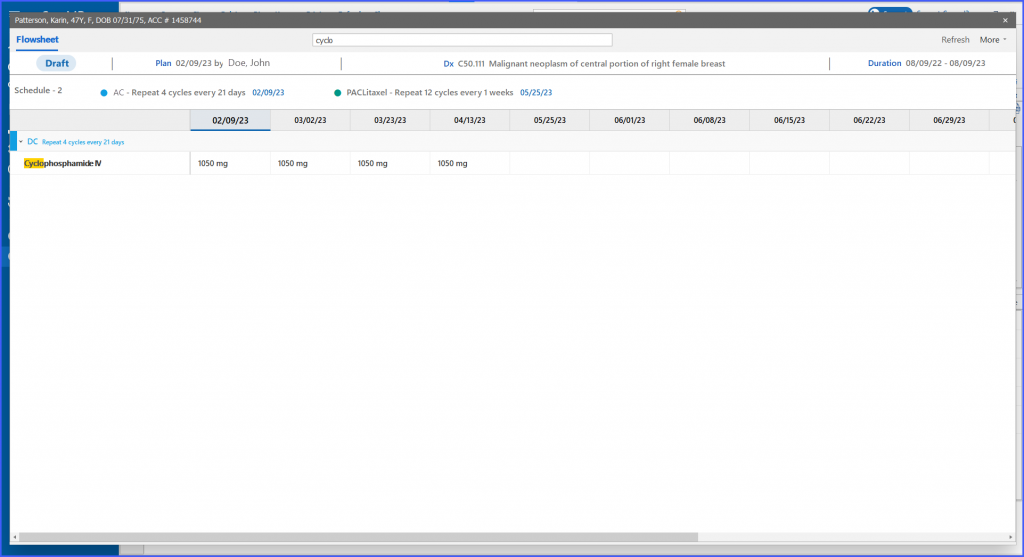
The users can search clinical information in flowsheet using the search bar present in the header of the flowsheet window.
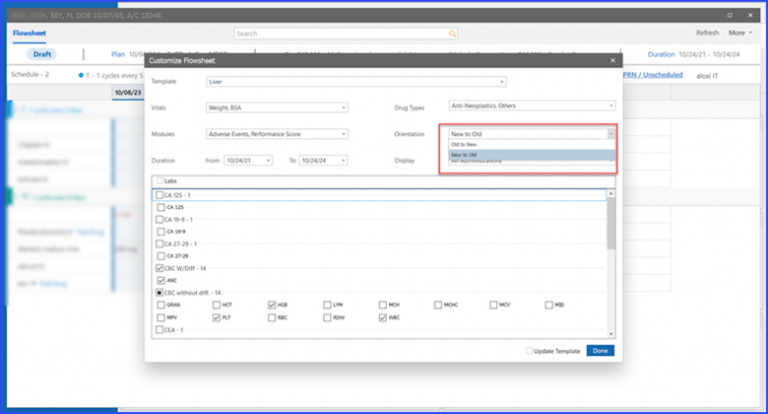
Customize Flowsheet
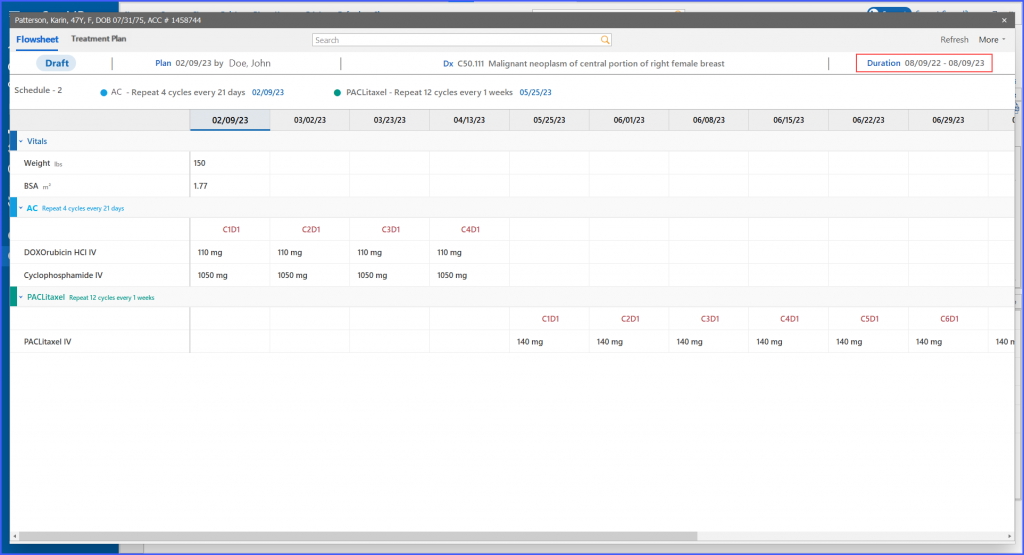
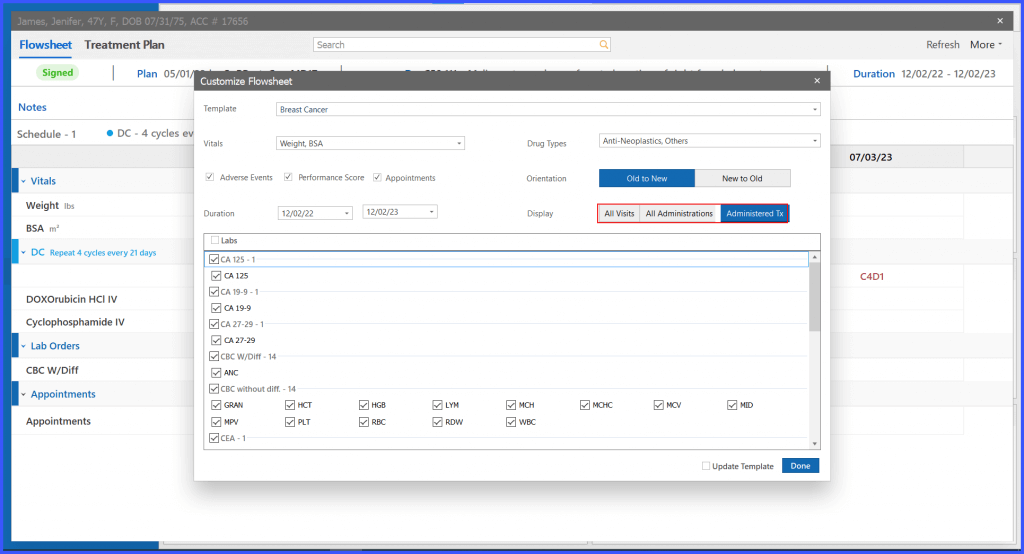
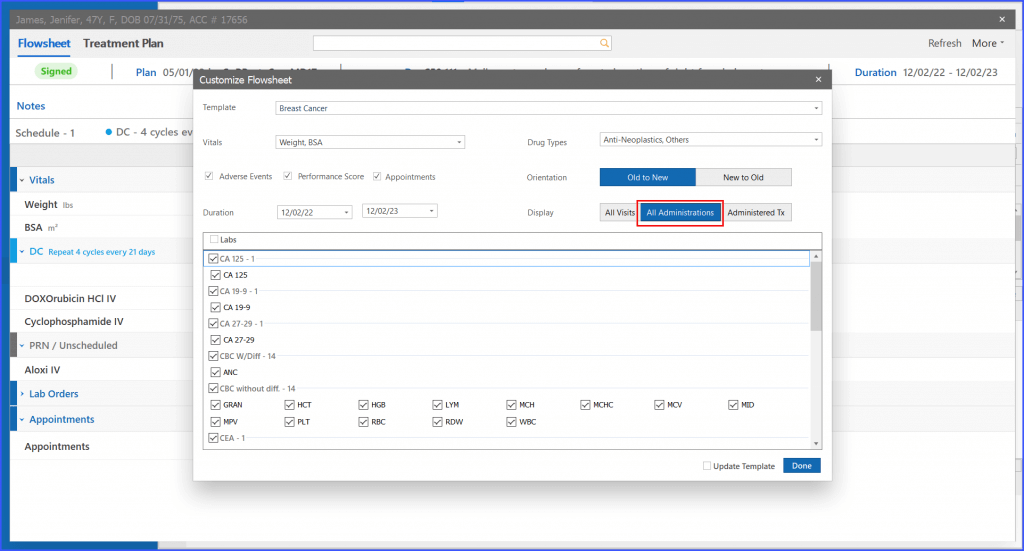
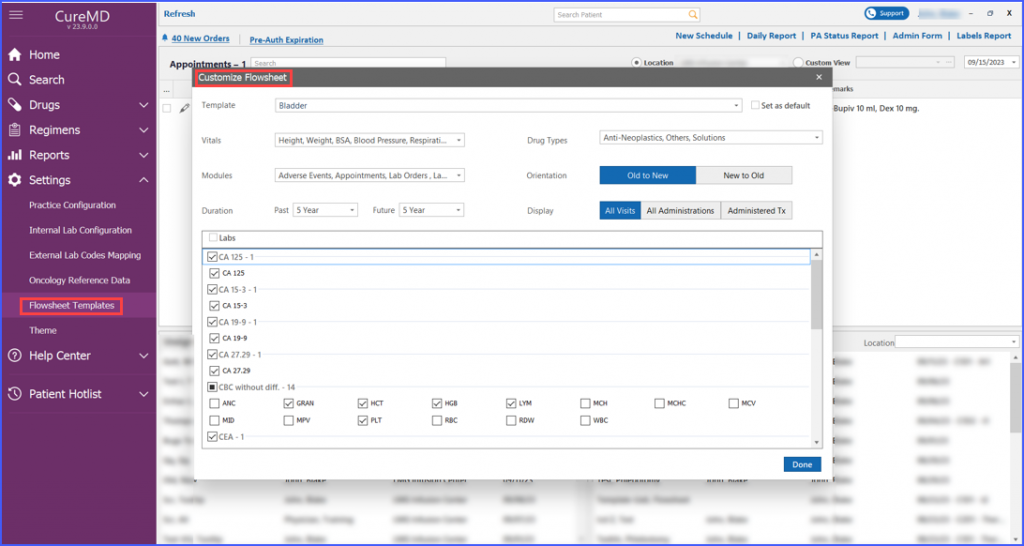
Users can customize the view of the flowsheet as per their requirement. To do that, click on the ‘Duration’ hyperlink.
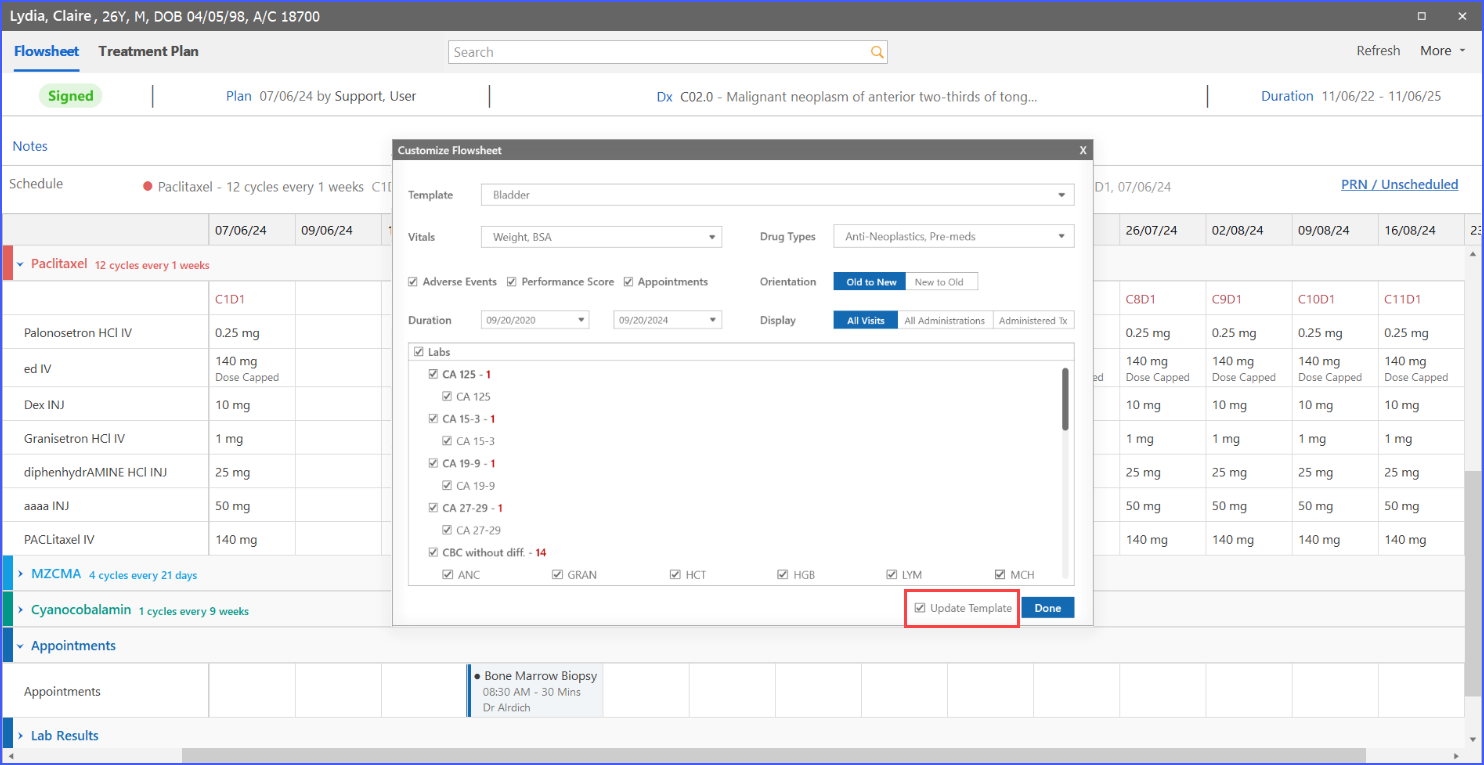
This leads the user to ‘Customize Flowsheet’ window.
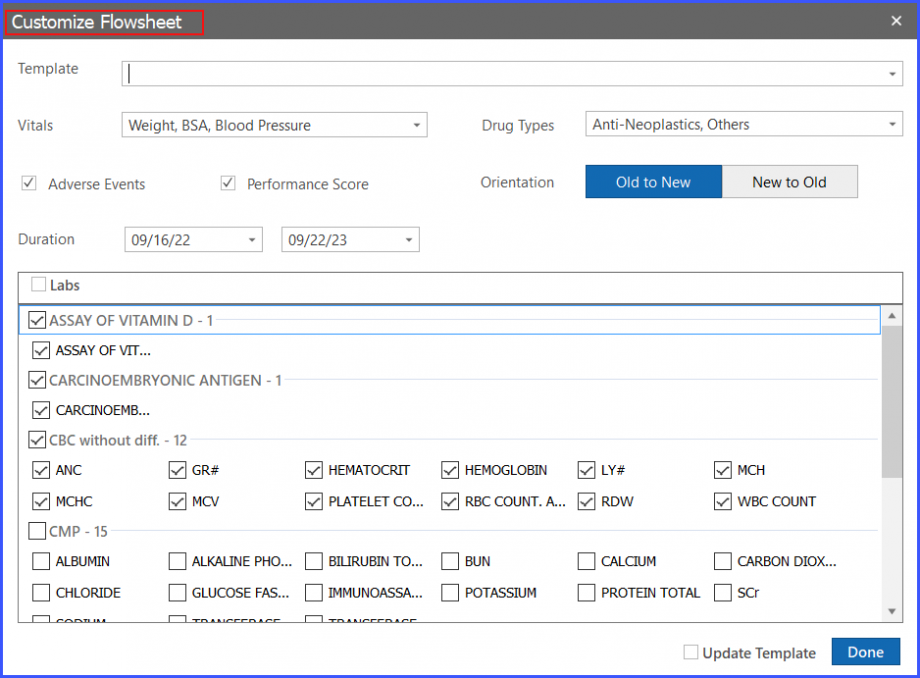
Here, the user can customize the information that they want to showcase on the flowsheet.
This includes:
- Template
- Vitals
- Drug types
- Labs
Users can enable or disable the checkboxes on this window to change the view of flowsheet as per their requirement.
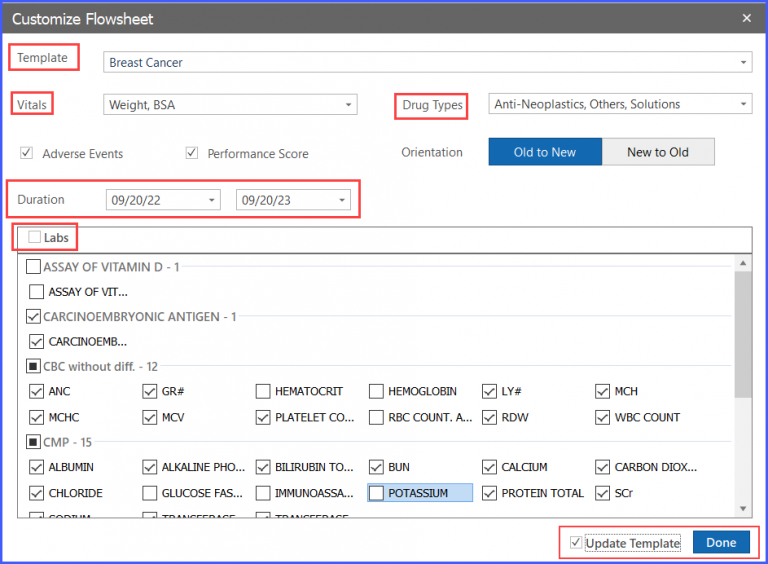
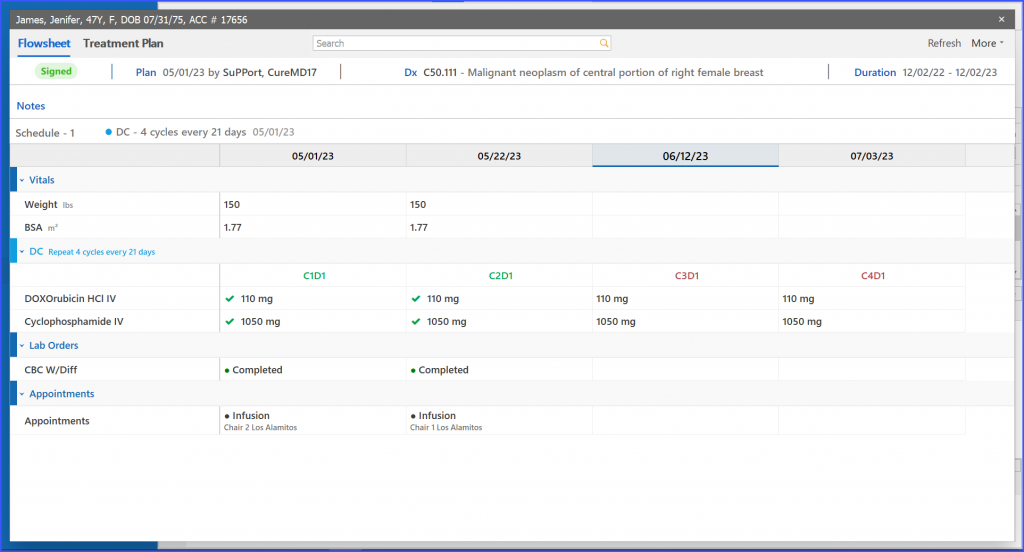
After making the required changes from the ‘Customize Flowsheet’ screen, enable the ‘Update template’ checkbox and click ‘Done’.

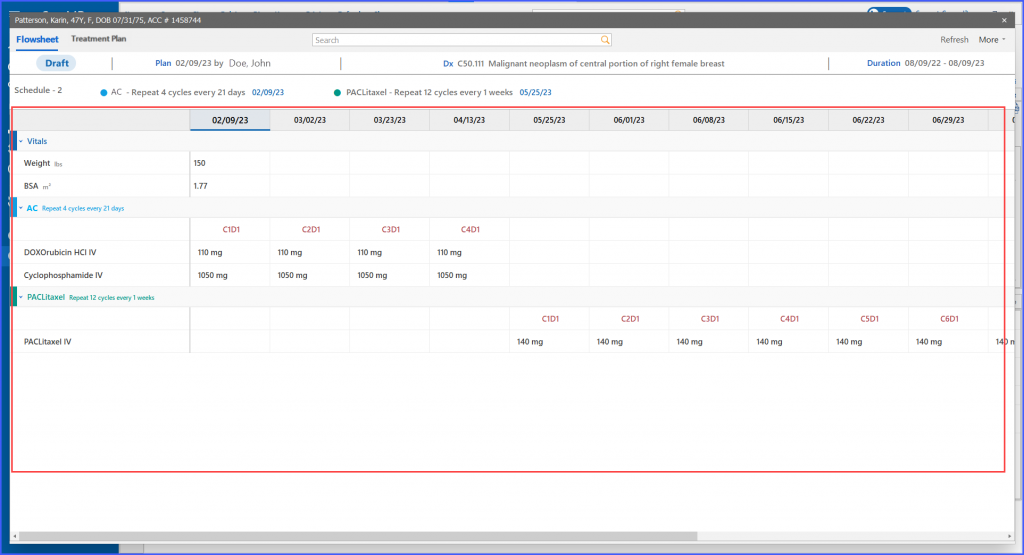
The changes are then displayed on ‘flowsheet’ as shown below.
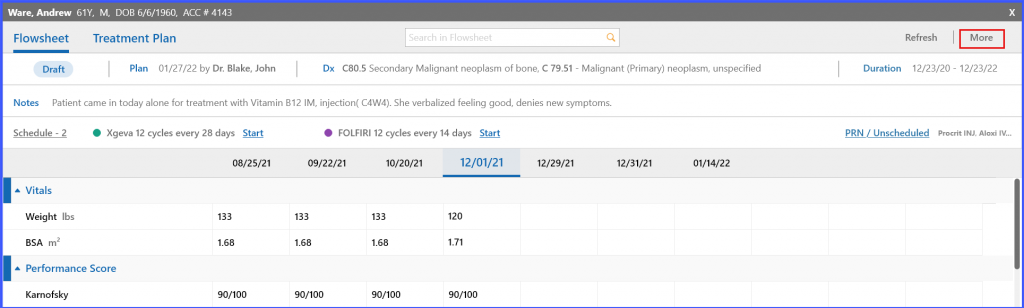
On the ‘Flowsheet’, the ‘More’ dropdown displays three options including:
- Customize
- Notify
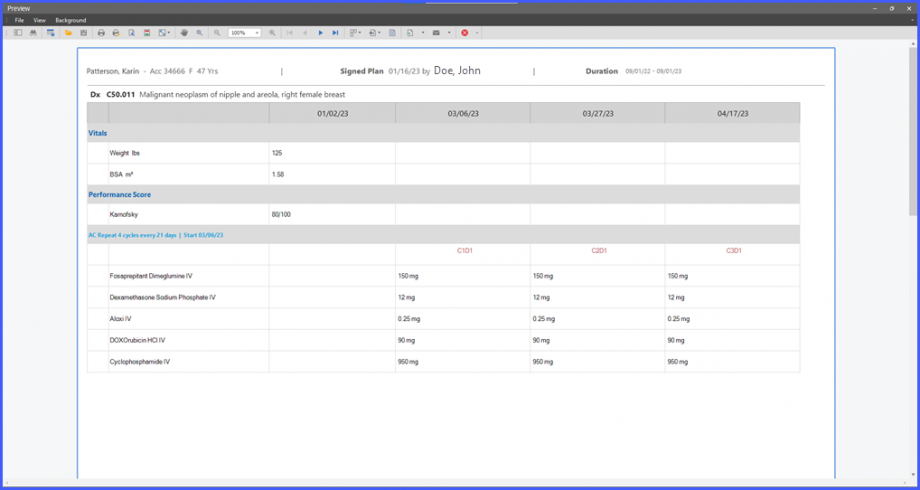
The user can print complete flowsheet or a selected duration on flowsheet by clicking on print. Clicking on ‘Print’ displays the preview of the flowsheet.
The customize button leads the user to ‘customize flowsheet’ window that can also be accessed by clicking on ‘Duration’ as mentioned earlier.
Meanwhile, the ‘Notify’ option leads to the ‘Notify’ popup.
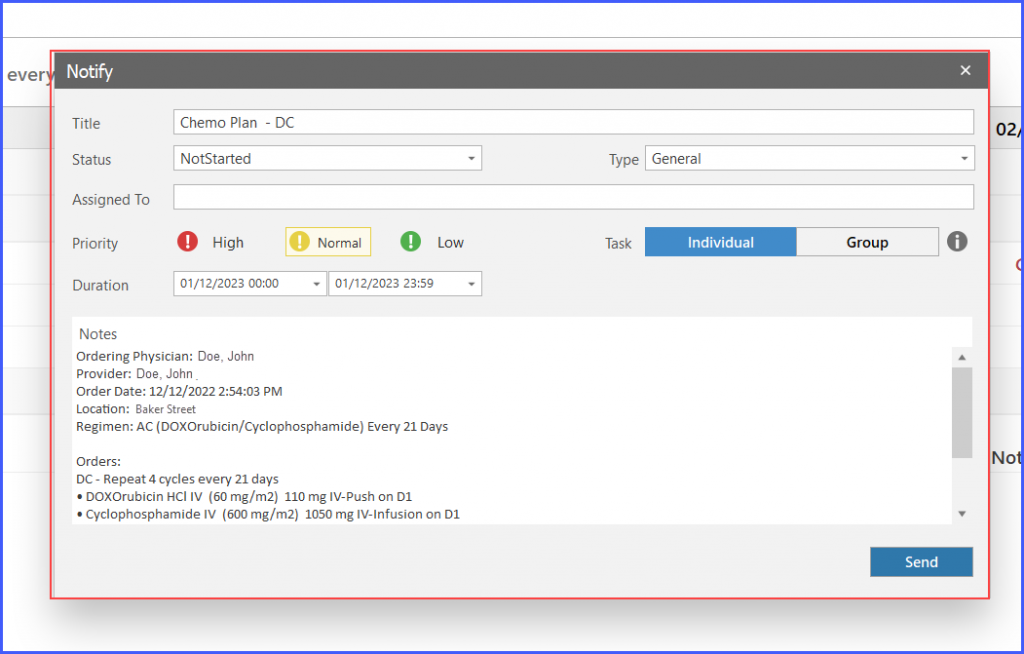
From this popup, users can assign tasks to different personas depending on the nature of task.
The notify window also allows the user to specify the type of the task. Click on the ‘Type’ dropdown to select one of the following:
- General
- Benefit Verification
- Chemo Pre-Auth
A task can be specified as a ‘Group’ Task or an ‘Individual’ Task by clicking on the ‘Group’ button. The ‘Group’ button allows the assigning of tasks to multiple users. Moreover, a task can also be labeled as ‘High’, ‘Medium’ or ‘Low’ priority.
After assigning the task, click on ‘Send’ button for the confirmation.
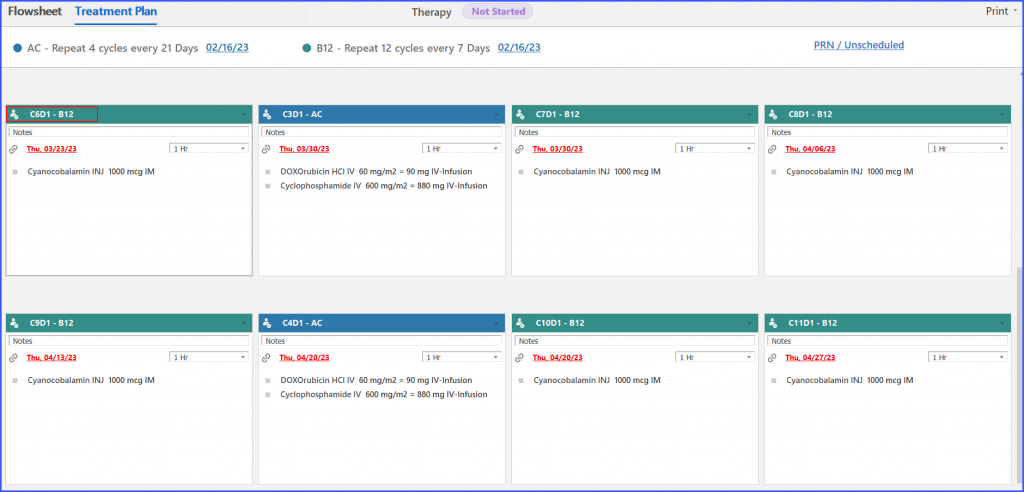
Treatment Plan
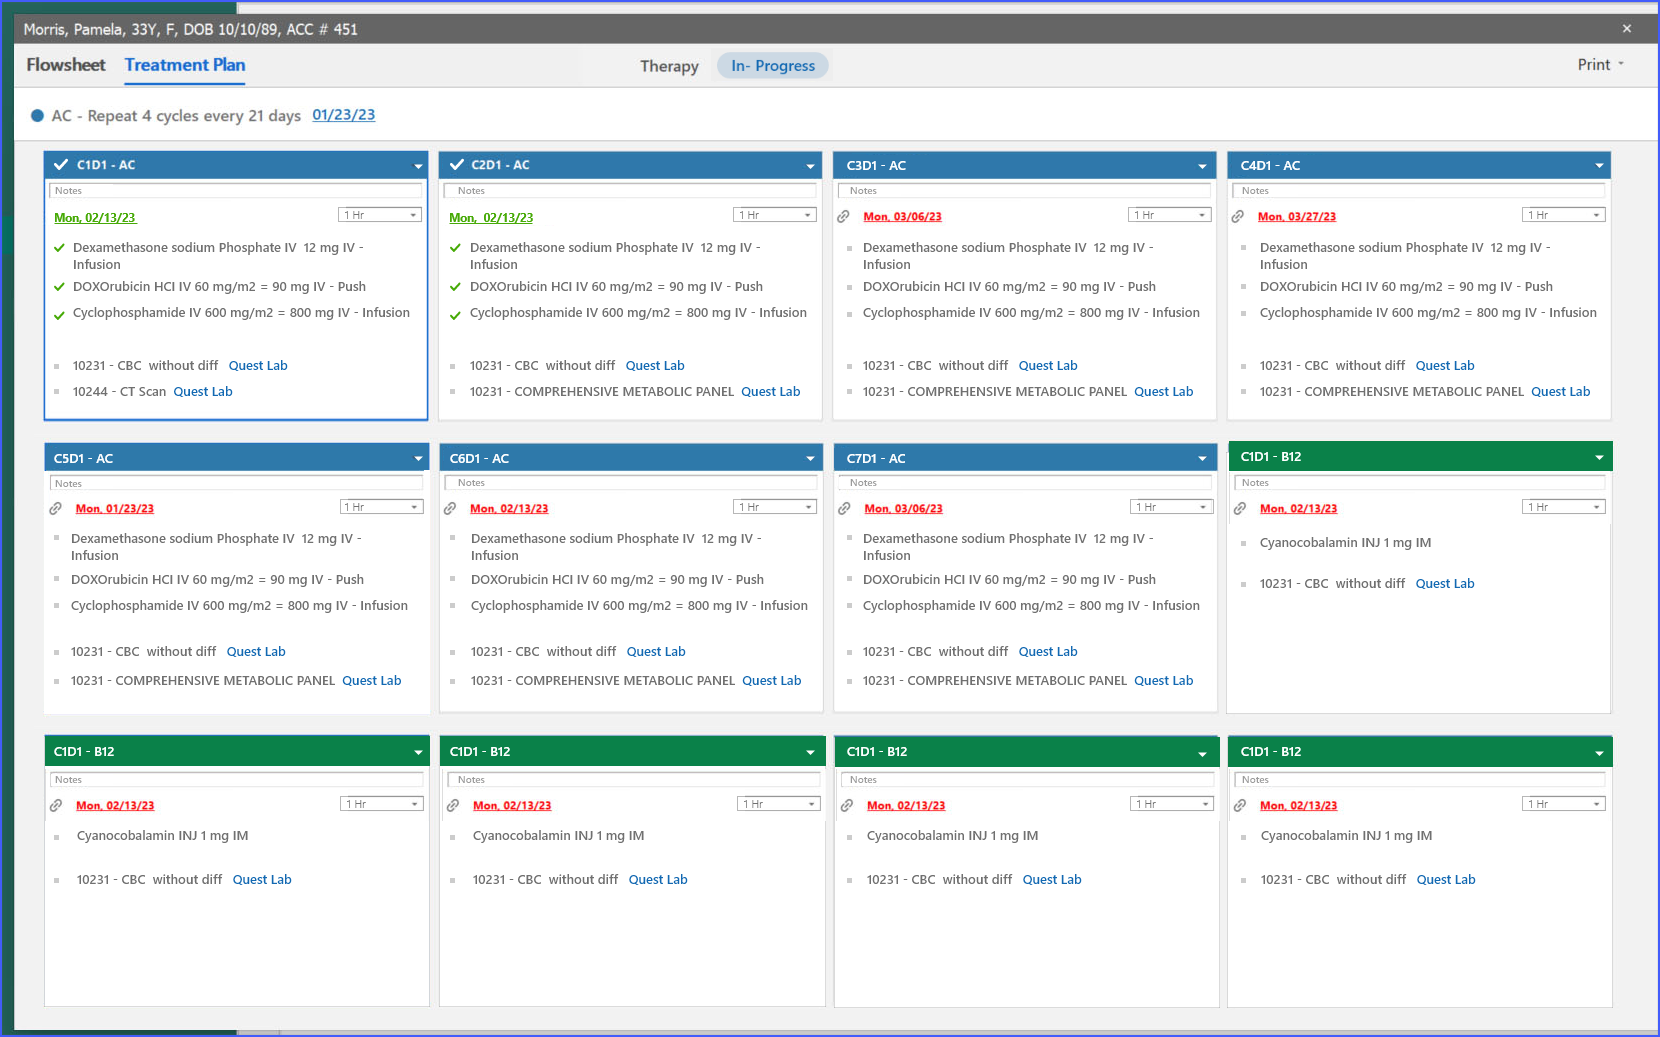
The treatment plan of the patient requires ‘physician approval’ and is displayed as an icon next to the cycle day. It can simply be accessed by clicking on the ‘messenger’ icon.
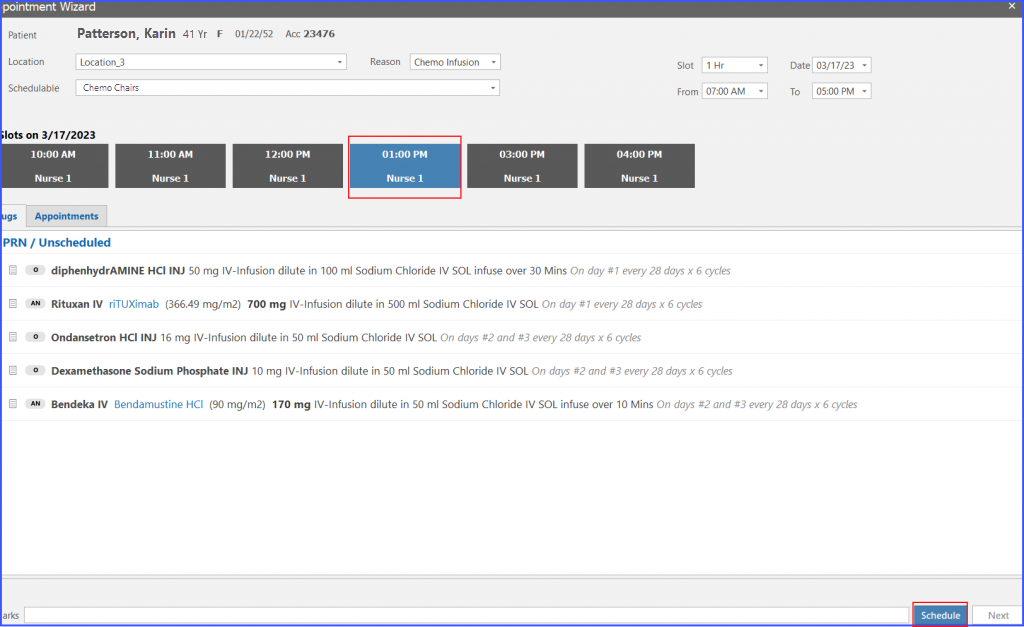
Appointments
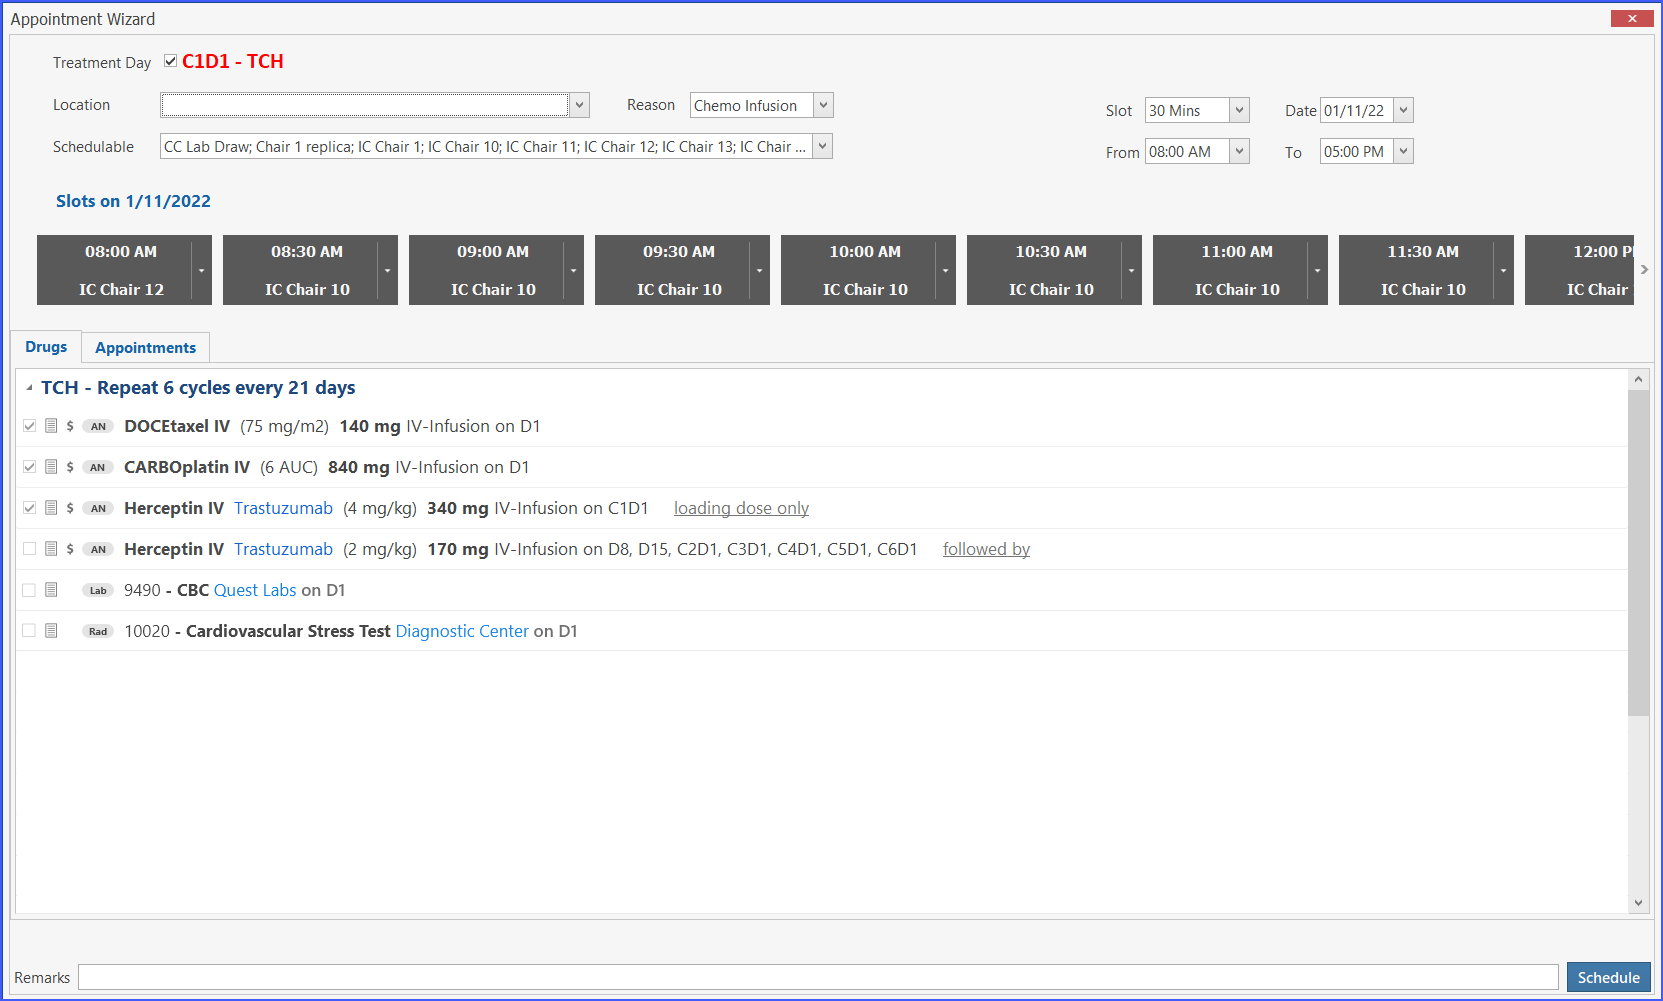
Appointments can be accessed by clicking on the ‘Appointments’ tab present next to ‘Drugs’ button. Moreover, users can select a slot for the appointment and then click on ‘Schedule’ to save the appointment.
Clicking on ‘schedule’ saves the appointment and a prompt appears for the confirmation.
PRN/Unscheduled
“PRN unscheduled” refers to the administration of medication as needed or on an unscheduled basis. PRN medication may be given to manage side effects, such as nausea or pain, or to address other symptoms that arise during treatment.
The PRN/Unscheduled’ section can be accessed via clicking on the ‘Treatment Plan’ beside the Flowsheet button.

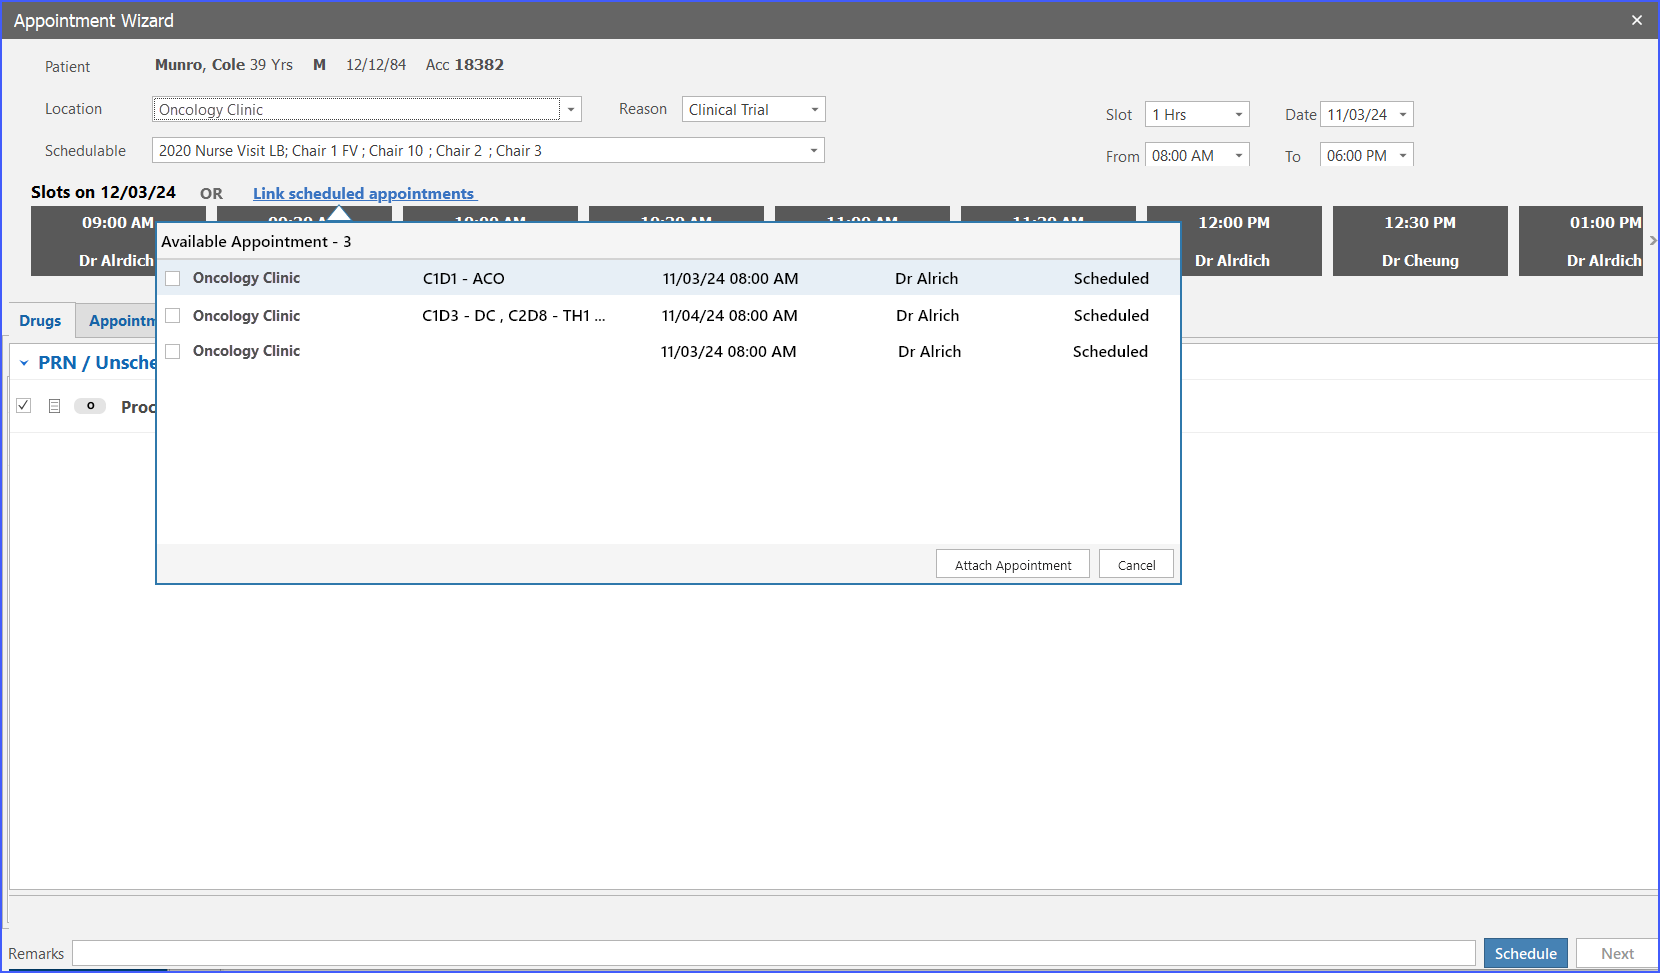
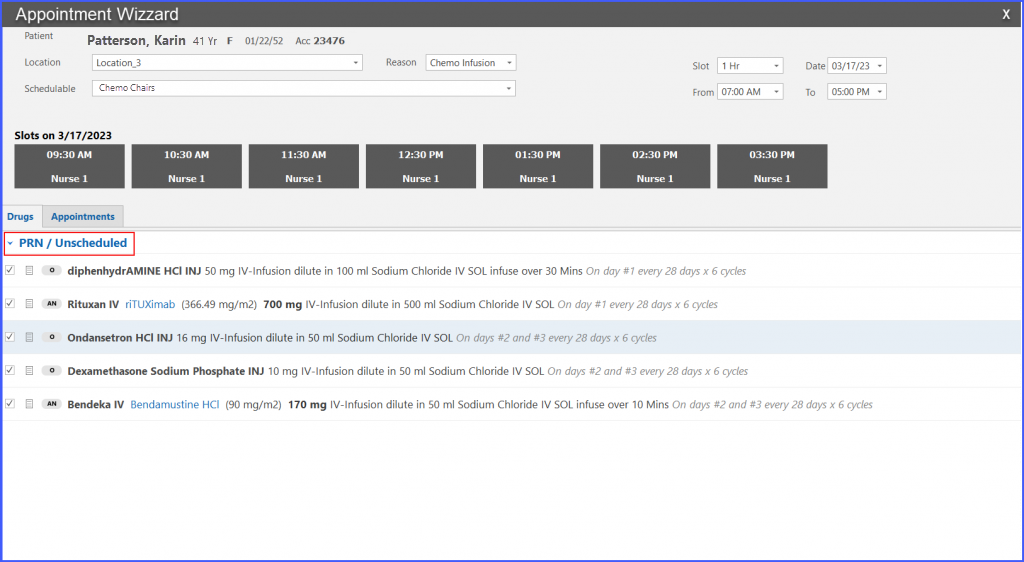
Meanwhile, users can click on ‘PRN/Unscheduled’ button on the top right corner to view the PRN medication under ‘Drugs’ section on the ‘Appointment Wizard’ popup.
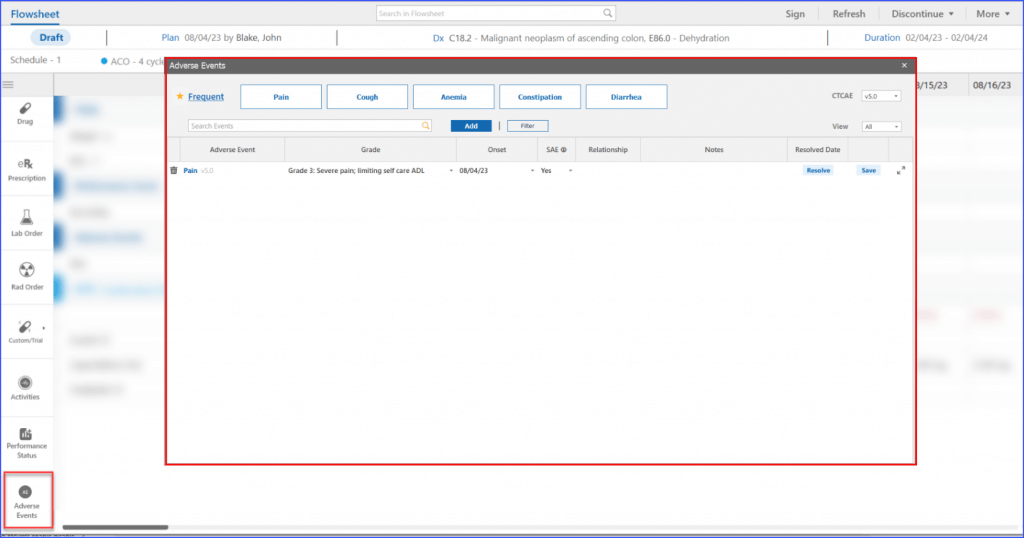
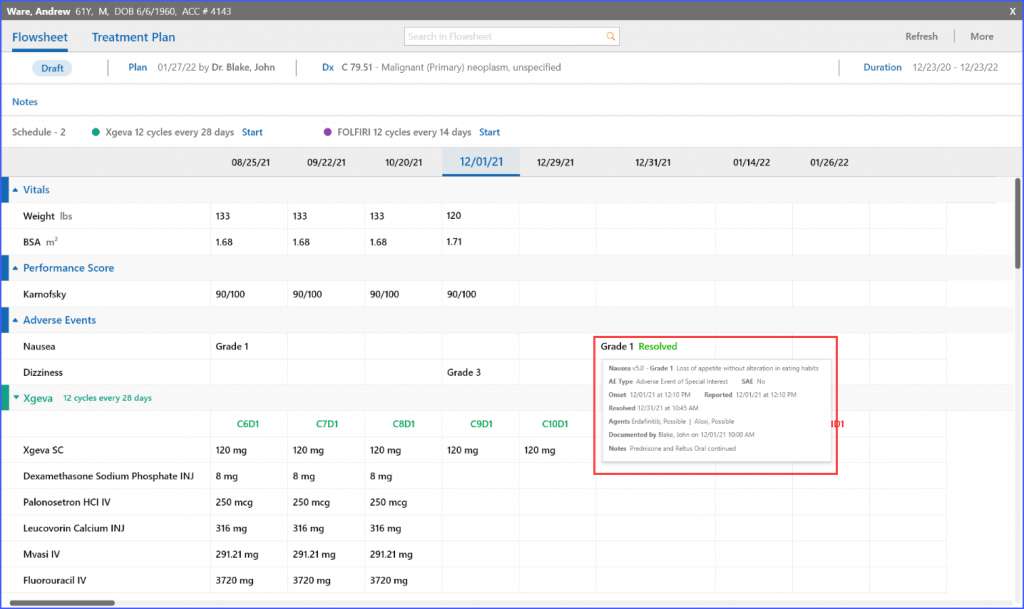
User can view complete details related to an adverse event on the flowsheet. To access it, navigate to flowsheet and click on the ‘More’ dropdown. After that, click on ‘Customize’.
Here, the user checks the ‘Adverse Events’ if it has not already been checked.
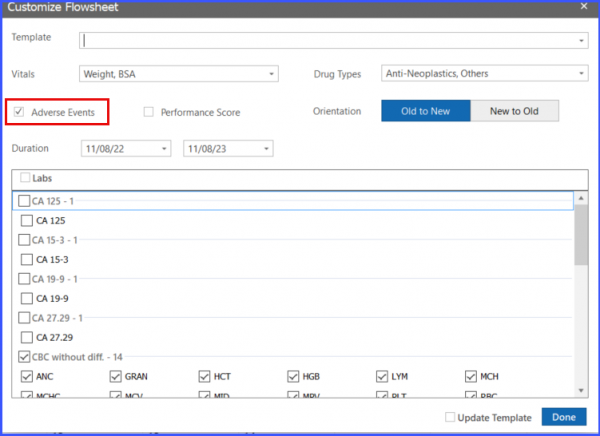
Once the user enables the ‘Adverse Events’ checkbox, the adverse event section appears on the flowsheet.
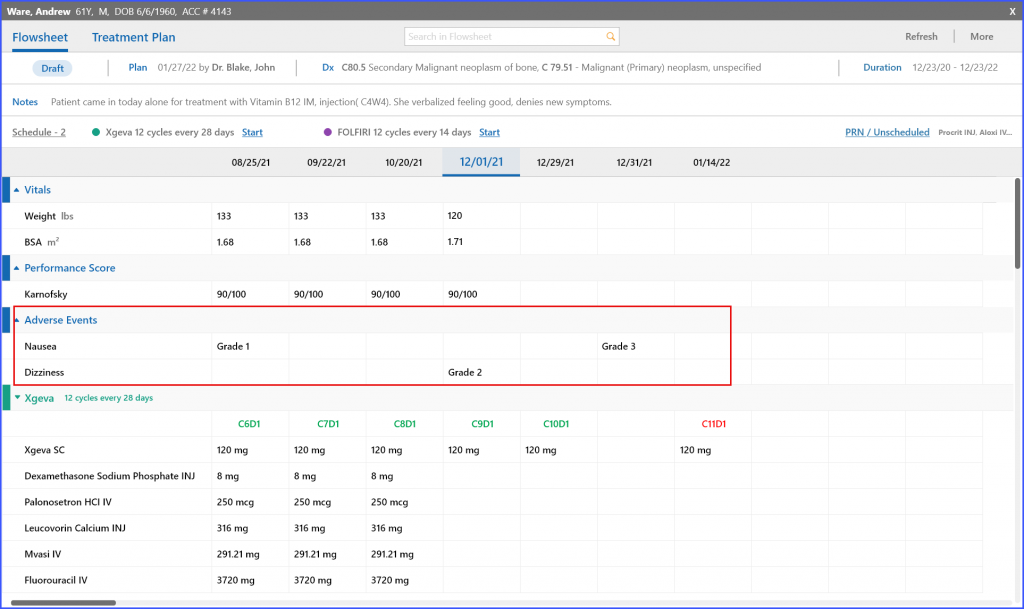
In this section, when the user hovers over an adverse event, a tooltip is displayed containing the complete information about that event.
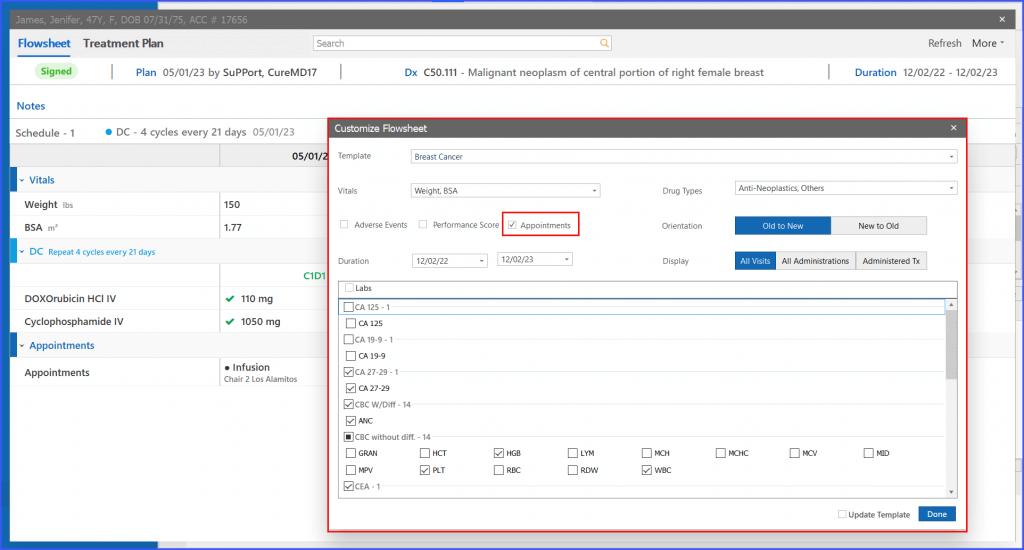
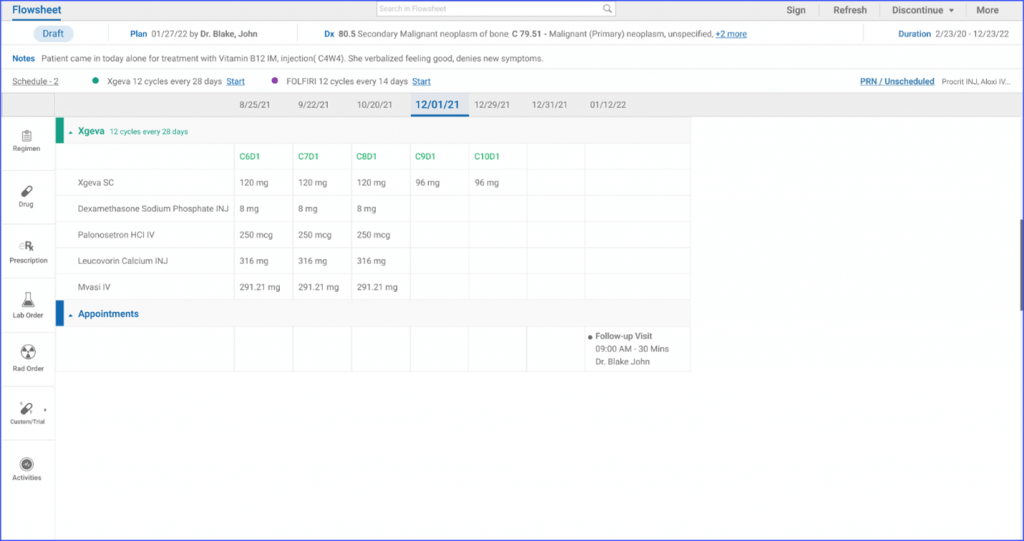
The users are able to view the scheduled appointments for a day, in the Appointment Band of the flowsheet.
- Enable Viewing of Daily Appointments:
By selecting the “Appointment” checkbox in the Customize Workflow section, all appointments scheduled for the day become visible under the Appointment Band on the Flowsheet.
2. Disable Viewing of Daily Appointments:
The user can simply uncheck the “Appointment” bit in the Customize Workflow section to hide daily appointments from the Flowsheet.
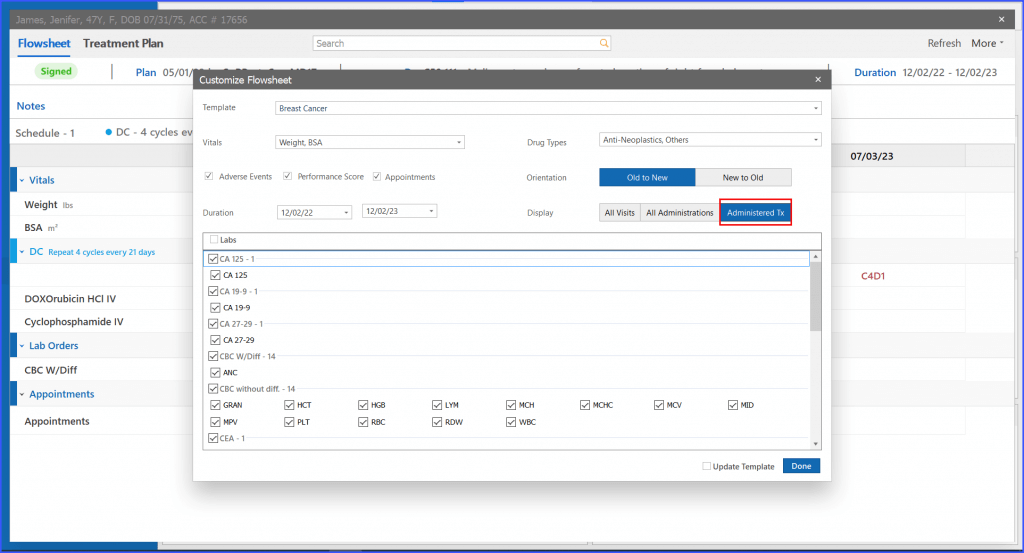
Three display options for flowsheet have been added in the Customize Flowsheet window. Users can choose how to display information on the flowsheet as per their requirement.
Within the Customize Flowsheet, users are able to select from three distinct display options – “All Visits,” “Administered Tx,” and “All Administrations” – each designed to offer a tailored view of the patient’s chemotherapy journey.
- “All Visits” Display Option:
In “All Visits” display option, user can view all (Past, Current and Future) visits on treatment days and custom date. System displays all relevant clinical components which are planned on that day.
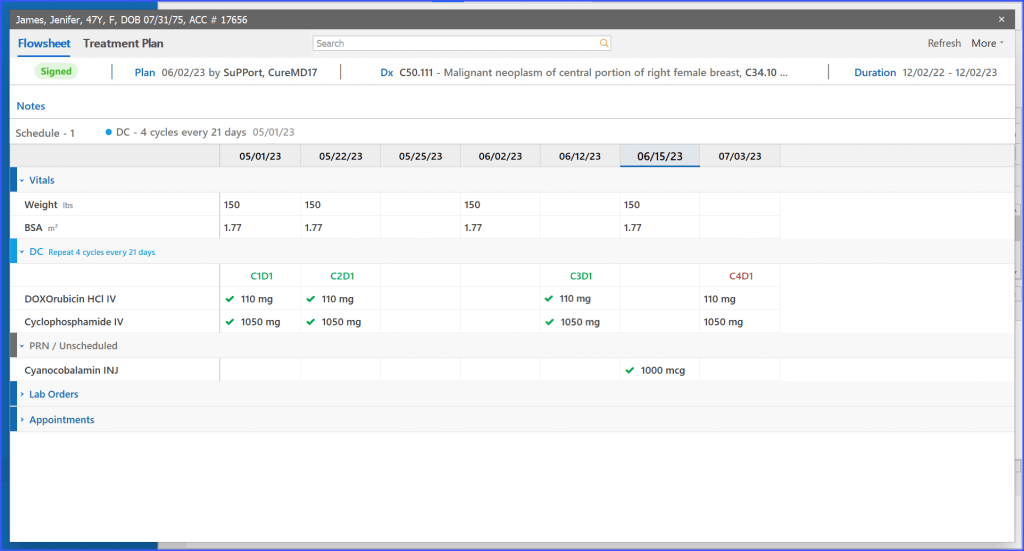
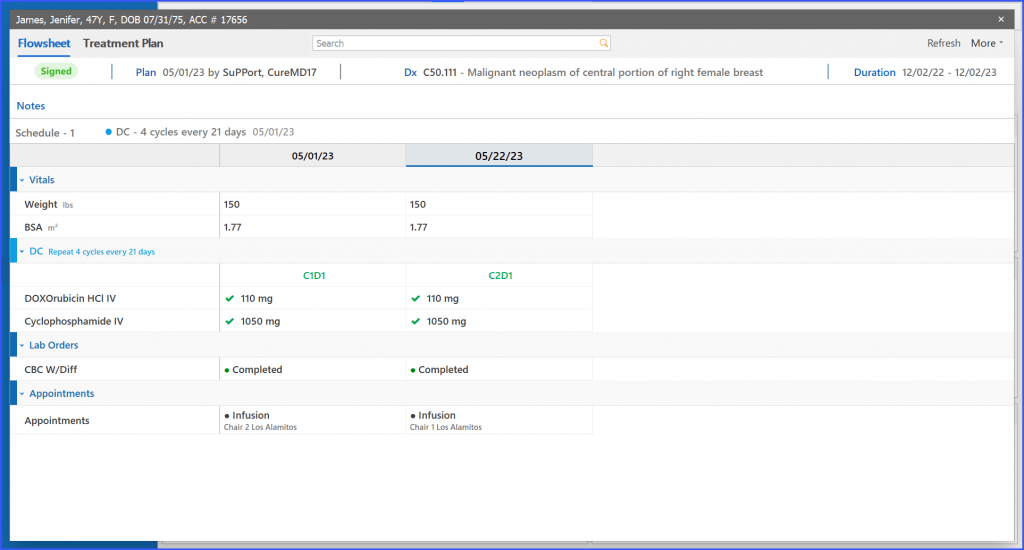
- “Administered Tx” Display Option:
In “Administered Tx” display option, user can view all past/present signed administrations those are performed on Cycle day/ Custom date. System displays all relevant clinical components which are planned on that day.
- “All Administrations” Display Option:
In “All Administration” display option, user can view all (Past, Current and Future) visits on treatment days. System displays all relevant clinical components which are planned on that day.
Users are able to add vitals, performance status and adverse events directly from flowsheet.
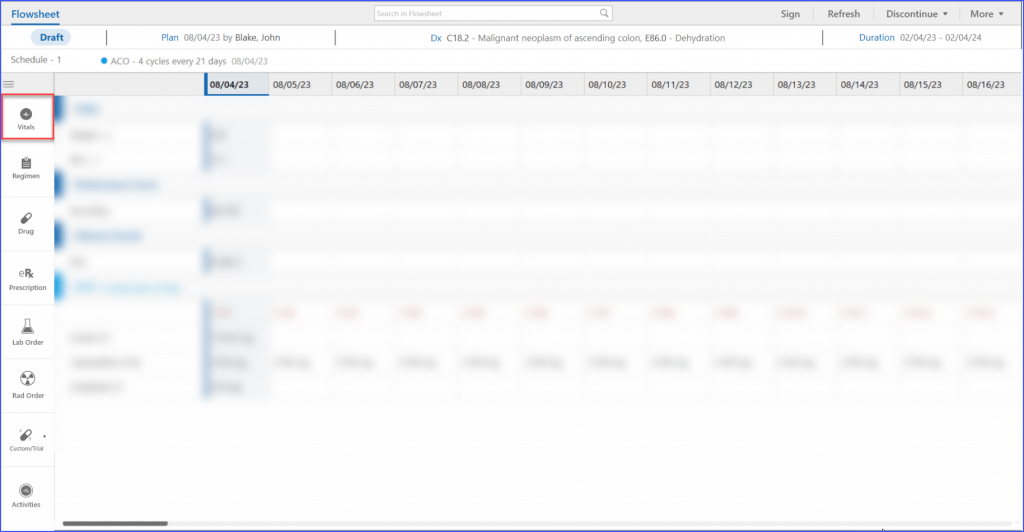
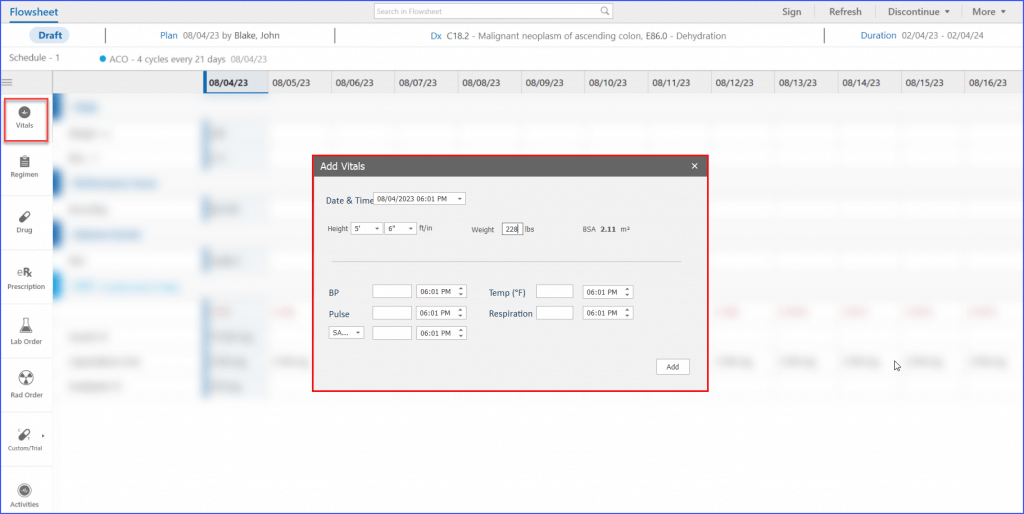
Vitals
When the user opens the Chemotherapy manager and navigates to Flowsheet in the patient tab, following screen is displayed. The user can access the Vitals’ Icon at the top of the navigation bar.
When the user clicks on the Vitals’ icon, the Vitals popup appears where the user is able to add values.
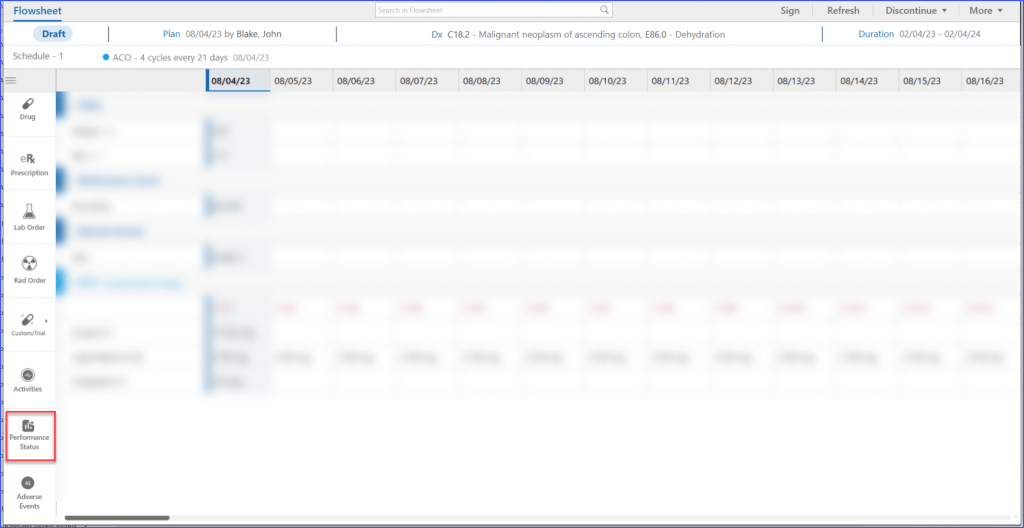
Performance Status
When the user opens the Chemotherapy manager and navigates to Flowsheet in the Patient Tab, following screen is displayed. Here, the user can access the Performance Status Icon at the end of the navigation bar. This ensures the user can access the critical patient data in real time.
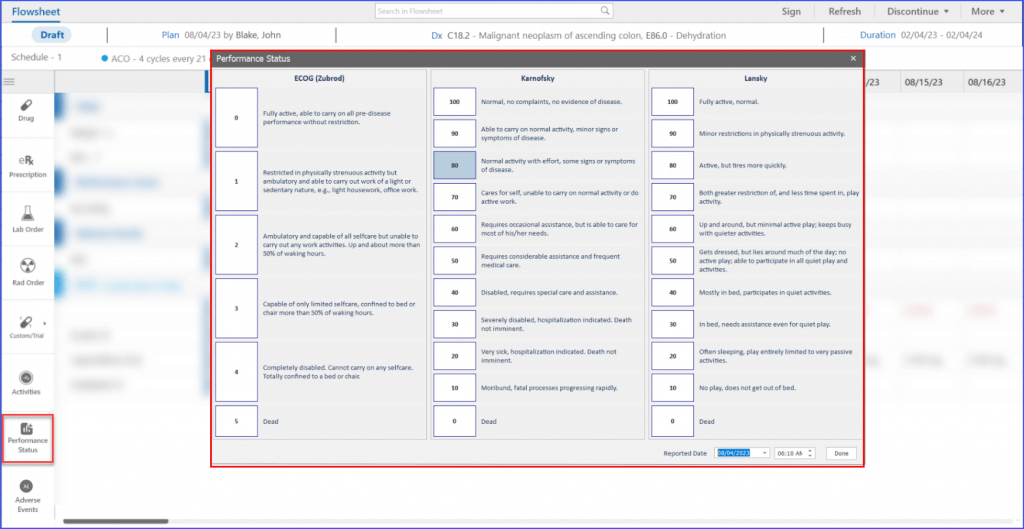
When the user clicks the Performance status icon, the Performance status popup is displayed so that the user is able to add values.
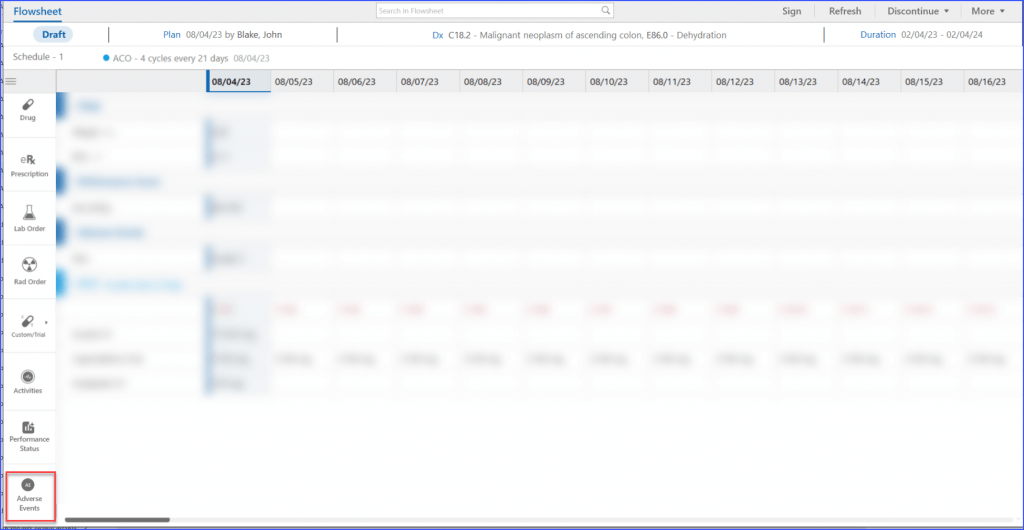
Adverse Events
With this enhancement in the Chemotherapy manager when the user navigates to Patient tab in Flowsheet, the following screen is displayed. Here, the user is able to access the Adverse Events Icon at the end of the navigation bar. This ensures the user can access the crucial data regarding patient’s health smoothly.
When the user clicks on the Adverse Events icon, the Adverse Events popup is displayed for the user so that they can add the relevant data.
Users are able to select a ‘Default’ flowsheet template, which is then automatically selected whenever a plan is generated for a patient.
When the user navigates to the workflow mentioned above, the following screen appears, where a window called ‘Customize Flowsheet’ is displayed.
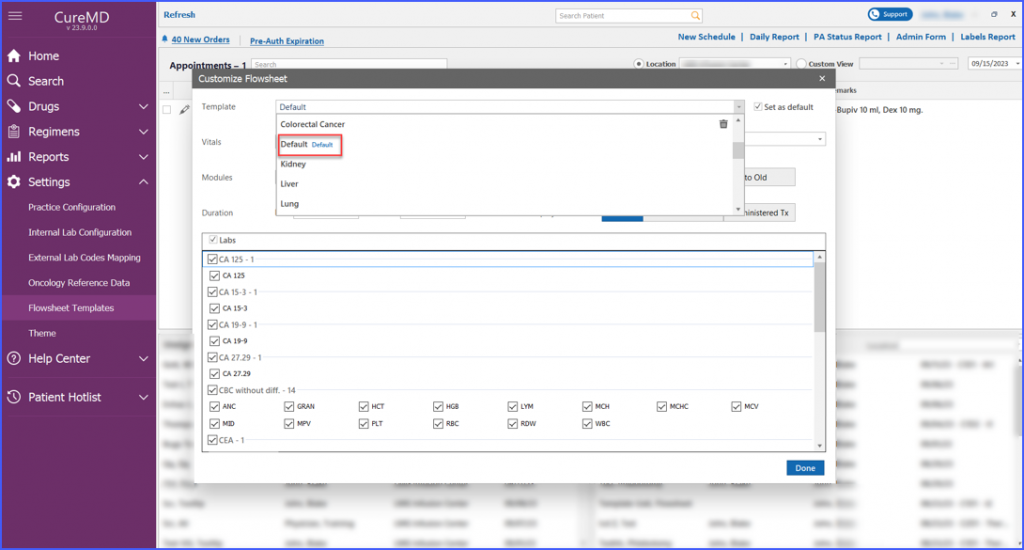
After creating a new template, the user proceeds to select the relevant template from the list. The template can then be marked as the default template by checking the ‘Set as default’ checkbox present next to the ‘Template’ drop-down field.
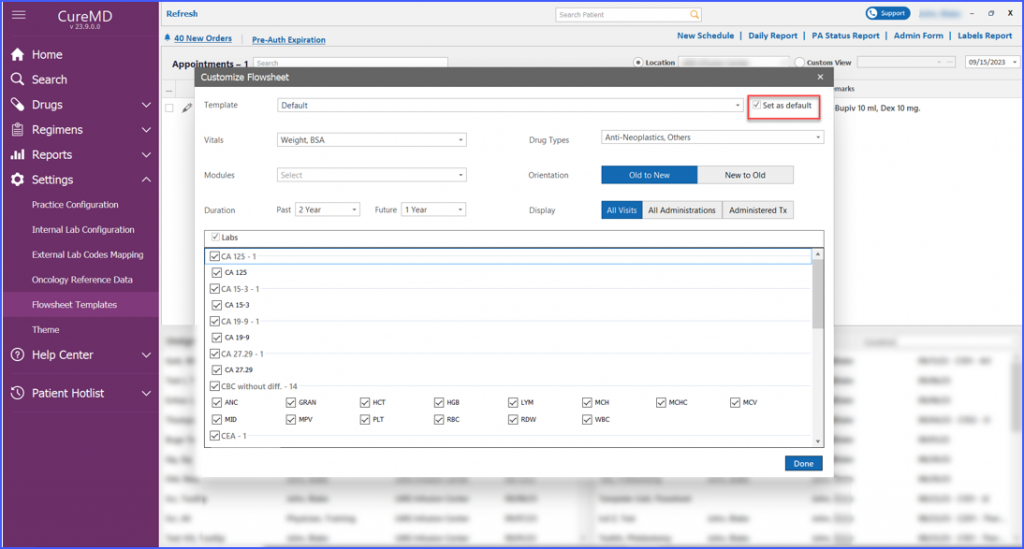
The default template is also visibly marked in the list of templates populated in the ‘Template’ drop-down field.
Users are able to predefine the duration displayed on the patient’s flowsheets for both past and future periods. They can specify the timeframe for which information is presented on the flowsheet for a specific patient, including both past and future periods.
On the ‘Customize Flowsheet’ window, a field for ‘Duration’ is available, with drop-downs for both ‘Past’ and ‘Future’ durations.
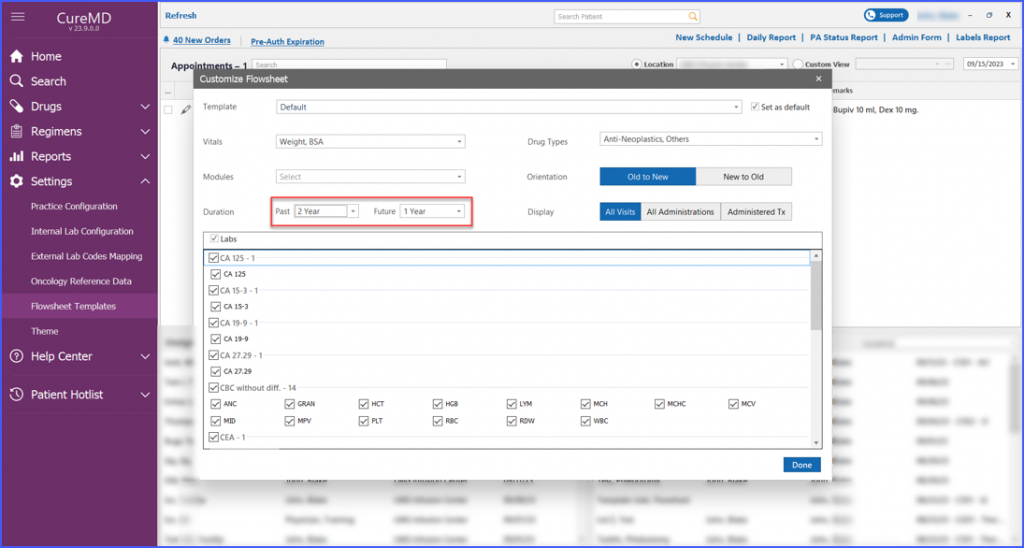
User can select up to 10 year from each respective drop-down.
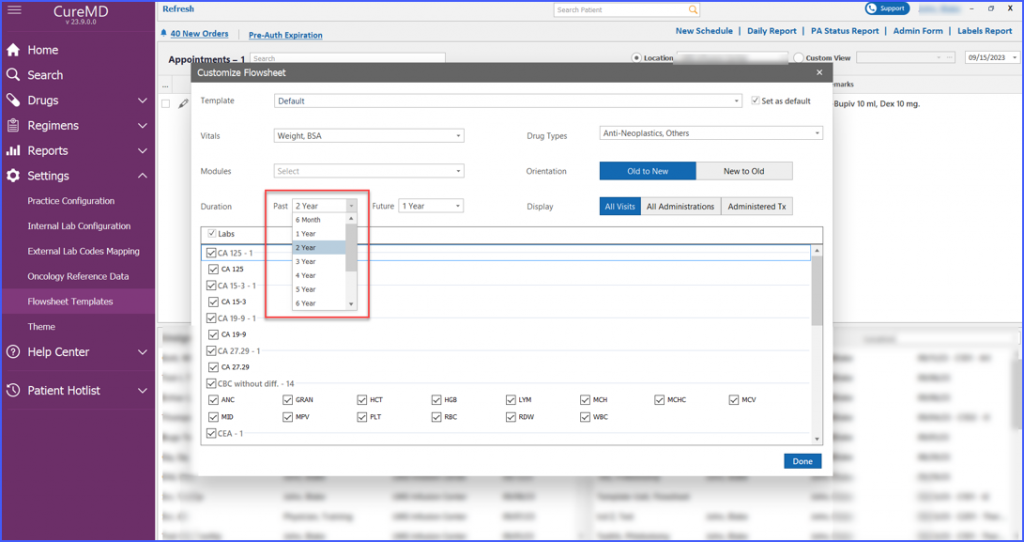
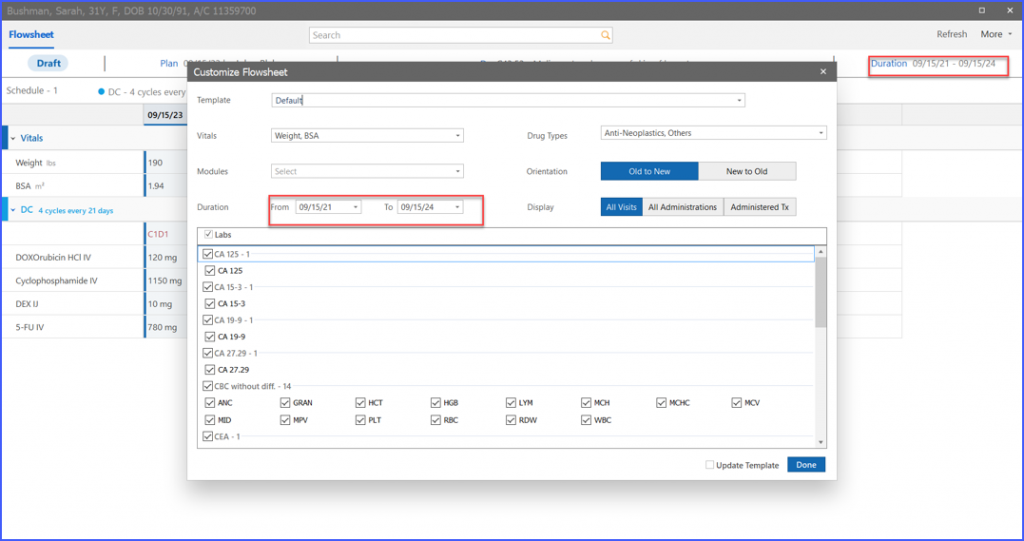
Once the duration is selected, the user clicks ‘Done’ and the changes are saved to the flowsheet.
After duration has been customized, when the user opens a flowsheet for a specific patient, the duration time range appears according to those pre-selected by the user. If past duration is set to 2 years and future duration to 1 year, the ‘from’ date on the flowsheet appears two years prior to the current date and ‘to’ date appears a year ahead of the current date.
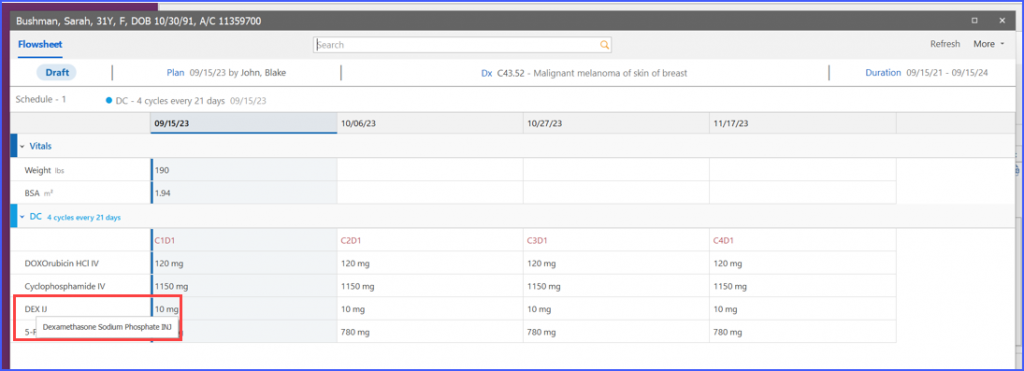
The flowsheet also displays short names for drugs instead of their full form.
If there is a short name present for a drug in the drug library, then this form is displayed on the flowsheet instead of the full name. However, hovering over the short name does display a tooltip with the complete name of the drug.
Users have the capability to modify the sequence of modules within flowsheet templates, ensuring an arrangement that is in harmony with individual preferences and workflows.
Upon selecting the desired template in the Flowsheet, users are directed to click on the ‘Modules’ dropdown. Here, a sequencing icon becomes visible as users hover over a module name, facilitating the rearrangement of modules via a drag-and-drop mechanism. To finalize and preserve the adjustments for subsequent uses, users must click on ‘Done’.

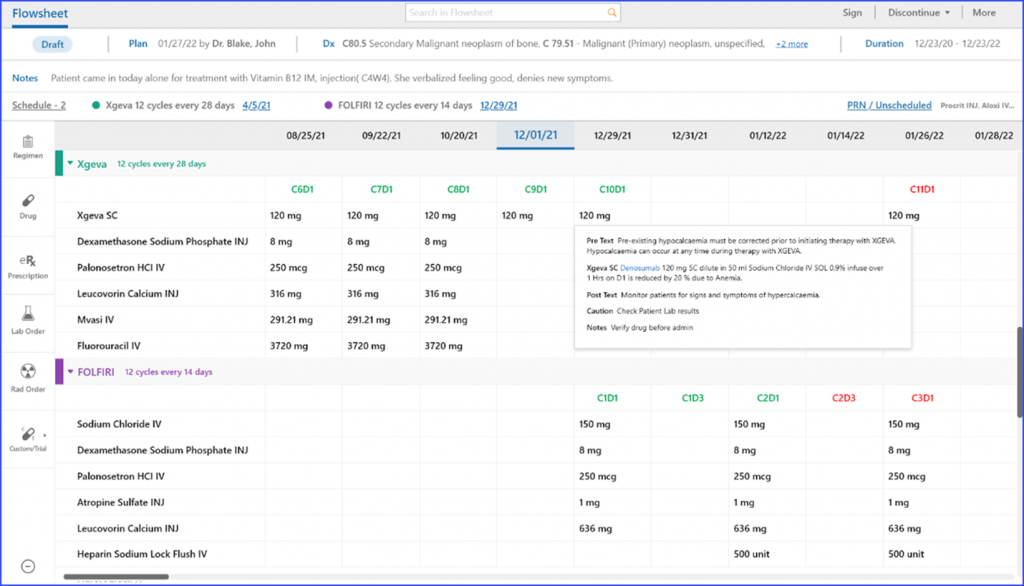
The system offers tooltips that provide detailed and specific information when users hover over different sections of the flowsheet grid, namely drug dosage, adverse event grade, and performance score.
- Drug Dosage Tooltip:
When hovering over the drug dosage, users see a comprehensive tooltip that includes:
- Pre-text and post-text of the drug
- Second level information of the drug along with any modification details
- All tags present on the drug strip
- Any notes associated with the drug
- Scr lower limit and Crcl upper limit, and information about who modified the drug details
- Adverse Event Grade Tooltip
Hovering over the adverse event grade section displays a tooltip showing:
- The grade of the adverse event
- CTCAE version
- Onset and resolved dates
- Serious Adverse Event (SAE) status
- Relationship status
- Any notes added
- Information about who documented the adverse event
- Performance Score Tooltip:
For the performance score, the tooltip includes:
- The score
- A description of the score
- Information on when the score was reported

As part of the user’s interaction with the flowsheet grid within a patient’s plan, the user can directly view the appointment’s duration and time. This information is displayed under the appointments band, ensuring that users have a smooth access to this vital information.
The Display settings in Flowsheet Templates can be accessed when users click on the ‘Display’ dropdown and select their preferred option from the list.
Similar enhancement has been made to Settings of flowsheet templates.
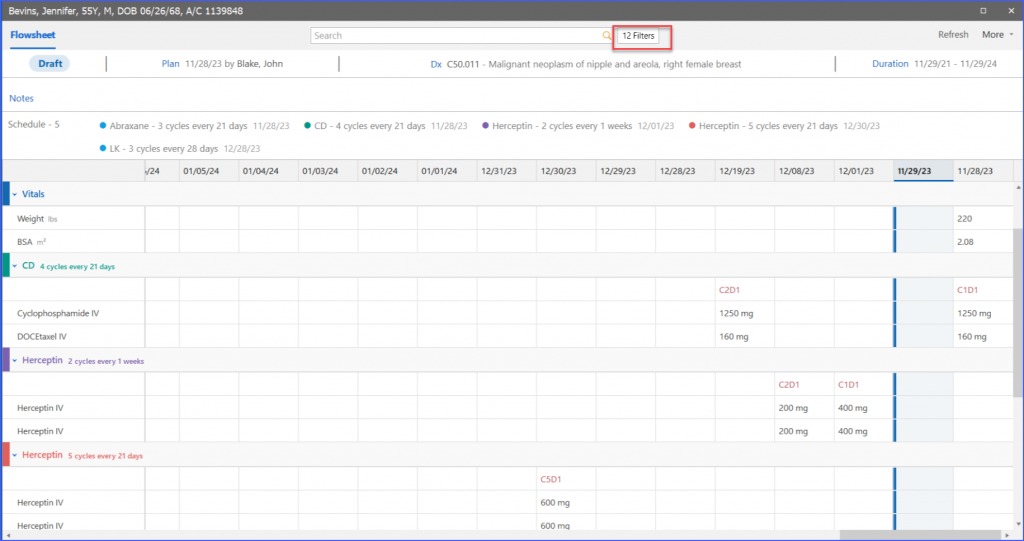
Users can filter out certain therapies and lab results in patient flowsheets by clicking on the ‘Filter’ button located next to the search bar.
Upon clicking, a list appears, displaying all therapies (both active and discontinued) and lab results that are present in the flowsheet for the selected duration. Users have the option to check or uncheck specific therapies, drugs, and activities related to a therapy. Additionally, they can filter lab results based on their requirements.
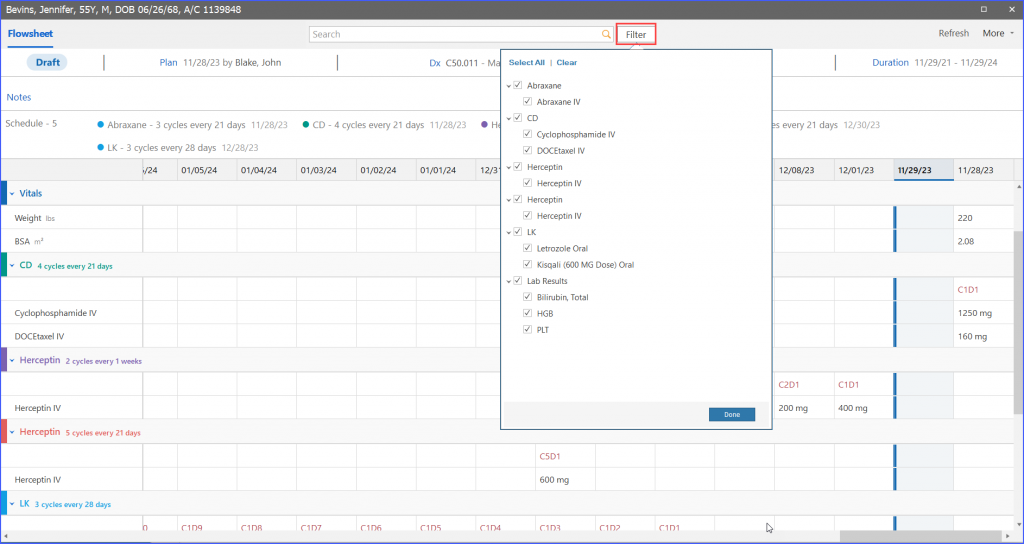
After making the desired selections, users click on the ‘Done’ button to apply these filters to the flowsheet. A count of the applied filters is also displayed on the filter button, providing a quick reference to the number of filters currently in use.
A comprehensive suite of dose management enhancements is available to the users for streamlining the modification process. These changes are for practices that have activity-based scheduling enabled:
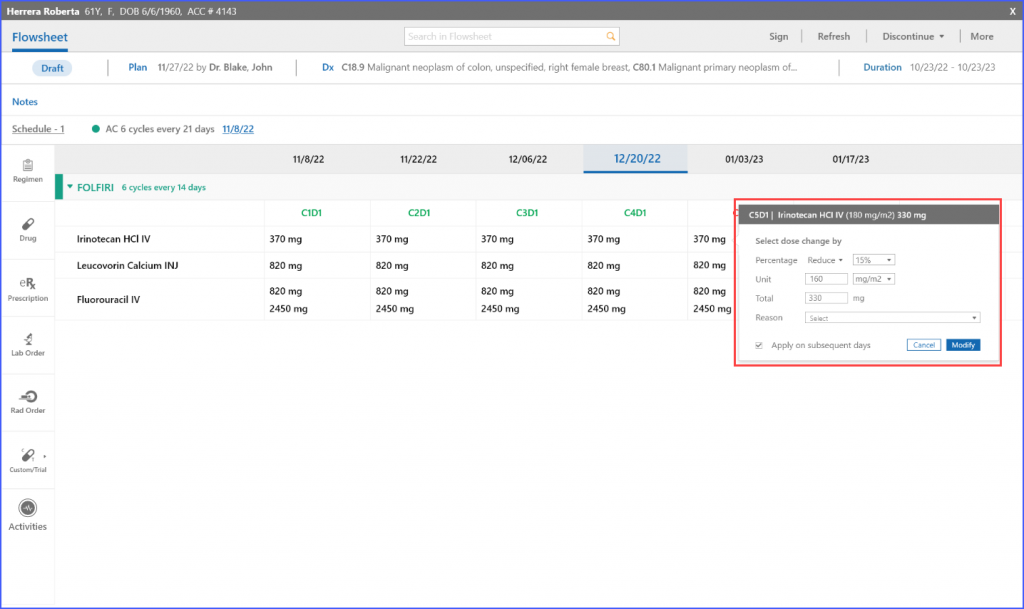
- Enhanced Single-Day Dose Modification from Flowsheet
When accessing the patient’s flowsheet, users click on an unconsumed treatment day to open a dose modification beak form. This form displays essential information like cycle & day, drug name, unit dose, and total dose. Modifications can be made by adjusting the dose percentage, unit, or total dose, with each change recalculating the other values for precision.
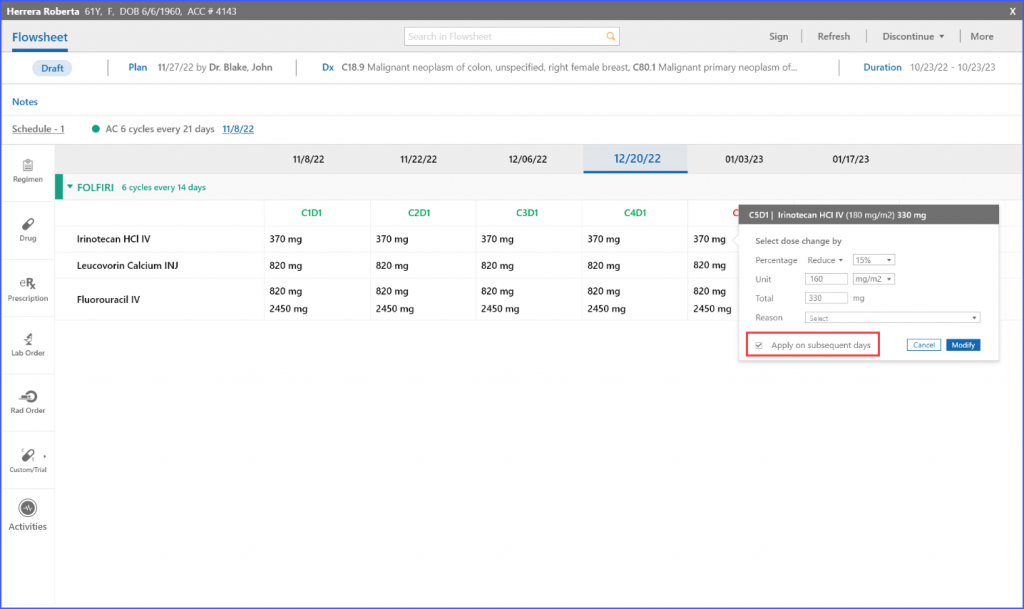
2. Dose Modification Across Multiple Treatment Days
Users can apply the changes from a specific treatment day to all subsequent treatment days as well. Clicking on a CD dosage within a patient’s flowsheet opens a dose modification beak form for detailed adjustments. A checkbox to “Apply on subsequent days” is available, and the system provides alerts if changes cannot be applied on certain days, ensuring clear communication and efficient treatment planning.
3. Comprehensive Dose Modification History
After modifying a dose on the flowsheet, users can navigate to the patient’s plan and view a comprehensive history of these modifications by clicking on the order detail icon. This feature logs modifications from the flowsheet, displaying both initial and modified dose values, reasons for modifications, and even sequential changes in a single transaction.
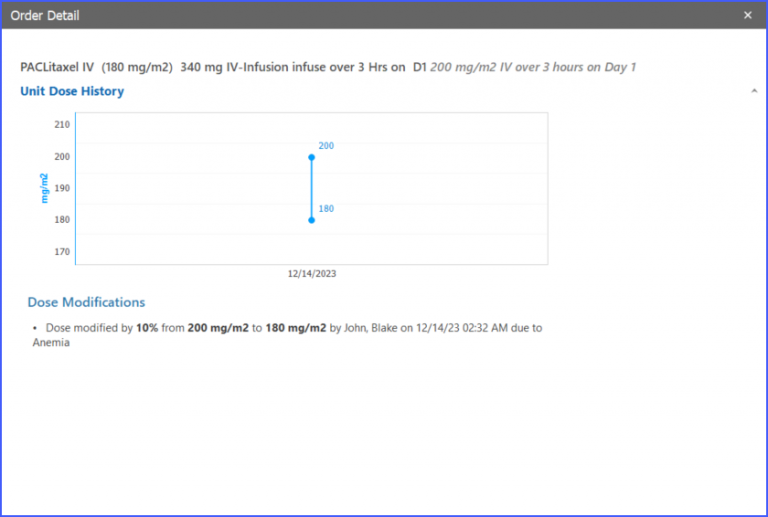
Additionally, details for multiple changes in a single transaction, and sequential modifications like percentage change followed by unit dose change, are all logged methodically, offering an elaborate insight into dose adjustments for each plan.
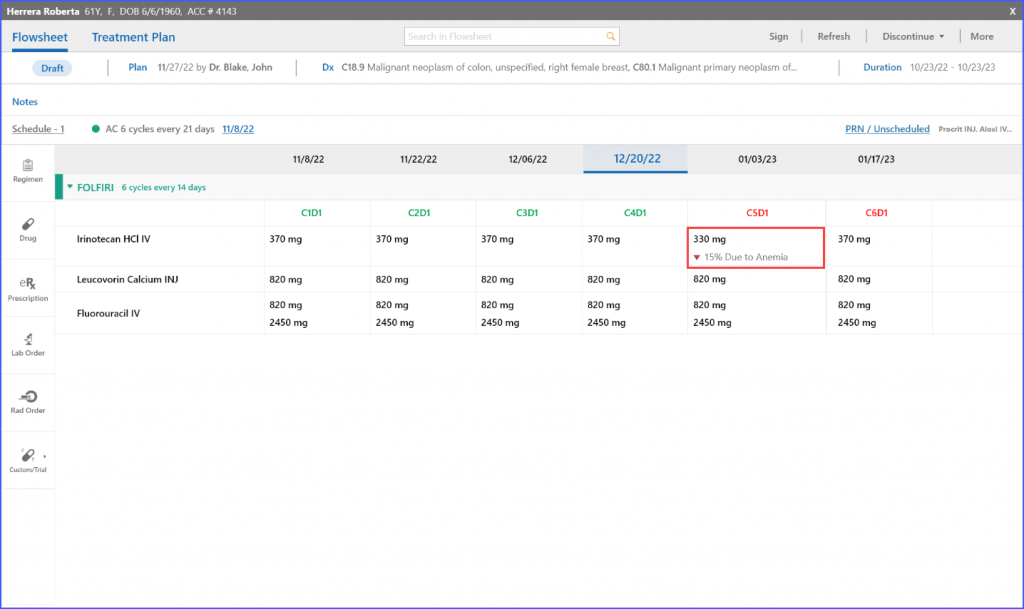
4. Visual Representation of Dose Changes on Flowsheet
Following a dose modification on the flowsheet, the system displays these changes, including the reasons for adjustments, directly in the selected treatment cells. This visualization is particularly effective for total dose overrides, where the final dose and reasons for change are clearly indicated with a ‘Total Dose Overridden: ‘Reason” narration.
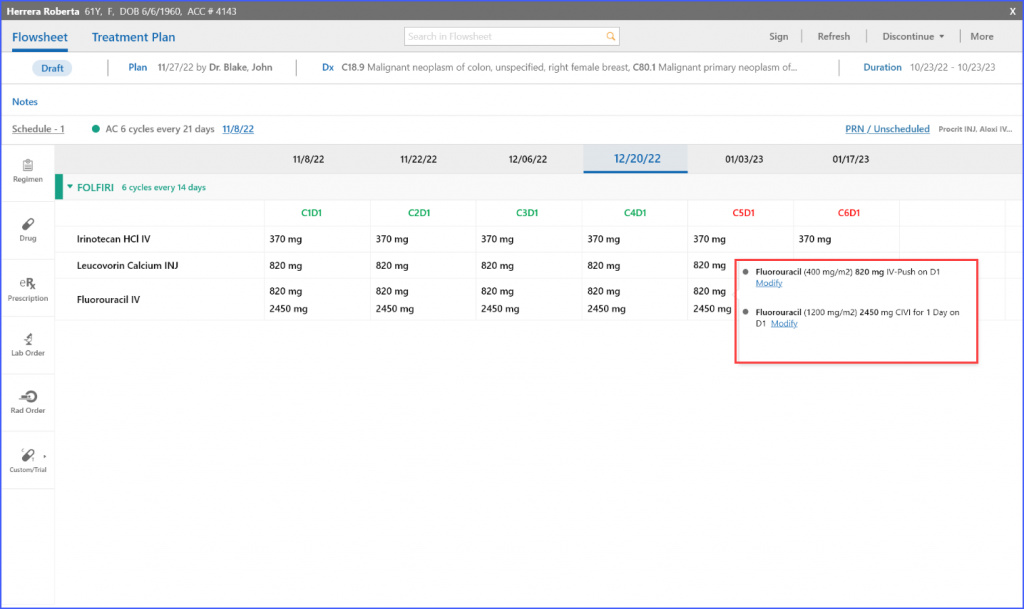
5. Multi-dose Drug Modification
In scenarios where a treatment day involves multiple drug dosages, users can select a specific dosage before opening a dose modification beak form. This allows for precise modifications of multi-dose drugs, including the provision of reasons for each change.
6. Dose Capping Feature
If a modified total dose exceeds the maximum daily limit, the system automatically caps the dose to this limit. A ‘Dose Capped’ indicator is displayed next to the total dose, informing the user of this safety measure.

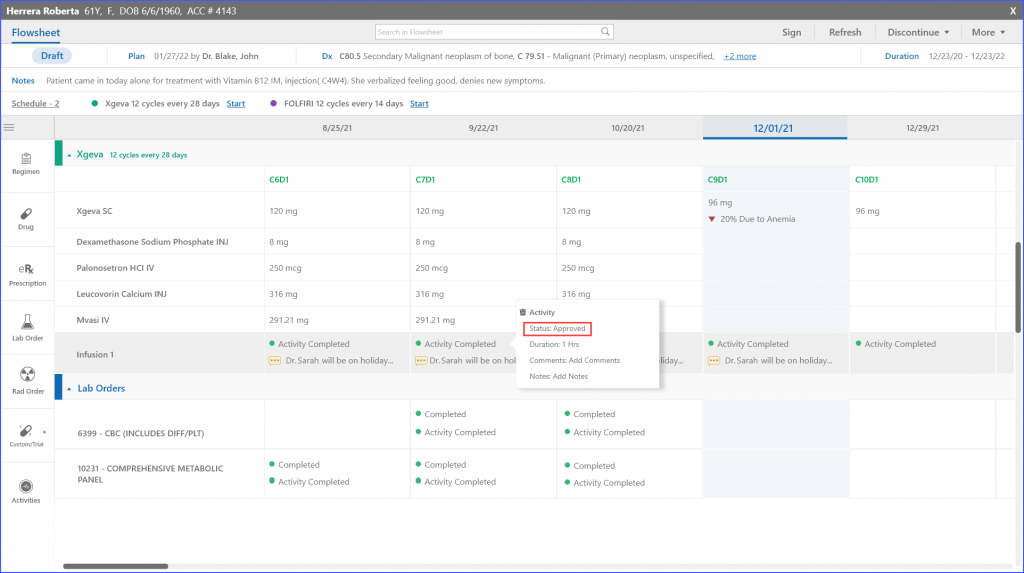
Users are provided with integrated activity status features, enabling improved visibility and editing capabilities directly from the Flowsheet. These changes are for practices that have activity-based scheduling enabled.
- Enhanced Visibility on Flowsheet:
Users gain immediate visibility of the activity status on the Flowsheet. Clicking an activity cell opens the Beak form, which prominently displays the status above the duration, offering quick access to vital treatment information.
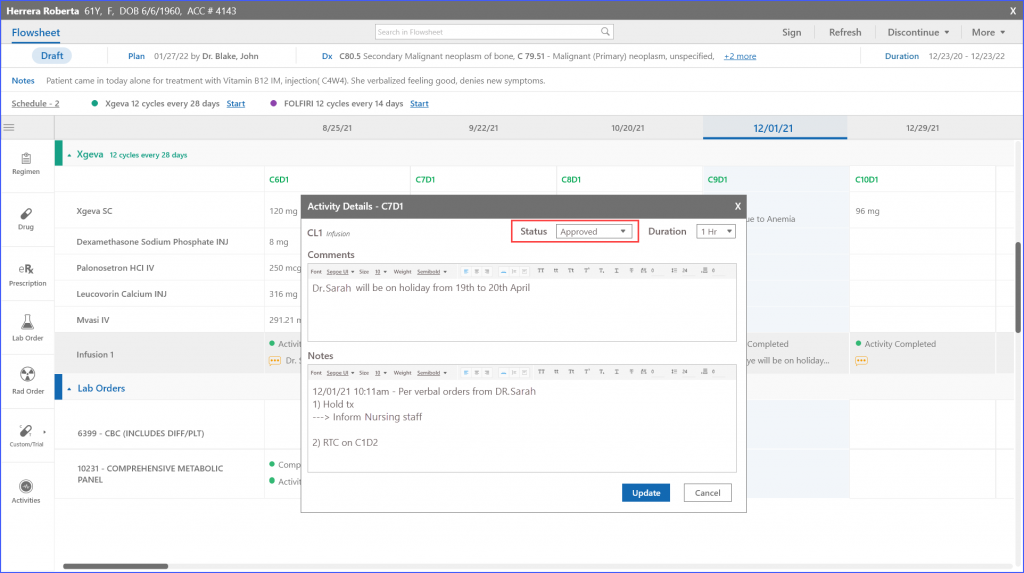
2. Simplified Status Editing from Flowsheet:
Editing the activity status is streamlined with a hyperlink feature on the Beak form. Hovering over the activity status reveals a link that leads directly to the Activity Editing Screen, where users can conveniently review and modify the status.
The status is also reflected on the appointment dashboard. To view this change, click here.
Users can view comprehensive adverse event data, with grades displayed in the reported date cell which allows for easier monitoring of changes over time.
Hovering over an event gives detailed information for that specific date, including details of resolution.
Similarly, adverse event details are also displayed on the Patient Dashboard. To view this enhancement, click here.
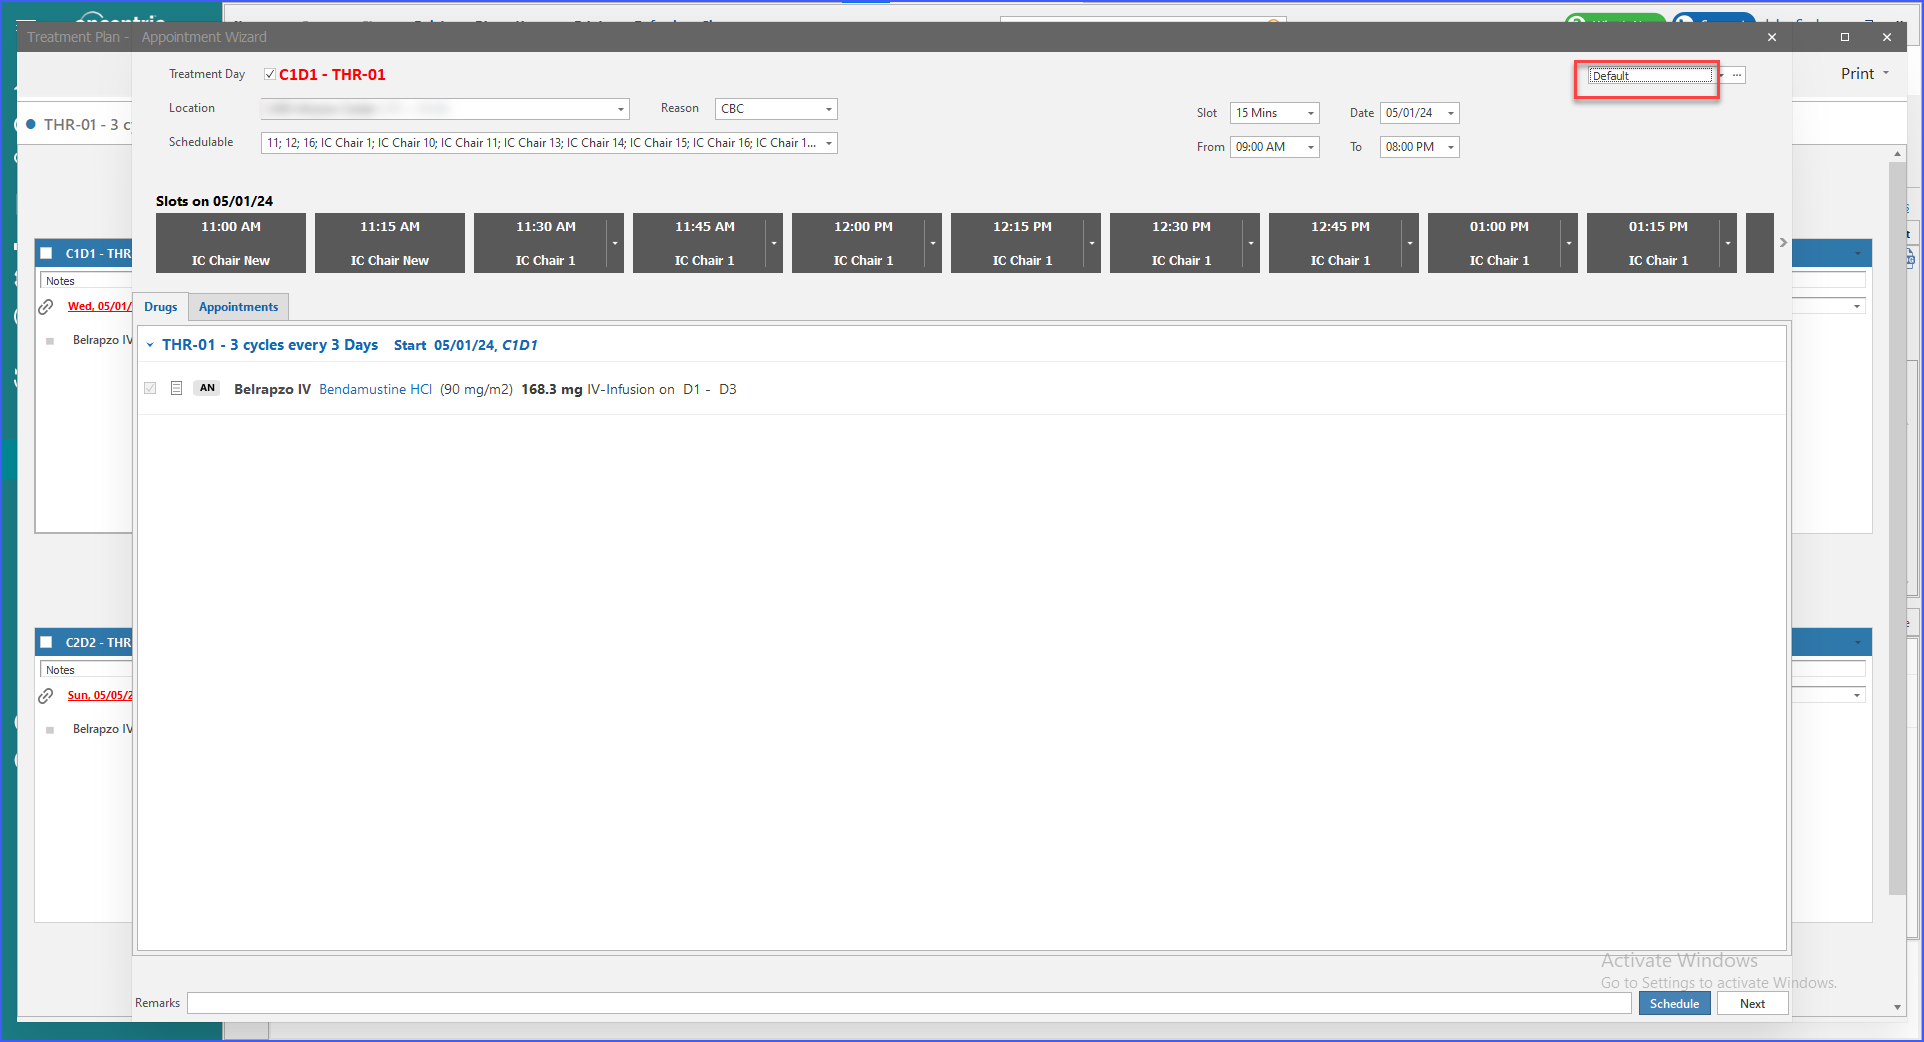
Users can save their filter preferences within the appointment wizard when scheduling appointments in the treatment planner. ![]()
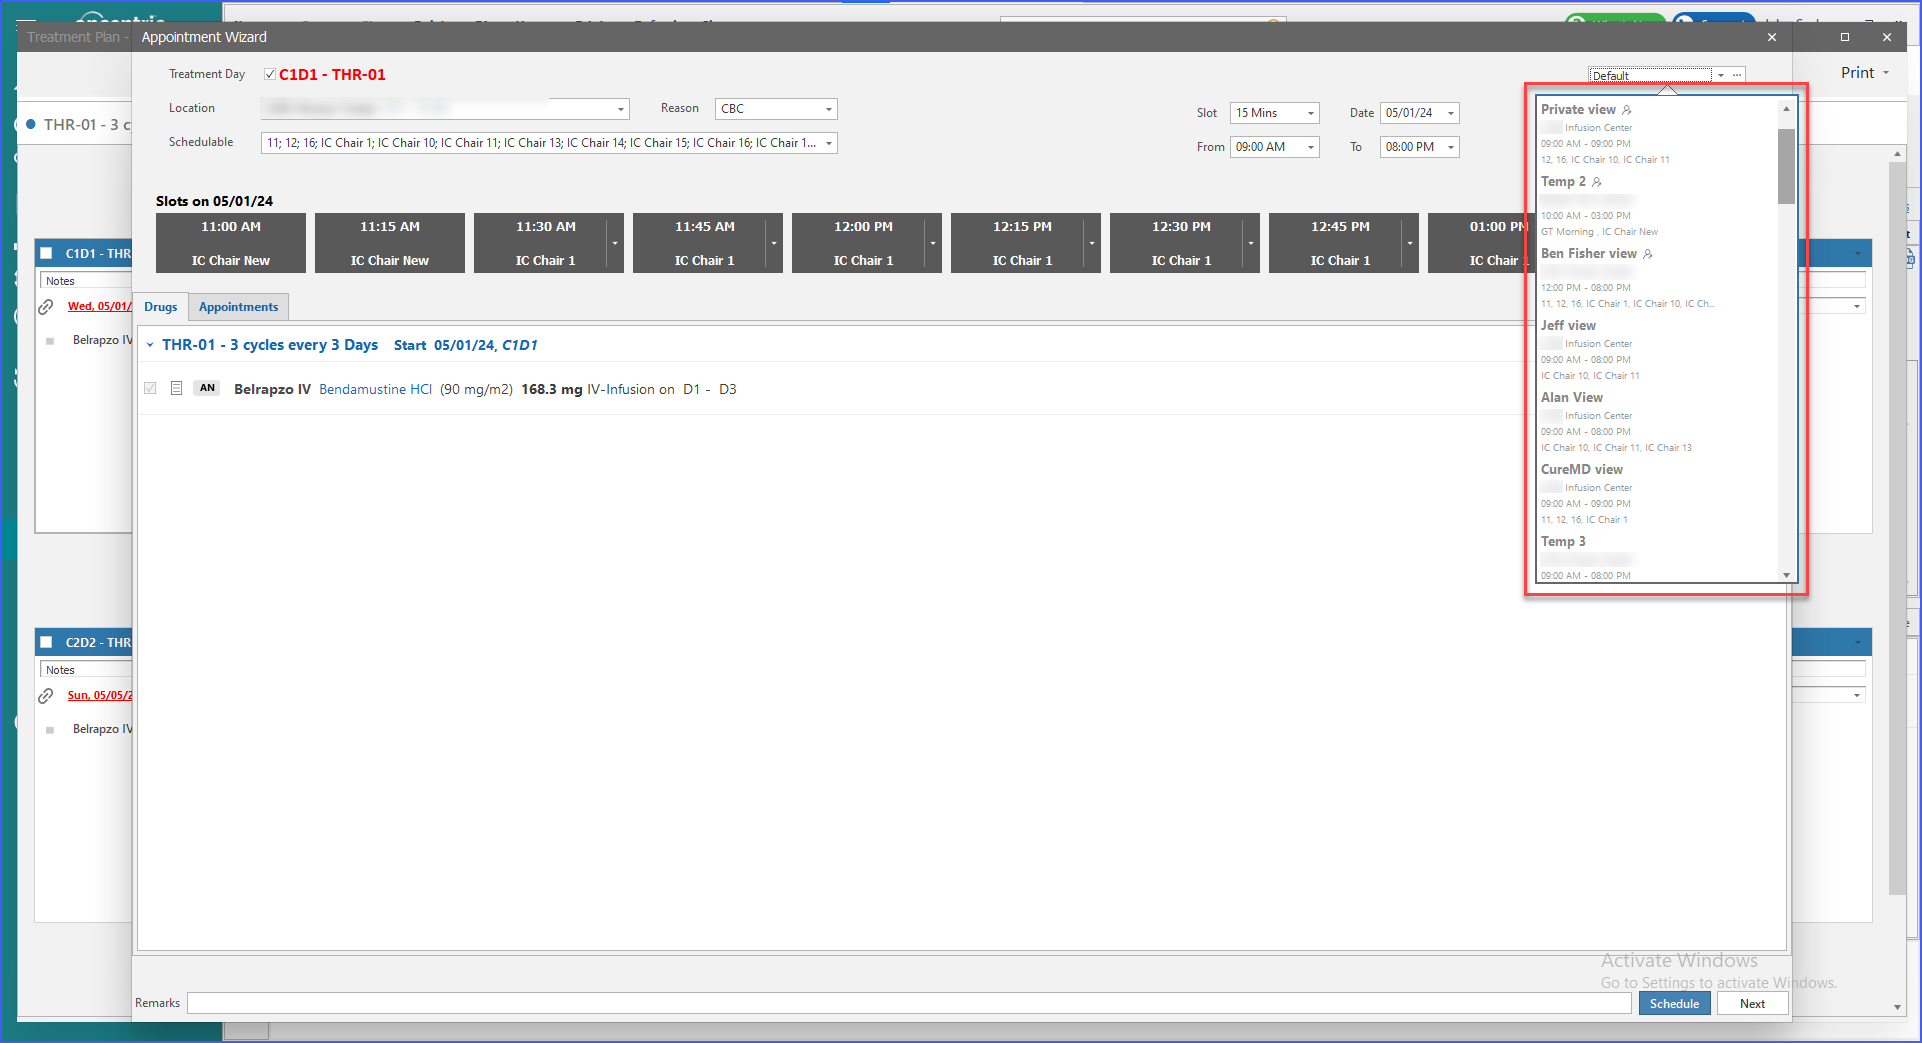
Instead of reapplying filters for every new appointment, users can save these settings to be automatically applied when scheduling. By default, the filter is set to ‘Default’, indicating no filter is currently applied. Users can select saved filters from the dropdown menu in the appointment wizard.
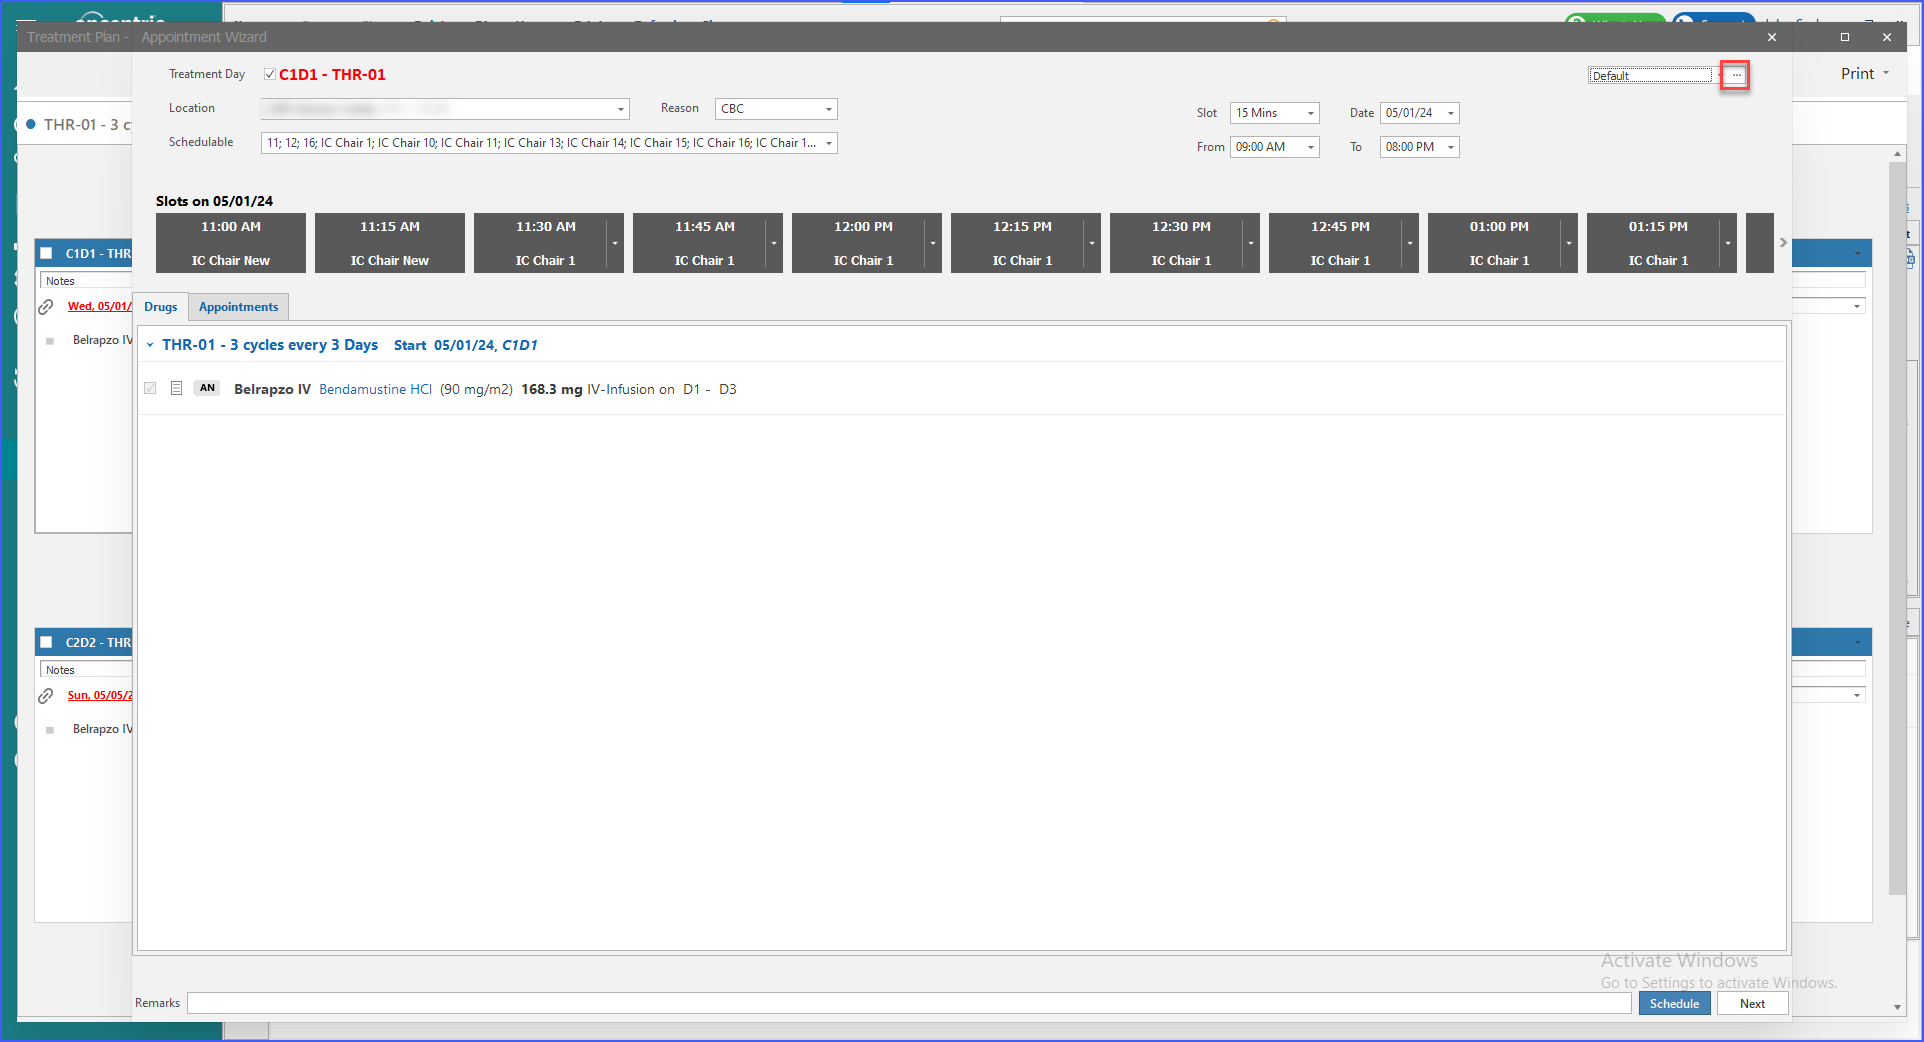
To create a new filter, users can click the ‘three-dot’ option next to the dropdown.
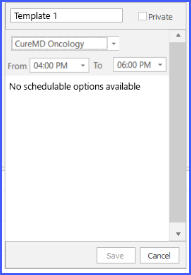
When creating a filter, users must name the custom view and choose whether to make it publicly accessible or private by checking the ‘Private’ checkbox. Users must select a location, set start and end times, and choose from the available schedulable options (resources). Only one location can be selected per filter.
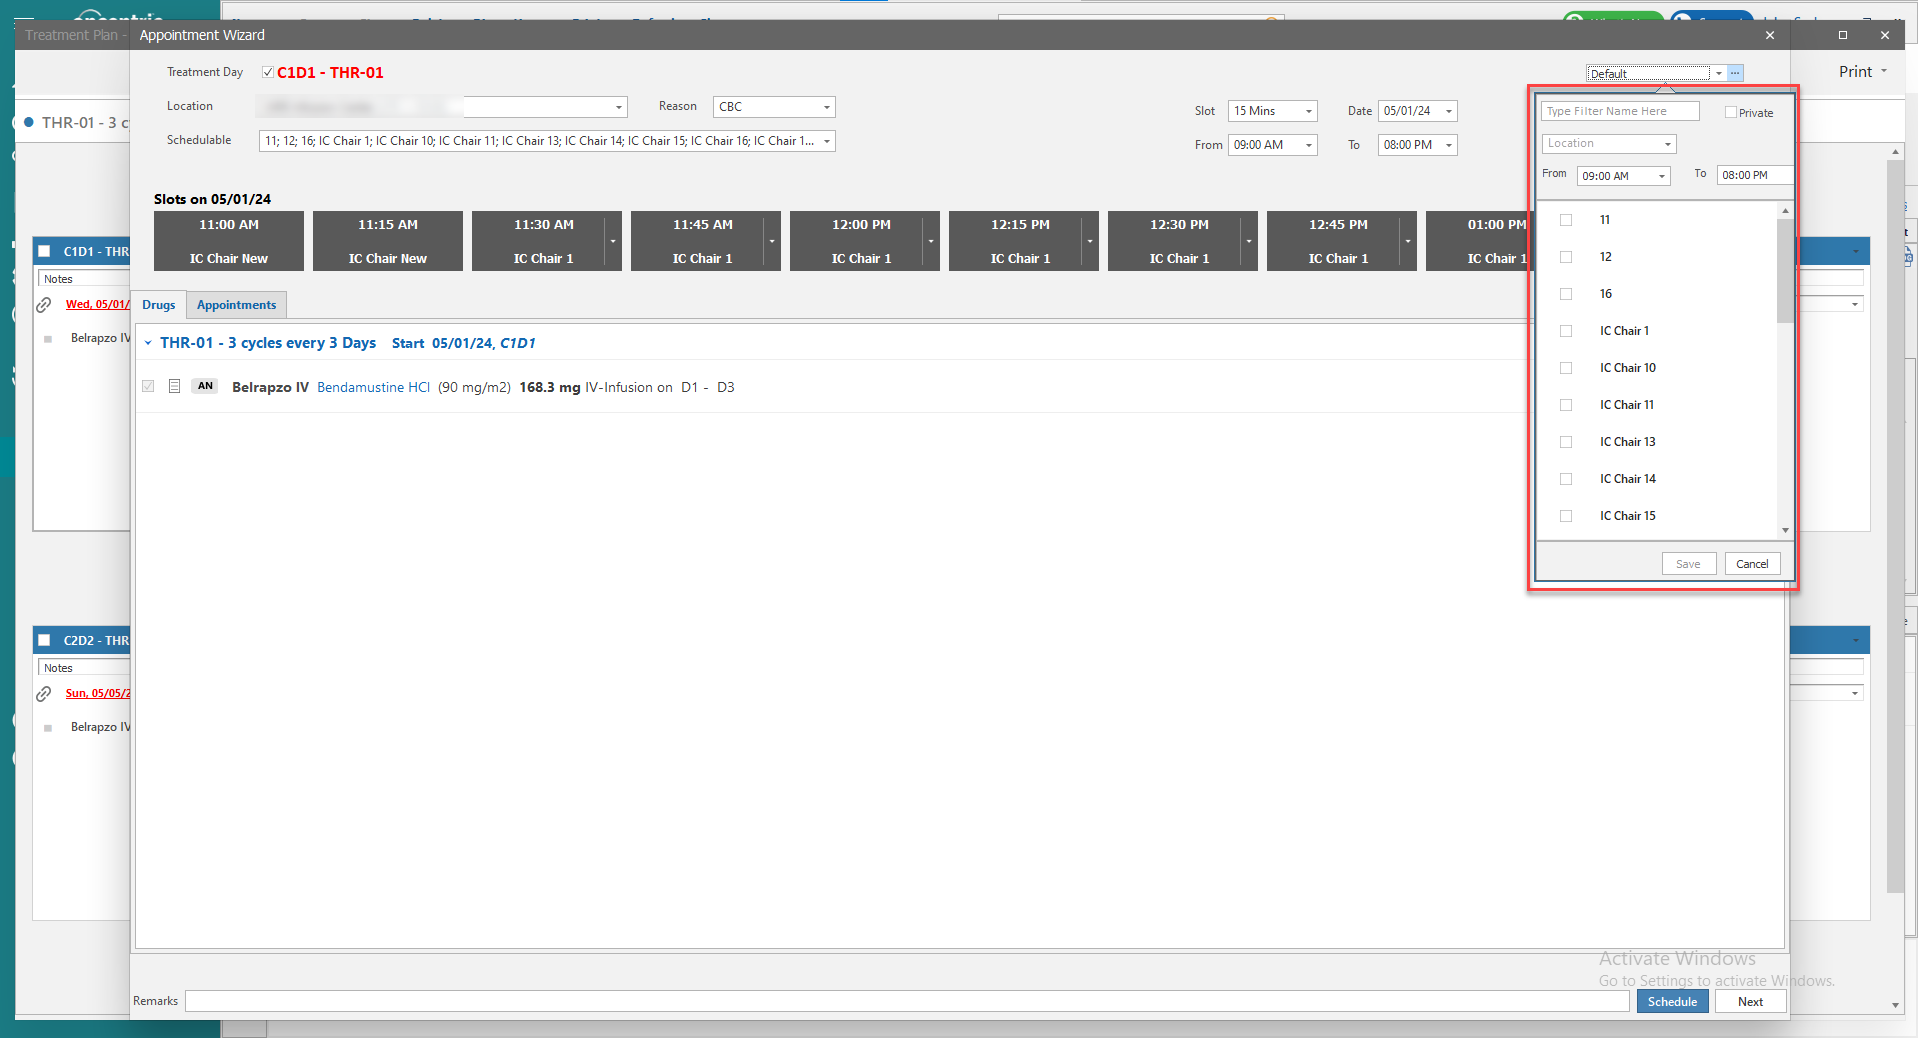
Note that once a filter is set to private, it cannot be changed back to public.
If no schedulable options are available under the chosen location, the system will specify ‘No schedulable options available.’
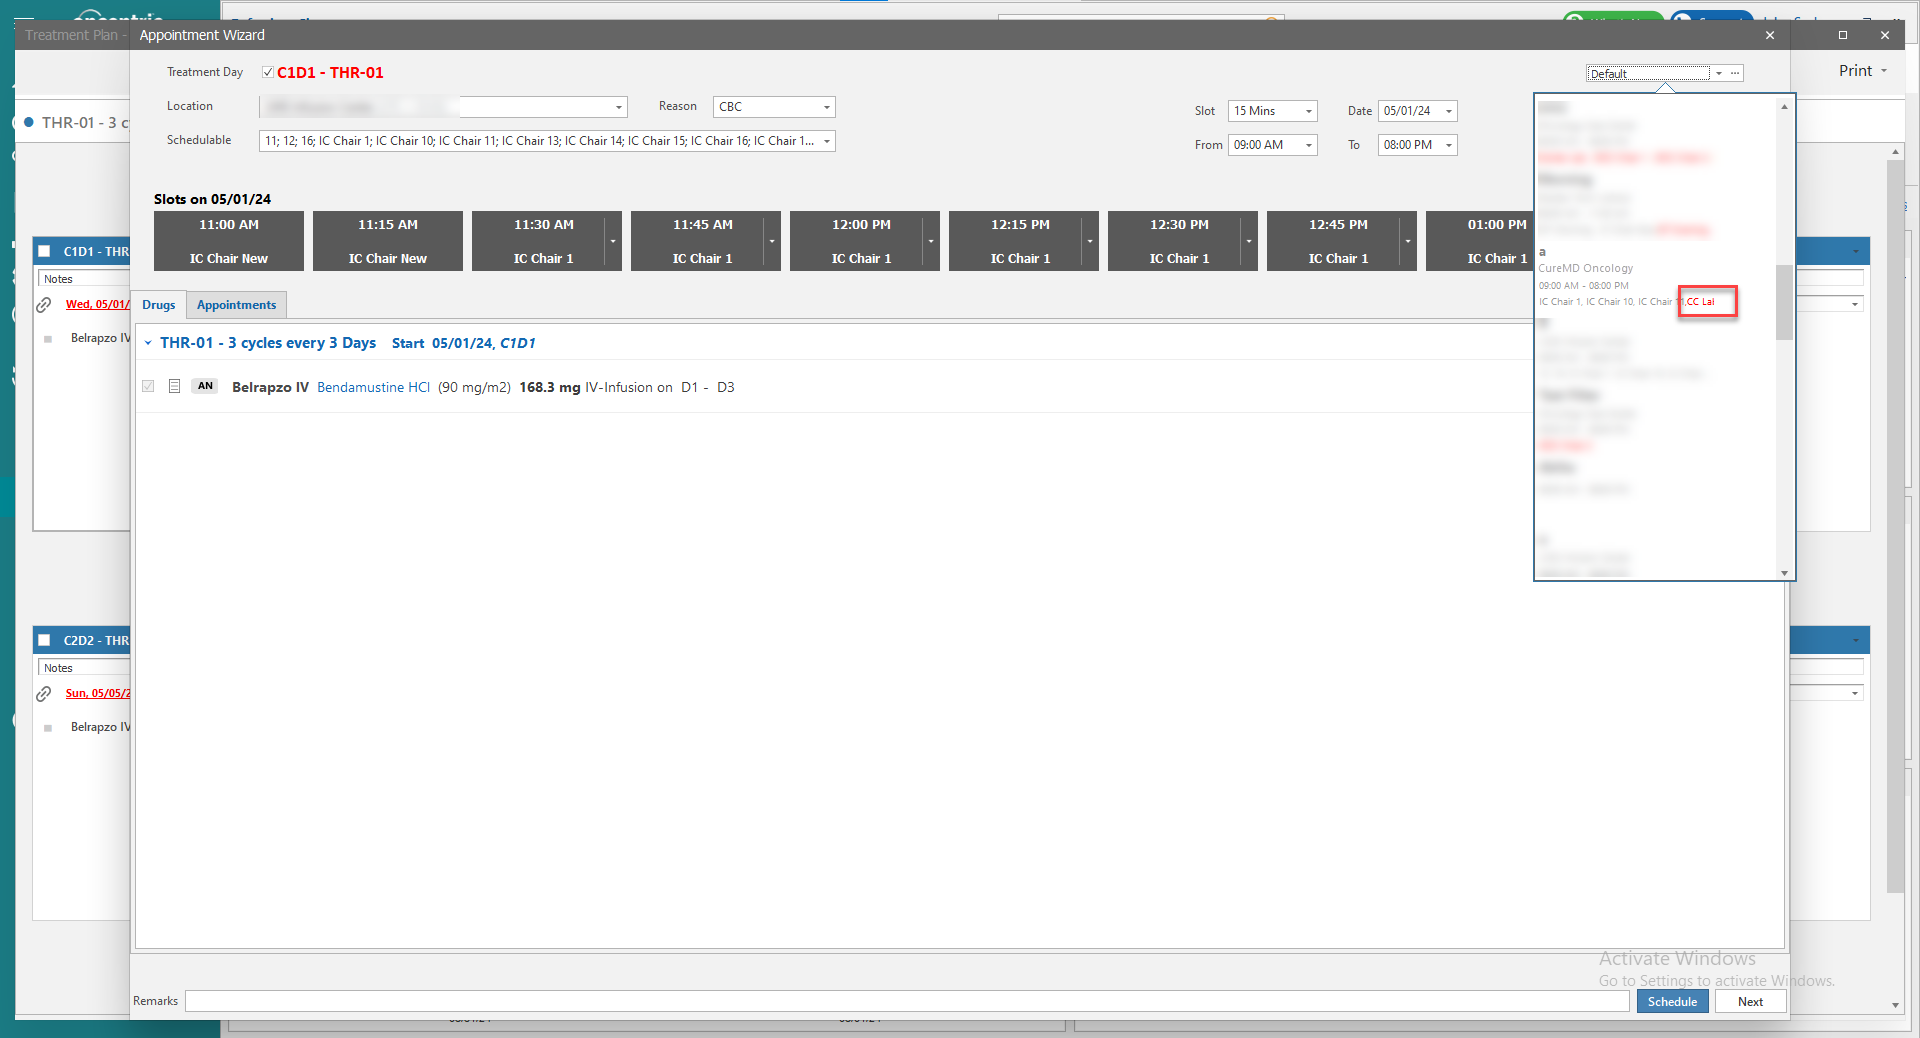
Upon saving, the custom filter is added to the dropdown and reflects all associated information.
If any schedulable options are inactive, they appear to be labelled red in the dropdown menu.
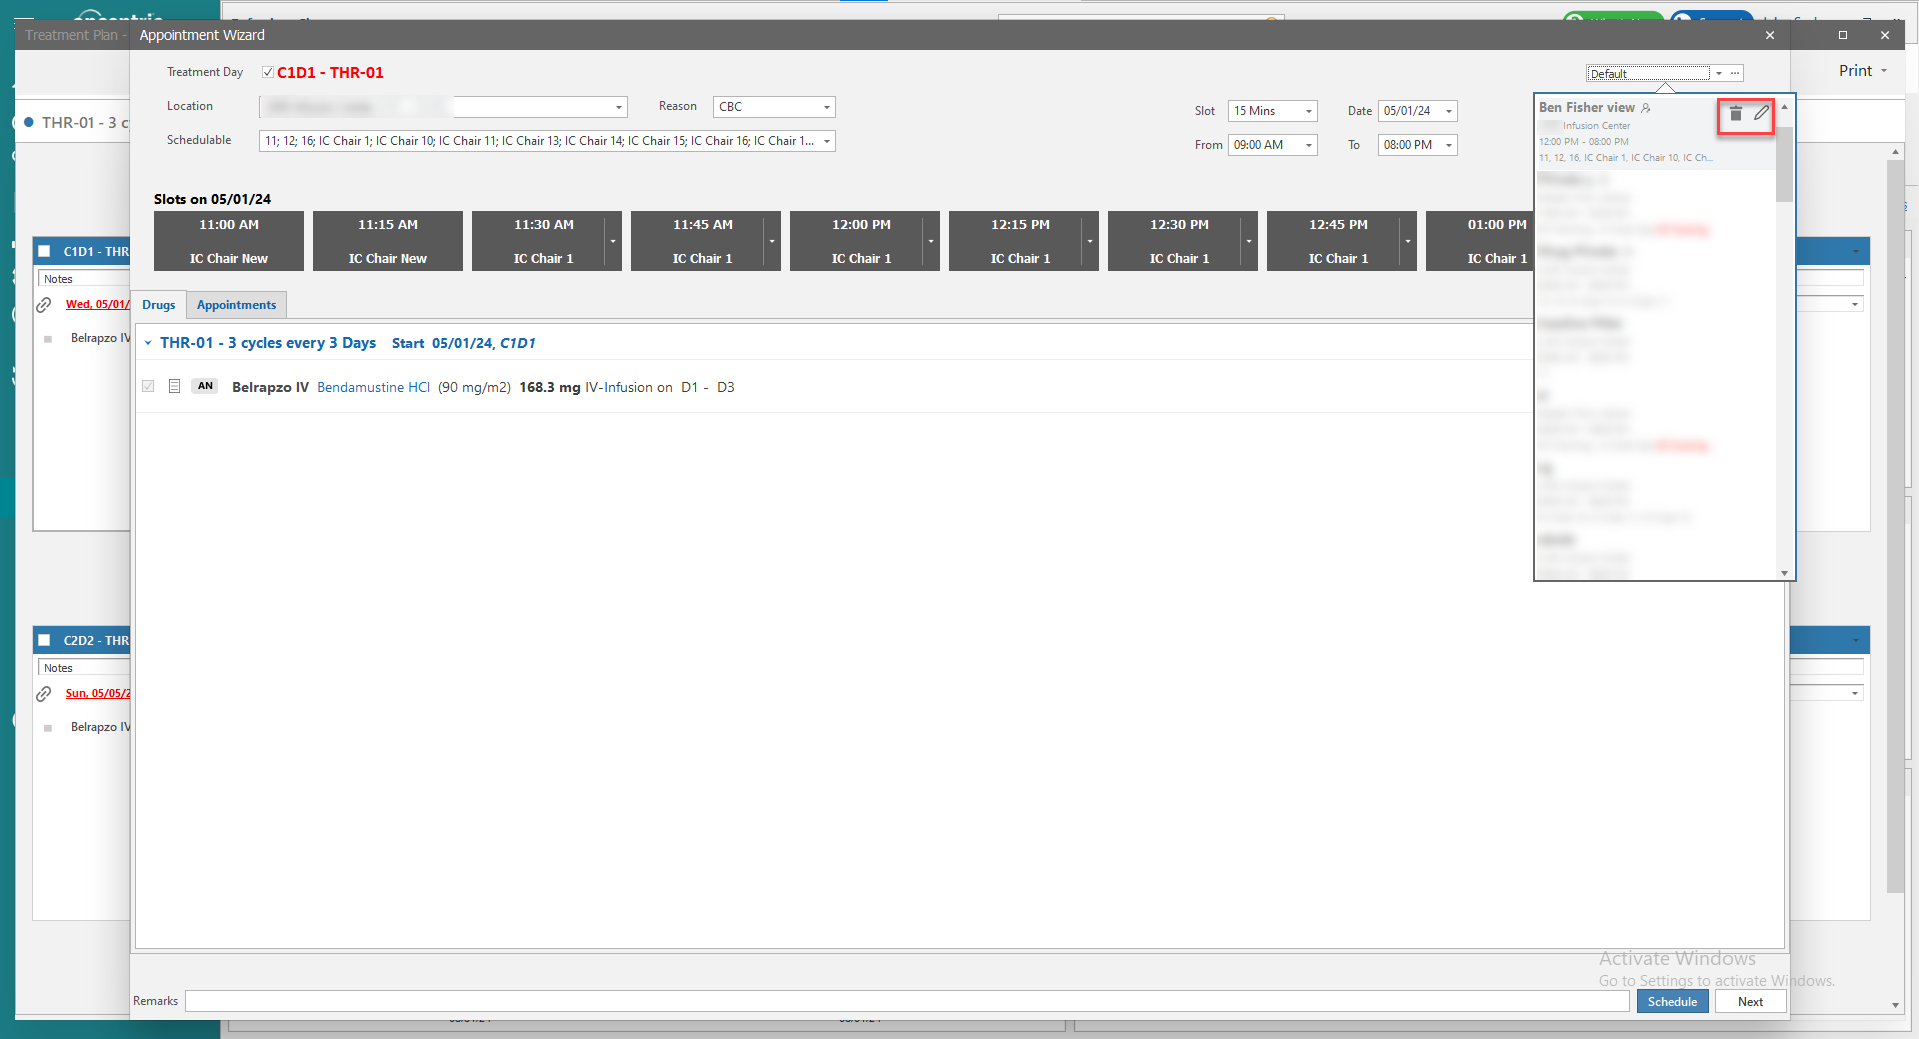
Users can also edit or delete a custom filter at any time using the pencil or delete icons next to each filter in the dropdown menu.
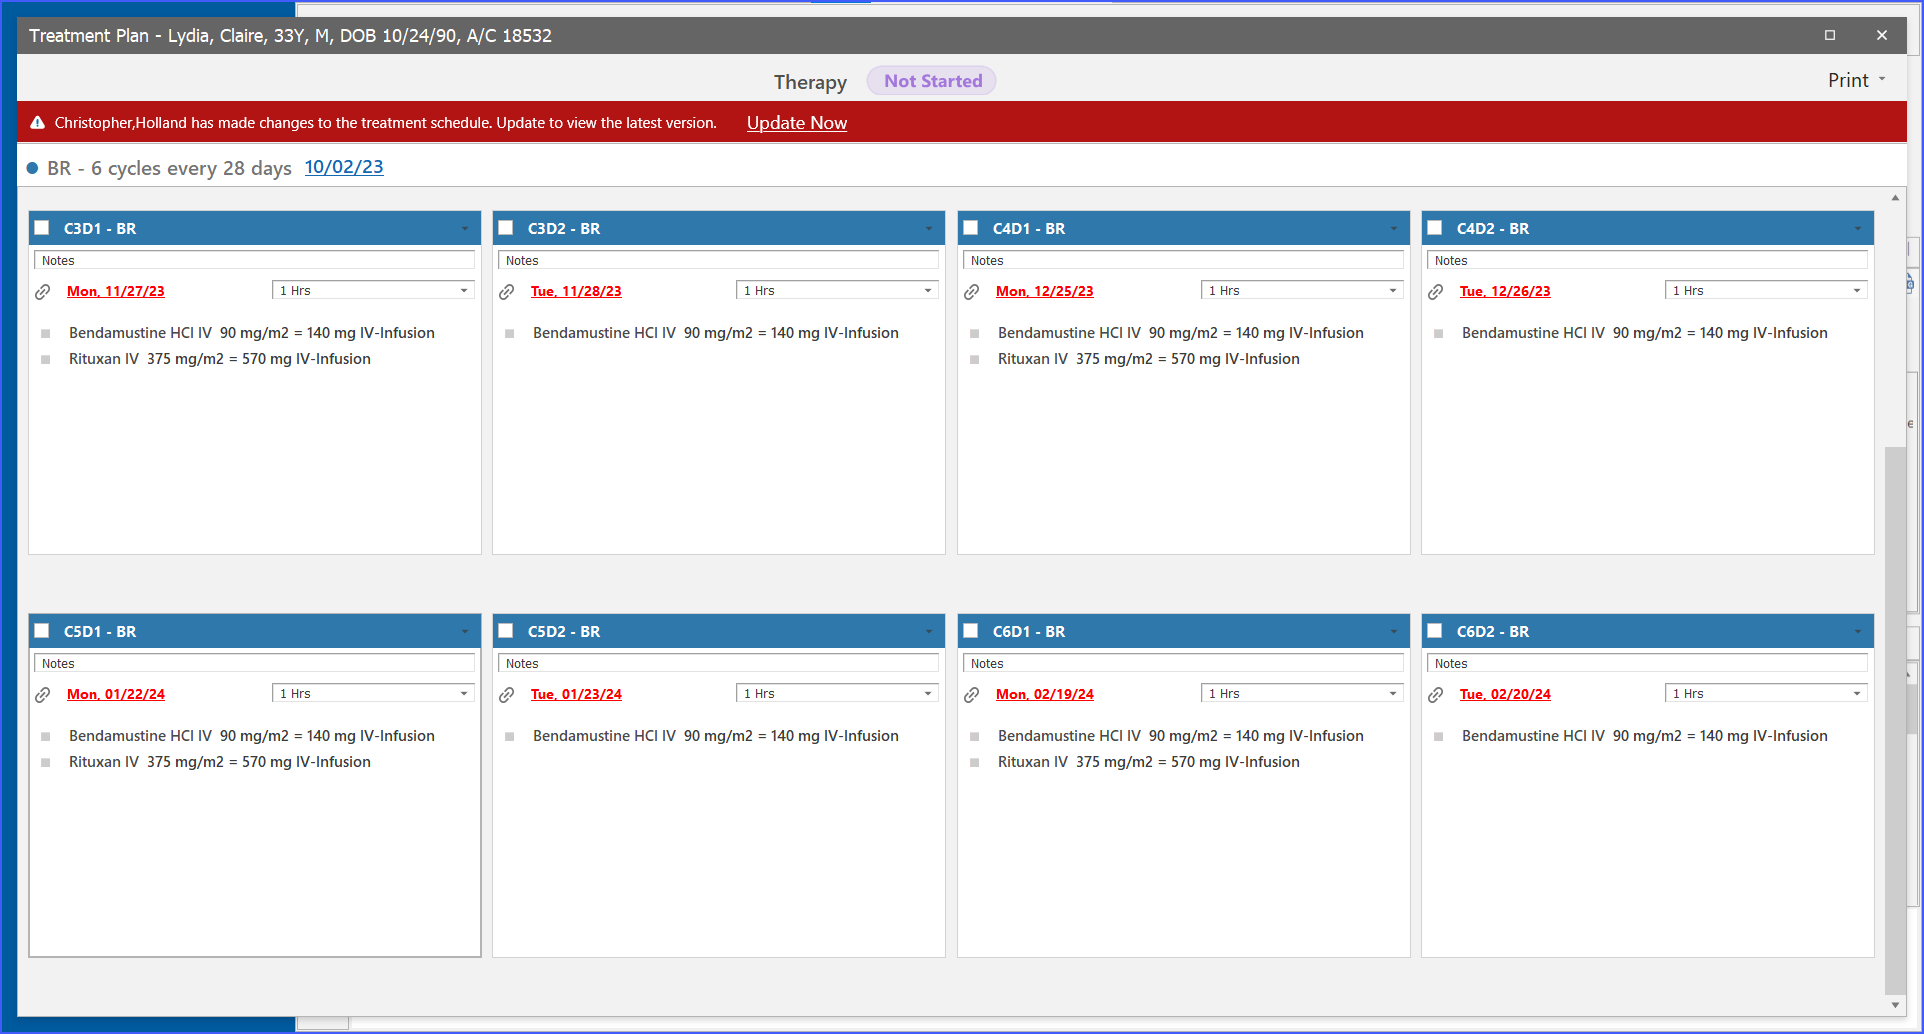
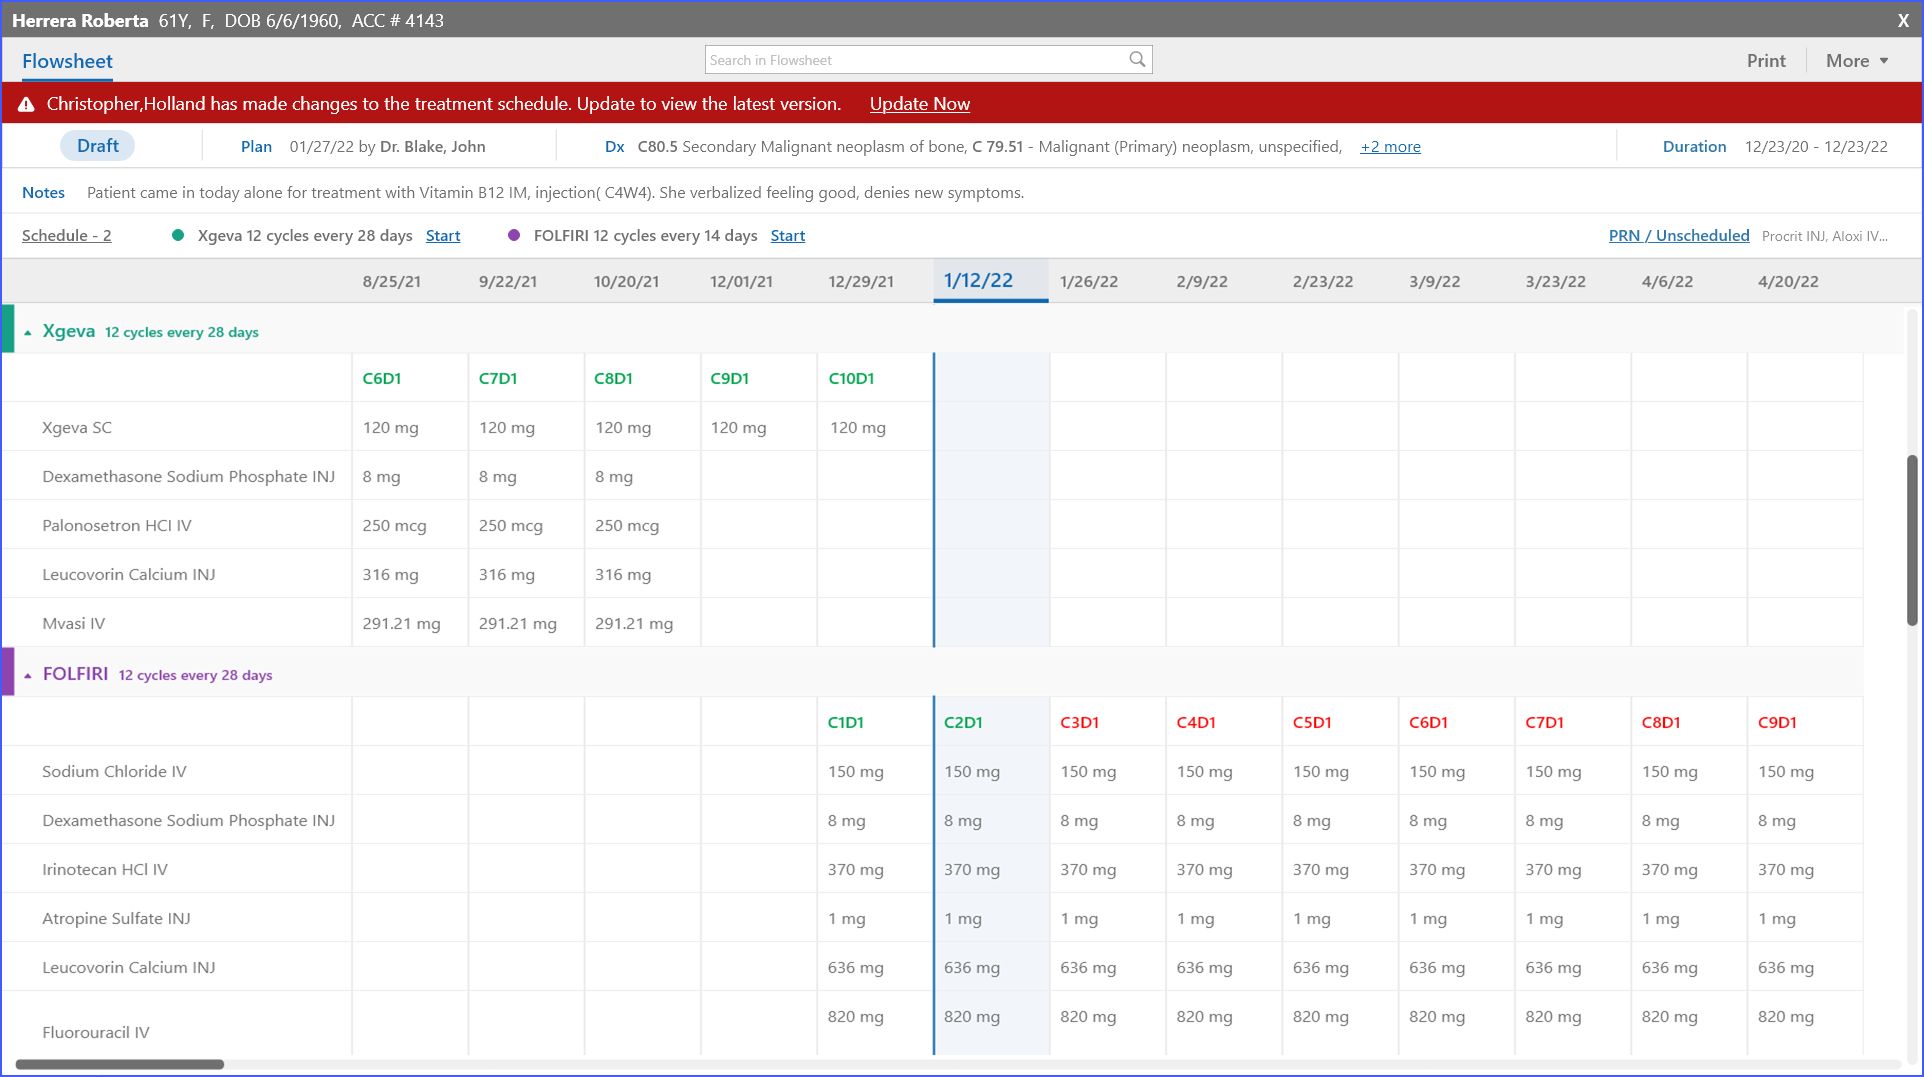
If another user updates the Treatment Plan or Flowsheet, a snackbar notification appears to prompt an immediate update. The system restricts other actions until the update is performed, ensuring that users always work with the most current information and reducing the risk of data discrepancies.