What is the Ordering Screen For?
After filling in diagnosis and clicking ‘continue’, the user is directed to the ‘Ordering’ screen.
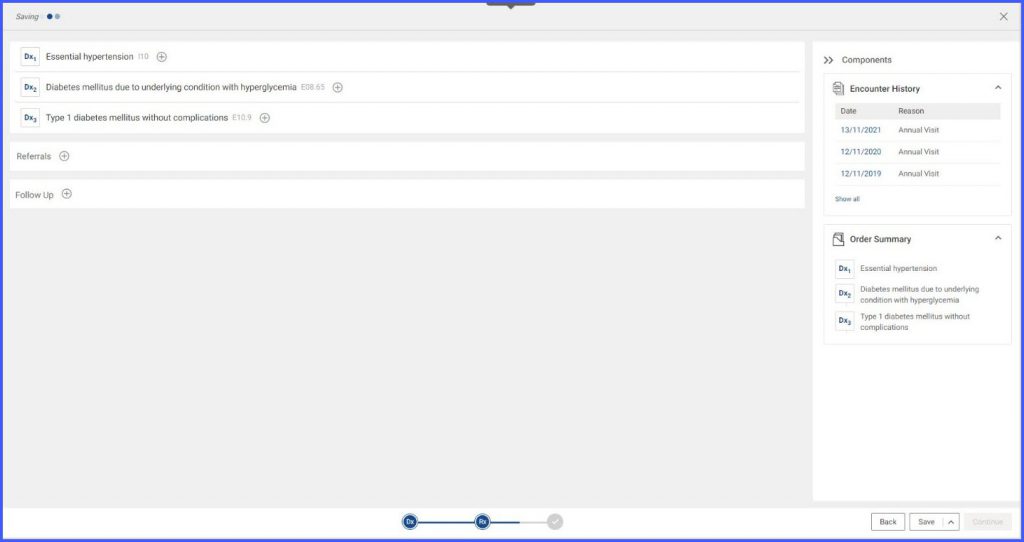
The main ordering frame consists of:
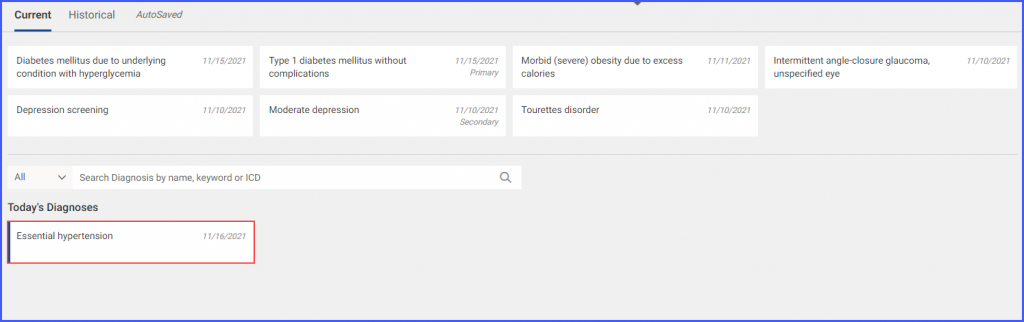
- Patient’s ‘Today’s Diagnoses’
- Referrals
- Follow Up
Users can search and then directly import referring providers from the NPI library in the Treatment Plan.
Against every diagnosis is an ‘Add Orders’ icon. Hovering over a particular diagnosis, shows the ‘delete’ and ‘comment’ icons.

Clicking on the Add Orders icon ‘![]() ‘ a popup containing the Global search bar opens.
‘ a popup containing the Global search bar opens.
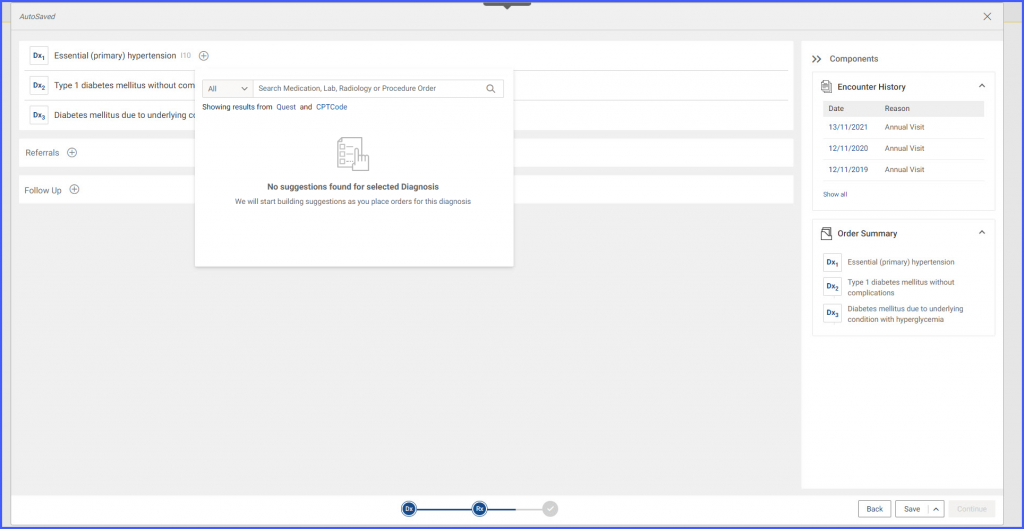
The ‘Global Search’ can be used to search the following:
- Medication
- Lab
- Radiology
- Procedure
Similar to the implementation in the Dx search, a user can look up a clinical order from either ‘All’ lists or their ‘Favorites’ lists.
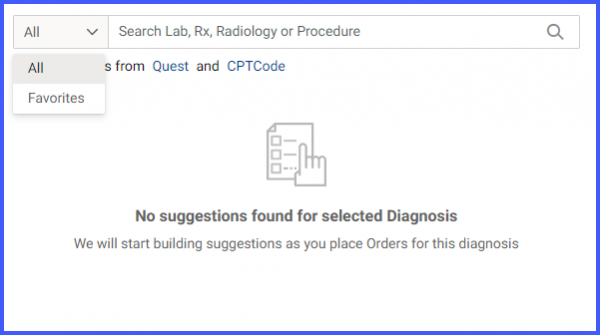
In ‘Favorites’, the results are segregated into tabs with respective favorite lists:
- Rx
- Lab
- Radiology
- Procedure
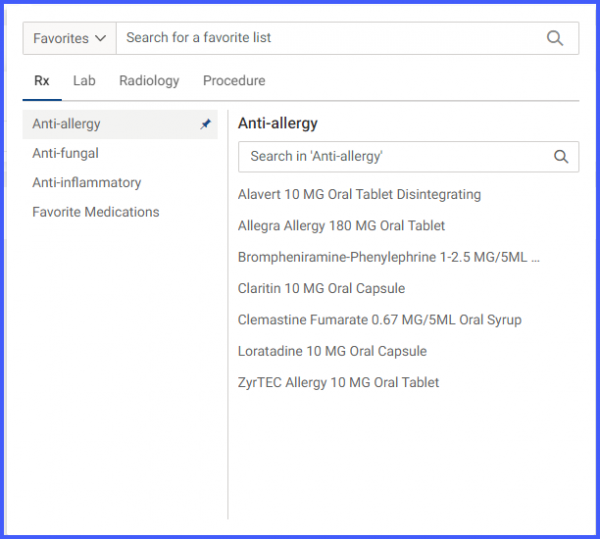
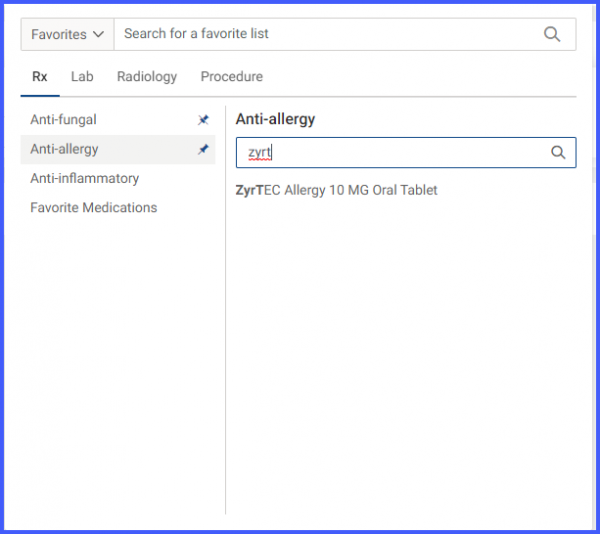
The pin icon ‘![]() ‘ icon appears by hovering over a ‘Favorite’ list in the left pane. Clicking on this icon pins the list on top.
‘ icon appears by hovering over a ‘Favorite’ list in the left pane. Clicking on this icon pins the list on top.
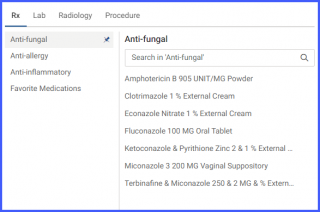
Clicking on the result opens an internal search in the right pane for searching through each specific list.
The user can choose the relevant medication /lab /radiology /procedure and a ’tick’ icon appears, indicating that the component has been added to the treatment plan.
By using the global search, the user can start creating a prescription against a Dx by searching and selecting relevant medications.

After a medication has been selected, the system shows a list of sigs for the selected medication.
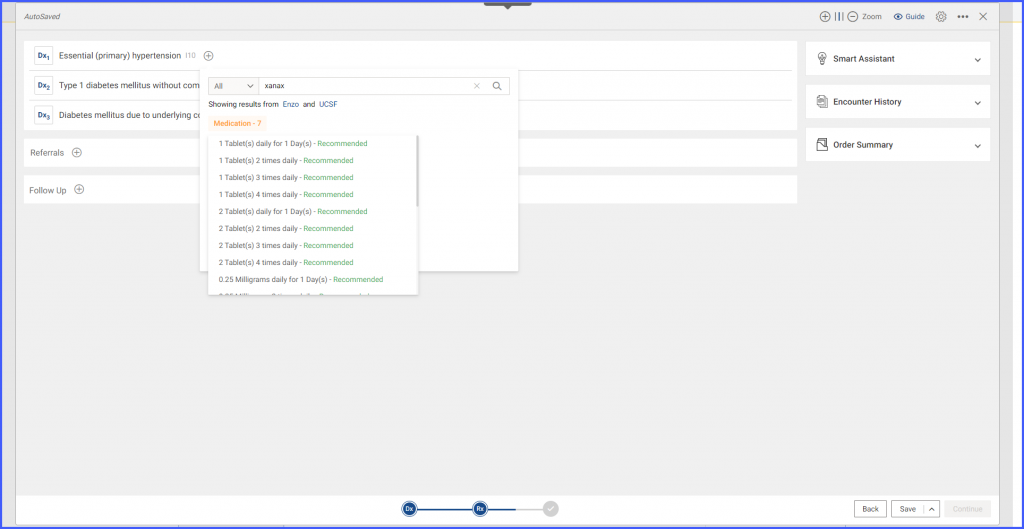
After choosing a sig, the medication is then added to the treatment plan.

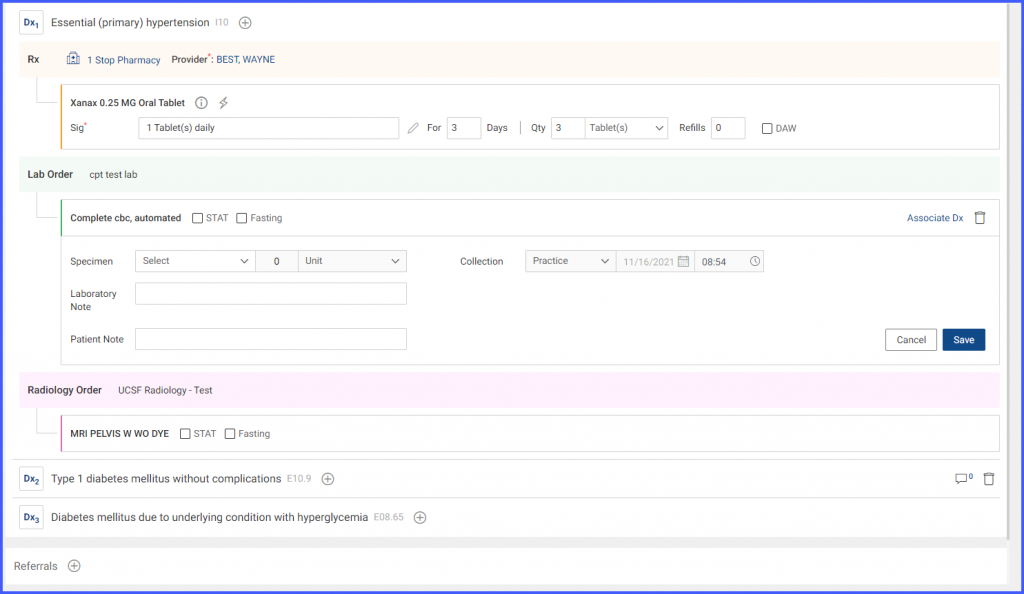
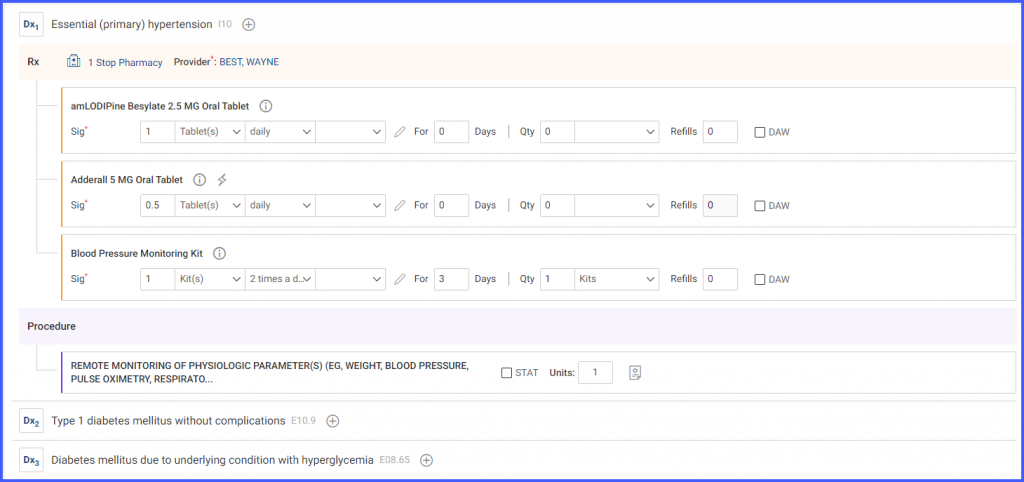
On the main prescription tab, the following fields are present:
- Pharmacy name
- Provider name

Upon further expanding the prescription tab by clicking on ‘Rx’, the following fields are displayed:
- Supervising Provider (if any)
- Location (if the provider has multiple locations)
- Pharmacist (if any)
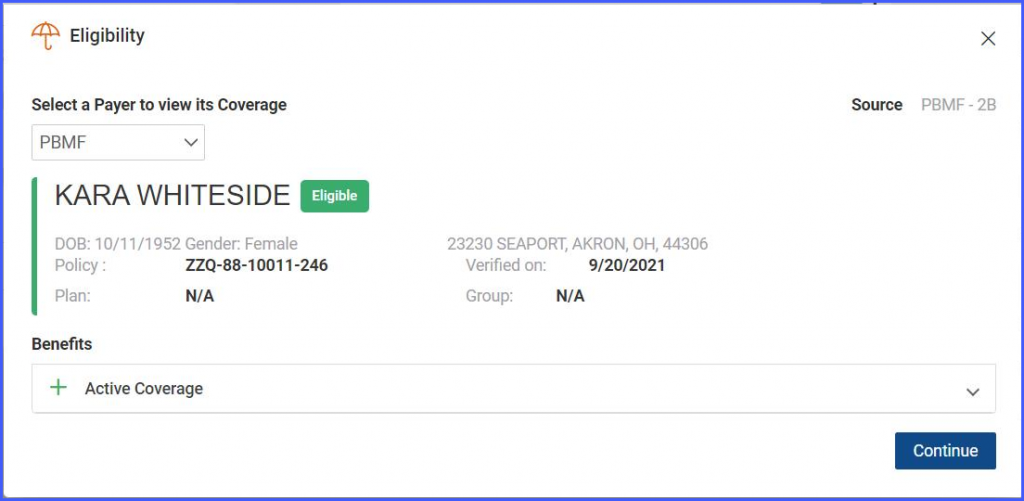
- Eligibility check hyperlink

If the patient’s eligibility hasn’t been checked in the last 72 hours, then the eligibility check is automatically triggered upon adding the first medication.
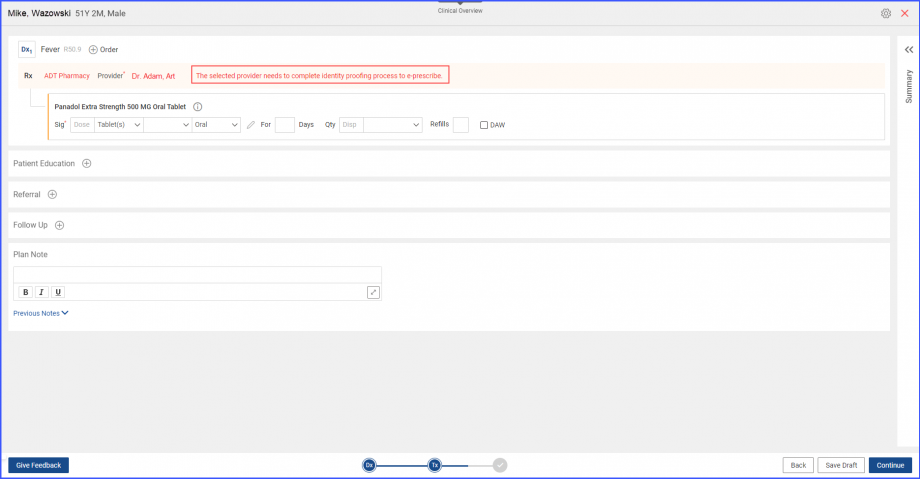
New providers joining a practice must undergo identity proofing before they can send e-prescription orders to pharmacies.![]()
This ensures secure and reliable transmission of electronic prescriptions in accordance with regulations set forth for e-prescribing.
When the associated user electronically prescribes a medication, a message is displayed that states:
‘The selected provider needs to complete identity proofing process to e-prescribe.’
The users can select specific preferences for lab orders.
This allows the user to specify and restrict their lab preferences from settings.
Click here to learn how enable settings for ‘One Test Per Order’.
The user can add one test in one order. The system automatically creates a new order for second test if added to order already consisting of test in it.
Moreover, if user selects multiple tests from the favorite list, new order is created for each test. Similarly, if an order set is selected with multiple tests in it, new order is created for each test.
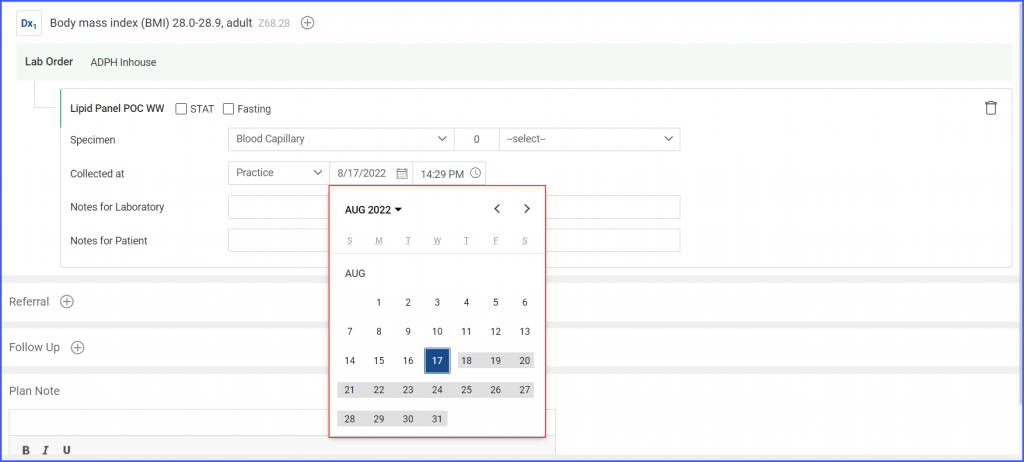
Click here to learn how enable settings for ‘Disable Specimen Collection on Future Dates’.
The specimen collection date is automatically selected as present date and calendar drop-down for the future collection dates are disabled.
The user can also run the eligibility check using the ‘Check’ hyperlink in the Rx tab.
Upon hovering on the Rx section, the following icons appear:
- Associate Dx
- Delete
Clicking on ‘Associate Dx’ allows the user to associate only one other Dx present in the ‘Today’s diagnosis’ to this diagnosis’ Rx.

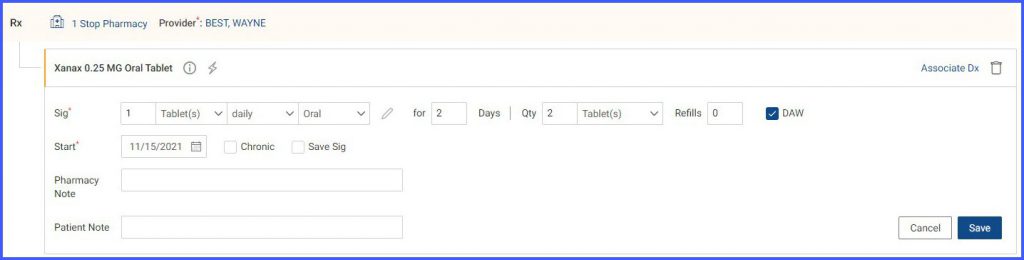
The user can fill in the following fields of the medication.
- Dosage | Frequency | Route
- Days
- Quantity
- Refills
- DAW

Clicking on the medication name expands the medication to show the following additional fields.
- Chronic checkbox
- Start Date (by default of the current day)
- Save Sig checkbox
- Patient Notes
- Pharmacy Note
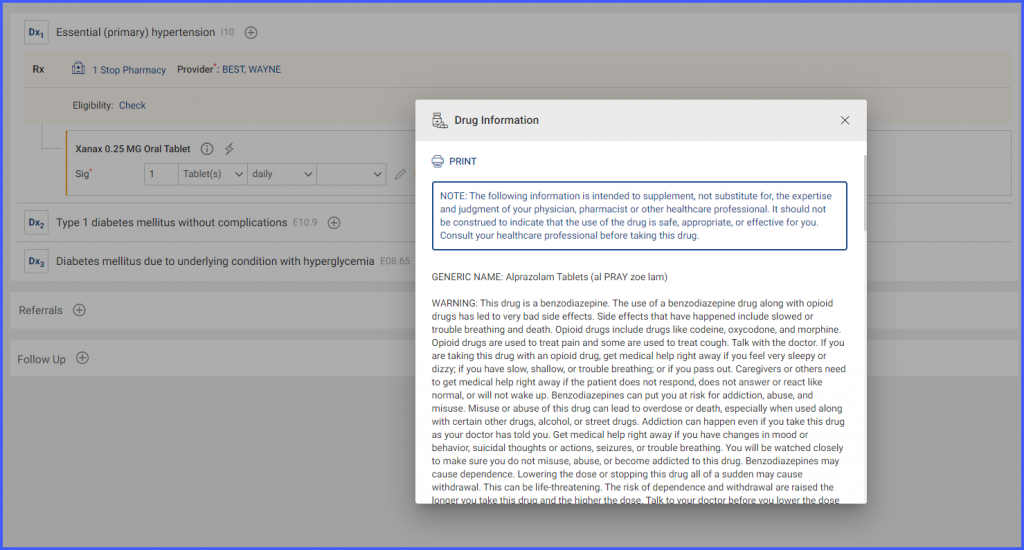
Against every Rx name is an icon for information. Upon hovering on that icon, a tooltip stating ‘Drug Information’ is displayed.

Clicking on this icon opens up a pop-up with detailed information pertaining to that drug. The print option is also displayed in order for printing this information.
Clicking on the ‘pencil’ icon allows the user to add free-form sig. Upon clicking it, the sig fields are converted into a single text box and the user can write in custom sig details. Clicking on this icon reverts the text field back to 4 separate sig fields.

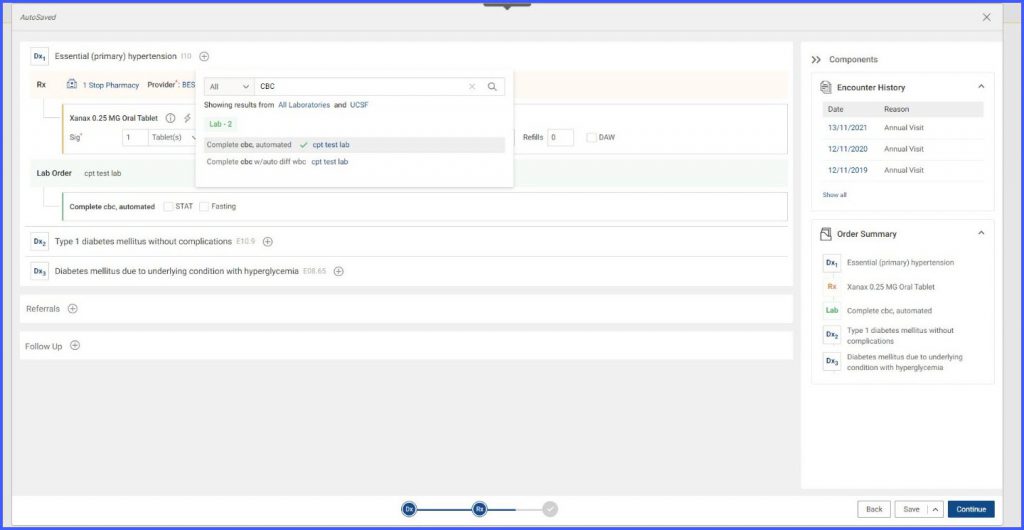
The user can create a lab order against a Dx by accessing the global search and looking up a lab test. The user can search for a lab test using either specific keywords or CPT codes.
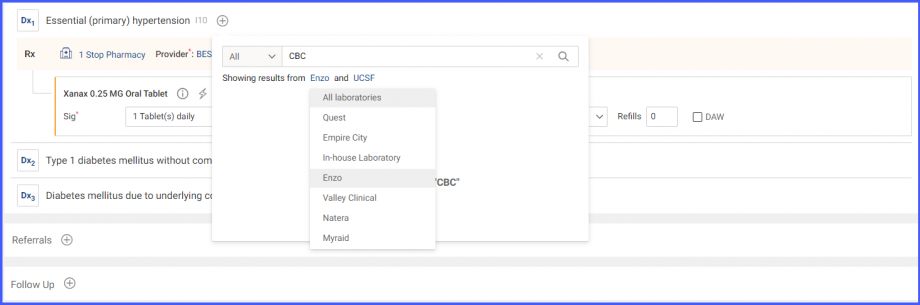
By default, the lab order results are fetched from the patient’s preferred lab. If the patient’s preferred lab hasn’t been recorded then the lab results are fetched from all laboratories. The provider can filter out the results from a lab of their choice by clicking on the relevant hyperlink and accessing the selection dropdown.
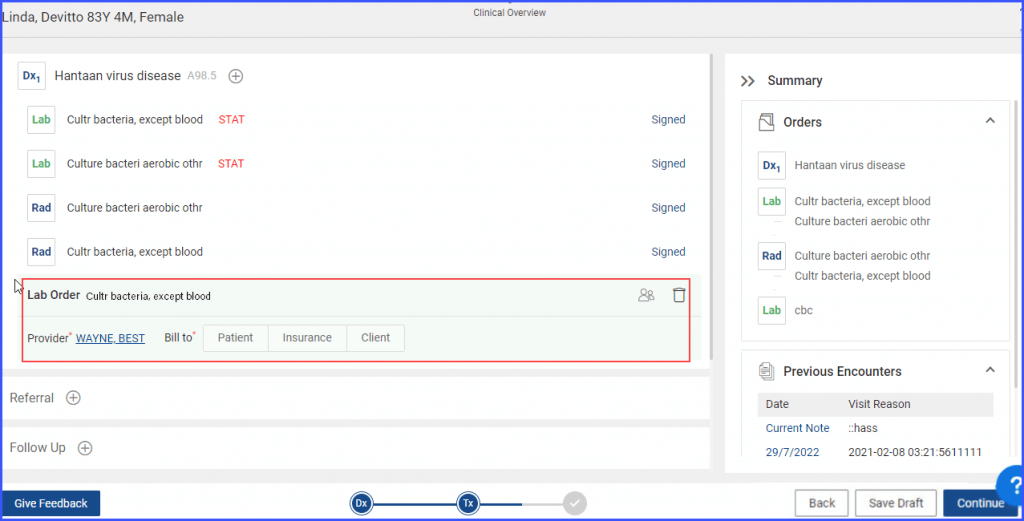
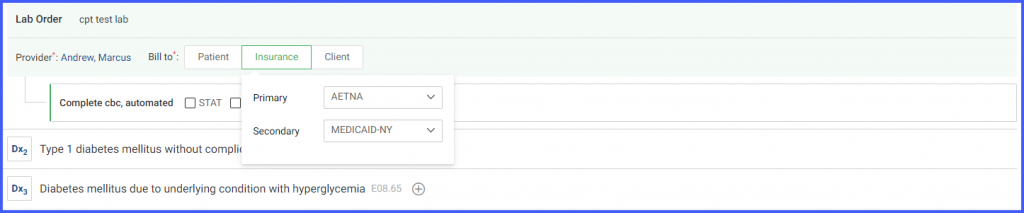
The main lab order bar contains the lab name. Expanding the lab order by clicking on the ‘Lab Order’ bar displays the following fields:
- Bill To
- Ordering Provider

The user can choose who to bill to from the following options:
- Patient
- Insurance
- Client
On choosing ‘Insurance’ the user has to add further insurance information such as choosing a primary and secondary insurance etc.
Upon hovering over the Lab test, the ‘Delete’ and ‘Associate Dx’ controls appear.

A lab test can be expanded to reveal the following additional fields:
- Specimen
- Collection Date
- Laboratory Note
- Patient Note
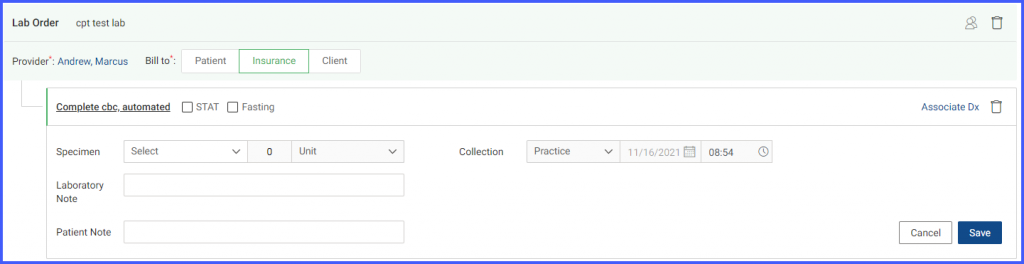
The user can fill in the relevant fields and press ‘Save’ to save the lab test as part of the lab order.
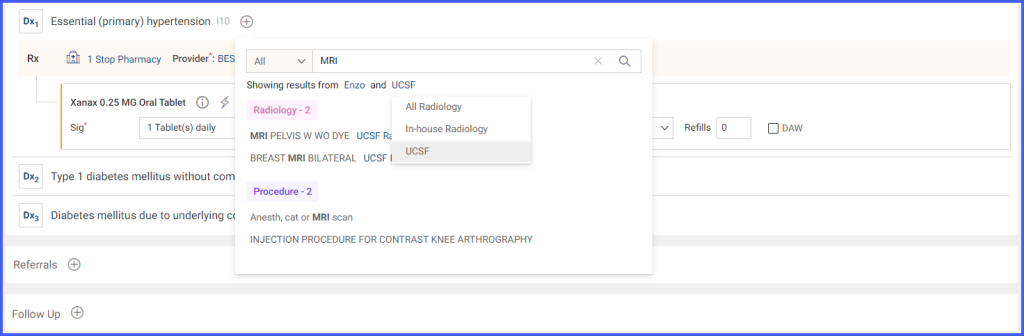
The user can add a radiology order against a Dx by accessing the global search and adding radiology tests.
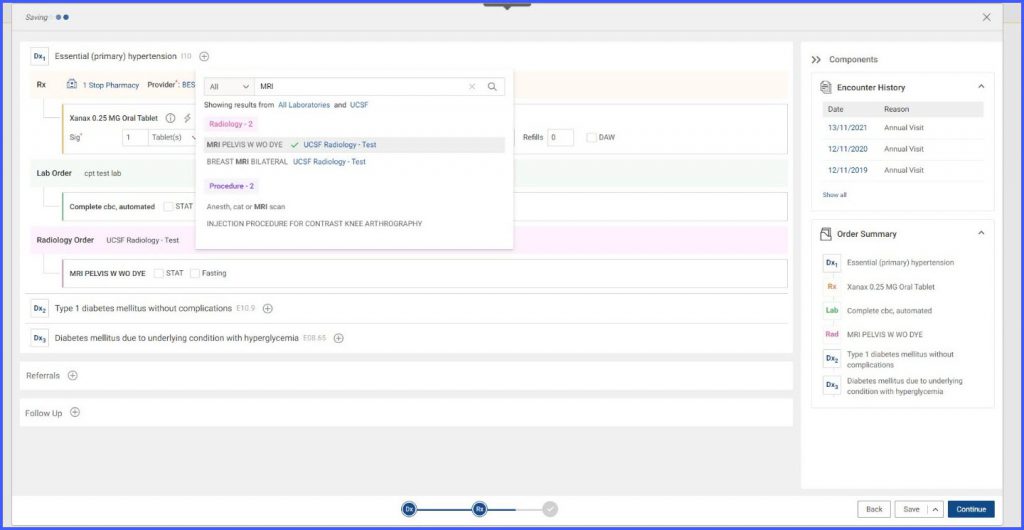
Similar to the Lab Order implementation, the user can search for radiology tests from ‘All Radiology’ or any preferred lab by accessing the radiology dropdown from the radiology hyperlink in the global search.
Similar to the Lab Order, the user can view the radiology order lab name in the main bar. The user can also explain the radiology order bar to view the following fields:
- Ordering Provider
- Bill To

The user can mark the following two fields for a radiology test:
- STAT
- Fasting
Upon clicking the radiology test name, the test is expanded to reveal the following fields:
- Test Note
- Patient Note

Once the user has clicked ‘Save’, the information for the radiology test is saved.
The user can create a procedure order against a Dx by accessing the global search and searching for procedures.
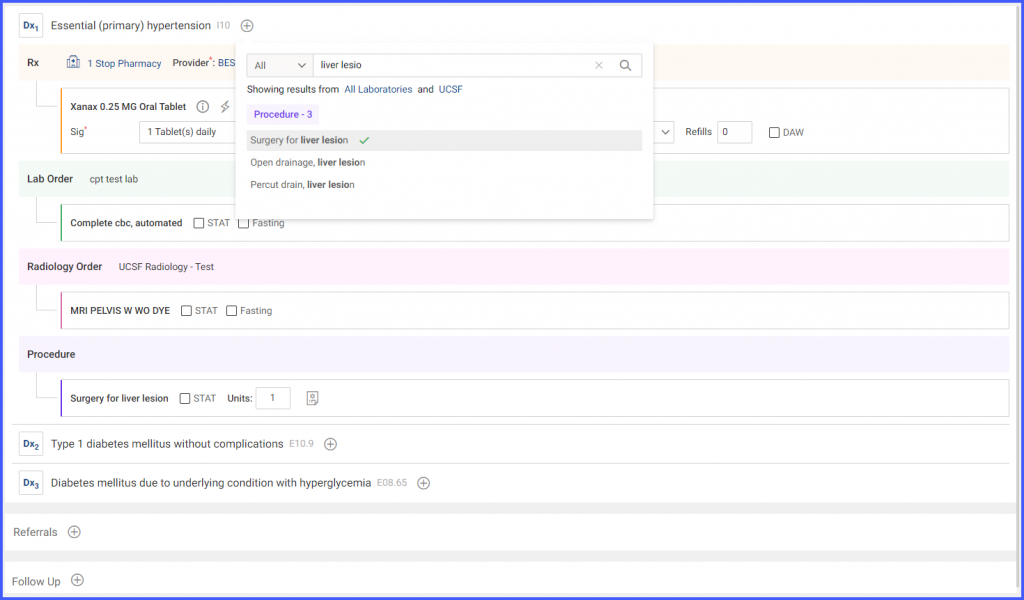
The procedure main bar can be expanded to view the ordering provider for the procedure. Hovering over the main tab shows the ‘User Assignment’ and ‘Delete’ controls.

The ‘STAT’ checkbox can be marked and the number of units for a procedure can be filled in the units field. Expanding a procedure shows the following fields:
- Modifiers
- Order Note
- Patient Note
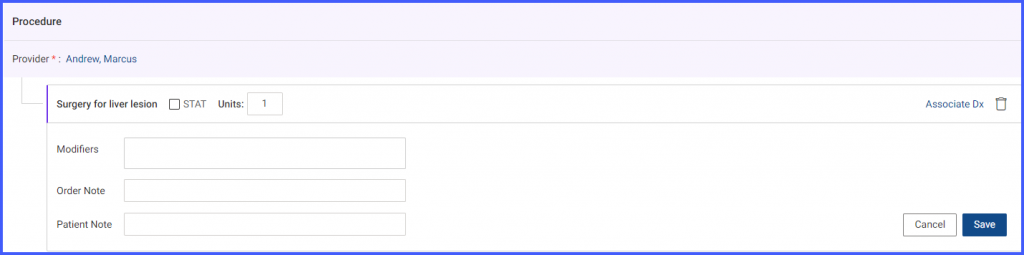
Clicking on ‘Save’ saves the details against the ordered procedure.
For deleting an order, the user can use the delete button against the relevant component. Deleting an order removes all components from that order and deleting a Dx removes all orders made against that Dx.
A user can use the global search to add the Order Sets against the diagnosis. The order sets are associated with the diagnosis and have orders related to multiple clinical components. The order sets appear as ‘Suggested Orders’ in the global search against the relevant Dx.
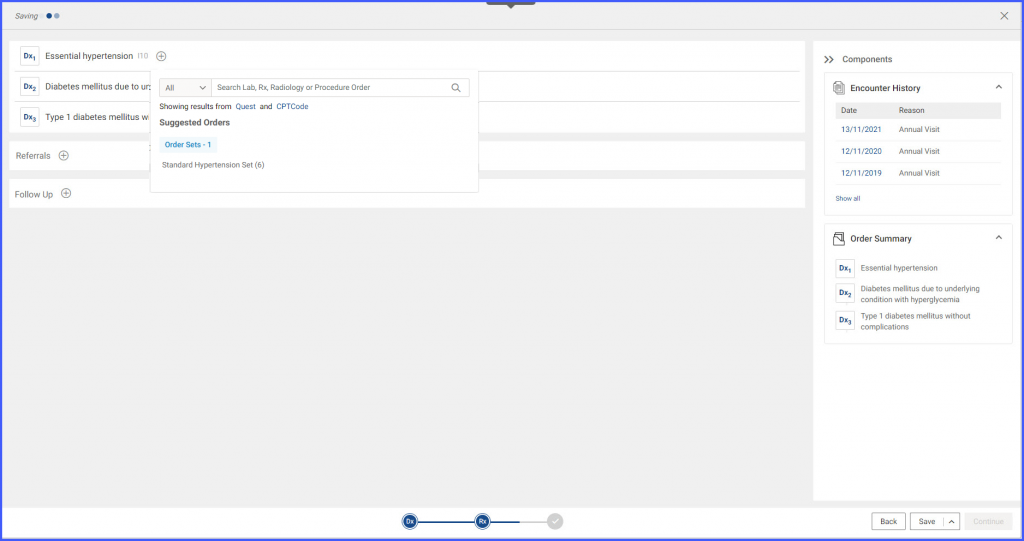
Selecting an order set from the global search associates all orders from that order set with the Dx.
As the user continues to use the treatment plan, the system starts recommending orders that a user has placed against a particular diagnosis previously.

The user can attach components from the suggested orders or search for a particular component using the global search as previously described.
If at any point, the user wishes to add another diagnosis, the user can use the ‘Back’ button.
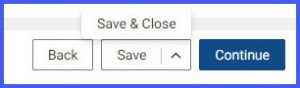
At any point in time, the user can choose to:
- Save the treatment plan (by using the ‘Save’ button)
- Save the treatment plan and go back to the provider note (by using the ‘Save & Close’). This is accessible by clicking on the upward arrow next to ‘Save.’
If the user is done with the treatment plan and wishes to move to the signing stage, the user can click on ‘Continue’ to go ahead.
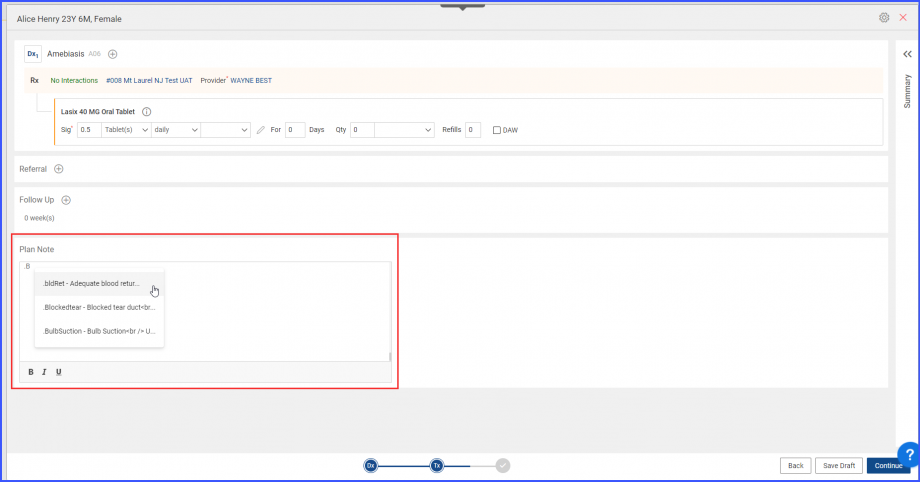
Users can use smart phrases in the plan notes section of the treatment plan.
This saves users from the hassle of writing long instructions or descriptions.
Click on the text box under ‘Plan Note’ and type-in the desired keyword starting with a dot(.).
Then press ‘Ctrl + Space’.
The system displays a list of top 5 results stored in alphabetical order.
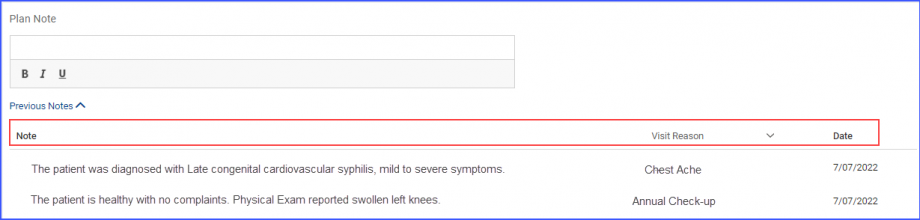
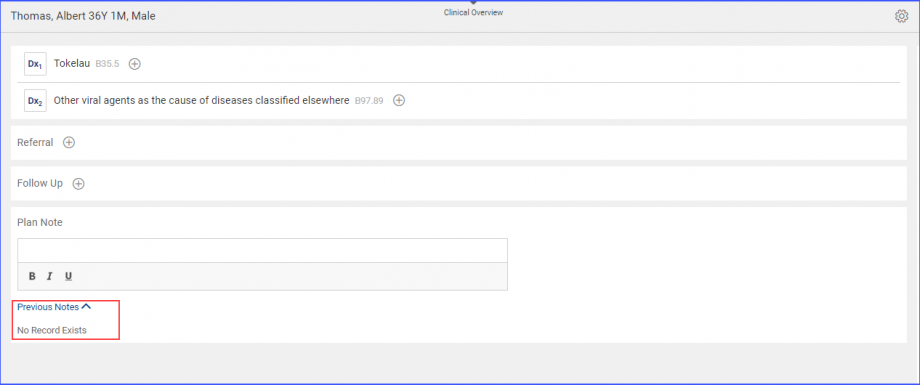
The users can view patient’s previous plan notes in the treatment plan.
This allows providers to review patient’s complete health records while drafting the new treatment plan.
The ‘Previous Notes’ hyperlink is displayed under the ‘Plan Note’ section on the ordering screen.
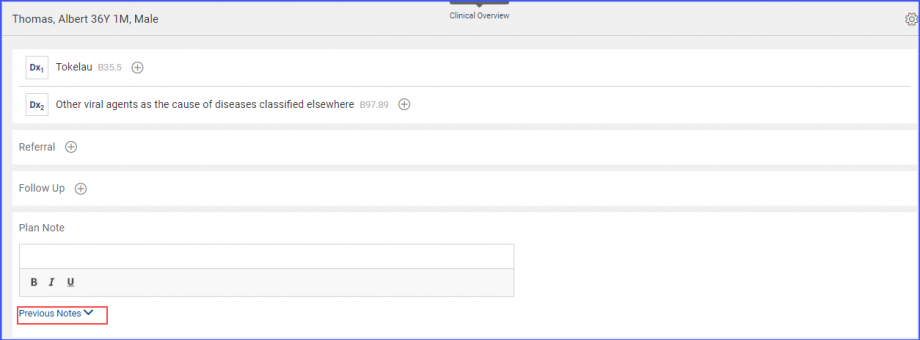
Clicking on the hyperlink displays the list of previous notes of the patient under ‘Note’ along with ‘Visit Reason’ and ‘Date’.
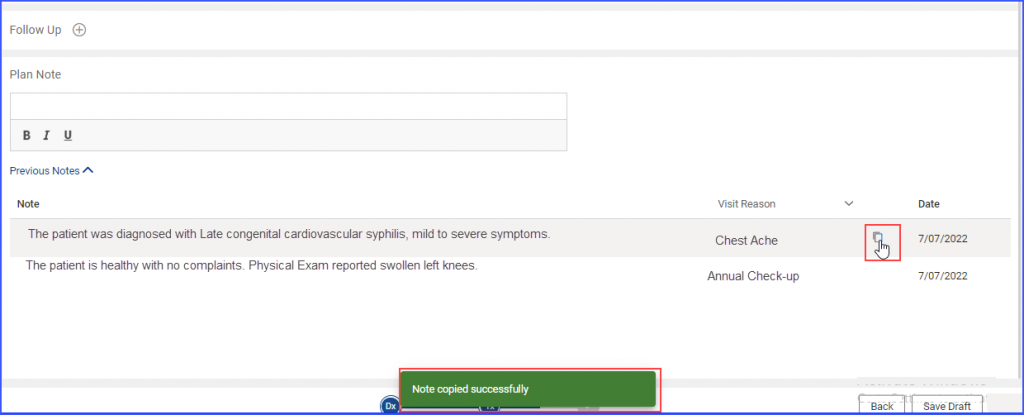
Hovering over a specific note displays the ‘Copy’ icon. Clicking on the copy icon displays a message, ‘Note Copied Successfully’ at the bottom of the screen.
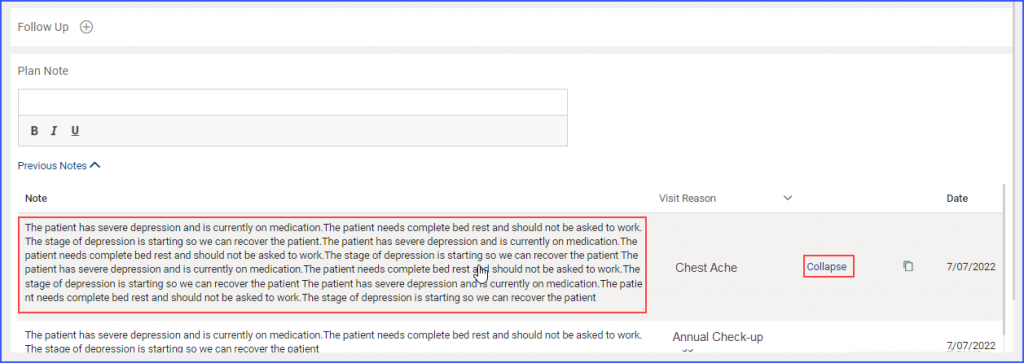
Clicking anywhere on the note displays the complete note. A ‘collapse’ hyperlink is also displayed by the system. Clicking on ‘collapse’ hyperlink collapses the note.
The users can also filter the Note list based on ‘Visit Reason’.
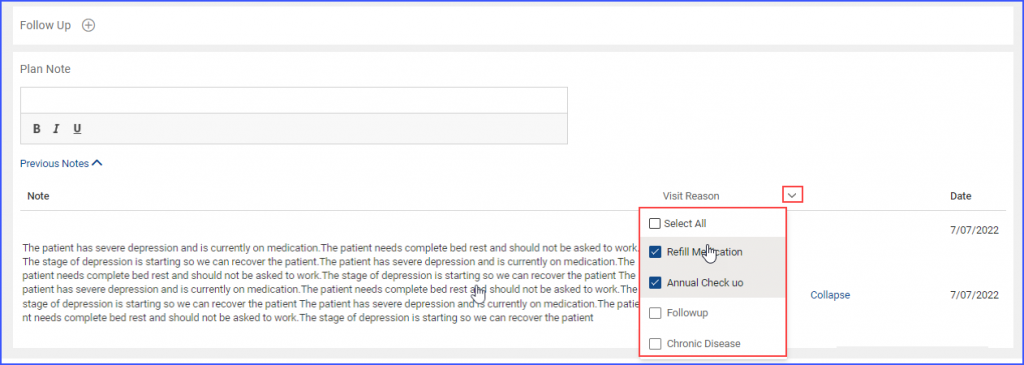
‘No Record Exists’ is displayed by the system if no Previous Plans exists for the patient.
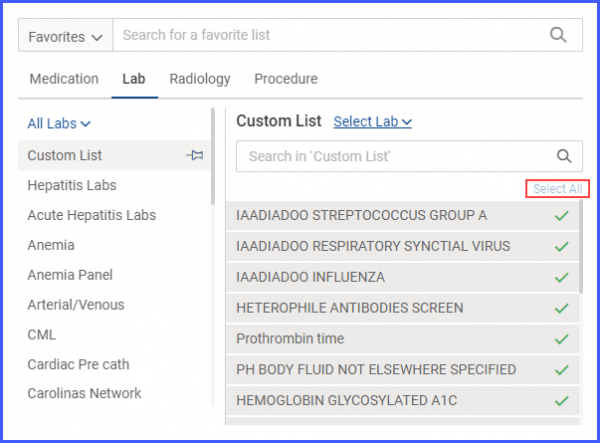
Users can select lab and radiology orders in bulk from the favorite list in the treatment plan.
Providers don’t have to select each order individually.
New lab orders can be added to the favorite list in the treatment plan.
Click here to learn how to add favorite lab orders.
Similarly, new radiology orders can also be added.
Click here to learn how to add radiology orders in the custom list.
In ‘Favorites’, when the user clicks on a result in the left pane under the ‘Lab’ or ‘Radiology’ tab, then the system displays a ‘Select Lab’ or ‘Select Radiology’ dropdown, respectively, next to the result heading in the right pane.
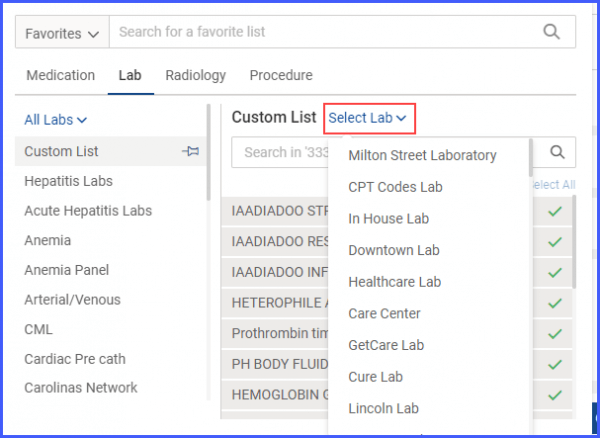
Once the desired lab or radiology is selected, the user can click on the ‘Select All’ option under the search bar to choose all the components present in a result.
Click anywhere on the screen to close the ordering popup.
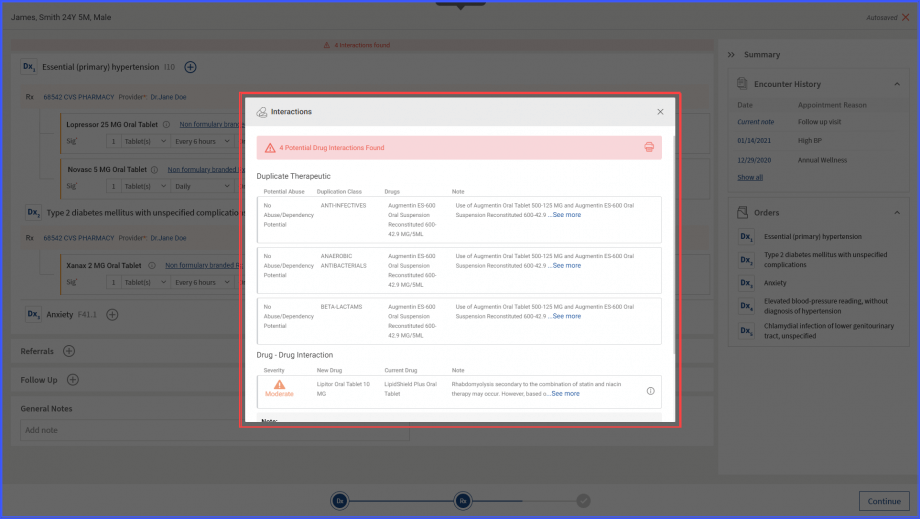
The drug interactions are displayed at the global level in the treatment plan.
Users get notified about all the possible interactions which could be fatal for the patient.
The user has added multiple drugs under a diagnosis. If one or more drug interactions are found, then the system displays the drug interaction in red color on the top right corner of the screen.
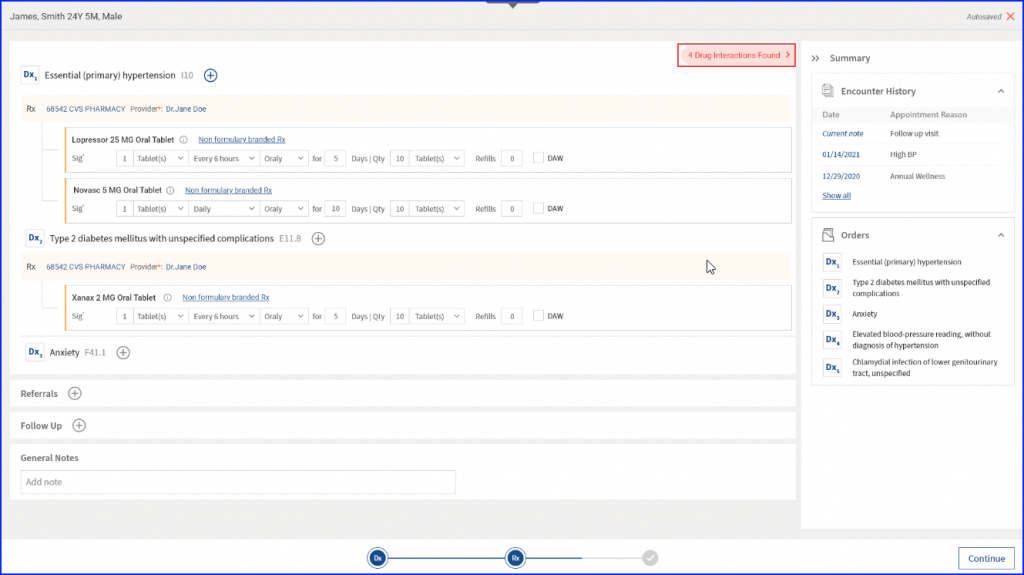
Clicking on the alert opens a popup window containing the details about drug interactions.
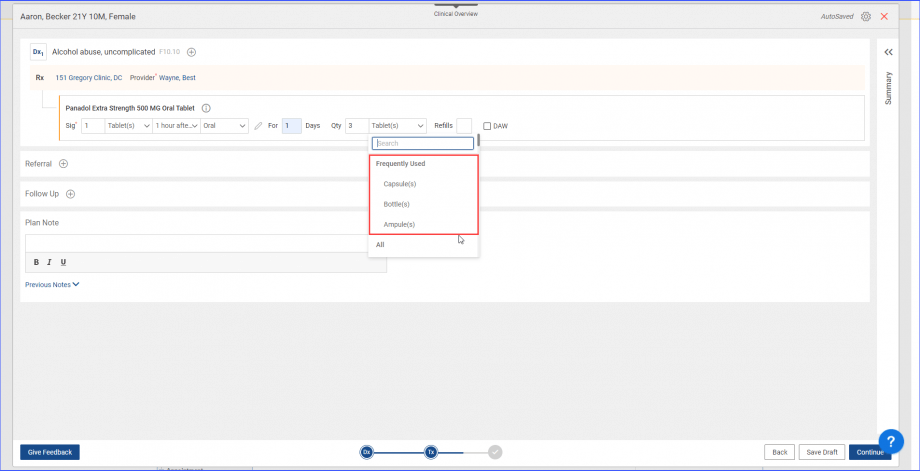
Frequently used dispense forms are displayed when sig is being filed for a prescription in the treatment plan.
Users don’t have to skim through the entire dropdown to find the relevant packaging.
The user clicks on the ‘Dispense Form’ dropdown in the quantity field of a medication.
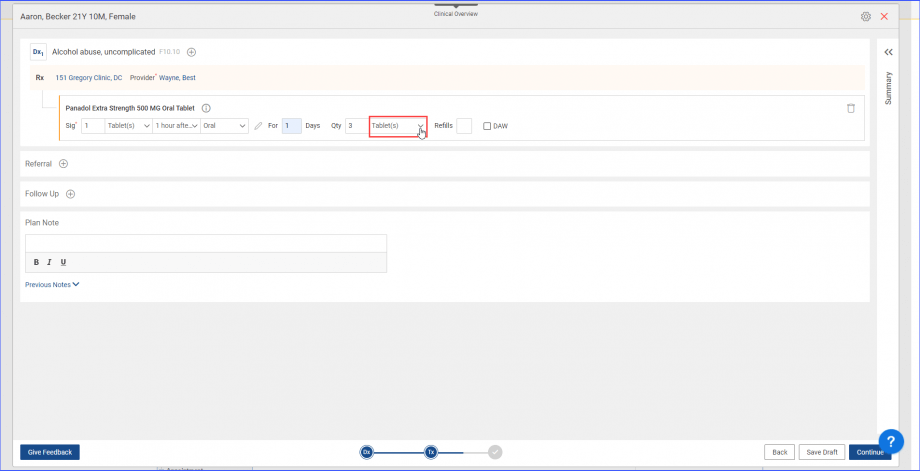
Clicking on the dropdown displays a list of the ‘Frequently Used’ dispense forms at the top of the list.
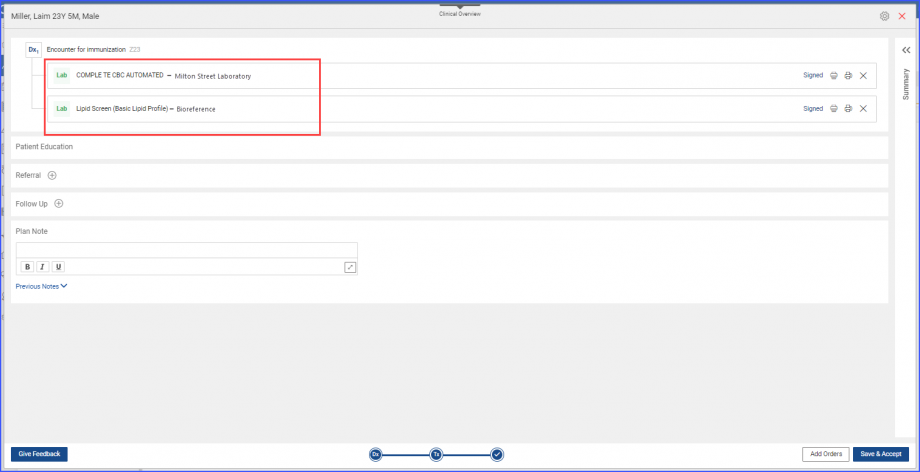
Laboratory name is displayed next to signed lab orders.
Users can query and check for LabCorp ABN requirements in real-time after selecting a lab test from Treatment Plan.
This allows the patient to be aware of whether the ordered lab tests are covered by the insurance or not.
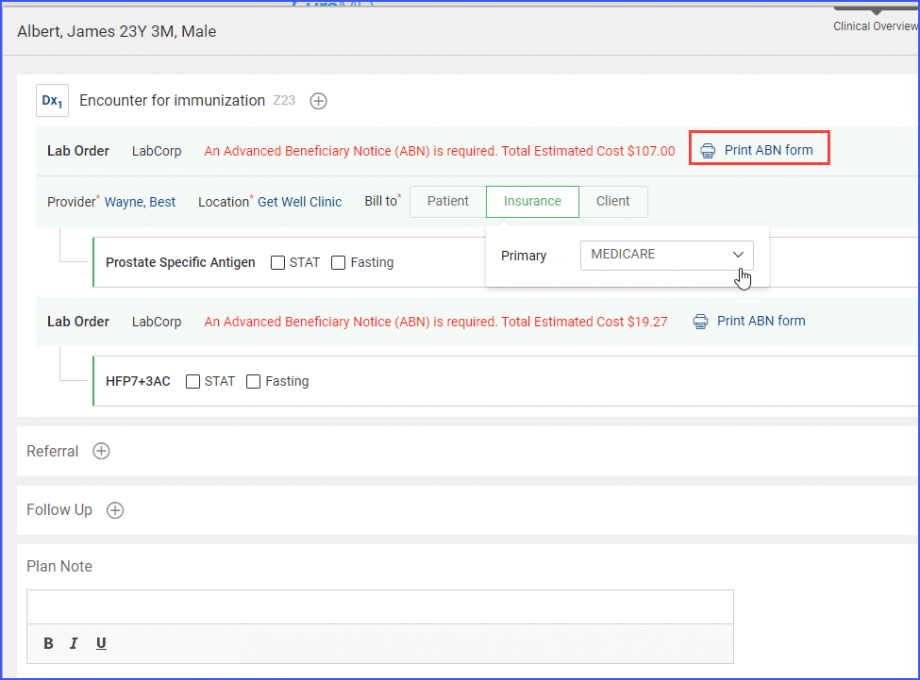
In order to check for the LabCorp ABN, click on ‘Lab Order’ to open the order details dropdown.
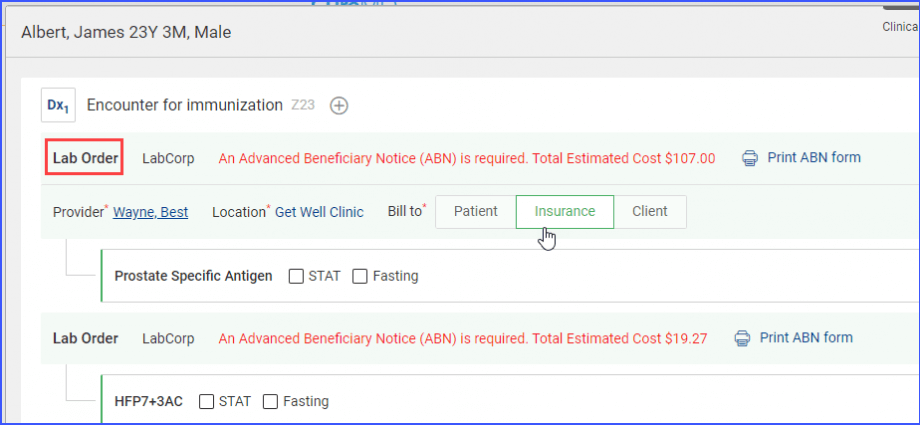
The below mentioned criteria must be followed to enable checking for LabCorp ABN:
- ‘LabCorp’ is selected as the ordering lab.
- ‘Insurance’ is selected in the ‘Bill to’ category.
The user clicks on ‘Insurance’ and sets ‘MEDICARE’ as the primary insurance.
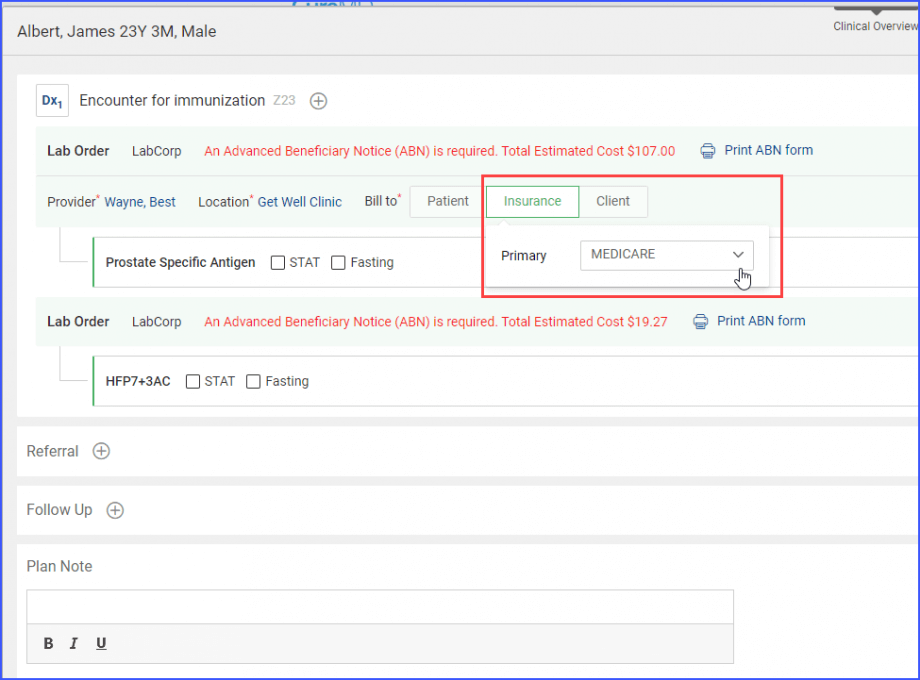
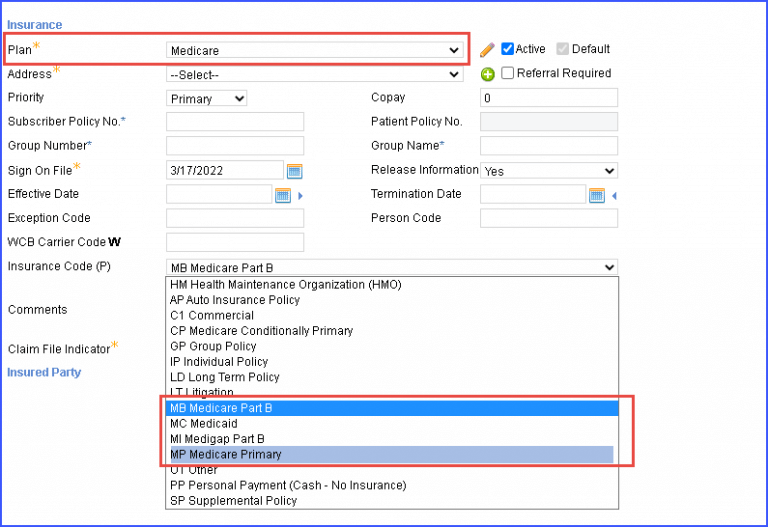
- The patient’s primary insurance must be Federal Medicare insurance & Insurance Code must be either “MP” or “MB”.’
Users can make the necessary changes on the Patient’s Insurance page. Click Here to learn how to select the relevant insurance information.
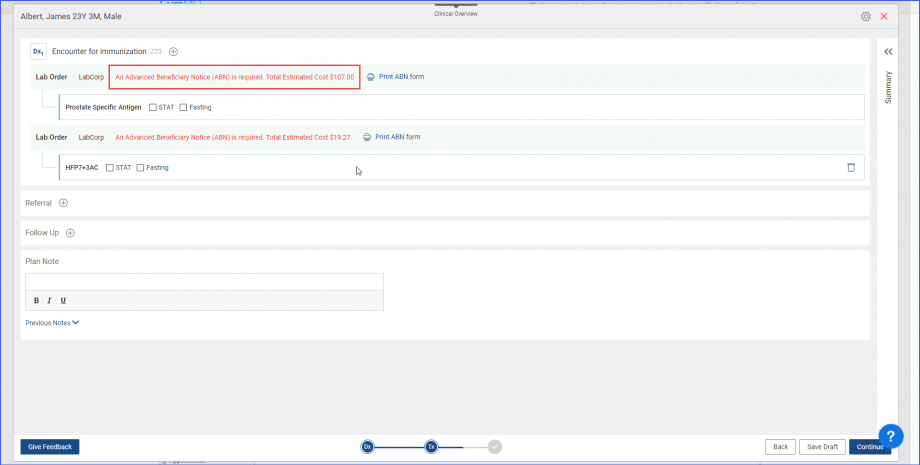
System checks for the ABN requirement in real time once the ‘Lab Order’ has been added.
If the ABN requirement is detected, the system displays a text stating:
‘An Advanced Beneficiary Notice (ABN) is required.’ Along with the total estimated cost of the selected lab order.
The estimated cost is updated when a lab test is added, removed, or edited.
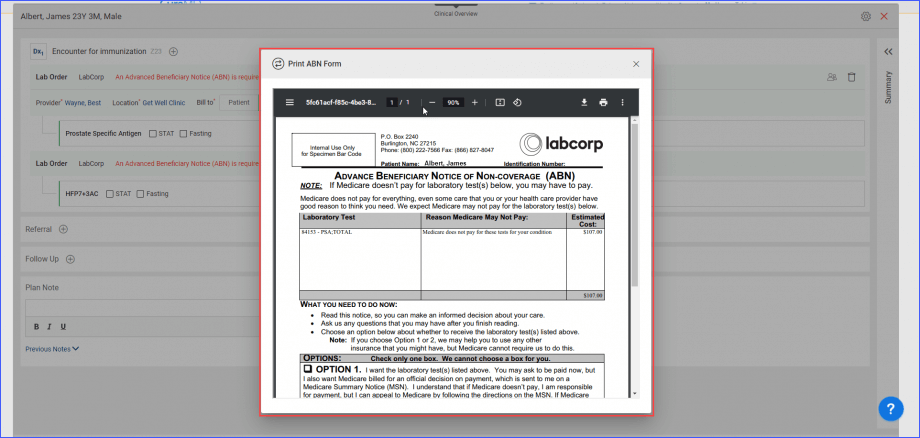
User clicks on ‘Print ABN form’ button to print the ABN form.
Clicking on the print button, opens a new window in which the ABN form is displayed.
If the user continues without clicking on the print ABN button, user cannot print the ABN form again.
The ABN form can be printed again from the ‘Lab Order’ page.
Click Here to access the lab order page.
When the user finalizes the order addition and clicks on ‘Continue’ button, a pop is displayed which states:
‘ABN is required against the order(s) with an estimated cost of $ (Amount). Do you wish to continue?’
The popup displays the total estimate cost of all of the added lab orders.
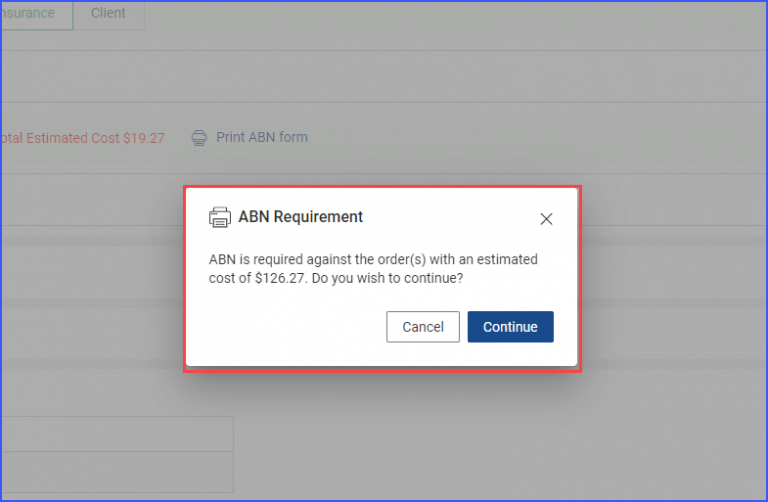
User clicks on the ‘Continue’ button and lands on the order signing page.
To stay on the order page, click on ‘Cancel’.
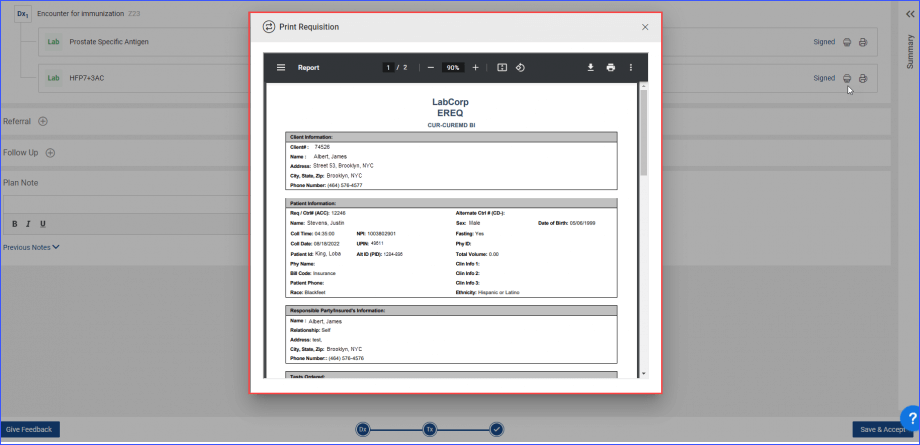
Once the user lands on the order signing page.
User clicks on the ‘Sign Order(s)’ button to sign the added lab orders.
User can then click on the ‘Print Preview’ icon to print the ABN requisition form.

Clicking on the icon displays the requisition form in a new window.
The signed order can be canceled on the treatment plan.
This provide users ability to cancel nonessential orders from the treatment plan.
Click here to learn how to enable the settings for canceling an order.
On the ordering screen, the system displays a ‘Cross’ icon next to all signed orders.
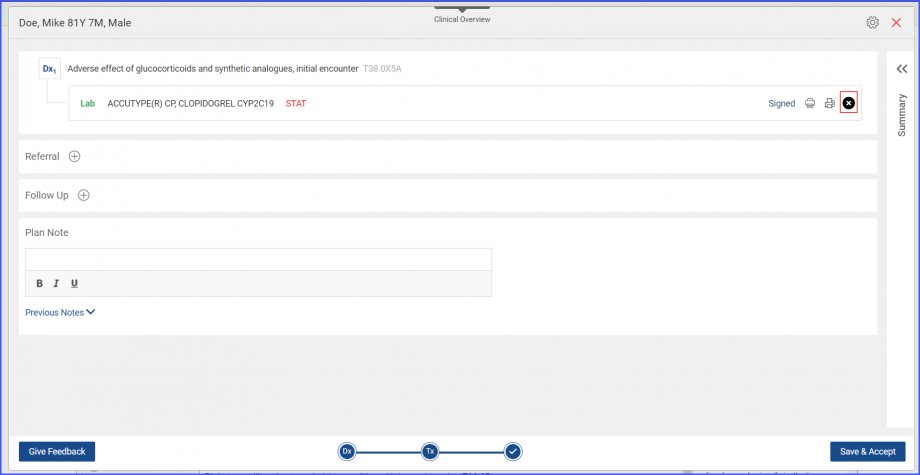
Hovering over the ‘cross’ icon displays a tooltip stating:
‘Mark as Canceled’
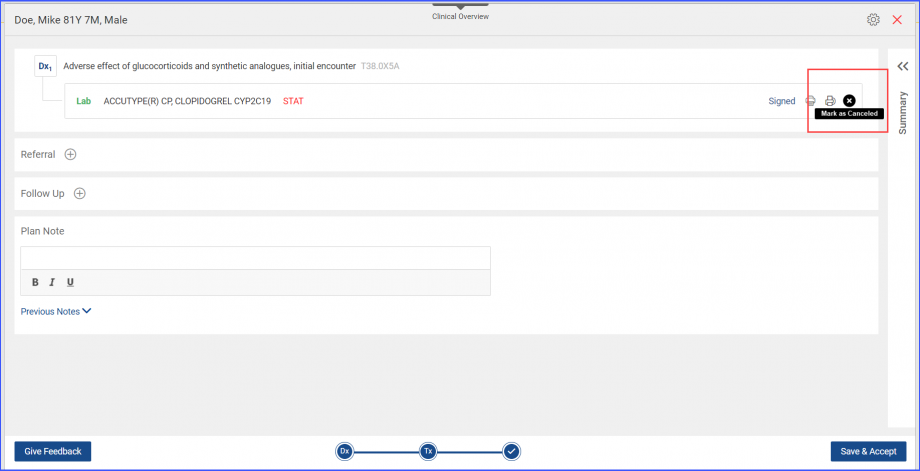
Upon clicking the cross icon, the system displays a prompt stating:
‘Are you sure you want to mark the order as canceled? You will not be able to receive or add a result against the canceled order unless they are restored’.

Clicking on ‘Yes’ displays a ‘Cancellation Reason’ popup.
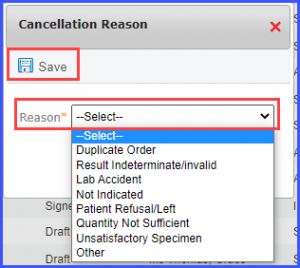
Here, the user has to select a reason from the ‘Reason’ dropdown for cancelling the order the selection of the reason is mandatory.
Once the reason is selected, click on ‘Save’.
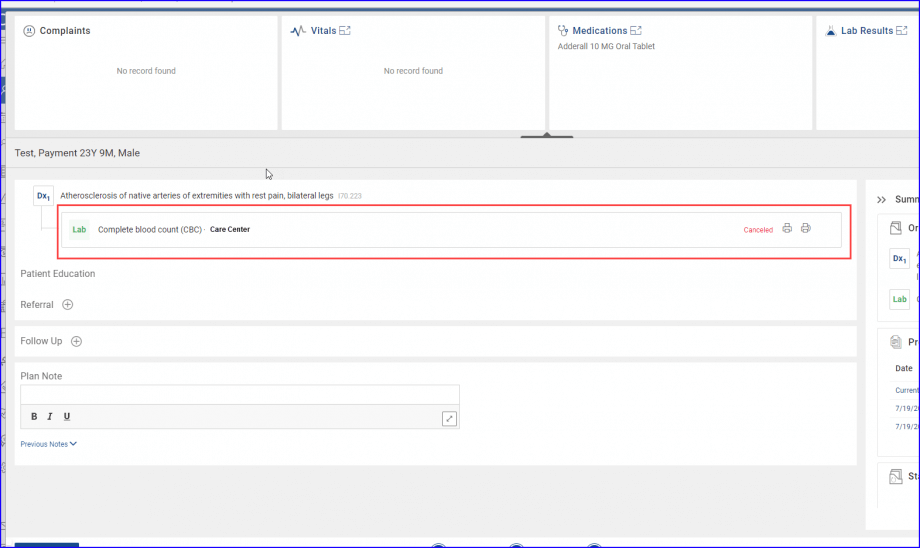
Once an order is canceled, a ‘Canceled’ text appears next to that order in the treatment plan.

After the order has been cancelled, the cross icon gets replaced by the ‘Restore’ order icon.
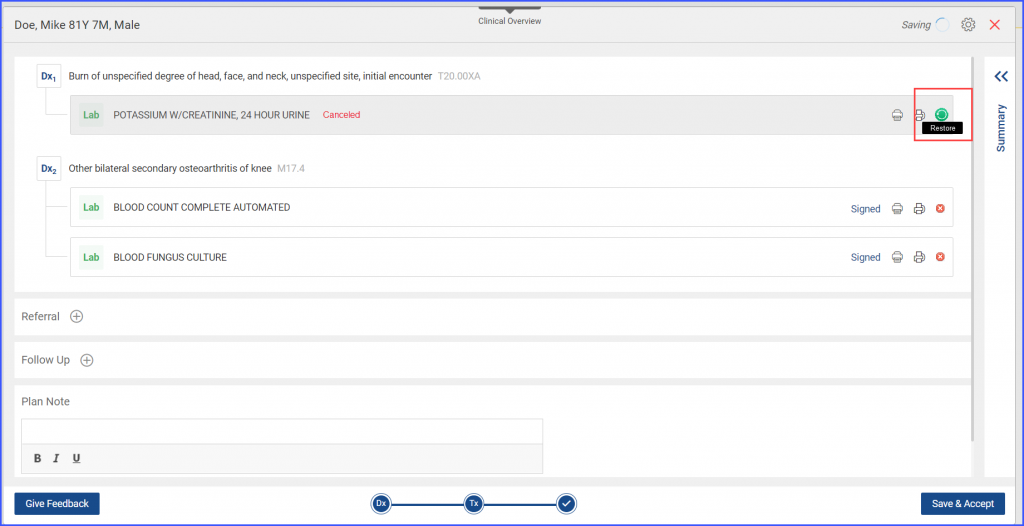
Clicking on restore icon displays a consent prompt stating:
Are you sure you want to restore this order?
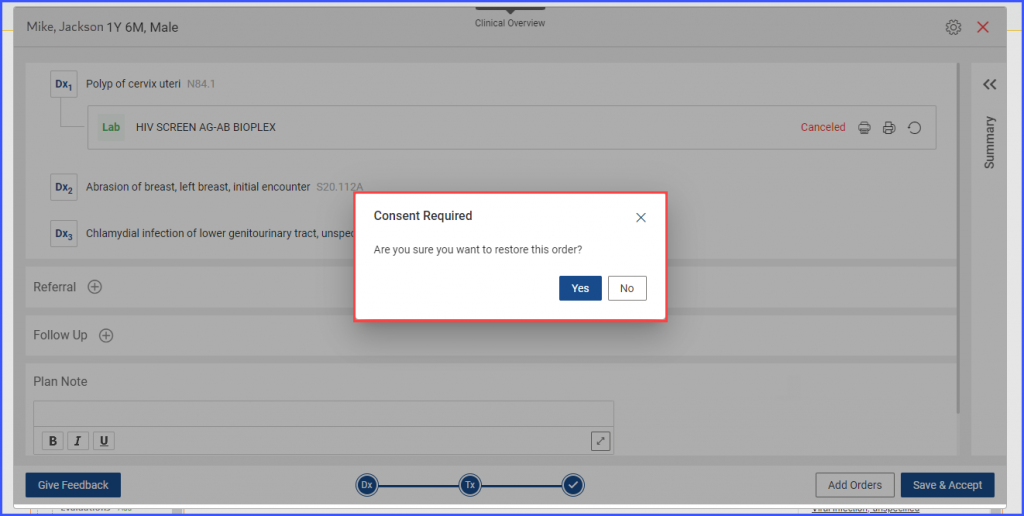
Clicking on ‘Yes’ restores the order.
Treatment plan can be created without the association of an order with a diagnosis.
It allows users to create treatment plan swiftly without adding orders.
The user has clicked on the ‘Continue’ button without adding any order. The system displays a prompt stating:
“No order added. Do you still want to continue?”.
Meanwhile, the “Add Order” button next to diagnosis is highlighted in red.

When the user clicks on the “Continue” button, the system redirects to the “Save and accept” screen and gives an alert as:
“Treatment Plan created successfully.”
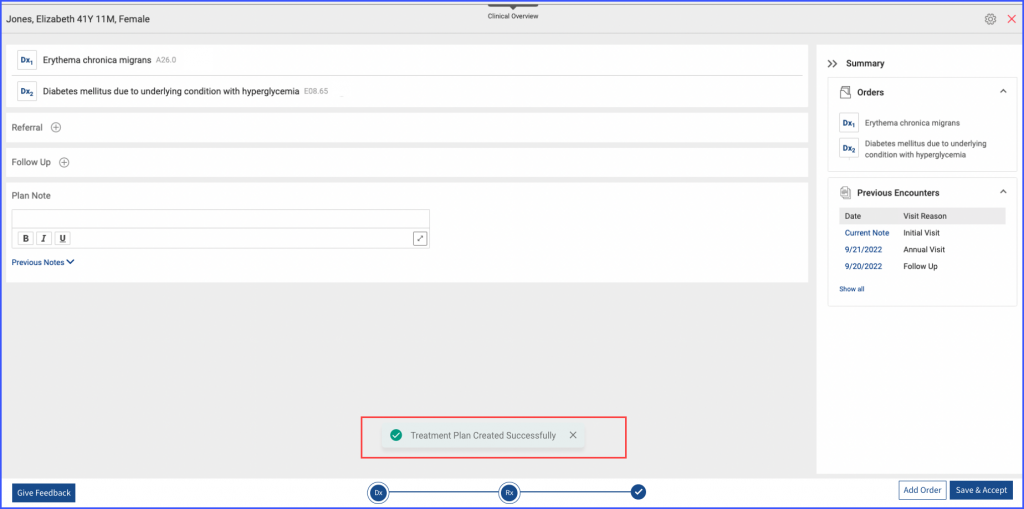
Once the treatment plan is saved, ‘Add Order’ button appears next to ‘Save & Accept’.
users have to validate their credentials for electronic signatures before signing an order in treatment plan.
Click here to view how to enable 21 CFR Part 11 Compliant Electronic Signatures.
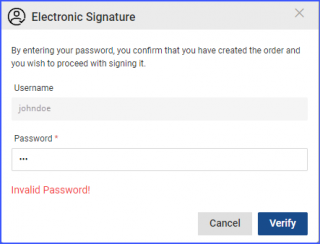
When the user clicks on the ‘Sign’ button, the system displays a user verification popup titled ‘Electronic Signature’ is displayed.

The username field is greyed out and the password has to be provided to validate credentials.
If the user signing the treatment plan is the same who has created the orders, then the popup states ‘By entering your password, you confirm that you have created all orders and you wish to proceed with signing it‘.
The same text appears when the user signing the treatment plan is different from the one who has created the orders.
After typing in the password, click the ‘Verify’ button to sign the treatment plan.
Once the ‘Verify’ button is clicked, the order(s) along with the treatment plan gets signed and the following signature stamp appears on the relevant reports in the treatment plan.
‘Created and electronically signed by [Name](Username) on [Day], [Date] at [Time].’

If the user enters the wrong password, the following message is displayed on the user verification popup:
‘Invalid Password’.
Users can add the same CPT/Lab code with a lab order if the lab test has once been cancelled on the treatment plan.
This ensures that the system allows the users to add a new test with the same CPT/Lab code.
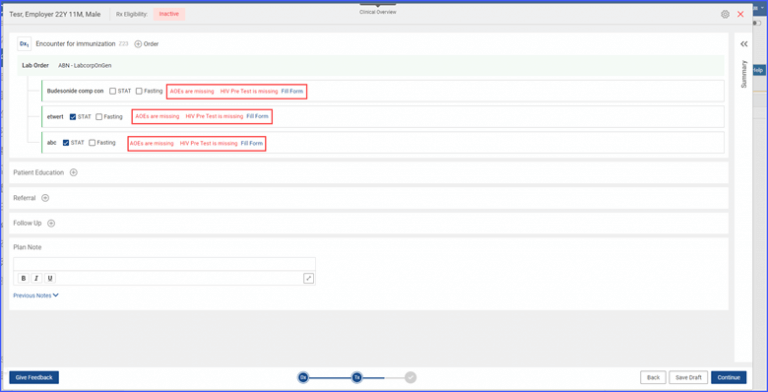
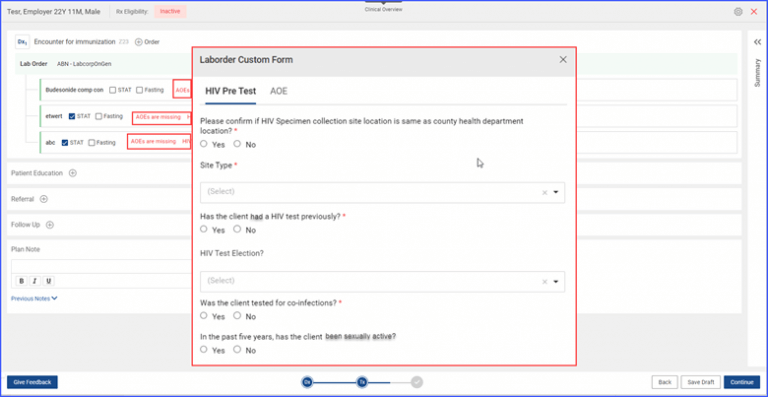
The users have the ability to access and complete custom forms associated with lab orders added through ‘Provider Notes’ and ‘Treatment Plan.’

Within the “Provider Notes” section, when creating a treatment plan, the user can add an order set to the plan. After selecting a diagnosis and proceeding to add an order, the user chooses the desired order set. Once done, the user has the ability to view and fill out custom forms associated with the selected test. The user can simply click the “Fill Form” hyperlink alongside the test, ensuring a smooth and comprehensive experience when managing the orders.
Similar enhancement has been made to ‘Provider Notes’. click here to view.
