How to View a Charge?
To view charges, navigate to ‘Patient’ module, expand ‘Billing’ and click ‘Charges.’ This page displays all the charges. User can edit these by clicking Appointment Date and Time.
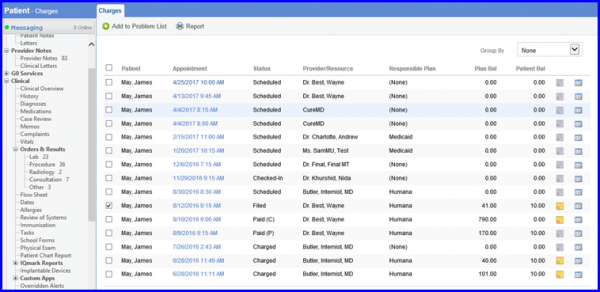
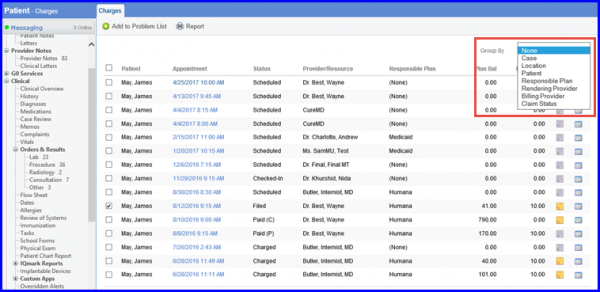
You can also view these charges by grouping them into categories available in the dropdown.
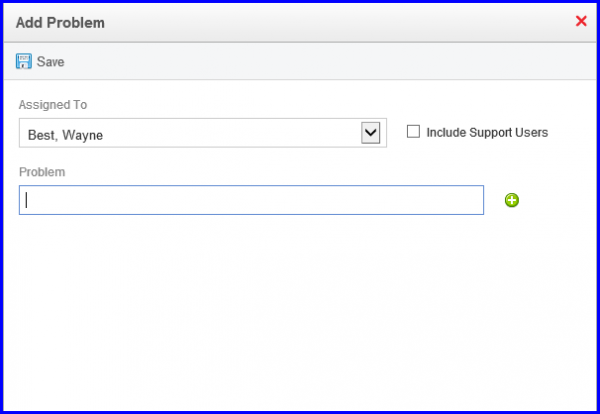
To add a charge to problem list, select the desired charge and click ‘Add to Problem List’ This displays a pop up. User can assign this to any resource and explain the problem in the description section. When done, click ‘Save.’
On the ‘Charges’ screen, user can see the charges list. From the list, click the log of the patient whose charge is converted. User can see the date and time with the name of the user who converted the charge.
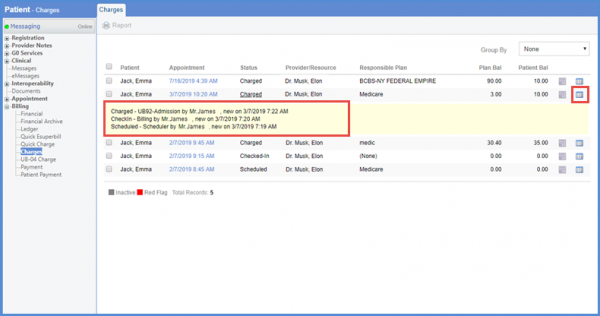
If the charges are converted by selecting the multiple charges, user can see ‘Bulk Conversion’ written with the charge.
Similarly, user can see the change log in the status along with the comments. The comments represent how the charges were converted.

Click ‘Appointment’ date hyperlink to navigate to ‘Add/Edit Charges’ page.
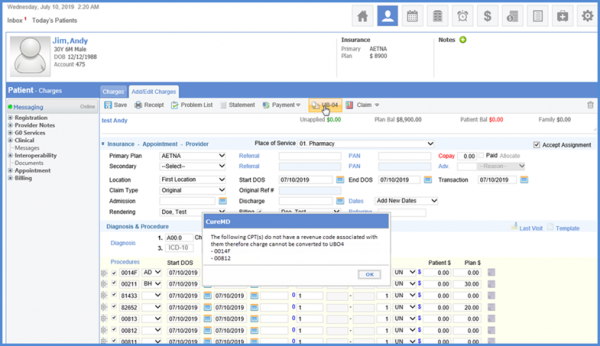
Click ‘UB-04’ to convert the charge into a UB-04 charge.
If the charge has the revenue code associated with it, it is converted into the UB-04 charge. If there is no revenue code associated with any CPT(s), user can see a prompt on the screen.
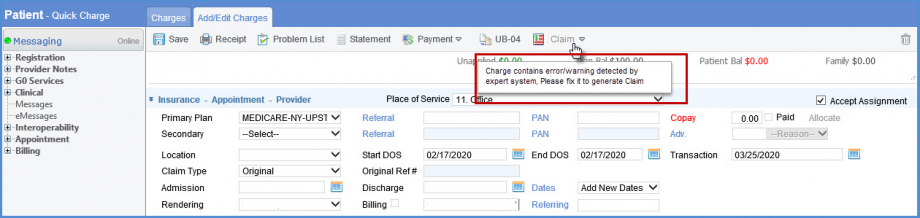
Only users with certain roles are permitted to submit claims if the expert system detects a warning/error.
If an unauthorized user tries to submit a claim then upon hovering on ‘Claim’ button a tool tip ‘Charge contains error/warning detected by expert system. Please fix to generate claim’ is displayed.
To see how to enable this feature, click here.
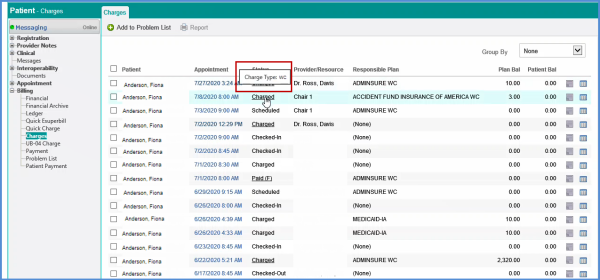
User can see the charge type WC in the Charges Type drop down on the charge page.
On hovering on the appointment status, the Charge Type WC is displayed.
ICD – 9 codes have become obsolete and have been removed from the charges page. Only ICD – 10 codes are visible here.
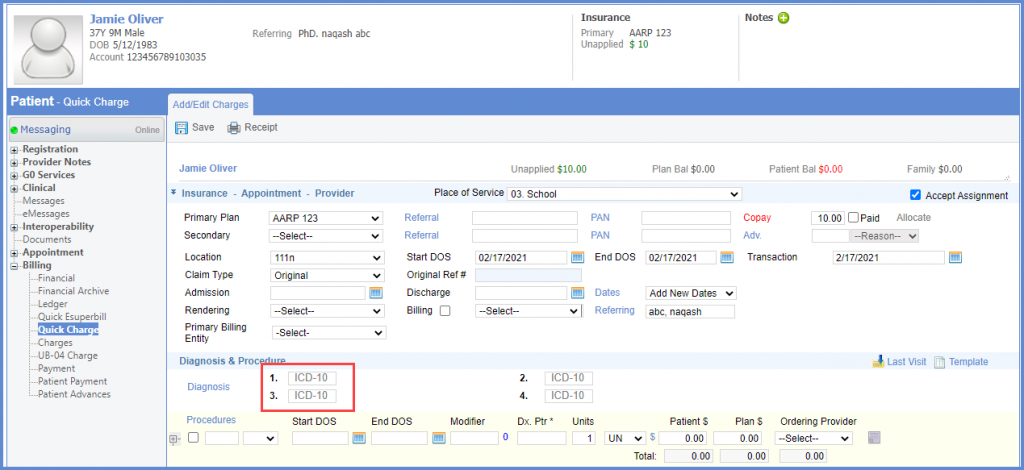
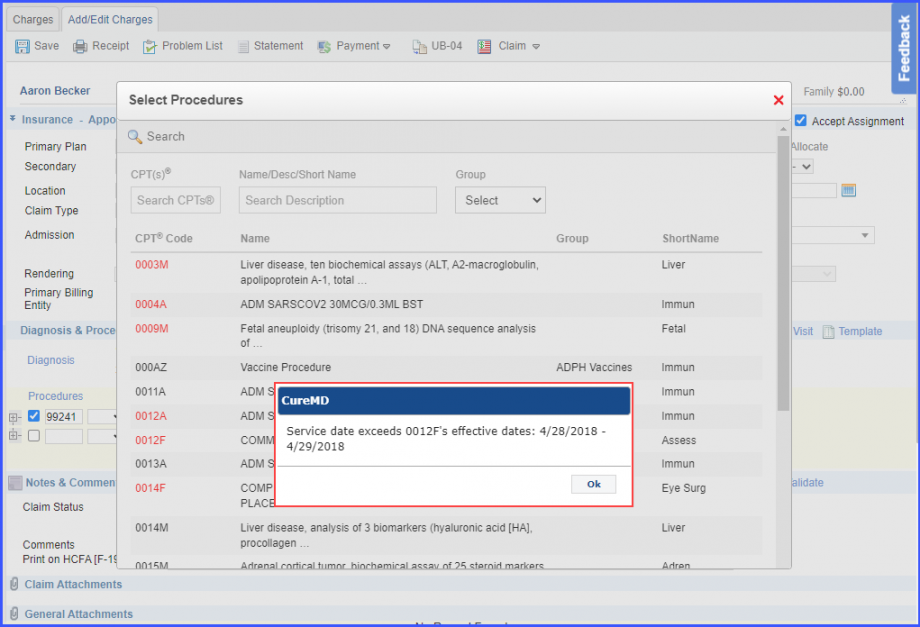
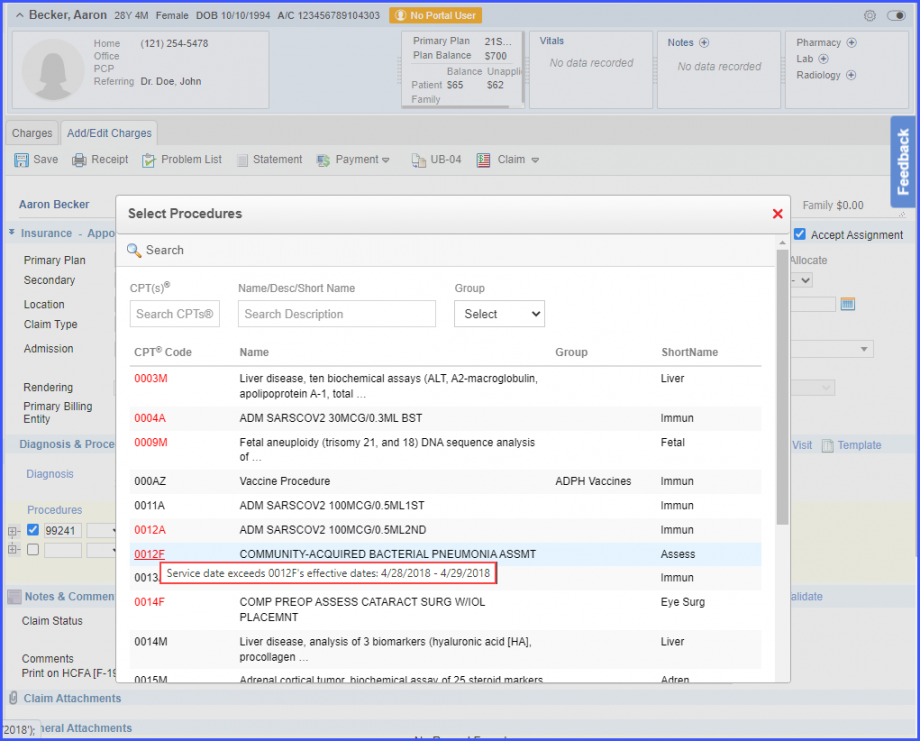
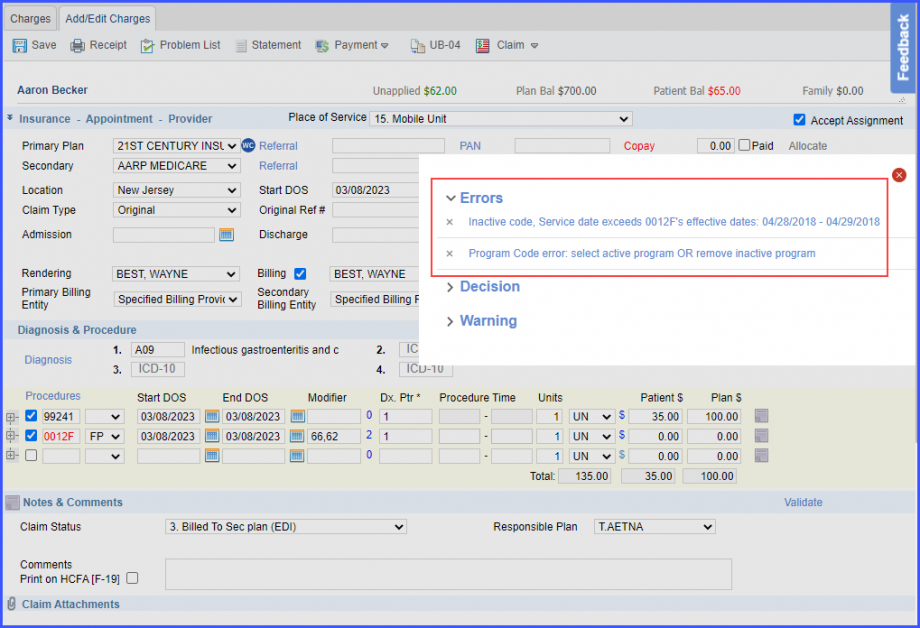
A prompt is displayed when the user selects a CPT code whose effective date is invalid on the service date.
This ensures that the claims do not get rejected.
On the ‘Procedures’ window, all inactive CPT codes are displayed in red text. Clicking on those codes displays a prompt popup stating:
‘Service date exceeds [CPT Code] effective dates: [Date].’
Similarly, hovering over an inactive code displays a tooltip that states: ‘Service date exceeds [CPT Code] effective dates: [Date].’
If the user manually inputs the inactive CPT code into the ‘Procedures – CPTs’ field, the code is displayed with red text. When the user hovers over the red text, the following tooltip is displayed:
‘Service date exceeds [CPT Code] effective dates: [Date].’
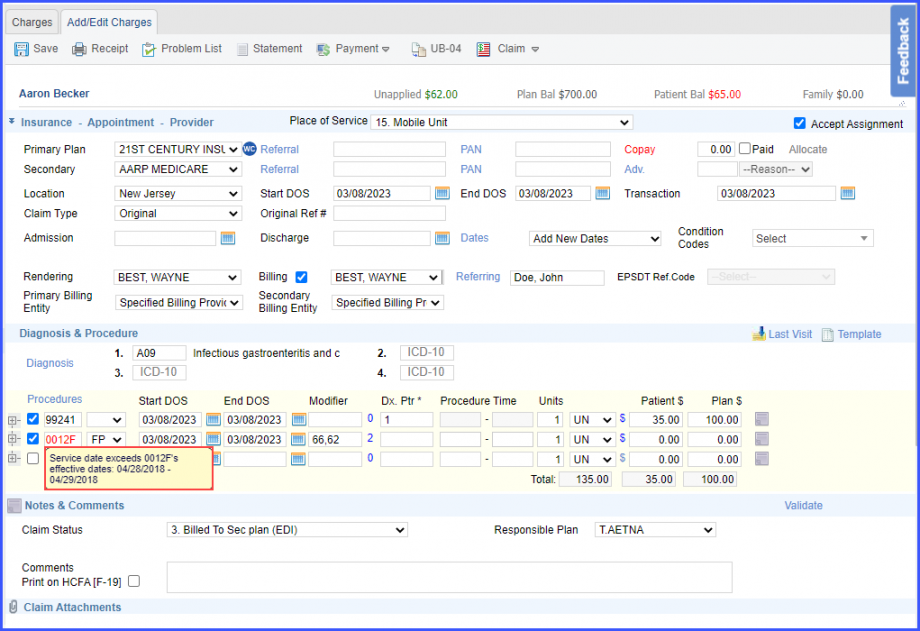
When the user clicks on the ‘Save’ button, an error message is displayed with the inactive code details.
A similar enhancement has been made in the ‘UB-04 Charge’ section of the ‘Billing’ node in the Patient Module. Click here to view the change.
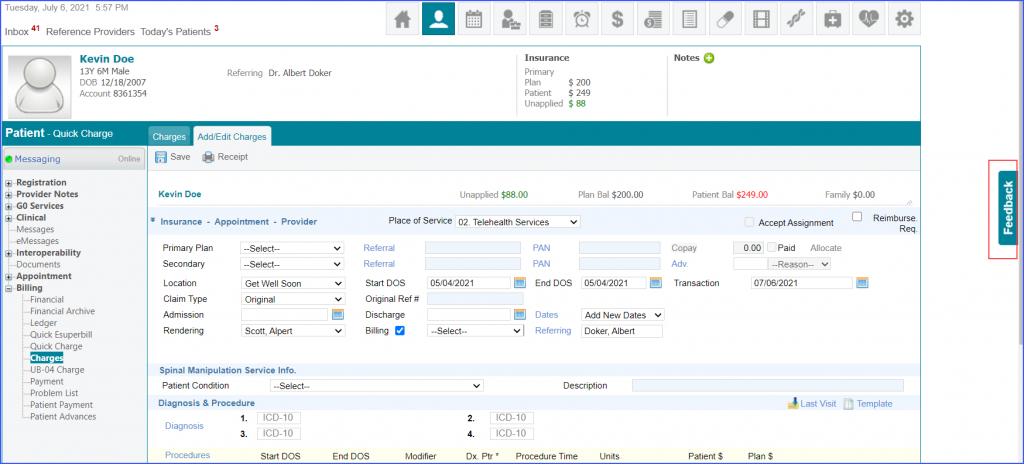
The system facilitates gathering feedback from users about their experience on the ‘Charges’ page.
To provide feedback, users can click on the ‘Feedback’ button.
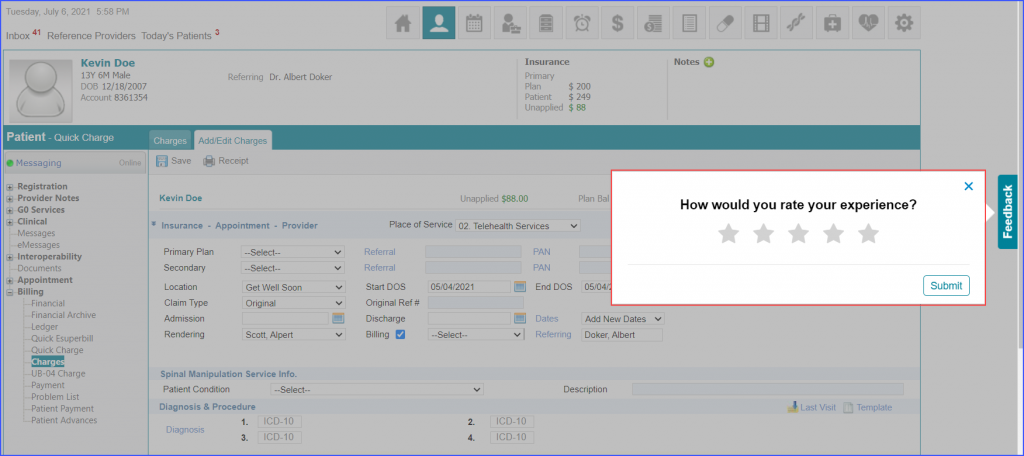
Once the ‘Feedback’ button is clicked, a feedback overlay is displayed. Users can rate their experience by clicking on the desired star.
After a star is clicked, further feedback options appear. Click ‘Submit’ to submit the feedback.
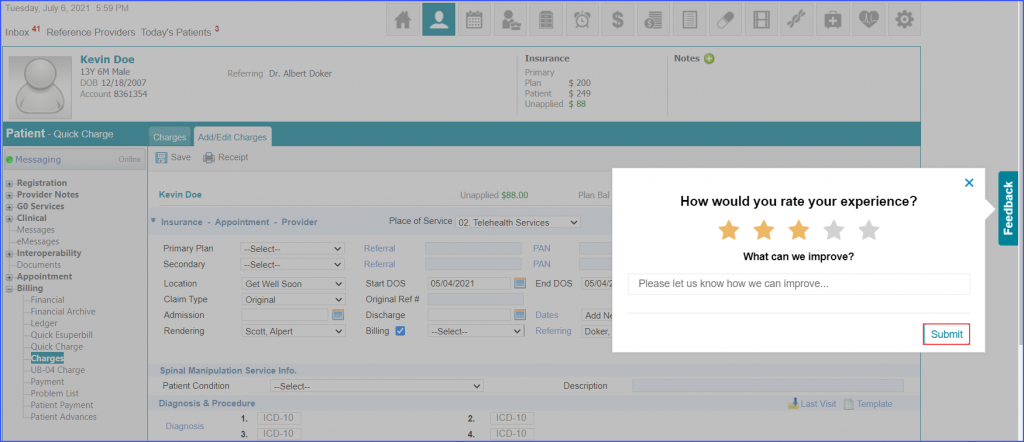
The system automatically displays the feedback overlay after the first, two hundredth, and five hundredth time a user saves a charge. To view a similar enhancement made on the ‘Quick Charge’ page, click here.
The ‘Copay’ and ‘Advance’ payment screens have been enhanced for global payment gateway users.
Improved UI contributes to a positive user experience.
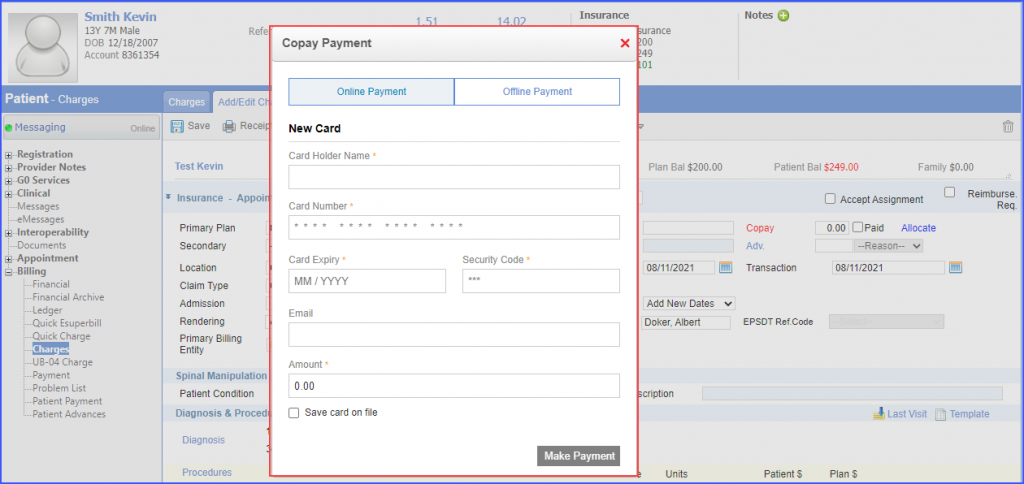
When the user clicks ‘Copay’ on a charge, the system displays the ‘Copay Payment’ pop-up. To make an online payment, enter the ‘New Card’ details and a copay amount. Then click the ‘Make Payment’ button.
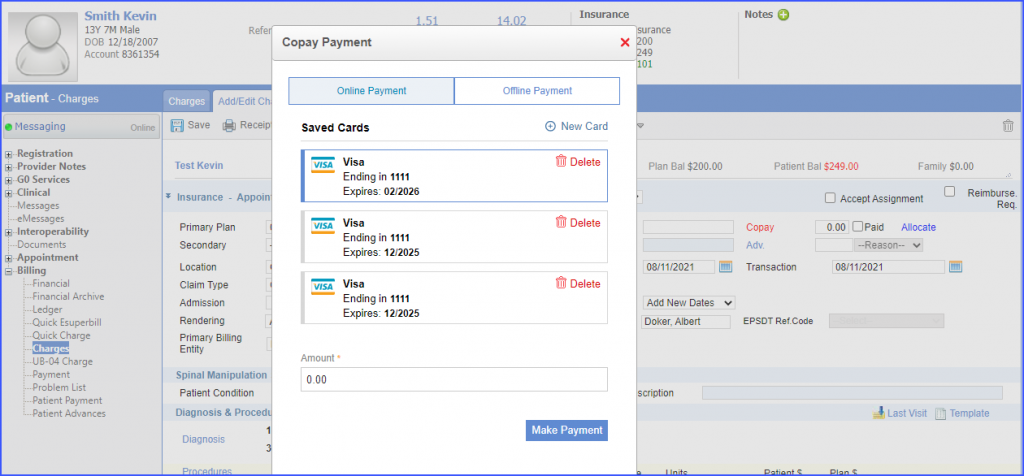
In case, saved cards exist for a patient, the system displays the ‘Saved Cards’ details. User can select a saved card, enter a copay amount in the ‘Amount’ field and then click the ‘Make Payment’ button.
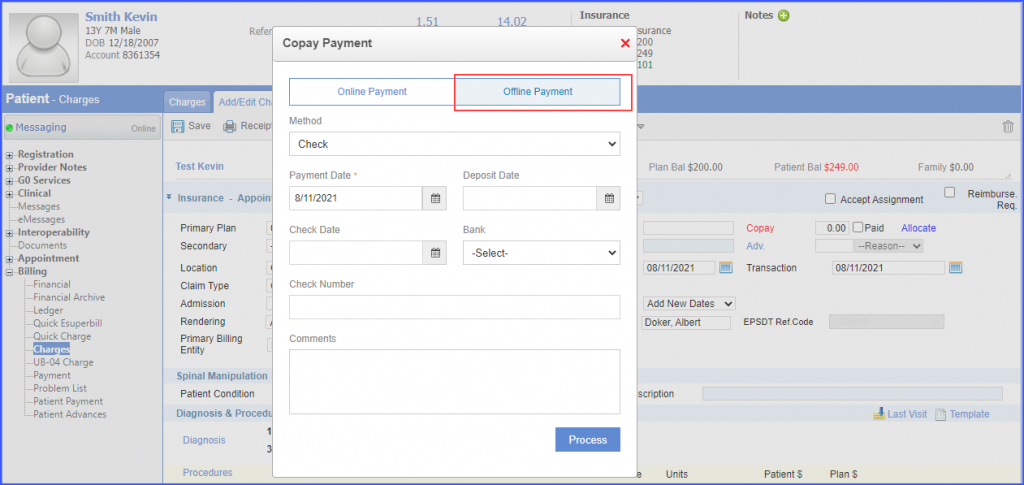
To make an offline copay payment, users can open the ‘Offline Payment’ tab. Complete the payment details and then click ‘Process’.
Users can similarly make online and offline advance payments on a charge.
Similar enhancement has been made in the ‘Scheduler’ module. To view the change, click here.
Copay payments received from third parties cannot be altered. This prevents users from modifying copay payments in the application and causing discrepancies.
Once a copay payment has been received from a third party, the ‘Copay’ field is disabled.
Users have the option to add an NDC with a procedure code in the ‘Charge Template’.
This ensures that appropriate codes are used while billing for the rendered services. To see how to add an NDC with a procedure code in the charge template, click here.
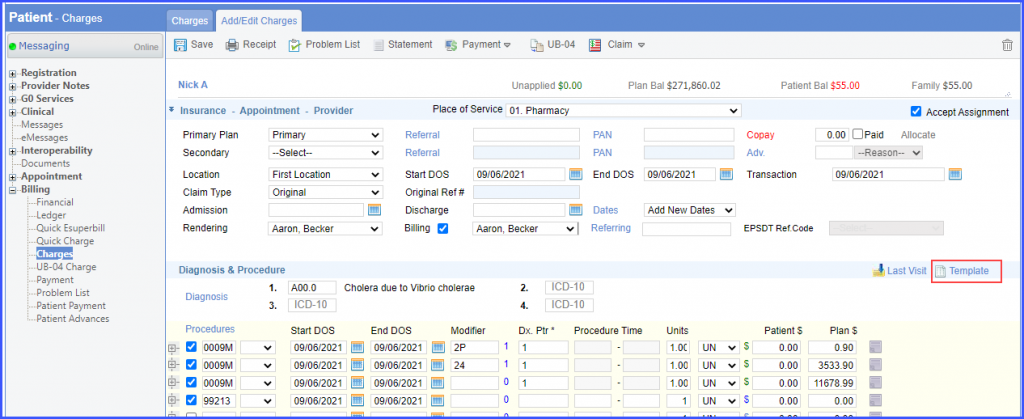
Once a charge template has been created, click ‘Template’ to add the template to the charge.
Similar enhancement has been made on the ‘Quick eSuperbill’ page. To view the change, click here.
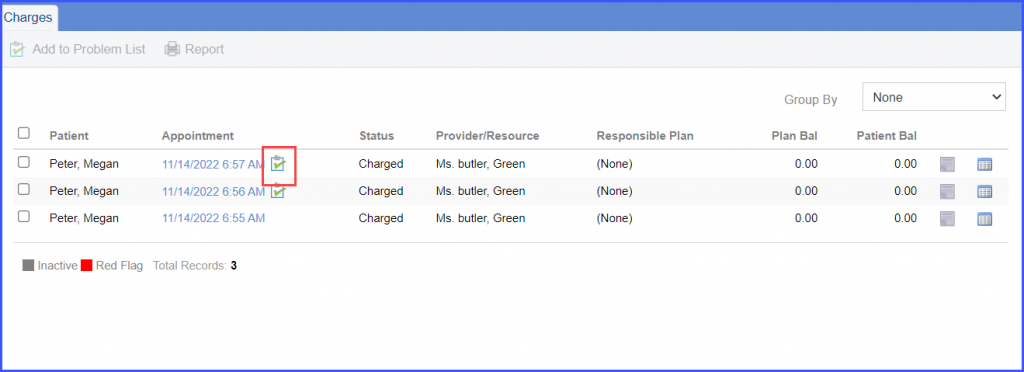
An icon has been added for problematic appointments on the charge page. This allows users to quickly differentiate problematic appointments from other appointments.
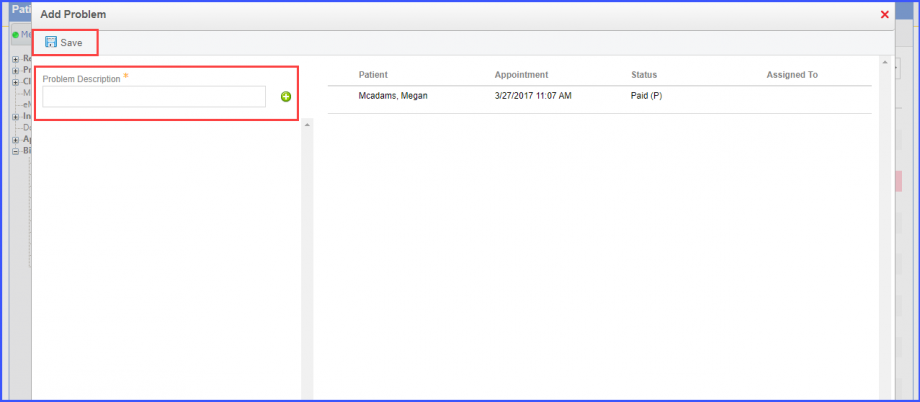
The appointment can be moved into ‘Problem List’ by selecting its checkbox and clicking the ‘Add to Problem List’ button in the top bar.

Fill the problem description and click ‘Save’.
When an appointment is moved into ‘Problem List ‘, the system displays a problem list icon next to the appointment Date of Service (DOS) on the ‘Charges’ page.
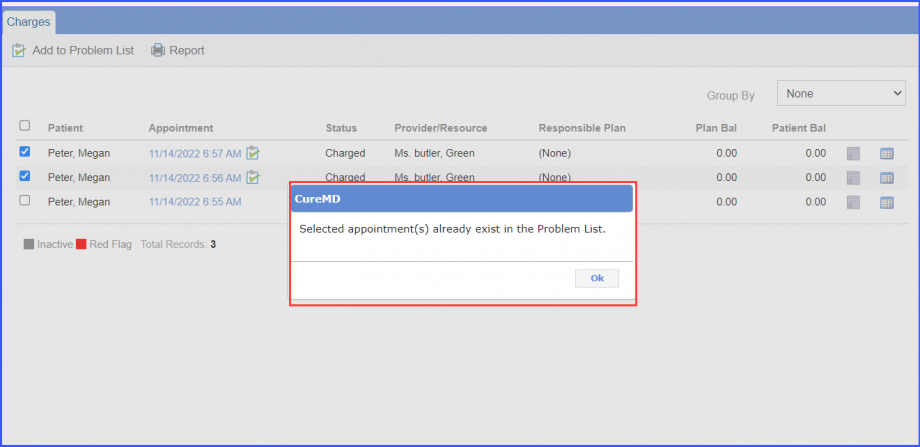
If an appointment is already moved into the problem list and the user tries to move it again, a prompt is displayed by the system stating:
“Selected appointment(s) already exist in the Problem List.”
Click here to see similar enhancement have been made in the ‘Payment’ section of Billing module.
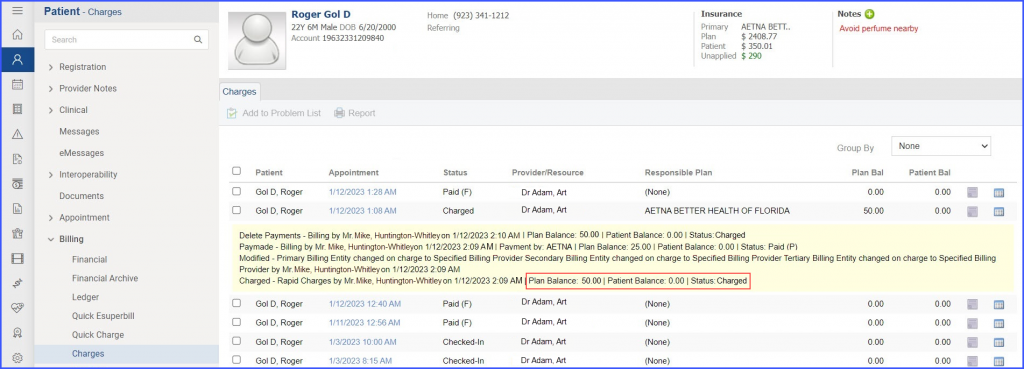
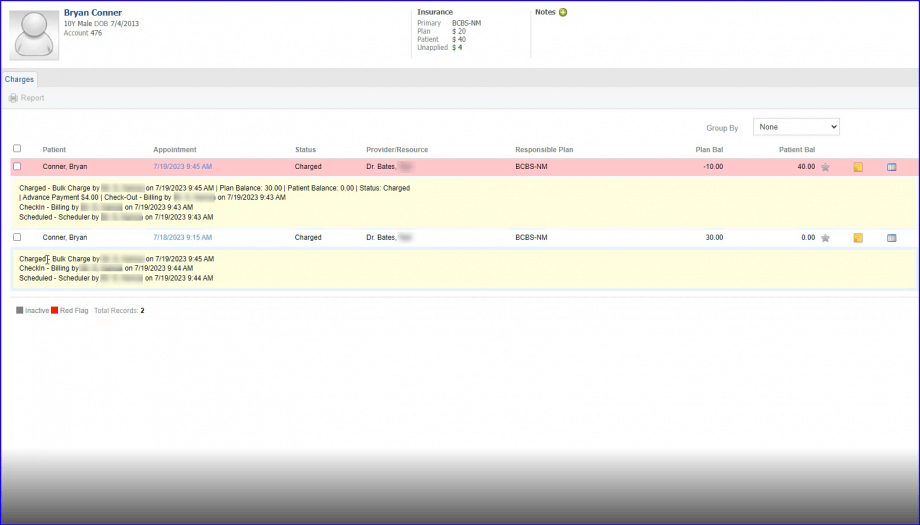
The user can view patient balance, plan balance, and status of appointments in the logs. This ensures that a complete record of settled and reopened claims is being maintained.
The user can view patient balance, plan balance, and status of appointments in the logs.
This ensures that a complete record of settled and reopened claims is being maintained.
When the user creates a charge against an appointment, a log is generated that displays the patient and plan balance tags, as well as the appointment status.
A similar enhancement has been made on the ‘Status’ page in the ‘Appointment’ node. To view the change, click here.
Users have the option to add TPL code with the procedure on charges page when Medicaid-IL is selected as the secondary insurance of a patient.
If the user has selected ‘Medicaid-IL’ as the responsible plan for the claim, then the system displays the ‘TPL Code’ dropdown in the ‘Procedure Exception Detail’ section. The ‘Procedure Exception Detail’ of a procedure code can be expanded or accessed by clicking on the plus icon ‘+’ next to each procedure code.
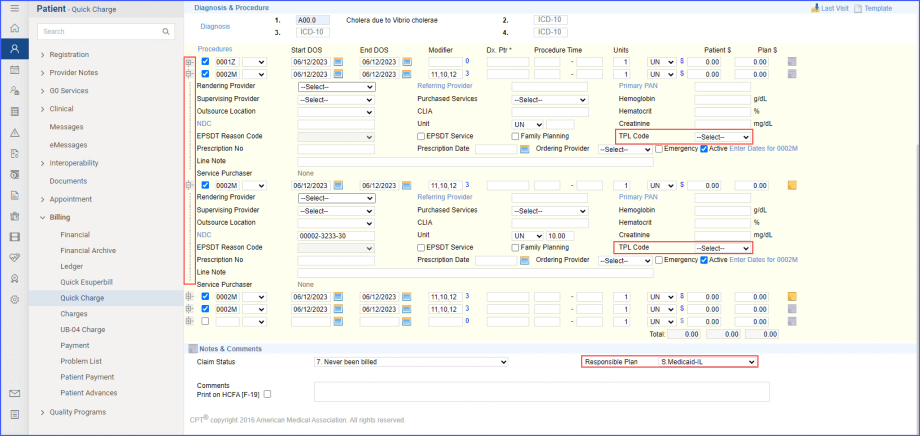
To assign a TPL code, click on the dropdown and choose the required number from the given list.
The list contains the following codes:
01 – TPL Adjudicated – total payment shown: TPL Status Code 01 is to be entered when payment has been received from the patient’s third-party resource. The amount of payment received must be entered in the TPL amount box.
02 – TPL Adjudicated – patient not covered: TPL Status Code 02 is to be entered when the provider is advised by the third-party resource that the patient was not insured at the time services were provided.
03 – TPL Adjudicated – services not covered: TPL Status Code 03 is to be entered when the provider is advised by the third-party resource that services provided are not covered.
05 – Patient not covered: TPL Status Code 05 is to be entered when a patient informs the provider that the third-party resource identified on the MediPlan Card is not in force.
06 – Services not covered: TPL Status Code 06 is to be entered when the provider determines that the identified resource is not applicable to the service provided.
07 – Third Party Adjudication Pending: TPL Status Code 07 may be entered when a claim has been submitted to the third party, thirty (30) days have elapsed since the third party was billed, and reasonable follow-up efforts to obtain payment have failed.
08 – Estimated Payment: TPL Status Code 08 may be entered if the provider has billed the third party, contact was made with the third party, and payment is forthcoming but not yet received. The provider must indicate the amount of the payment estimated by the third party. The provider is responsible for any adjustment, if required, after the actual receipt of the payment from the third party.
10 – Deductible Not Met: TPL Status Code 10 is to be entered when the provider has been informed by the third-party resource that non-payment of the service was because the deductible was not met.
99 – Zero or Negative Payment: TPL Status Code 99 identifies a zero or negative payment by Medicare on a crossover claim.
When bulk charge is created against any signed eSuperbill(s), the charge logs are updated indicating the creation of a bulk charge.
The log entry displays the name of the person who created the bulk charge along with other payments details.
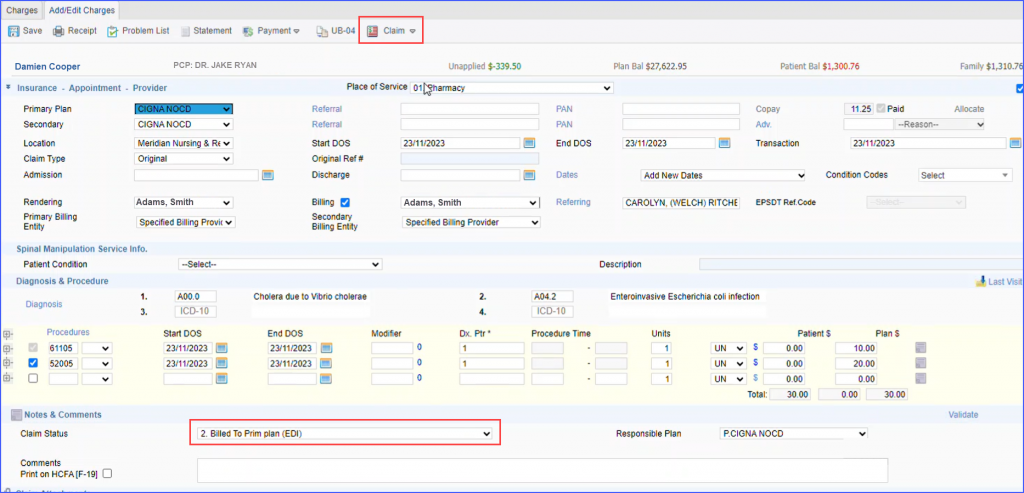
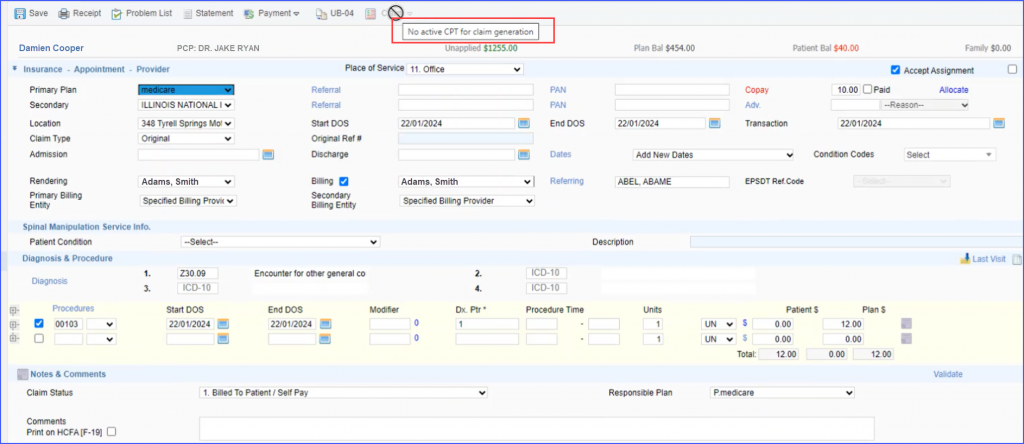
When generating an EDI claim, if a user proceeds to file a claim that includes an inactive CPT code—specifically in scenarios where the charge page contains only one CPT code and it is inactive—the ‘Claim’ generation button gets disabled. ![]()
To guide users further, a tooltip is displayed stating “No active CPT for claim generation,” which appears when the user attempts to interact with the disabled button.
When a claim is marked as ‘On-Hold’, the ability to submit an EDI/HCFA claim is disabled by hiding the ‘Claim’ button.
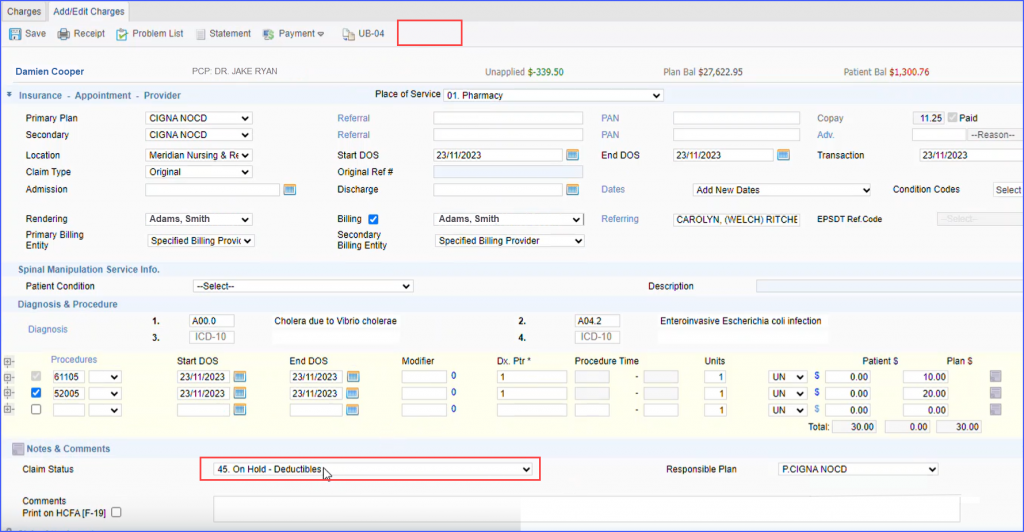
Consequently, users cannot proceed with submitting the claim until its status changes from ‘On-Hold’. To submit the claim, the status must be updated, followed by selecting ‘Save’.