How to Create a Plan?
In the Plan Section of the Patient Module, the user can create and edit plan details, create schedules, send notifications, and print chemo reports.
To create a new plan, click on the ‘New’ button at the top left corner of the screen.
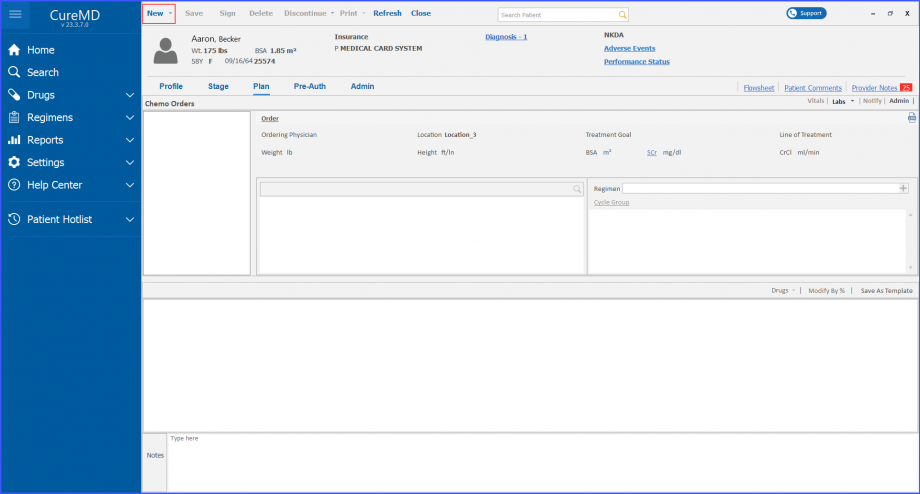
This displays the ‘Plan Detail’ window.
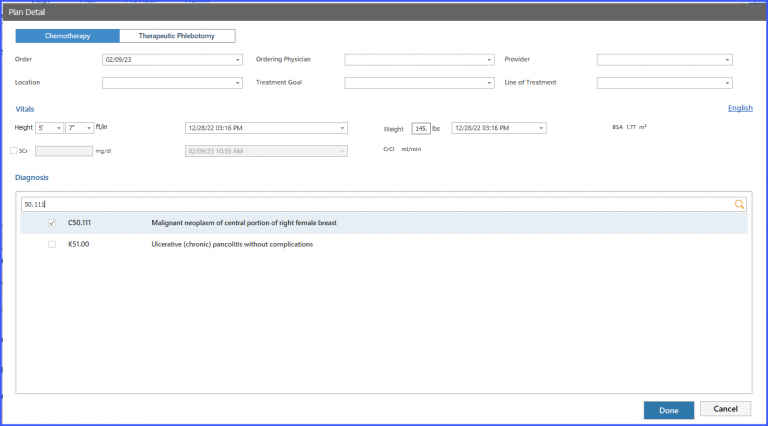
Here, the user can add the following information:
- Order Date and Location
- Ordering Provider and Physician
- Treatment Goal
- Line of Treatment
- Vitals information
- Diagnosis
Once the information has been added, click on the ‘Done’ button to populate the details in the ‘Chemo Orders’ section.
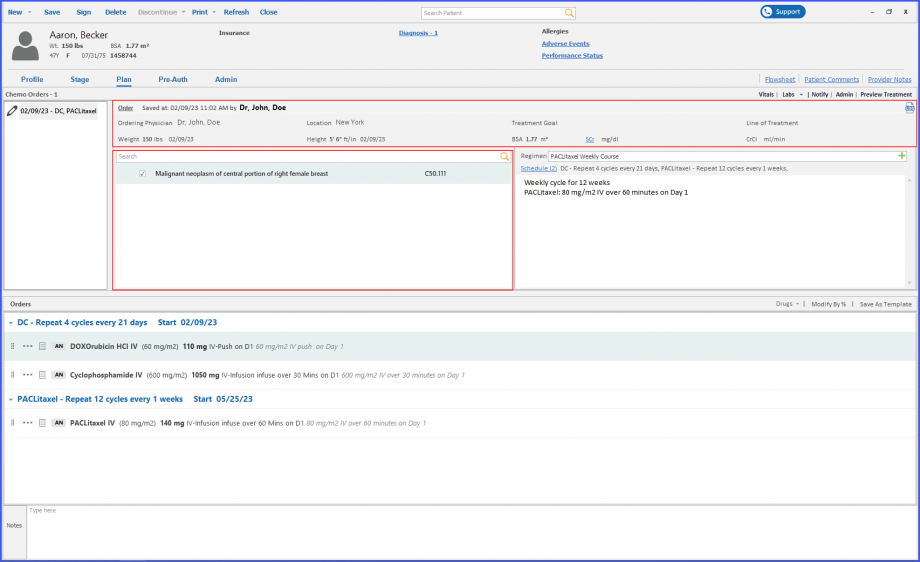
The user can also add or edit schedules via the Plan tab. To do this, click on the ‘Schedule’ hyperlink as highlighted in the image below.

This displays the ‘Schedule’ popup from where the user can click on the ‘Add +’ button to add a new schedule.
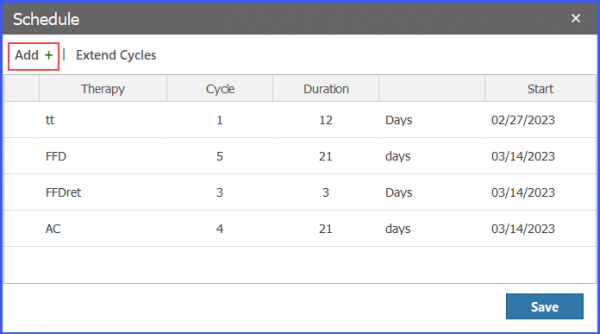
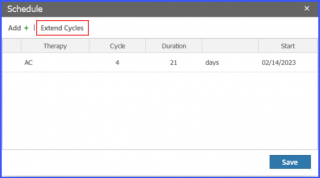
The user can also add more cycles to an existing therapy. To do this, click on the ‘Extend Cycles’ hyperlink.
This displays a popup where the user can add the number of additional cycles required, as well as the reason for the extension of therapy.
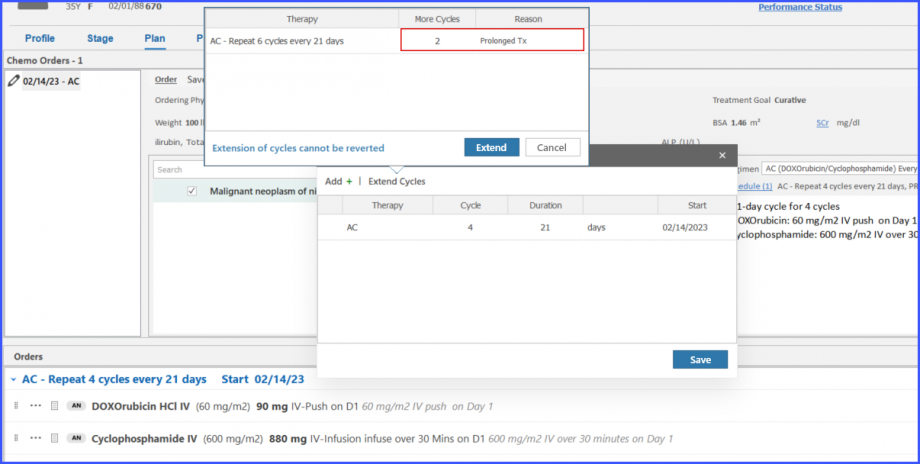
Once done, click on the ‘Extend’ button to add the additional cycles to the original schedule.
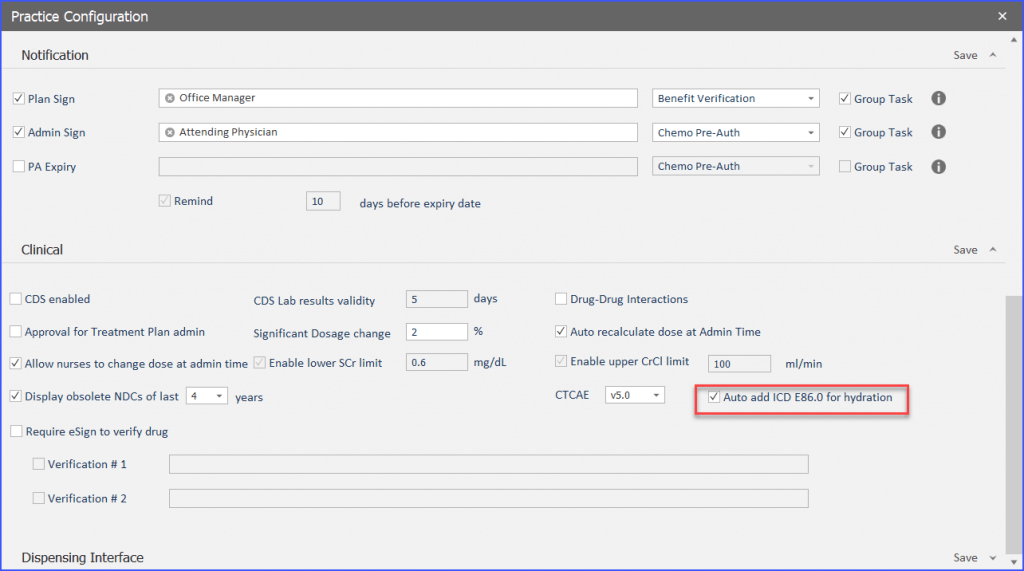
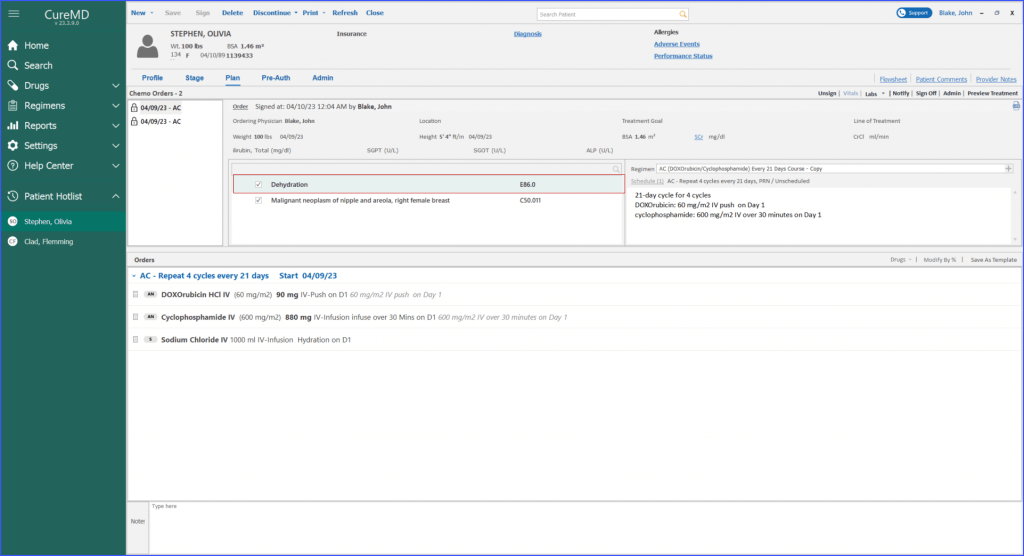
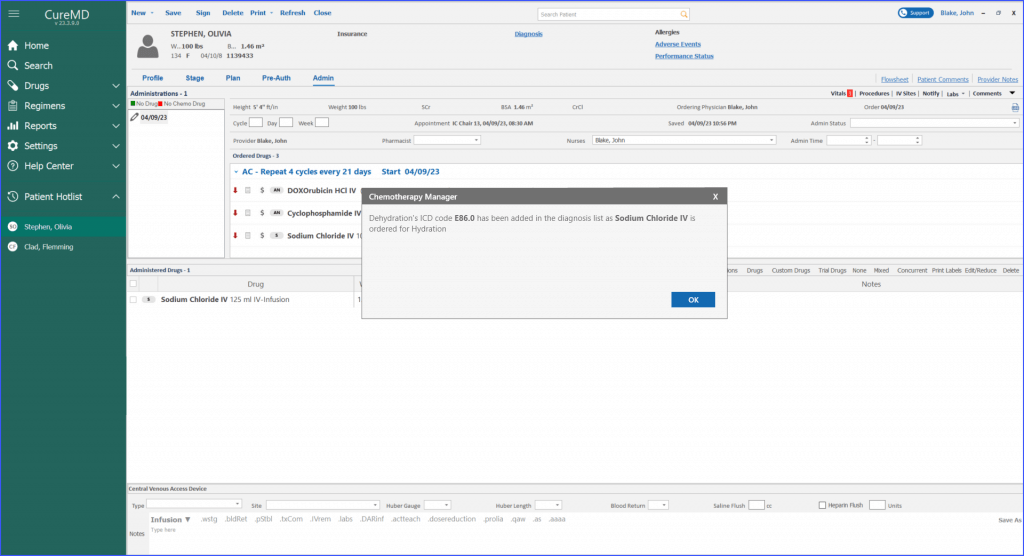
When the user adds a hydration drug to a patient’s plan, the software instantly adds the “E86.0 Dehydration” diagnosis. This helps in ensuring that this diagnosis doesn’t get missed when creating a super bill.
A toggle is displayed within the “practice configuration” under the “clinical section”. This toggle allows the users to enable or disable the “automatic addition of dehydration diagnosis” based on their preference or practice’s needs.
Whenever a user adds a drug in specific areas of the software, a relevant diagnosis is automatically added along an informational pop-up is also displayed to confirm or provide additional context about this action. The user navigates to ‘Drugs’ to select a drug and clicks on ‘Add to order’.
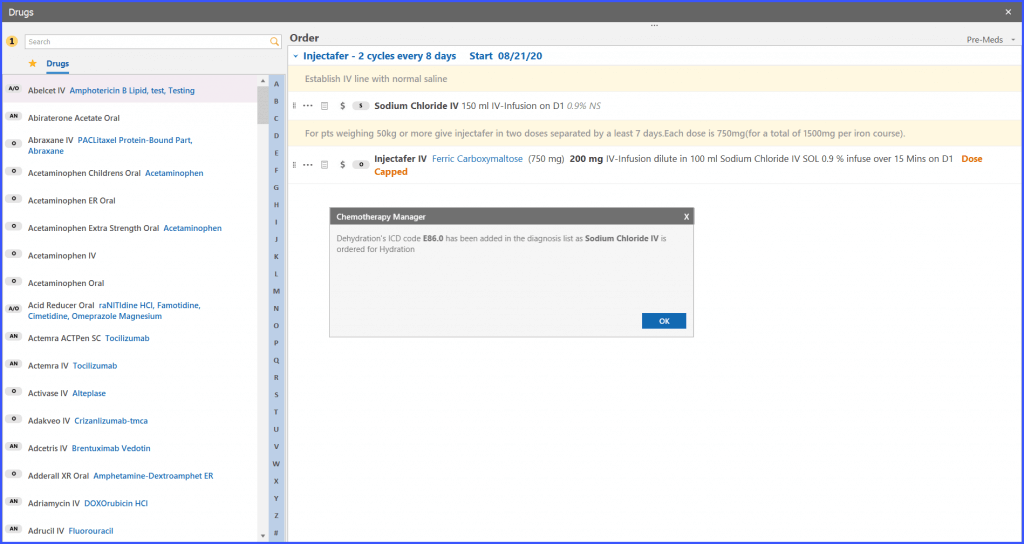
Another workflow to add a drug is by following this workflow:
Plan > Regimen Library > Select regimen and click ‘Done’
The user can also add a drug by following this workflow: Admin > Drugs > Select NDC and click on ‘Ok’
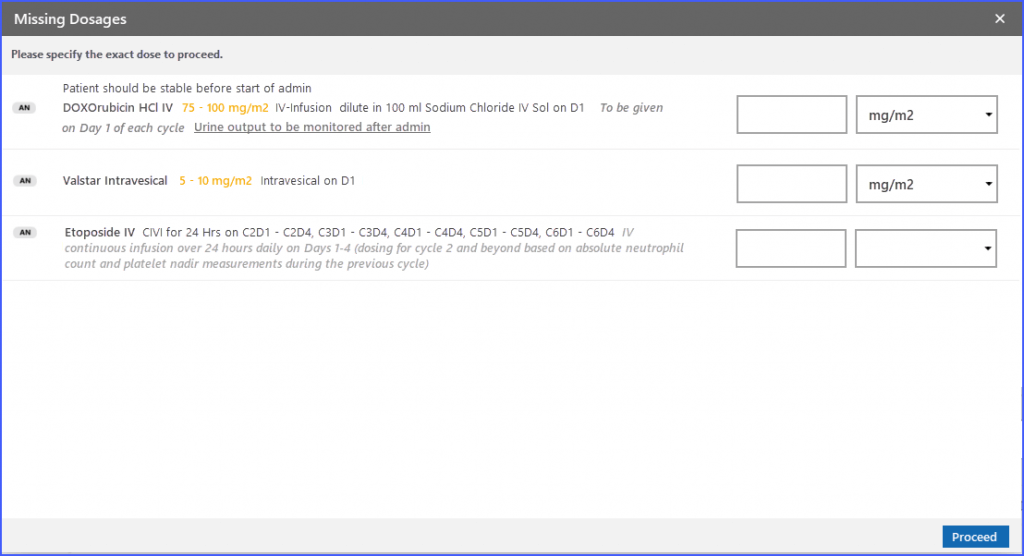
When ordering a regimen for a patient, users can specify exact drug dosages along with their units, especially useful when the dosages are within a certain range or initially not provided.
This can be done through the ‘Missing Dosages’ screen which displays additional details such as Pre-text, Post-text, and Schedule notes (if available) associated with the drugs.
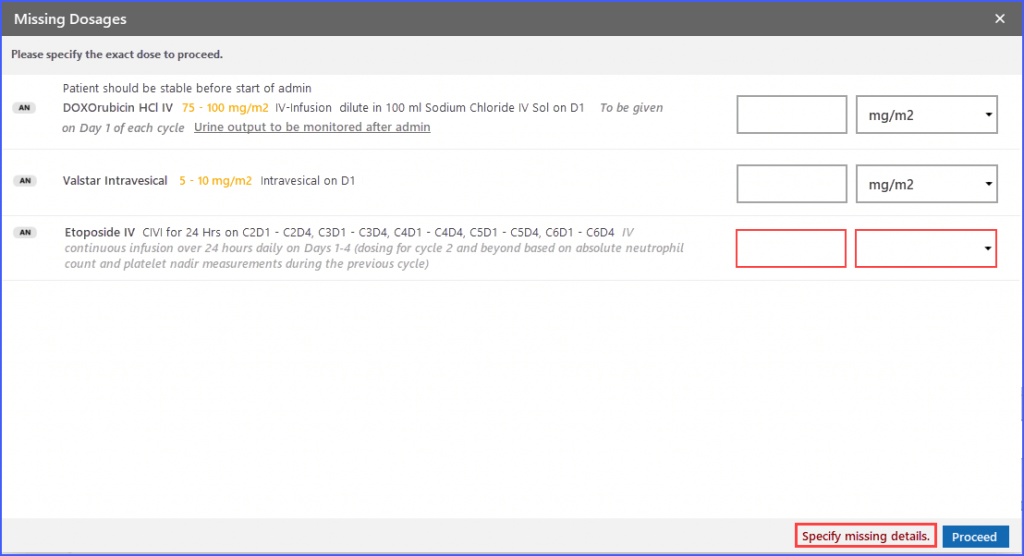
If the user tries to proceed without specifying the dose, the system displays the following error message.
This feature and workflow are for practices where ‘Activity Based Scheduling’ is disabled.
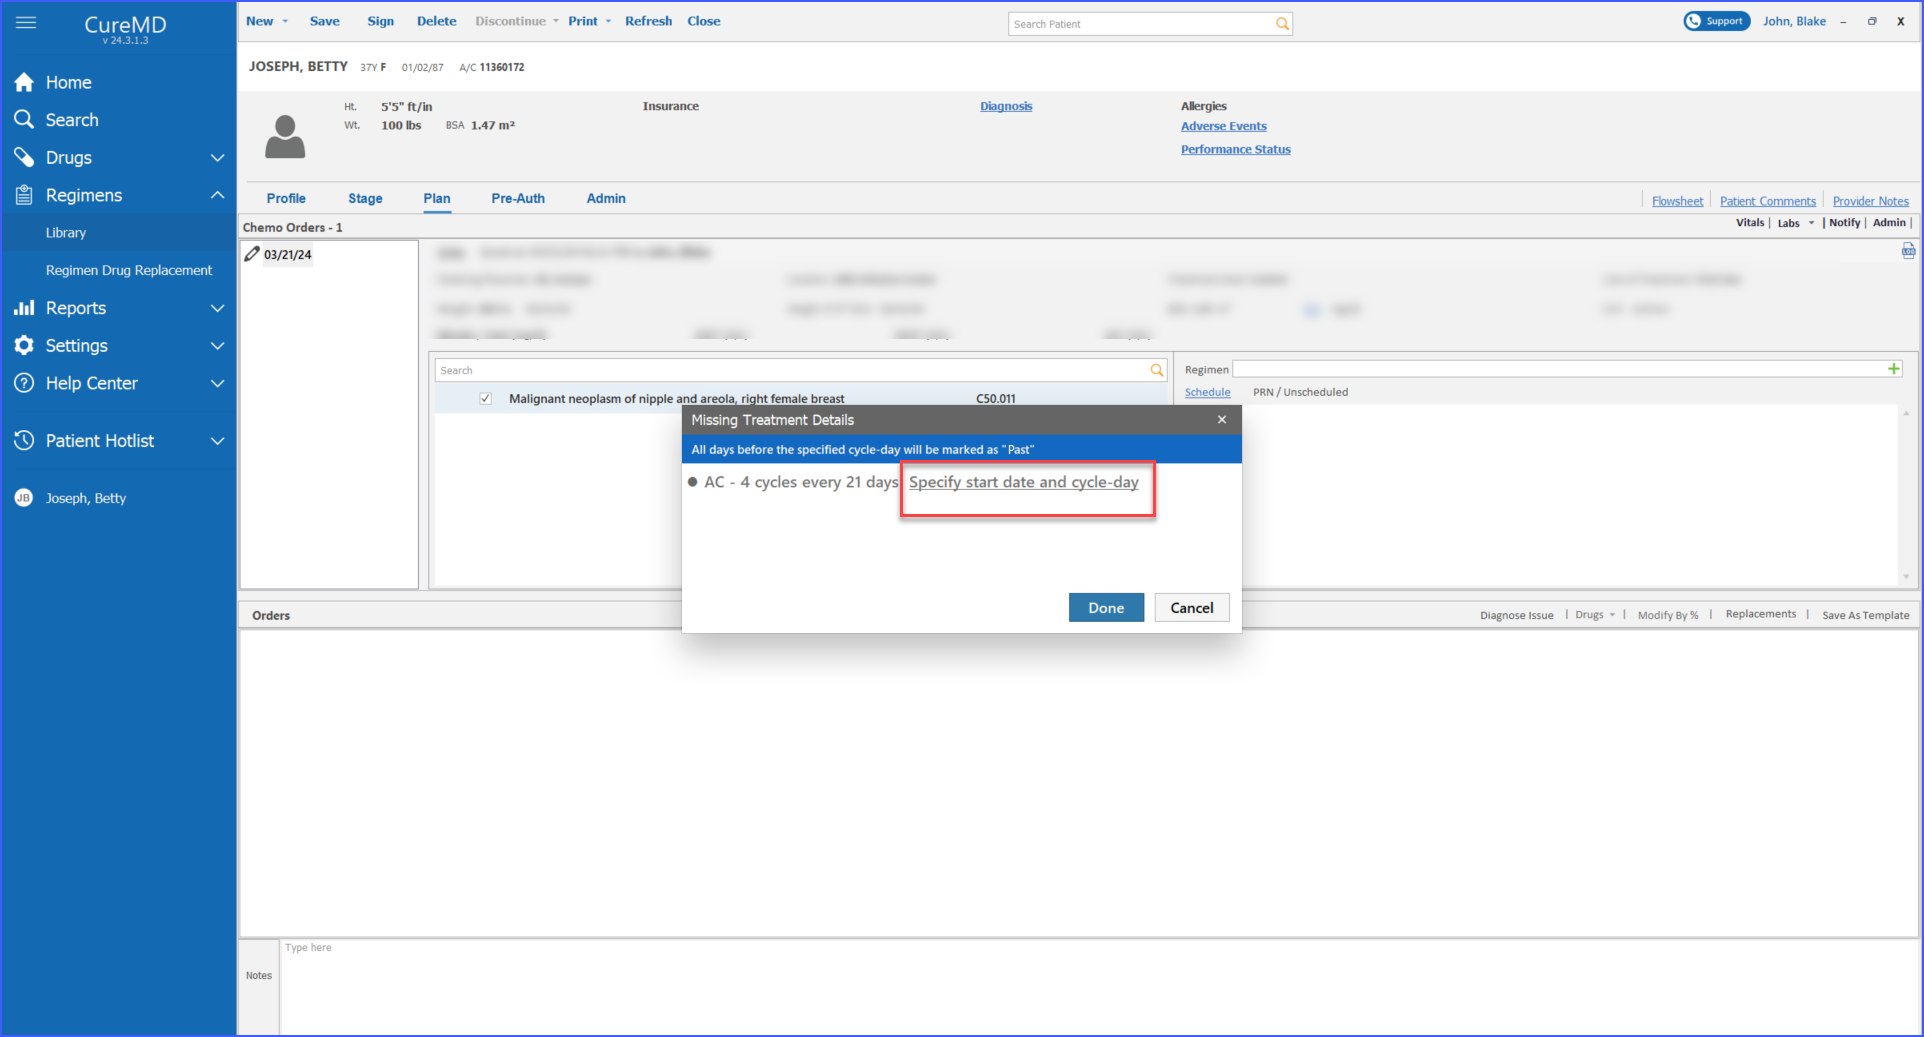
Similar to the process described for flowsheet, when creating a patient plan, the start date, start cycle and day are defined on the ‘Missing Treatment Detail’ screen.
Upon saving this information, the data for it is immediately reflected not only on the flowsheet but also on the treatment plan.
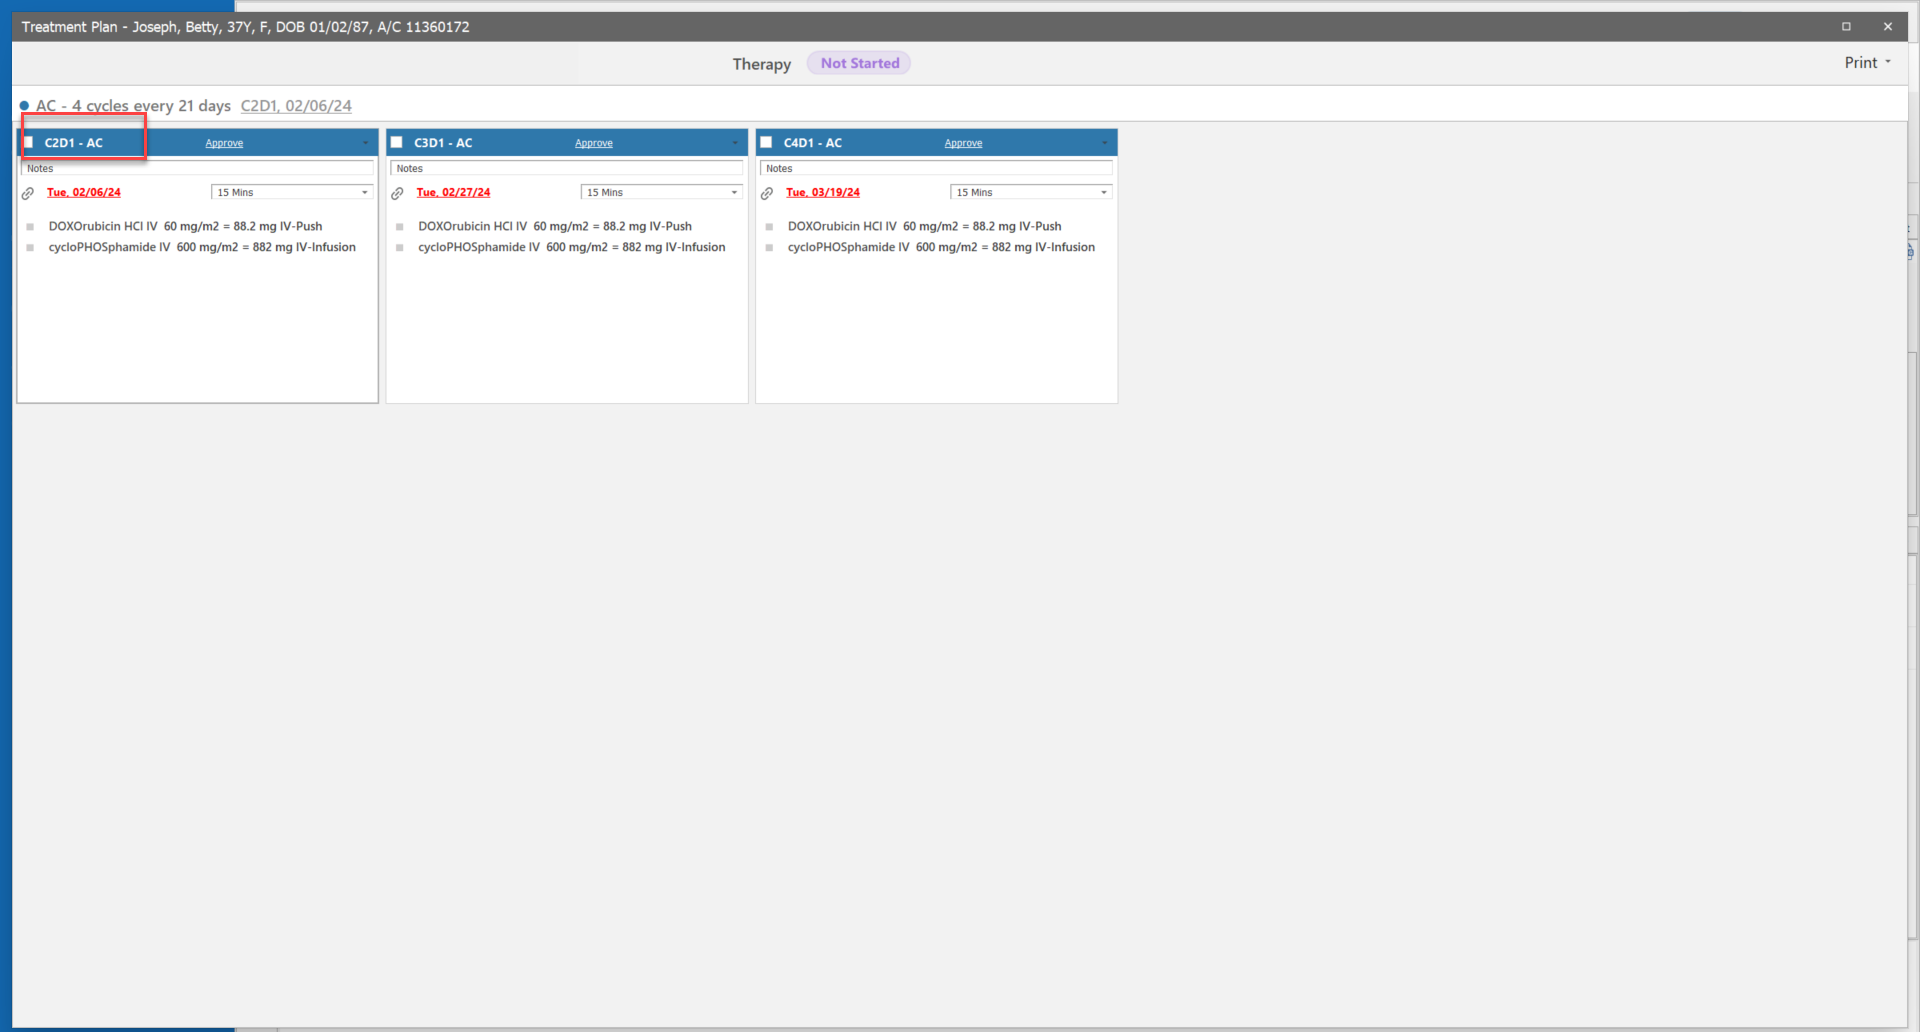
It is to be noted that the specified cycle date on the treatment plan is display-only and cannot be edited.
Furthermore, users can utilize the ‘Schedule’ hyperlink through the plan workflow as well, specifying start date and start cycle for scheduling therapy sessions.
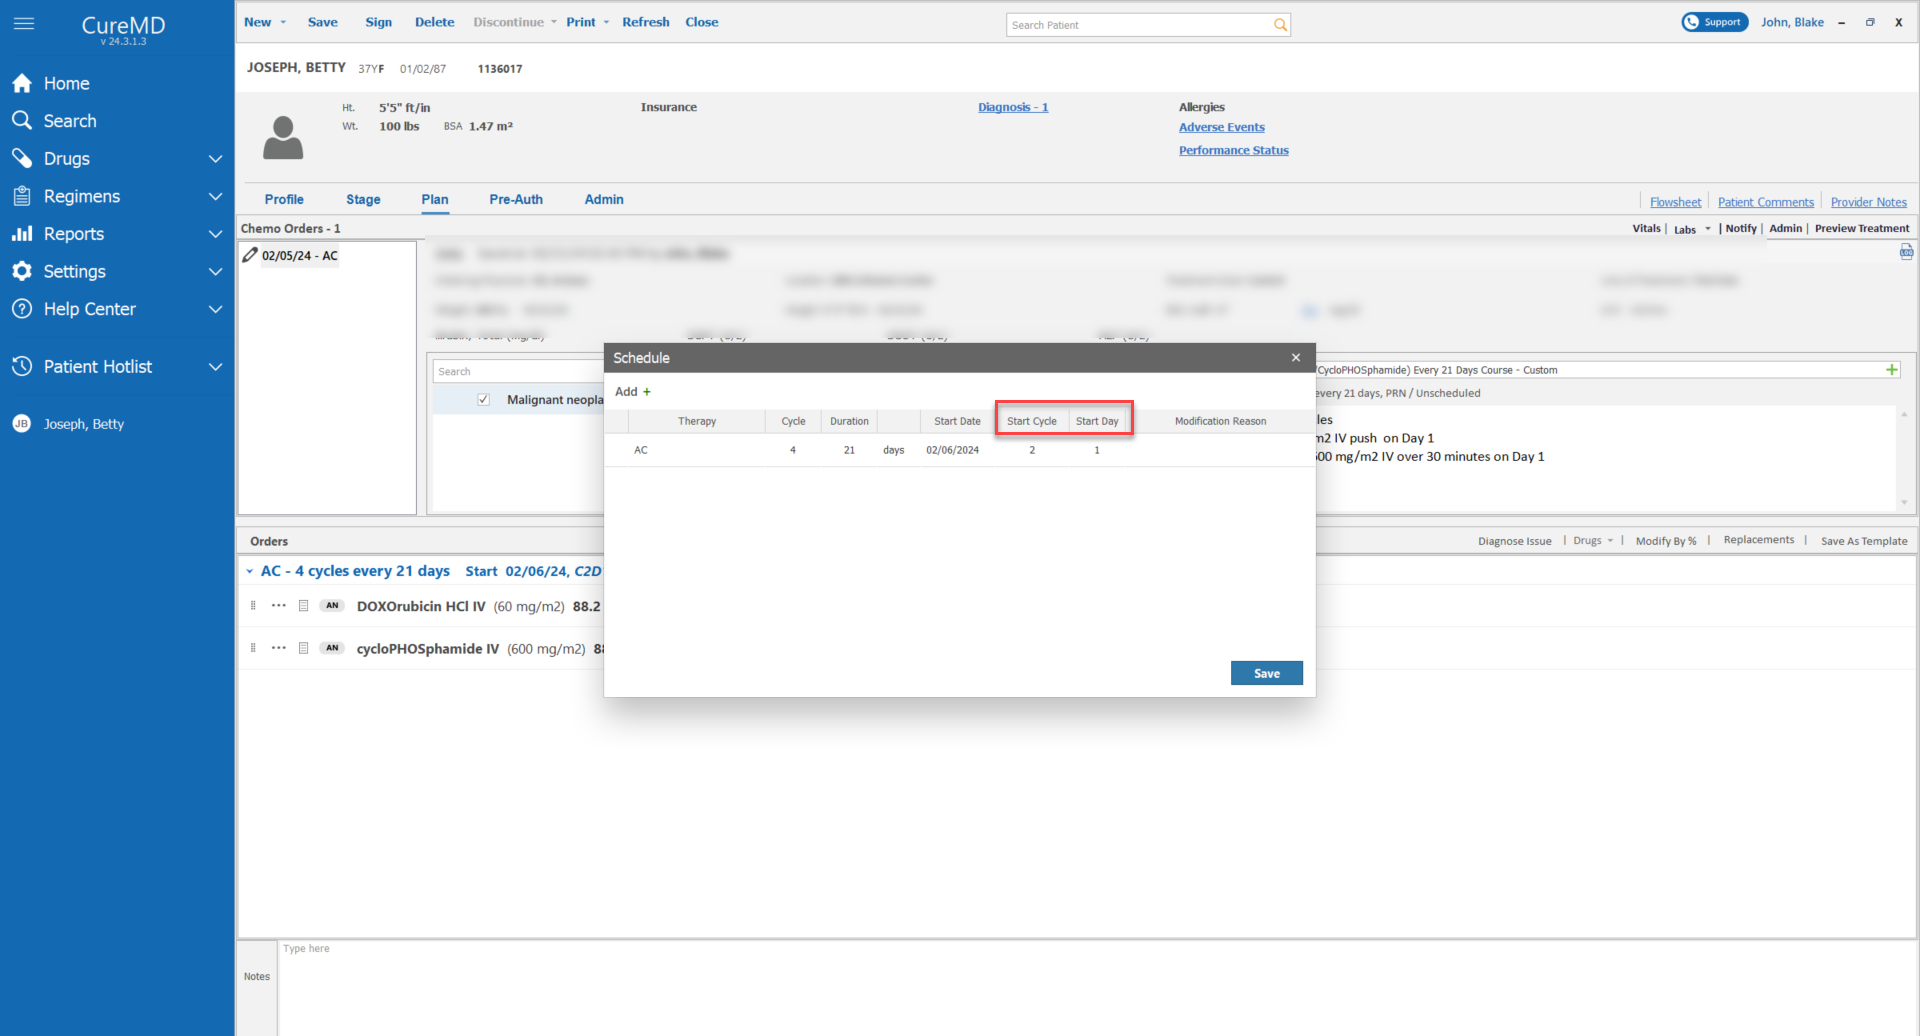
Once the details are entered and saved, the specified start cycle and day immediately get plotted on the flowsheet’s therapy band, displaying these dates in a read-only format to prevent unauthorized alterations.
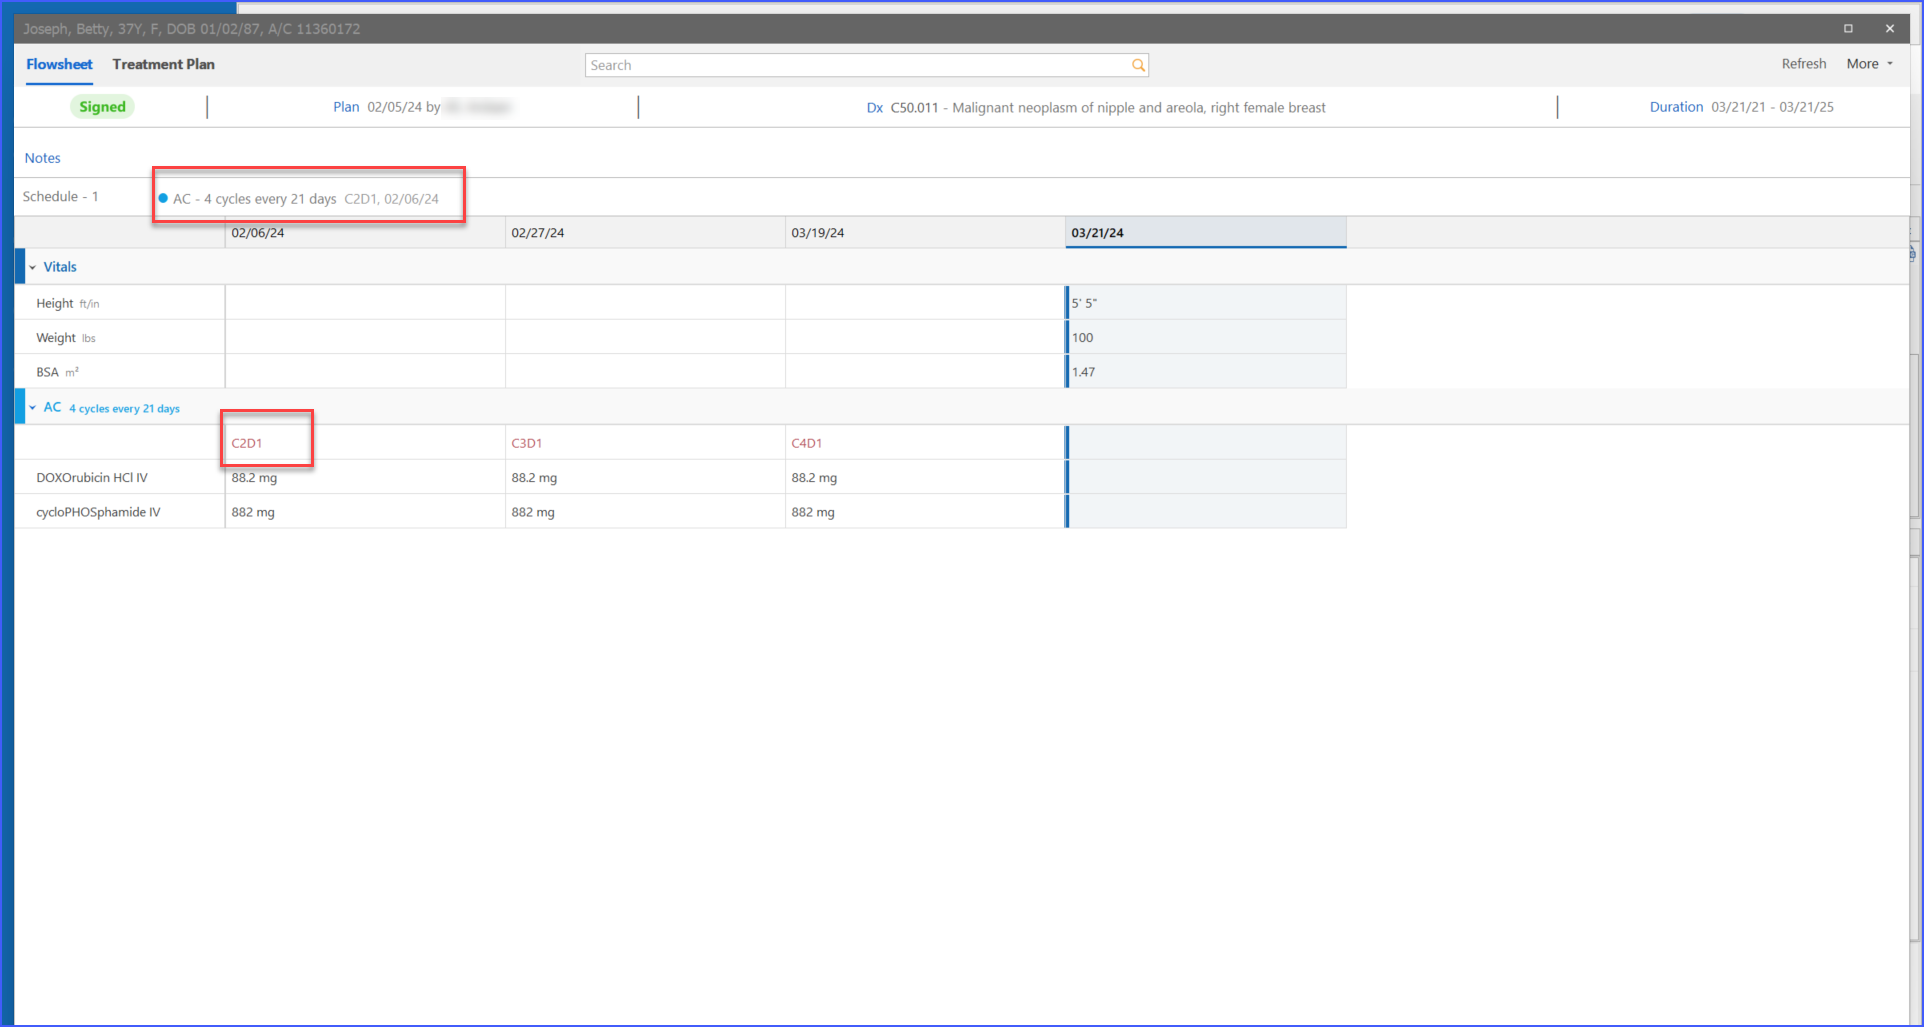
Moreover, the system designates days before the set start cycle day as past, prohibiting the addition of clinical components like drugs to avoid scheduling errors.
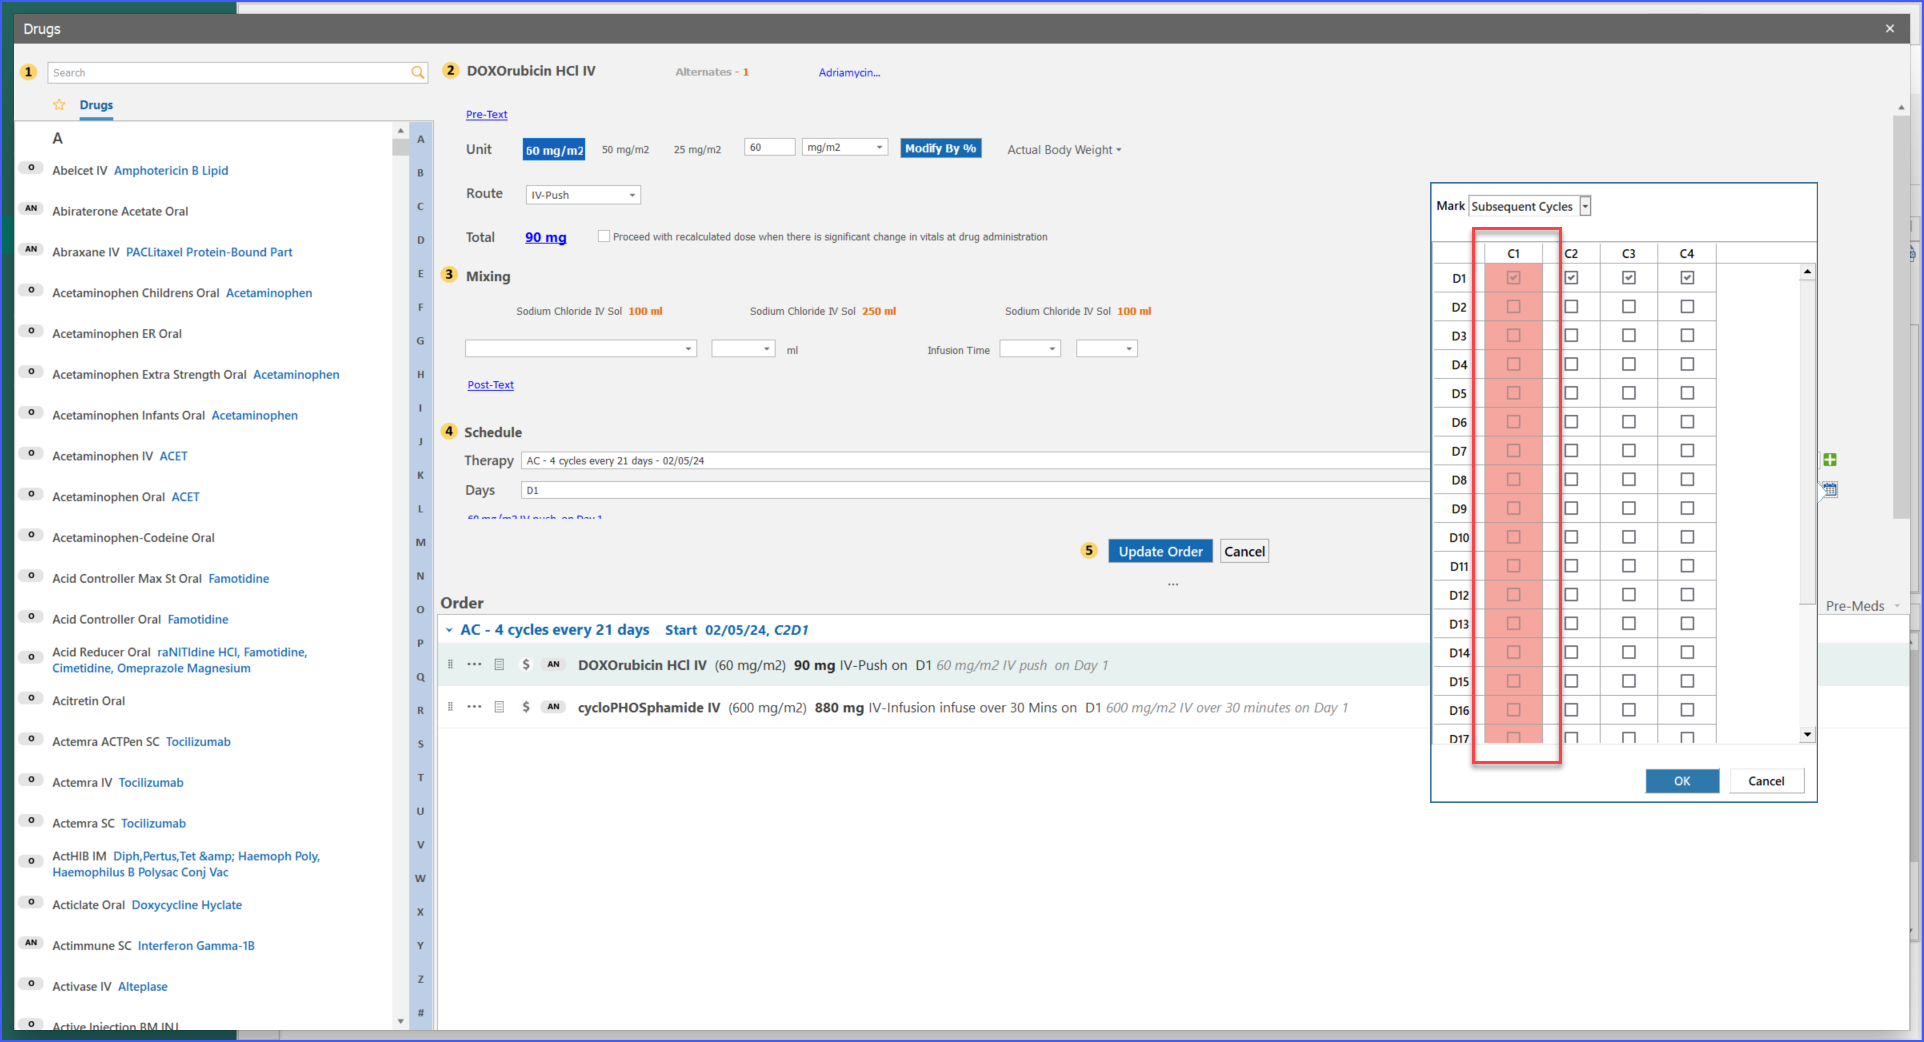
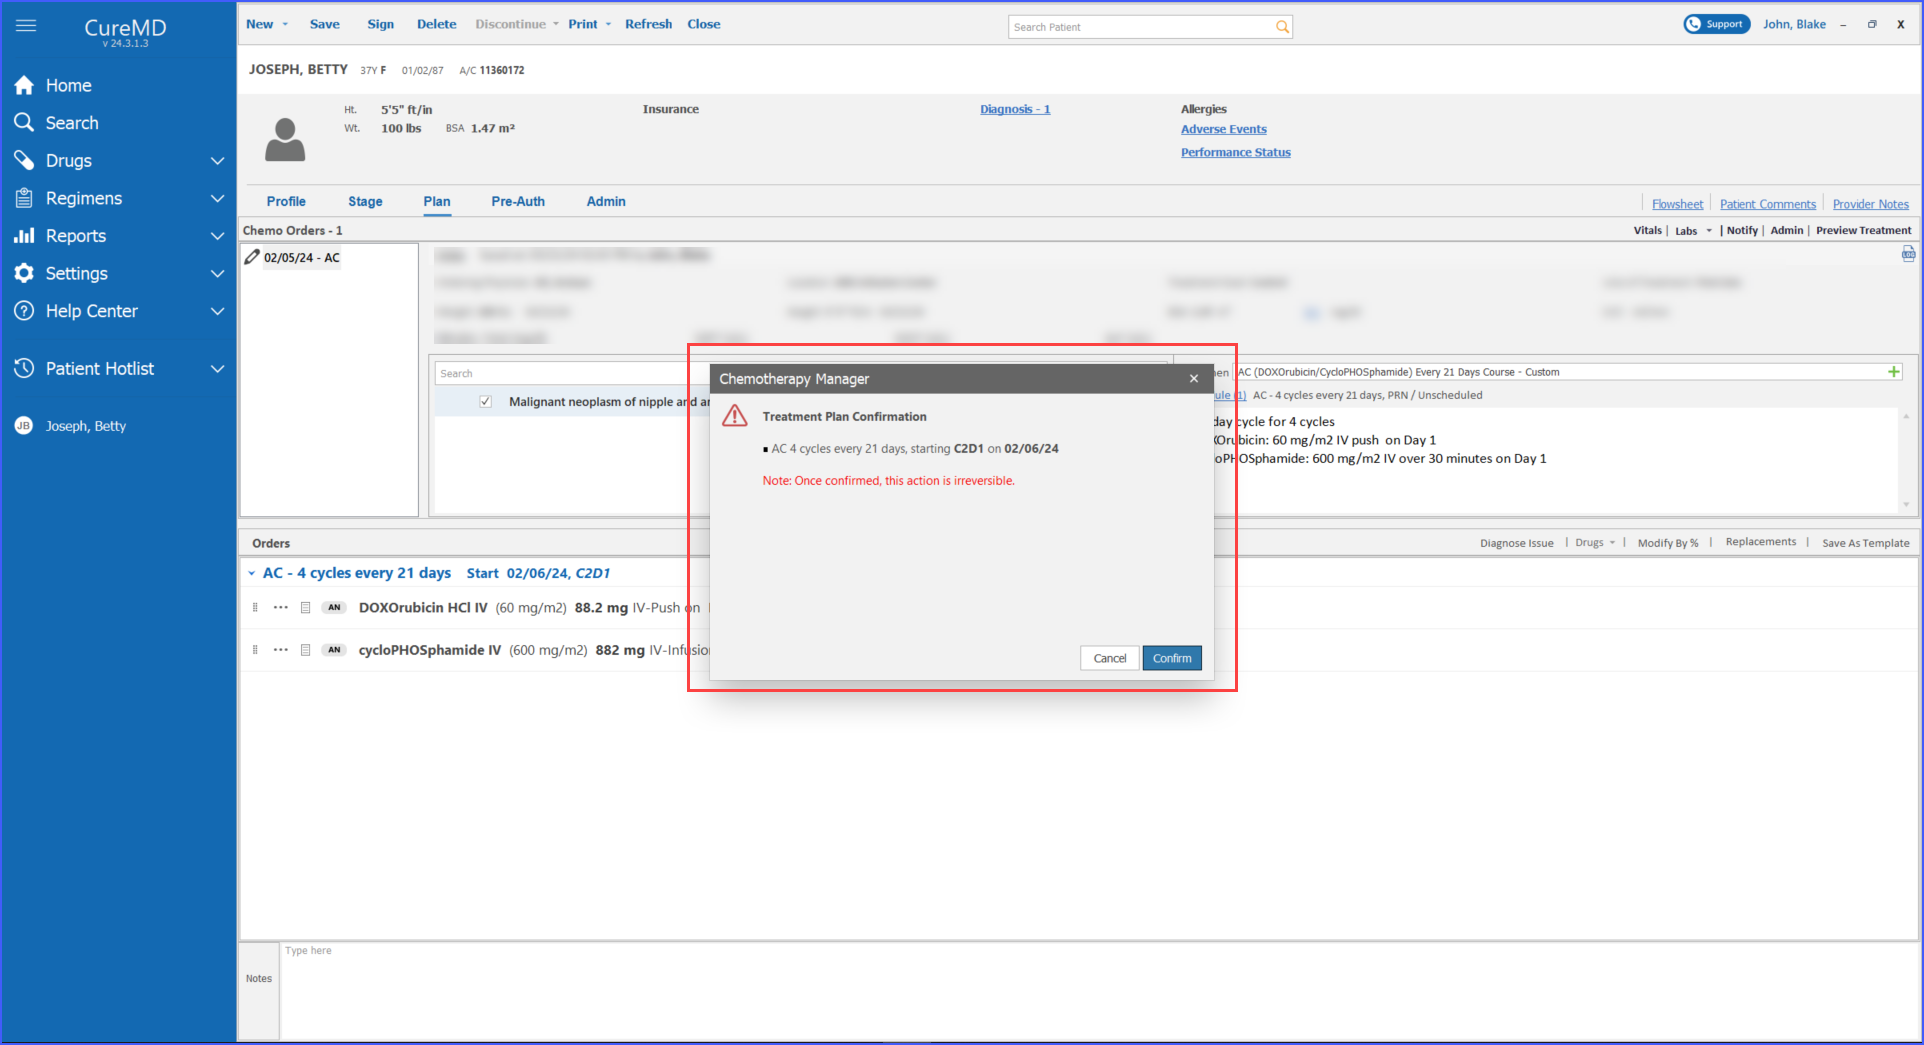
Users can adjust the start cycle day until the treatment plan is signed. Upon signing, an acknowledgment pop-up requires confirmation to finalize the plan. Once confirmed, the start cycle day is locked, securing the therapy schedule.
A similar enhancement exists for the ‘Flowsheet’ section of the patient module. Click here to view this change.
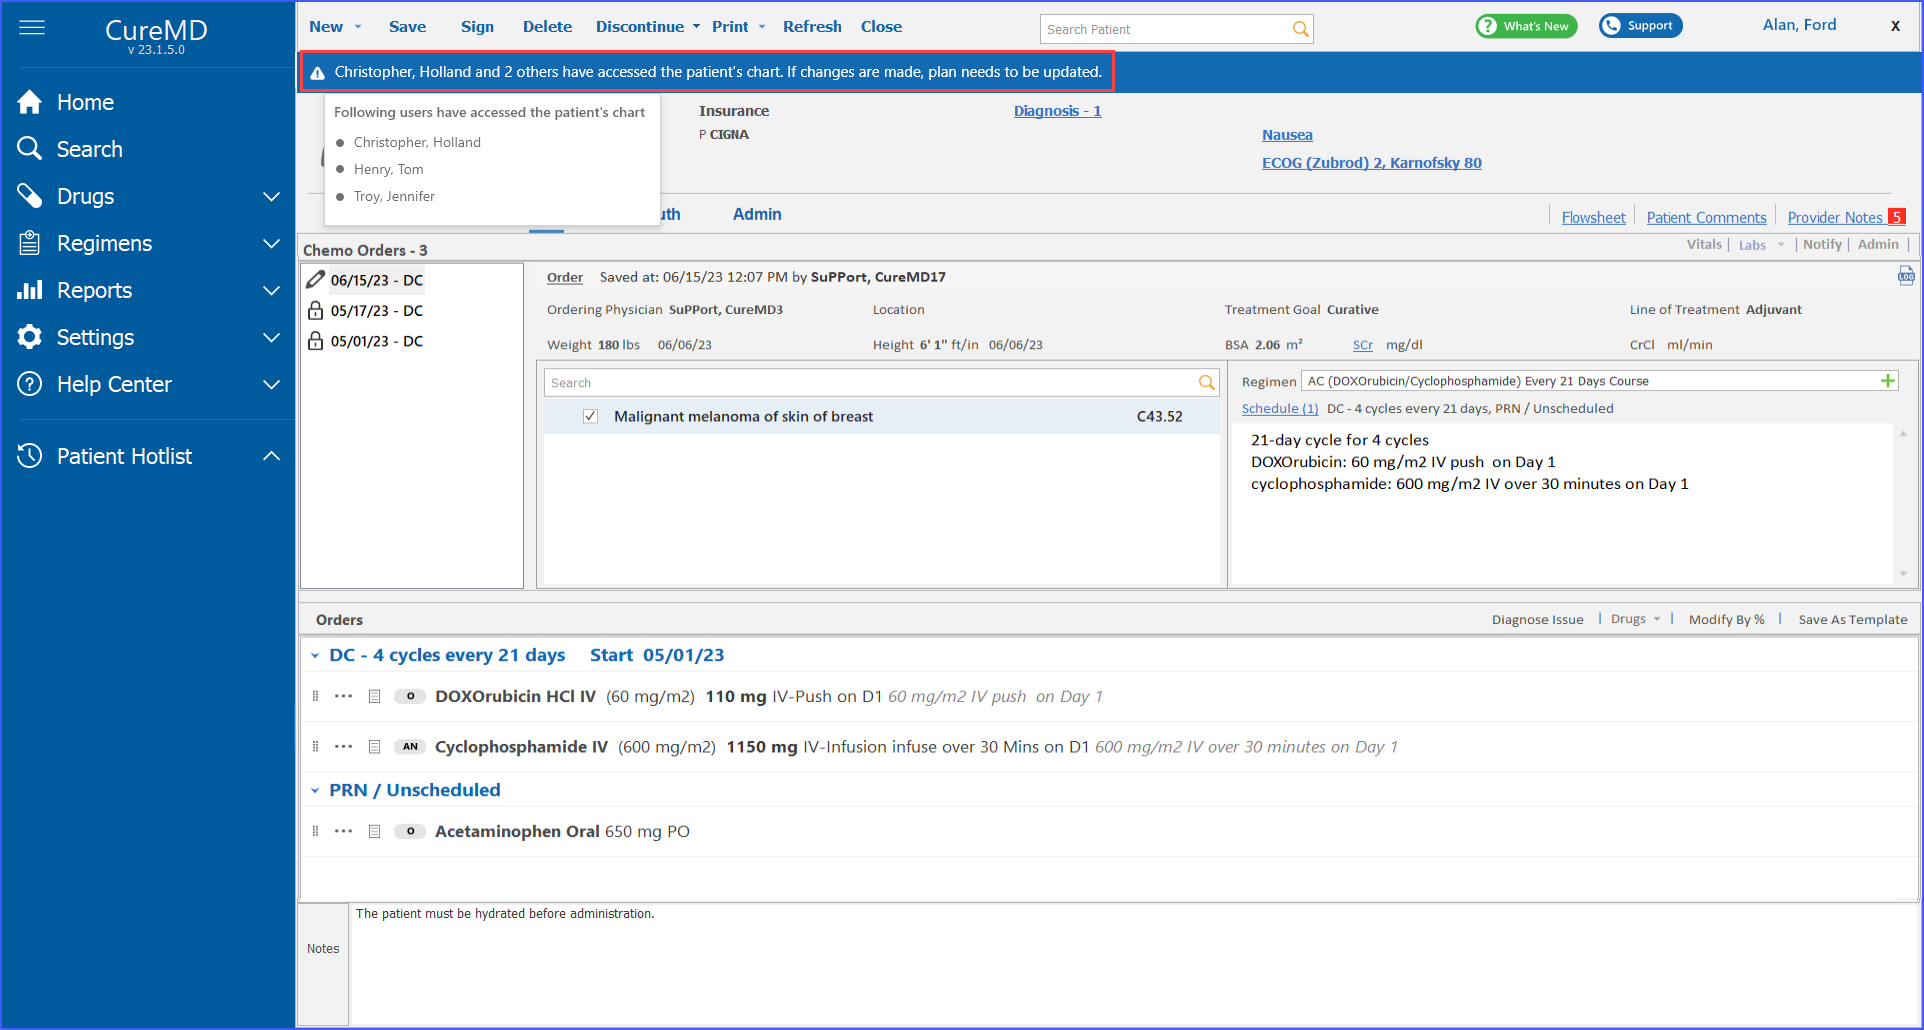
When users access a patient’s plan, a blue banner is displayed on the plan screen when multiple users have access to it simultaneously.
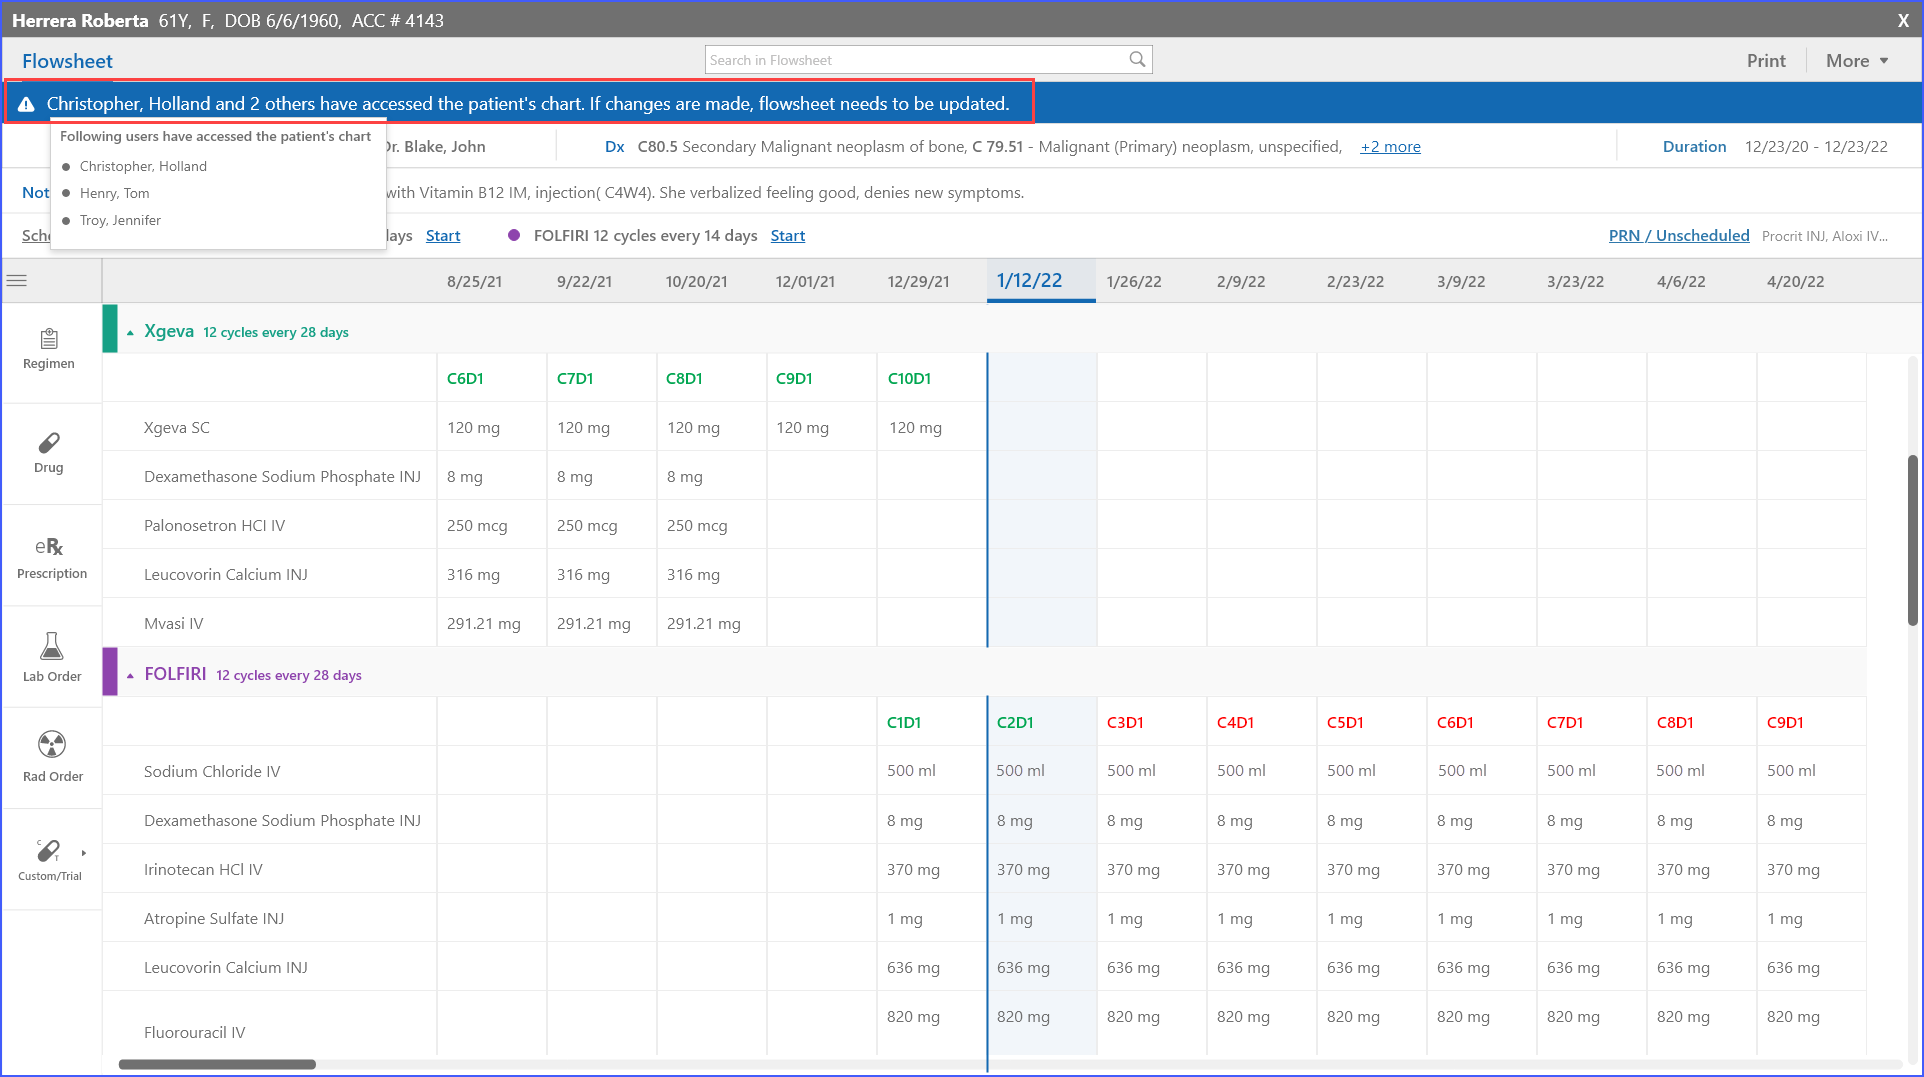
Additionally, if the user accesses the ‘Flowsheet’ from within a plan, a similar blue banner is also displayed on this screen indicating concurrent access.
Moreover, in scenarios where activity-based scheduling is utilized, a synchronization feature between the flowsheet and the scheduler is enabled. If the flowsheet is in a draft state, the scheduler automatically switches to a read-only mode.
This ensures that the scheduler is not modified while the flowsheet is being updated, guaranteeing conflict-free scheduling of chemotherapy treatments.
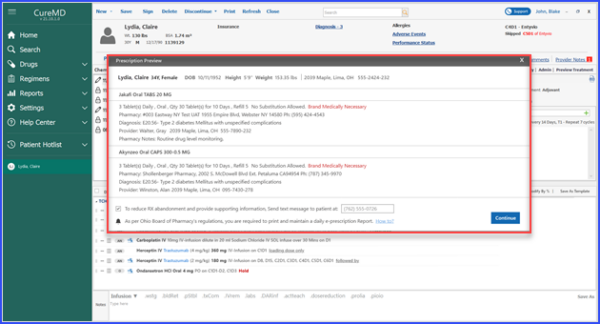
The system automates the e-prescribing for medications marked as “Ready for eRx” when a treatment plan is signed. ![]()
Upon signing a plan that includes such prescriptions, a prescription preview screen is displayed. If the provider confirms the action on this screen, the medications are e-prescribed immediately. If the provider lacks e-prescribing permissions or if permissions are needed due to plan constraints, an alert will inform them that they cannot proceed with signing the plan. Additionally, if it has been over 72 hours since the last eligibility check for these prescriptions, the system prompts a re-verification before continuing with other plan signing processes.

The chemotherapy manager provides a comprehensive preview of prescribed medications upon plan sign-off to ensure accuracy before sending to the pharmacy. The preview includes:
- Detailed Patient Information: Displays name, age, gender, DOB, address, height, weight, and phone number.
- Medication Details: Lists medication names, sig details, refills, maximum daily dosage, and start dates, with specific notations like ‘DAW’ (Dispense as Written) if applicable.
- Pharmacy and Provider Information: Shows pharmacy notes, pharmacy details, and provider information.
- Regulatory Compliance Notes: Includes statements such as “Substitutions Allowed” or “Substitutions Not Allowed” and “BRAND MEDICALLY NECESSARY” under specific conditions, ensuring compliance with state regulations and insurance requirements.
- SMS Notifications: An option to link an SMS statement for direct patient communication if the patient is eligible.
This preview helps providers verify all prescription details, reducing medication errors and enhancing patient safety.
Real-time notifications alert users of updates in the Plan section made by other users. When a change occurs, a red snackbar message appears prominently on the screen with an “Update Now” button, ensuring immediate visibility and action.
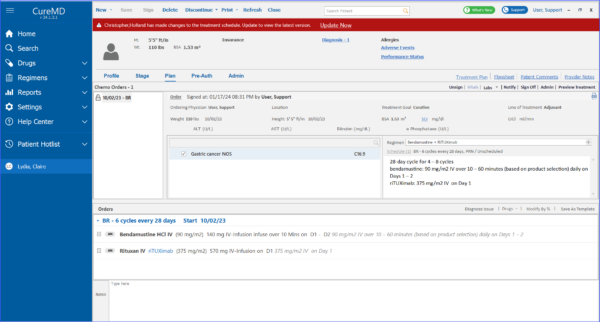
This notification system is activated in various scenarios, including when other users update the schedule, make sign-offs, deletions, or discontinuations in the Plan, and modify the patient chart while another user is actively using these sections. Similar changes have been made to Treatment Plan and Flowsheet as well.
For instance, if a user is working in the Treatment Planner and another user makes changes, a snackbar notification alerts the first user of these changes. The notification remain on the screen until the user clicks the “Update Now” button, ensuring they synchronize their view with the latest updates.
Users can schedule multiple lab tests on custom dates directly within the patient’s therapy plan. When adding labs, users select a therapy and specify a custom date for each test by clicking on ‘Date,’ which opens a date control with no pre-populated values.
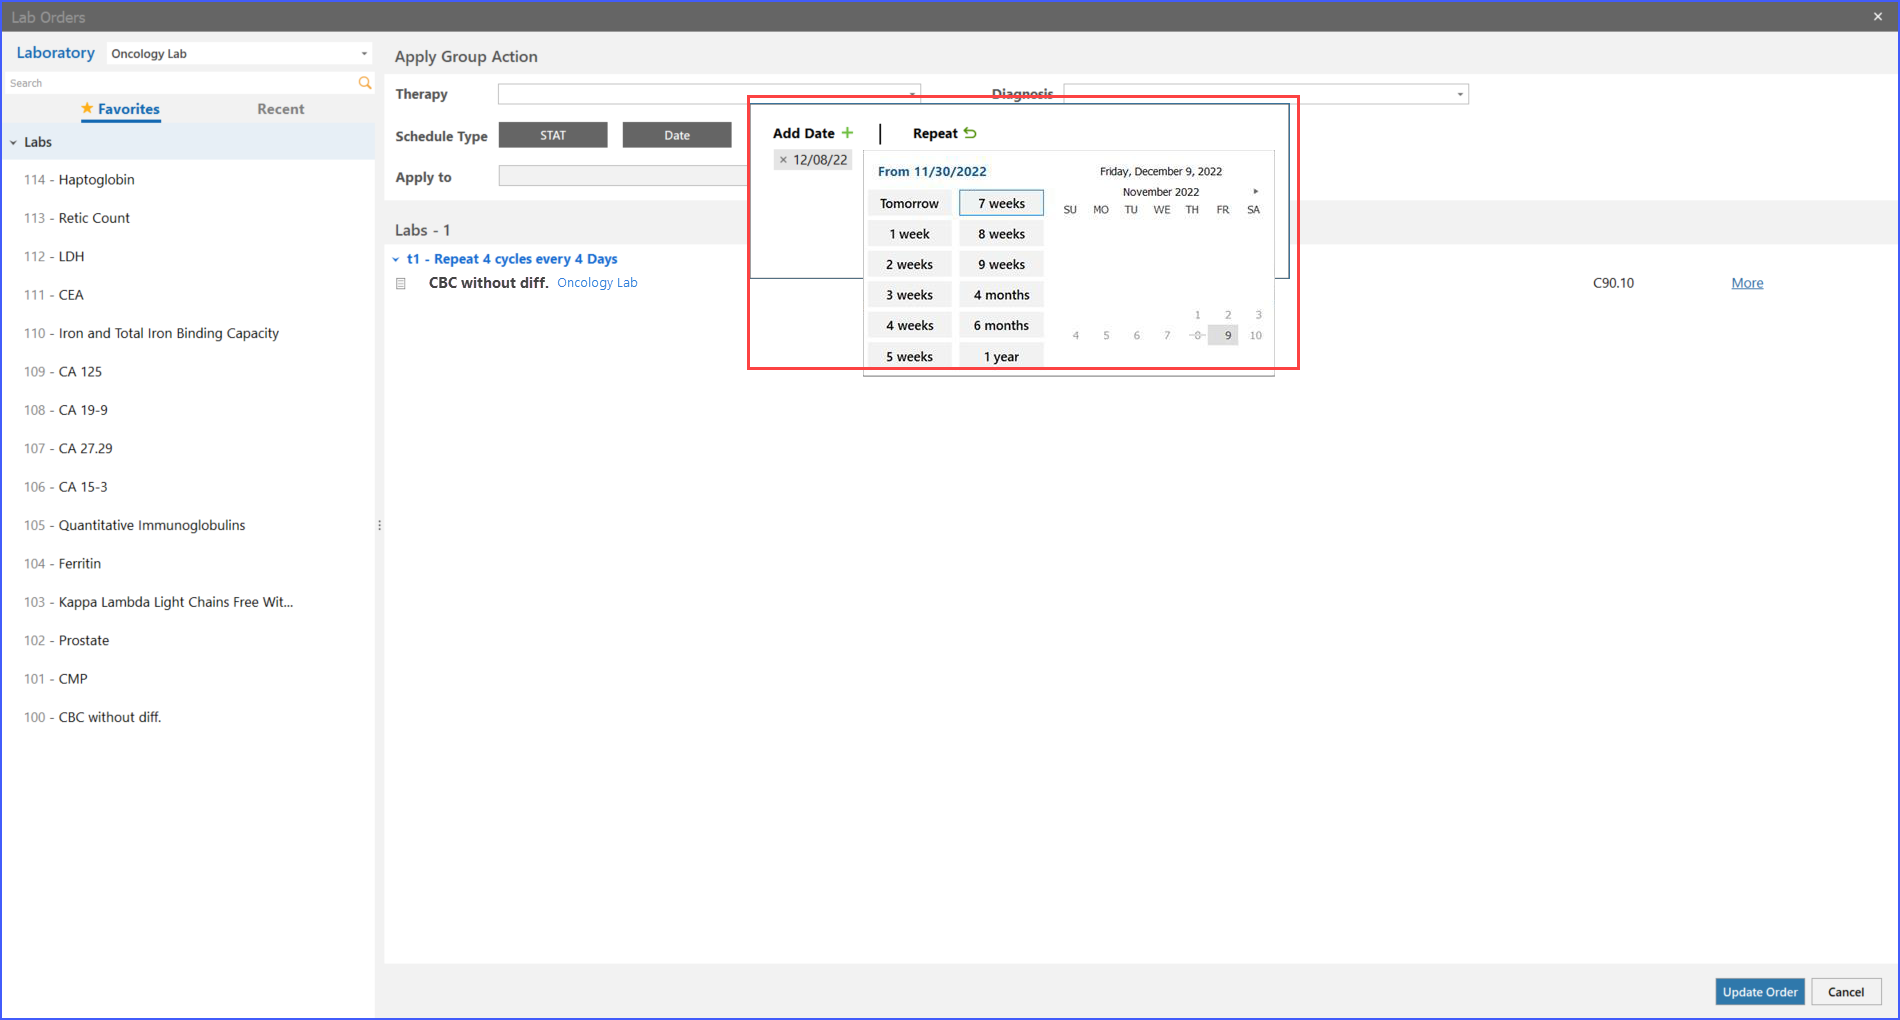
Once a date is set for a lab test, it becomes disabled and crossed out in future selections to prevent duplicates. Users can apply this date to other labs within the same therapy by selecting each lab individually or using the ‘Select All’ feature. An error message alerts users if they attempt to apply the date without specifying the labs.
Additionally, the Lab Test Details screen within the Plan has been updated for a better user experience. When ordering lab tests, users can access an improved ‘Lab Details’ pop-up after selecting a laboratory and clicking ‘add’ or ‘add all.’ The pop-up features an expanded diagnosis field to accommodate longer data.
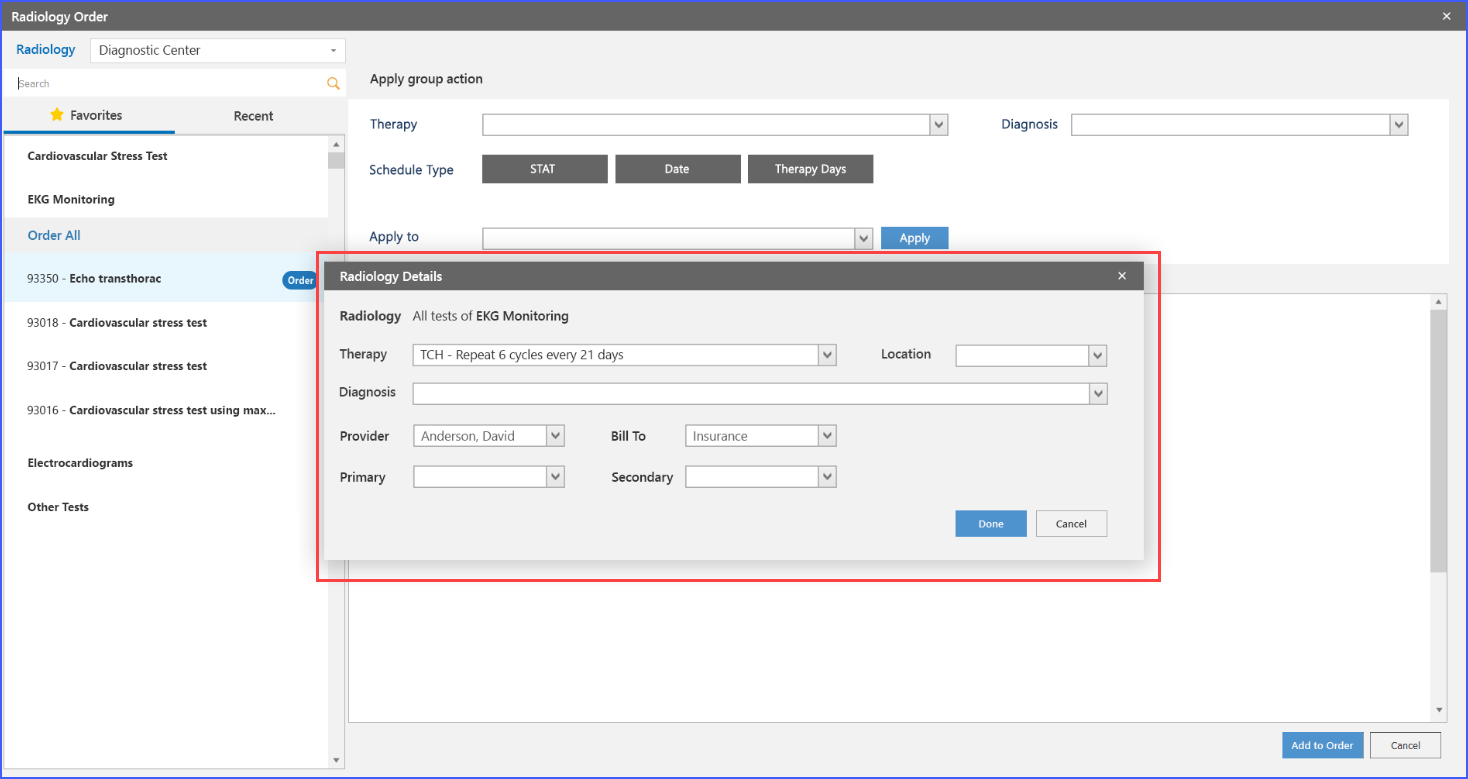
Users can also view all Custom and STAT lab and radiology orders in a single line, enhancing the clarity and accessibility of order information.
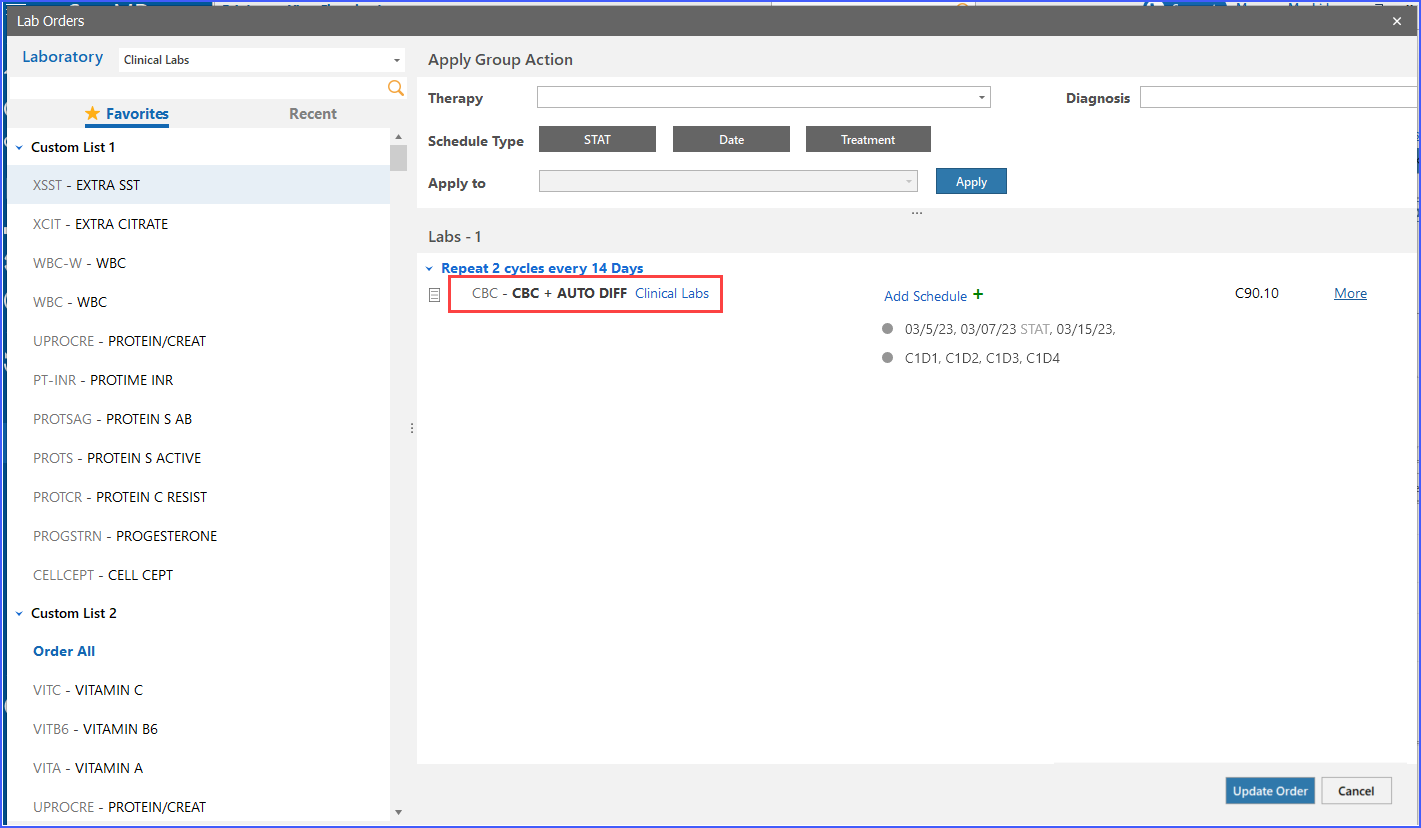
When scheduling a Custom or STAT lab/radiology order, the system consolidates these orders into one continuous line alongside previous Custom/STAT entries. This change applies to all statuses of orders, including Draft, Signed, Completed, and Cancelled, whether navigating from the flowsheet or the plan.
To ensure complete and accurate order details for ePrescriptions, the Regimen Library displays a ‘Missing Treatment Details’ screen when users add a regimen containing eRx drugs. Upon selecting a regimen and opting to append it to the order, users are directed to this screen if they click ‘Done’. This screen checks for any missing mandatory information across various fields such as Therapy, Prescriptions, Provider, Location, Diagnosis, Pharmacy, and Start date.
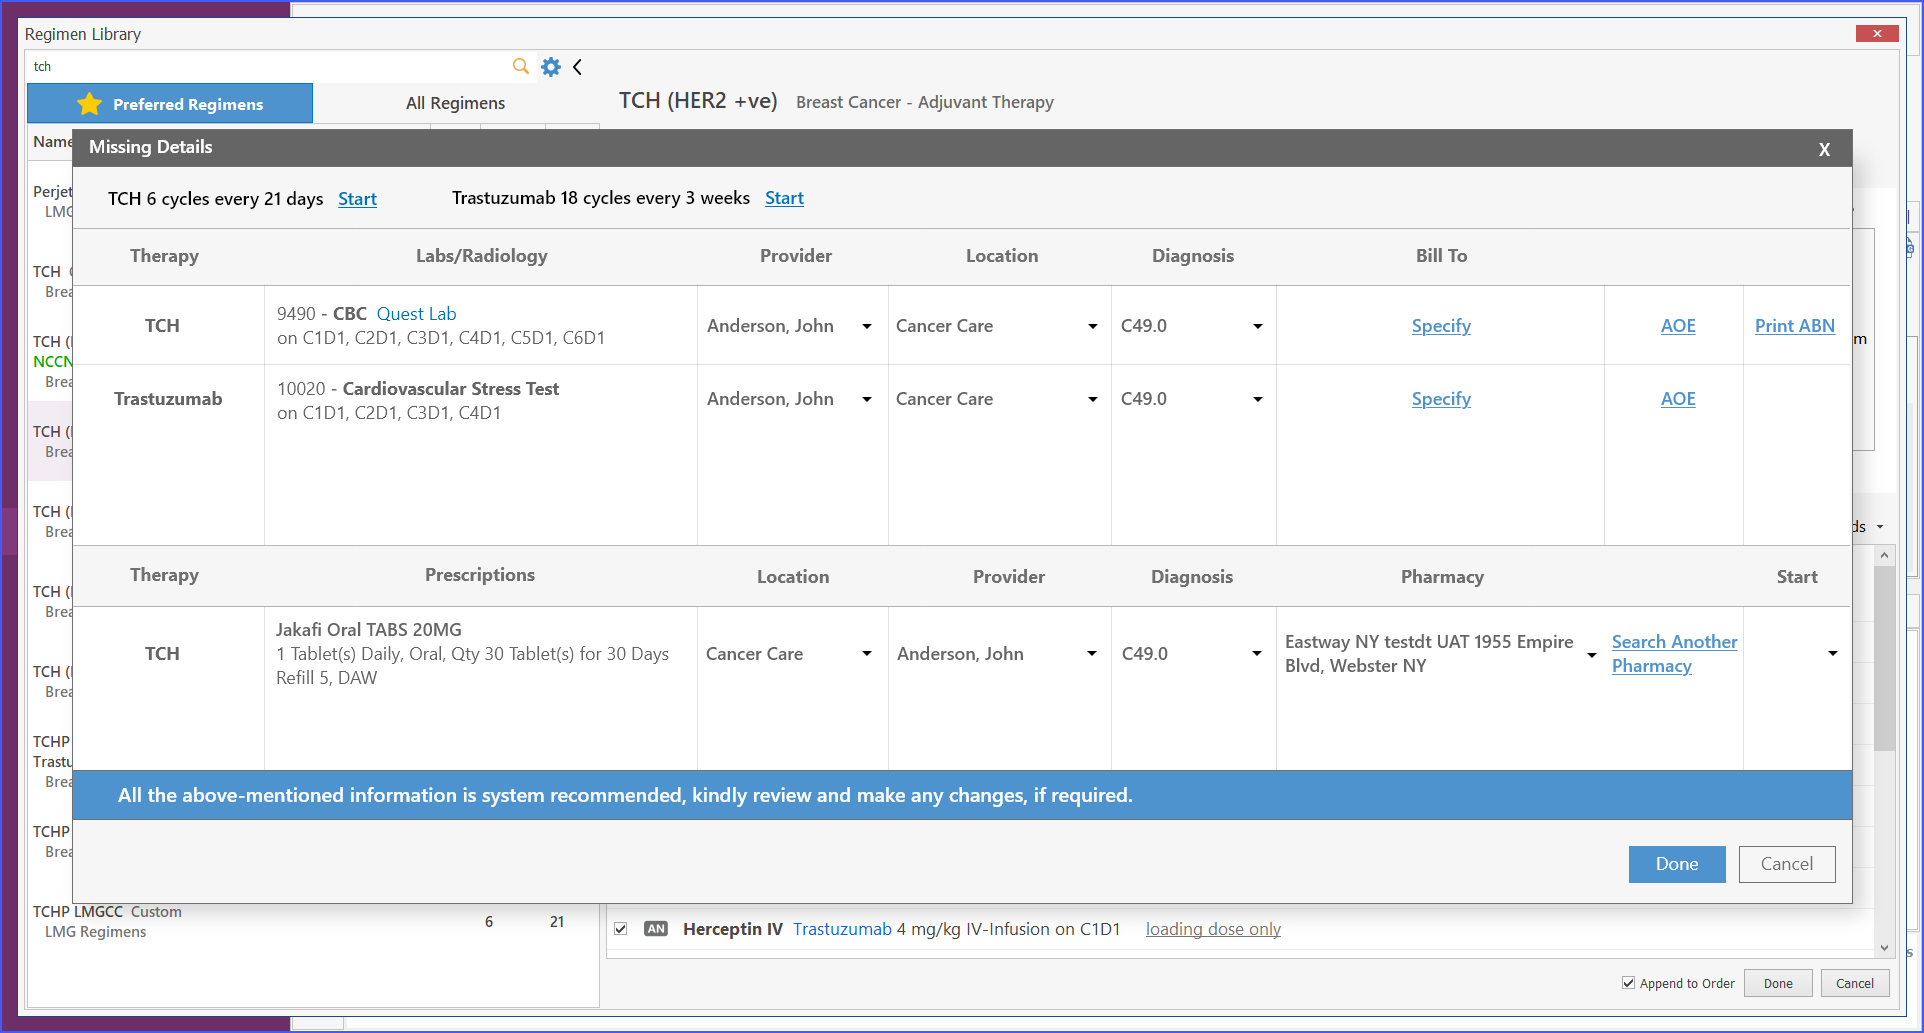
Each field is system-suggested and must be filled out before proceeding. If a user attempts to complete the process with missing details, the system highlights these fields and restricts further action until all information is provided. Users can confirm the entries by clicking ‘Done’ or exit without saving changes by clicking ‘Cancel’.
