What is Patient Index Case?
Users can classify a patient as an Index case and record contacts (others who may have acquired the disease from patient). An index case is defined as the first patient/case who has a disease which is hereditary or communicable.
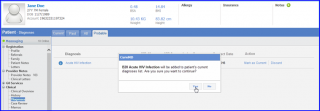
To record such cases, the ‘Index Case’ checkbox is included in the diagnosis addition screen.
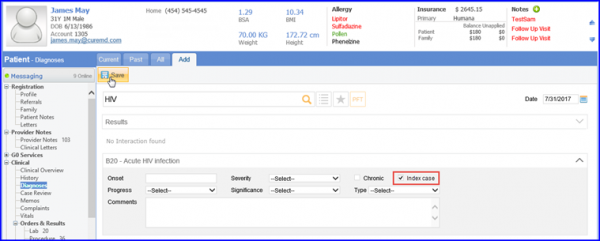
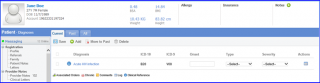
If a patient is identified as an index case for certain diagnoses, an icon is displayed on the list page against all such diagnoses.
After a patient is marked as an index case for a particular diagnosis, user is able to record contacts against it.

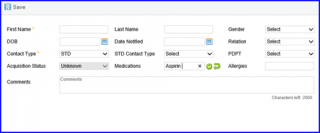
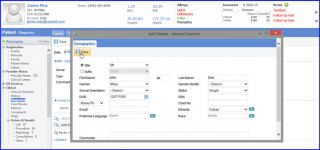
The First Name and Contact Type fields are mandatory to record an index case.
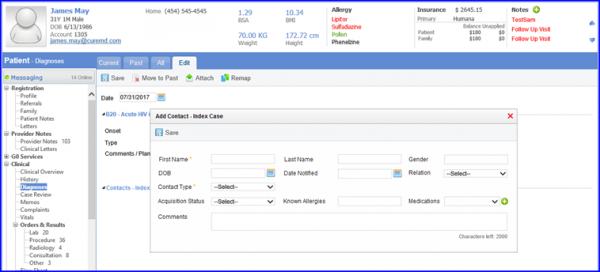
If ‘STD’ is selected as ‘Contact Type’, the STD Contact Type and PDPT fields appear. These fields are optional and users may or may not choose to record these fields while adding contact.
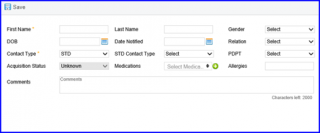
User can also add multiple medications that the contact might take for treatment. Azithromycin 1G PO and Metronidazole 2G PO are available by default. If any other medication is used for treatment, then user can click on add icon to associate it.
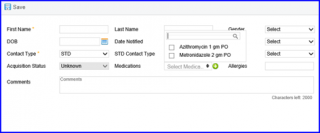
This changes the control to an open text field. Once relevant medication is added, user can click on check icon, which adds the new medication to multi-select drop down as an option.
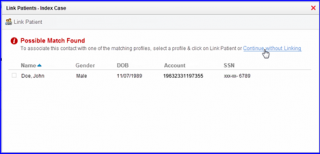
Once the user fills in relevant details about a contact and saves it, the system suggests to map this contact with existing patient profiles. It searches for a match among registered users and if matches are found, they are listed in order of relevance, from most relevant to least relevant.
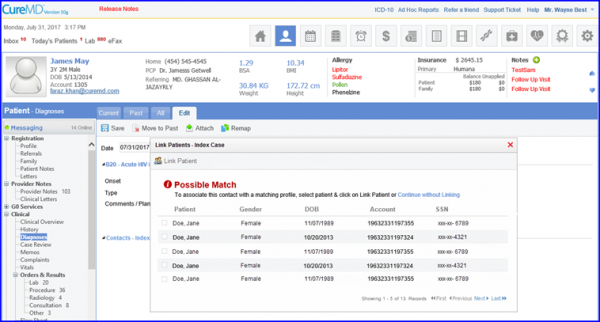
Users can then select required patient profile and link it with the contact.
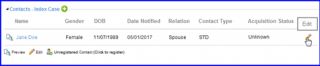
Once linked, name of this contact appears as a hyperlink.
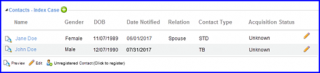
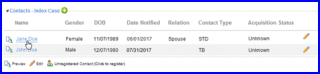
After a contact is saved, user can preview its complete details by clicking on the icon.
User can edit details of a contact by clicking on the pencil icon available against each contact on the right.
The ‘Index Edit – Contact’ window pops up to allow users to edit, delete, link/unlink the contact.
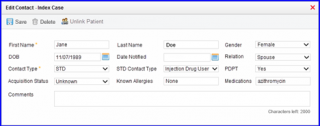
For linked contacts, acquisition status fields are read only and acquisition status are only updated via linked patient’s profile by adding that diagnosis or discarding it. Moreover, user cannot delete a linked contact whose acquisition status has been updated to Positive or Negative.
However if no match is found among registered users or none of the matching profiles belongs to the contact being added, it is recorded as an unregistered contact.
In case a match is found but user does not wish to associate the contact with suggested patient profile, they can proceed by clicking on the ‘Continue without Linking’ hyperlink or by simply closing the window.
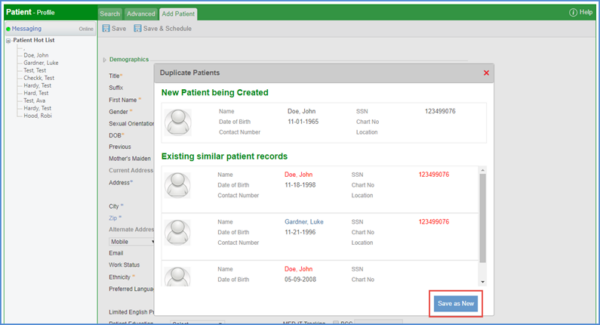
To add this unregistered contact as a new patient in the system, user can click on the ‘Register Contact‘ icon available on the list page.
Upon confirmation, an add patient window opens and fields such as First Name, Last Name, Gender and DOB is auto-populated if data is already available for them. After mandatory fields are filled in, the user can register this contact as new patient by clicking on the Save button.
Once registered successfully, the contact name changes to a hyperlink, indicating that the contact has been linked with the new patient profile.
Upon clicking on the name of a linked contact, user is redirected to that patient’s health record.
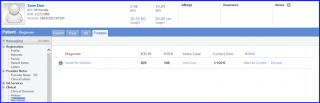
To view the patient’s association with the index case, the user can reach the ‘Diagnoses’ component by following the above mentioned workflow.

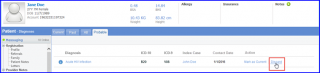
Here, a tab titled ‘Probable’ is available. Under this tab, user can view all the diagnoses for which this patient was added as a contact to index cases along with other details.
If any of these probable diagnoses are established after checkup or screening, user can move them to current diagnoses list by clicking on the ‘Mark as Current’ button.

The system prompts user to confirm this action before moving the diagnosis to current diagnoses tab.
If confirmed, then the selected diagnosis is moved from probable to current diagnoses.
Upon doing so, acquisition status of the contact is also updated from Unknown to Positive. Refer to the following screen where this update is automatically made in index patient’s chart:

Upon investigation, if it is confirmed that the contact has not acquired the disease from an index case, the diagnosis can be removed from the patient’s probable list by using the ‘Discard’ button.
The system prompts user to add comments before deleting selected probable diagnosis.
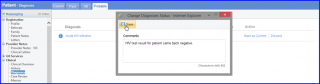
Once a comment is added and saved, the selected diagnosis is discarded and acquisition status for the contact is updated from Unknown to Negative.

