How To Set Up Patient Portal ?
In order to setup a Patient Portal user, follow these steps:
1: Login to your CureMD account and go to the Settings module.
2: On this screen, from the left-navigation menu, expand the Practice bucket and scroll down to the Patient Portal Setup option.
This opens up the Setup tab.
3: On the Setup tab, make sure that the Enable Patient Portal checkbox is enabled.
4: The Web Address field contains the system generated URL of the Patient Portal. If you wish to view Patient Portal, open the Web address in a browser.
5: To send emails, reminders or notifications to the patients, you can either use your own email account or send emails via (noreply@curemd.com ) system generated account.
6: To use system account, enable the checkbox Use ‘noreply@curemd.com’ for Sending Emails.

7: From the Setup tab, user can also customize the looks and the content being displayed on their Patient Portal. For example:
- User can upload the Practice Logo, by clicking on the Upload button in the Practice Logo section. There’s also an option to set the alignment of the logo. The practice logo appears on the Home page by default.
- User can choose which webpages should be displayed on the patient portal by enabling the checkbox next to them. Some webpage tabs are:
1.Home
2.Our Staff
3.Practice Forms
4.Keep in Touch
5.Register Now
6.Login - User can also specify the page that should display when the user opens the patient portal in a browser by selecting the desired option from the Landing Page dropdown.

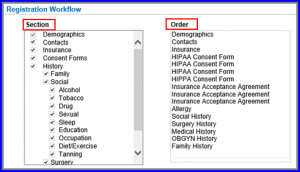
- User can change the order of screens that display for the patient registration from the Registration Workflow section. Upon selecting the desired section from the Section box, it starts populating in your desired sequence in the Order box.
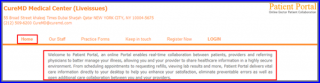
- User can set his Welcome Note, which is displayed on the Home tab of the patient portal.

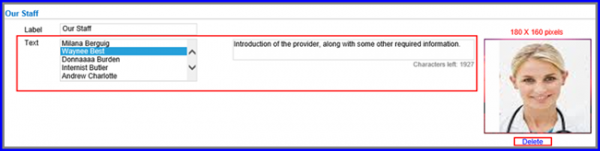
- The Our Staff section displays information about your staff. This information is displayed in the Our Staff tab of the patient portal. To show information about each practice staff member, select their name from the list and enter their details in the Text field.
You can also upload their picture by clicking on the Upload button.

- User can also upload a Form by clicking on the Upload Forms button in the Practice Forms section.
- User can upload their contact information from the Keep In Touch section.
- User can choose the template color of their choice for the patient portal.
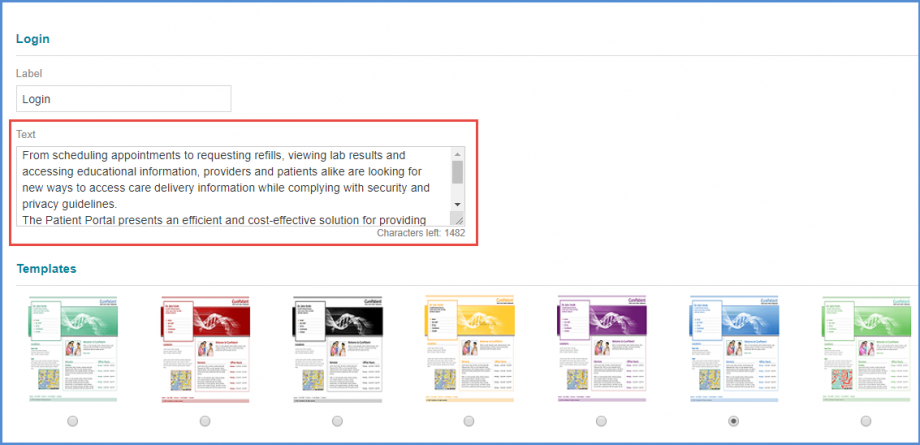
- User can display text of their choice on the patient portal login screen. Add the text to the “Login” text box and click “Save”. This helps provide guidance to the patient portal users.