How to Verify Eligibility?
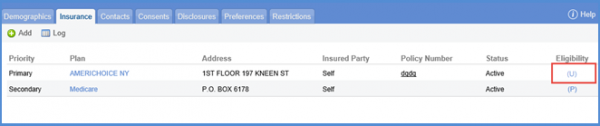
The insurance details have a column for ‘Eligibility’. The column can show either one of the following statuses; based on the last eligibility inquiry of the plan made by the user:
- ‘P’ indicates a ‘Pending Status’. This appears when eligibility inquiry has never been made for the plan. Clicking on ‘P’ takes user directly to the inquiry screen.
- ‘E’ indicates eligibility.
- ‘NE’ indicates ineligibility.
- ‘Er’ indicates an error.
- Clicking on either ‘E’ or ‘NE’ opens up the ‘Eligibility’ screen showing eligibility and benefit details of the plan.
- ‘U’ indicates the requested payer is not able to check the eligibility of the patient.
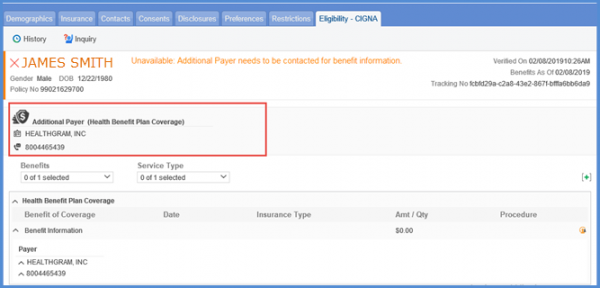
If the Eligibility status of the patient is “U”, hover over the status ‘(U)’. The tool tip guides that the user needs to contact the additional payer for benefit information.

Clicking the eligibility status ‘U’ user can see the “Eligibility” screen. On this screen, user is able to see the information of the ‘Additional Payer’, if available. User can contact the additional payer for the payment.
To know how to search claims with eligibility status, click here.
Eligibility
It is a lot easier for clients to filter through the eligibility data to find the exact items that they are interested in. The Eligibility screens are more user-friendly and allow users to view historical eligibility responses for review and/or verification.
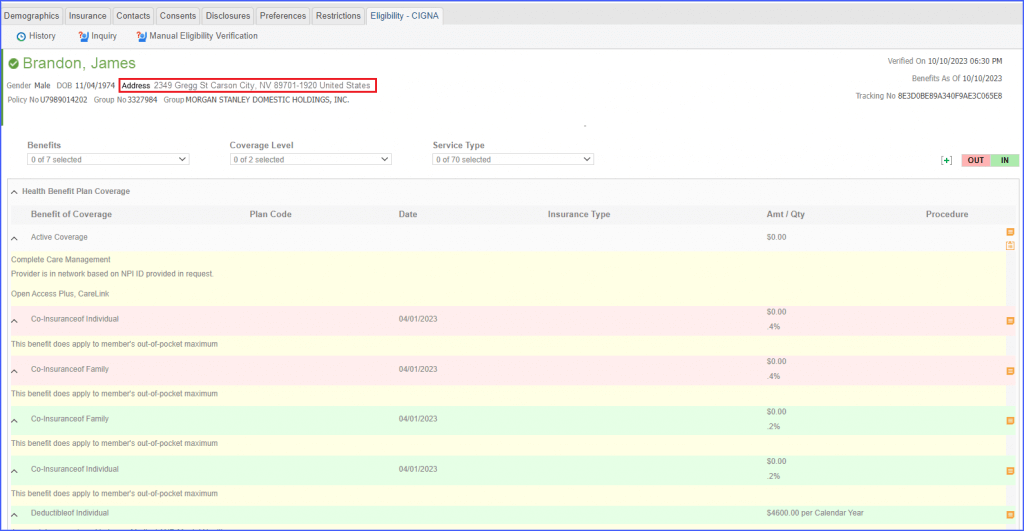
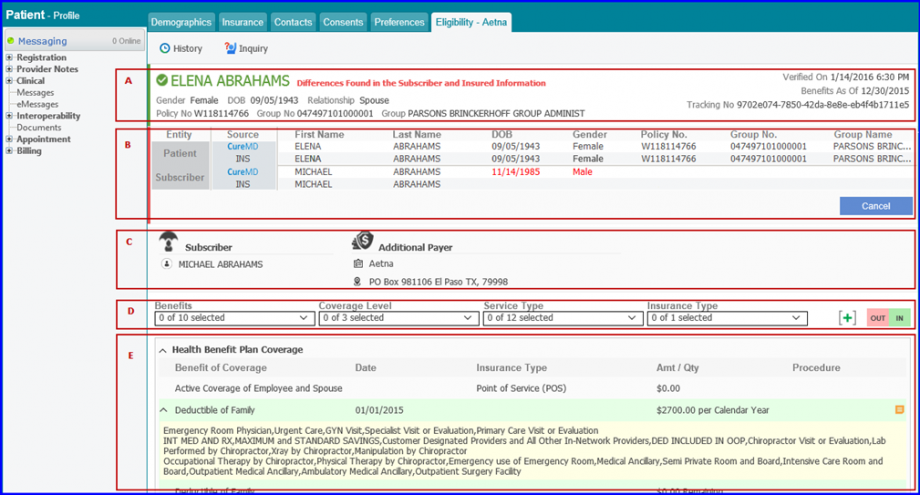
A. Patient’s Information
On the Eligibility Screen, Patient’s name is mentioned at the top along with other information such as verification date, benefits as of date and policy number . If the Patient is eligible, the name appears in green and if subscriber is ineligible, it appears in red.
B. Comparison of Patient/Subscriber information
This section shows the differences of Patient/Subscriber information that is present in CureMD with that of the insurance by matching them.It appears only if a difference between CureMD and Insurance data is detected. This lets the user know if updating of missing or outdated information is required. This section has two rows: Patient and Subscriber with further division into CureMD and Insurance. This way the user can check/compare the information of Patient and/or Subscriber that is present in CureMD or Insurance. Any information in red color shows it requires updating or its corresponding information is missing.
C. Subscriber Information
This section contains information regarding Subscriber, PCP/Provider, PCP Info, PCP Effective Dates, Additional Payer, Vendor, and Managing Entity.
D. Service Type Filters
The Benefits, Coverage Level, Service Type and Insurance Type dropdowns allow the user to select multiple values and view filtered Service Types in the Eligibility section as required. These dropdowns appear according to user information input in CureMD. Two other filters, ‘In’ and ‘Out’ are present which filter the Service Types which match the plan’s ‘In Network’ and ‘Out Network’ Providers. They appear if and when there are additional details in the results.
E. Service Types
This section displays the Service Types as filtered by the above mentioned filters. The Service Types are expandable. The expanded sections show Benefits of Coverage, Date, Insurance Type, Amt / Qty and Procedure information for every service type. There can be messages or related entities service types that can be viewed by clicking on and icons respectively. All benefits can be expanded at once by clicking on the + button.
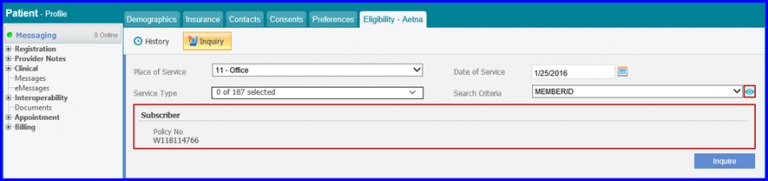
Inquiry
Clicking on ‘Inquiry’ button opens up inquiry search box. Users can fill in the Date of Service, Office, Service Type and Search Criteria fields to customize the auto-populated information. After filling in the necessary information, click ‘Inquire’. A ‘N’ button is placed next to the ‘Search Criteria’ dropdown. Clicking the button will expand the inquiry section to display detail of selected search criteria on which the search is based upon.
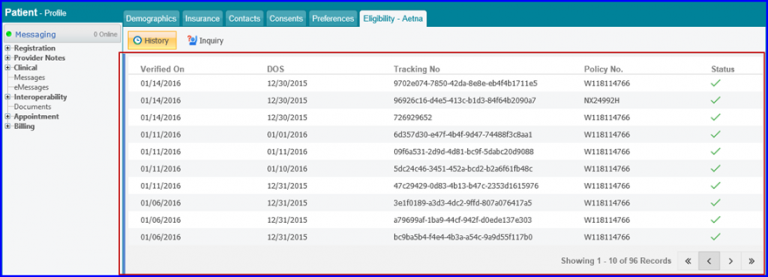
History
To view history of inquiries, click on the History Button at the top of the Eligibility Screen.
The history of inquiry requests is displayed under Verified On, DOS, Tracking No, Policy No, and Status columns. Clicking on any record in the ‘History’ pane shows the entire benefits which were obtained during the eligibility request.
Auto Eligibility Check
Whenever insurance is added or modified system automatically verifies its eligibility. This helps in saving a user’s time and also saves them the trouble of manually checking the eligibility every time insurance is added or modified.
To enable this feature, please click here.
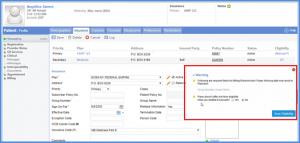
When the user adds a plan for which the eligibility status is not offered by the payer in real-time, system allows user to select status for the plan manually through a popup.
This popup appears even if permission for editing insurance information is disabled. User can select either Yes or No from the warning popup to verify the eligibility status.
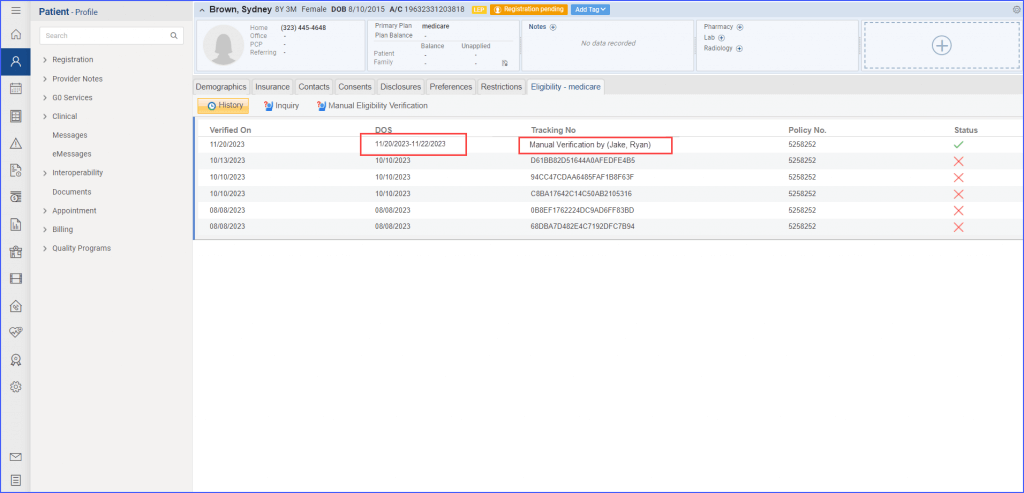
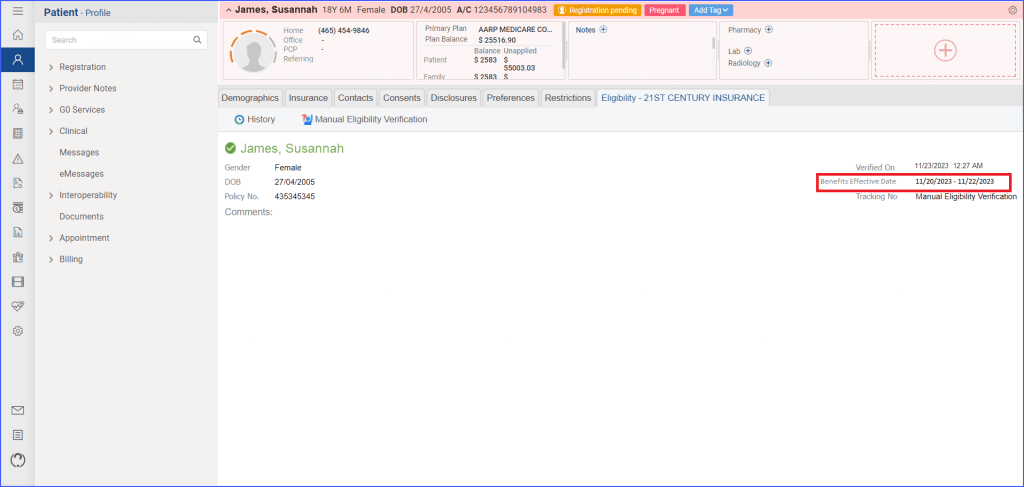
When users view the eligibility history, any manual verifications are distinctly marked. Instead of the simple “Manual” label, users are able to see “Manual Verification (by Last Name, First Name)”, offering clarity about the individual who made the manual update.![]()
Moreover, when an eligibility check is conducted for a specific range of dates, the system displays this date range in the DOS column.
Additionally, terms used in the eligibility response have been refined for better understanding.
The label formerly known as “Benefit As Of” is referred to as “Benefits Effective Date.” If the user checks eligibility for a specific date range, the system displays both the starting and ending dates. However, if the user doesn’t specify a date range, only the Date of Service (DOS) is presented.
Upon accessing the Eligibility Response Screen, users find an added detail of the insurance subscriber’s address in the top banner. This offers a clearer insight into the subscriber’s details.
If in case a patient is considered a ‘Dependent’, the dependent’s address is populated in this field instead.