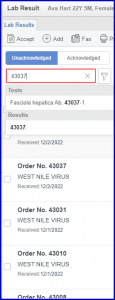
Filters can be applied to refine the search. Provided filters are:
- Normal/Abnormal Results
- Received Date (Today, Last 7/30/365 days, and Date Range)
- Ordered Date (Today, Last 7/30/365 days, and Date Range)
- Assigned To
- Retain filters
In order to view the Beta Lab module, users can select the ‘Beta’ option under the ‘Lab Result view’. (Personal > Preferences > General)
Click here to see how.
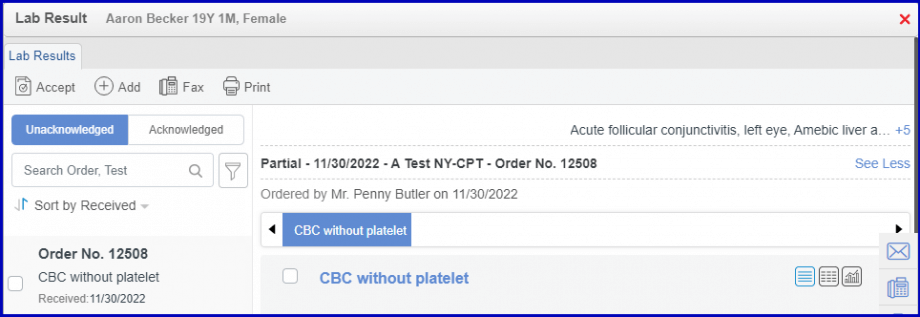
The user navigates ‘Results’ in the ‘Current Provider Note’ and clicks on ‘Lab’. This opens the Lab Result tile, where the result listing is displayed in the left pane and the selected lab result is shown in the right pane.
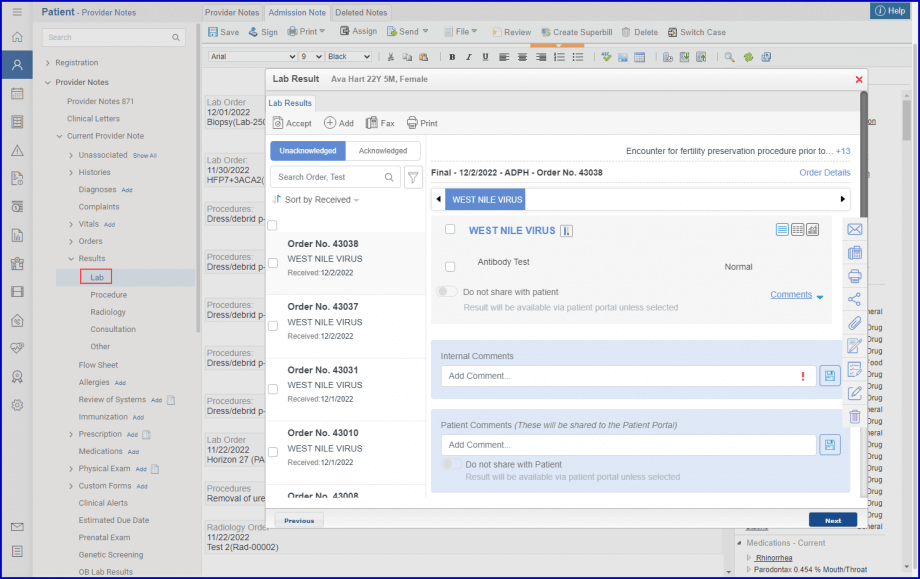
Users can use the Search feature to find lab results by the patient order number or test name. Search results are segregated by:
Filters can be applied to refine the search. Provided filters are:

Filter tags are created for all the filters applied by users. These can be removed easily by either crossing them out or updating them from the filters menu.
The ‘Received in the last 90 days’ filter is applied by default when the user navigates to lab results.
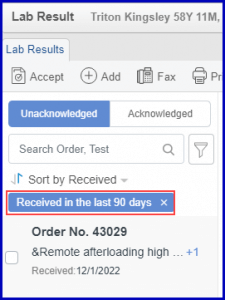
The default filter can be temporarily removed by clicking the cross icon on the filter tag.
If the user applies a different filter and retains it by marking the ‘Retain Filters’ checkbox, the newly applied filter becomes the default.
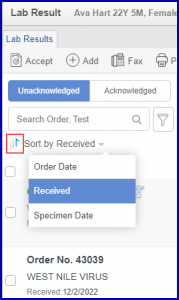
Results can be sorted by:
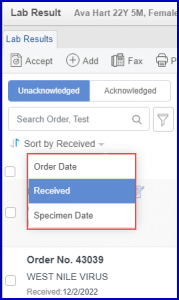
Sorting can be changed to ascending or descending using the ‘![]() ’ icon.
’ icon.
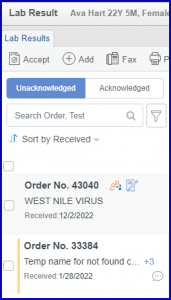
Badges appear next to each result to indicate if they are critical/advisory, acknowledged, have additional attachments or comments, assigned to a user and shared to patient portal. The details of the badges are displayed below:
Critical results are marked by red indicators whereas advisory results are shown with yellow indicators.
Select a lab result to view its details in the right pane.
Order details such as the order number, ordered date, ordering provider, and accession number are also displayed in this section.
The status of the result, received date, and laboratory name are also displayed here.
The navigation bar provides centralized control to go through all tests in the result. Users can click on the ‘![]() ’ icon to view all the tests and jump to the desired test.
’ icon to view all the tests and jump to the desired test.
A count of abnormal observations is displayed on top of the test name in the navigation bar.
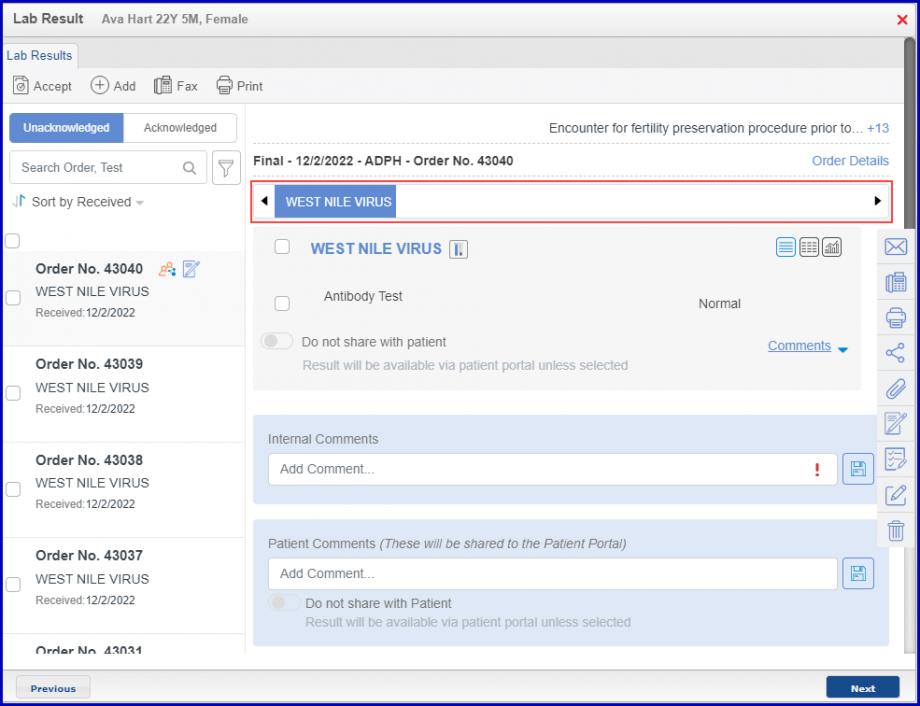
Users can view the result in the following views:
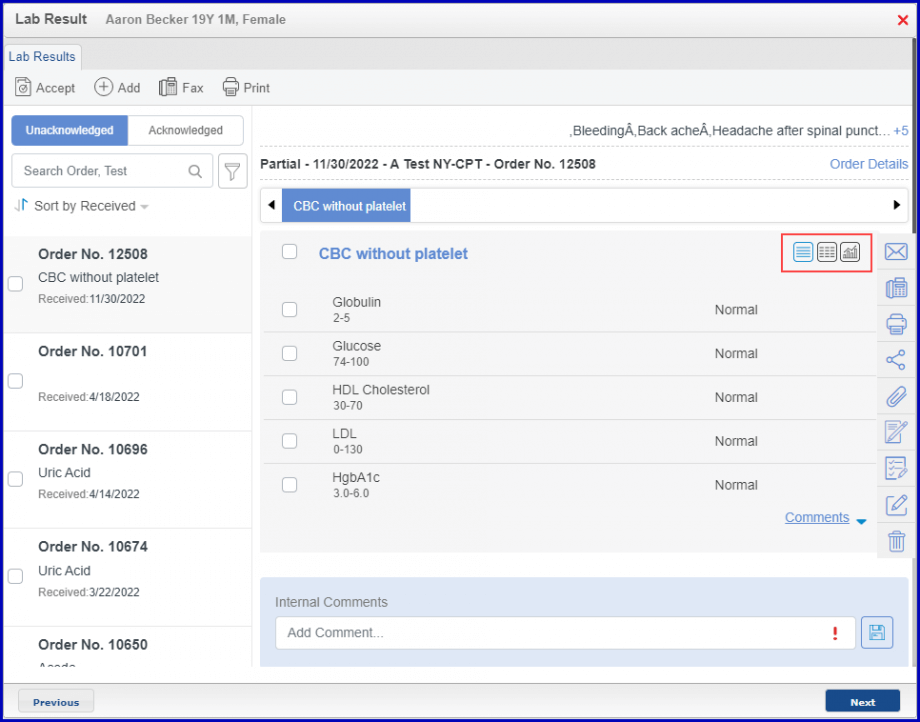
In the graph view, graph is displayed for the selected observation only. Multiple observations cannot be selected at the same time.
To view graph view of the lab result, click the graph view icon.
Date range for the graph can be selected using the ‘Reset’ and ‘To’ text boxes.

Users can zoom in and out of the graph using the ‘ + ‘ and ‘ – ‘ icons respectively.
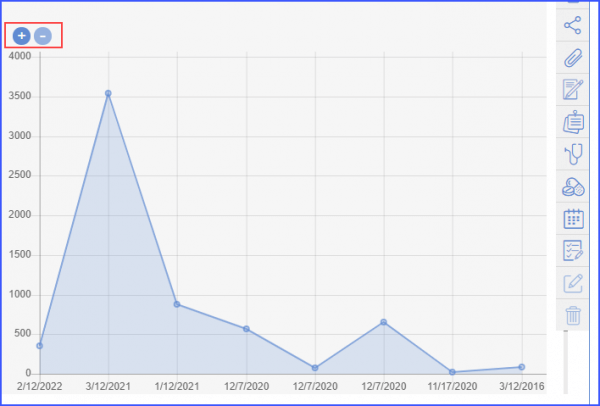
The date ranges on the x-axis of the graph can be displayed in chronological or reverse chronological order. Click here to see how.
Users can view the specimen details related to each test as well. The details include specimen name, received date, ordered date, and ordered by.
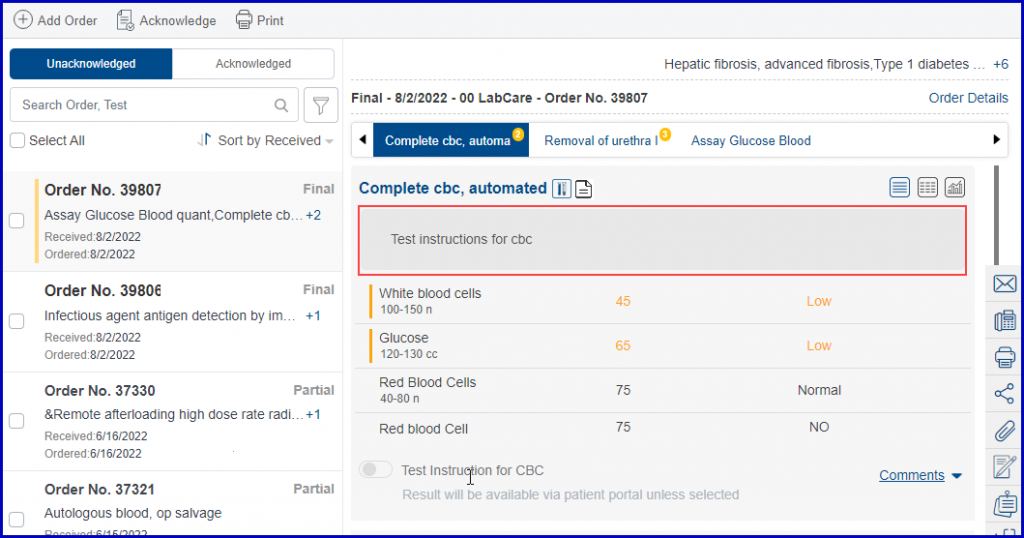
An icon to view test instructions has been added in lab results in the beta view.![]()
This allows users to view test instructions sent to the lab with the order.
When the user opens a specific lab result that has test instructions associated with it, the system displays a ‘Test Instructions’ icon next to ‘Specimen’ icon.
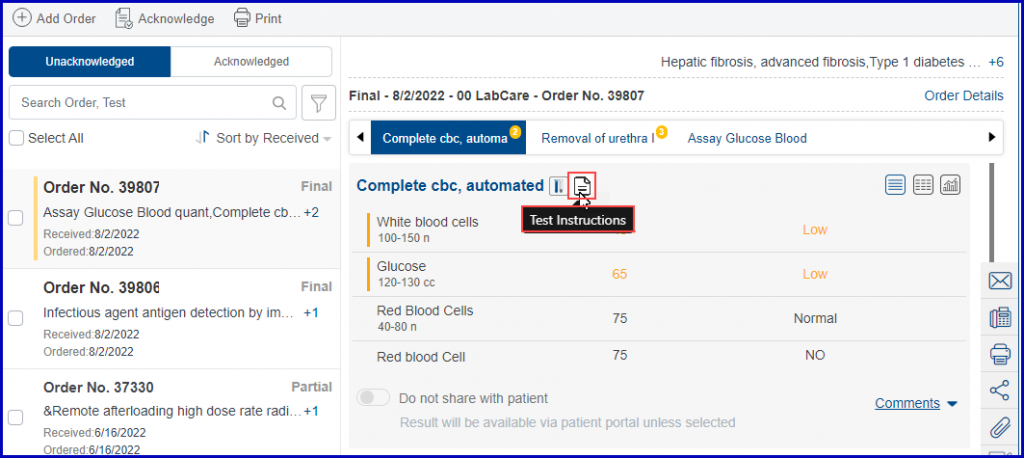
Clicking on this icon opens the test instructions associated with the lab order.
A similar enhancement has been made in the ‘Clinical’ Component in the ‘Patient’ Module. Click here to view the change.
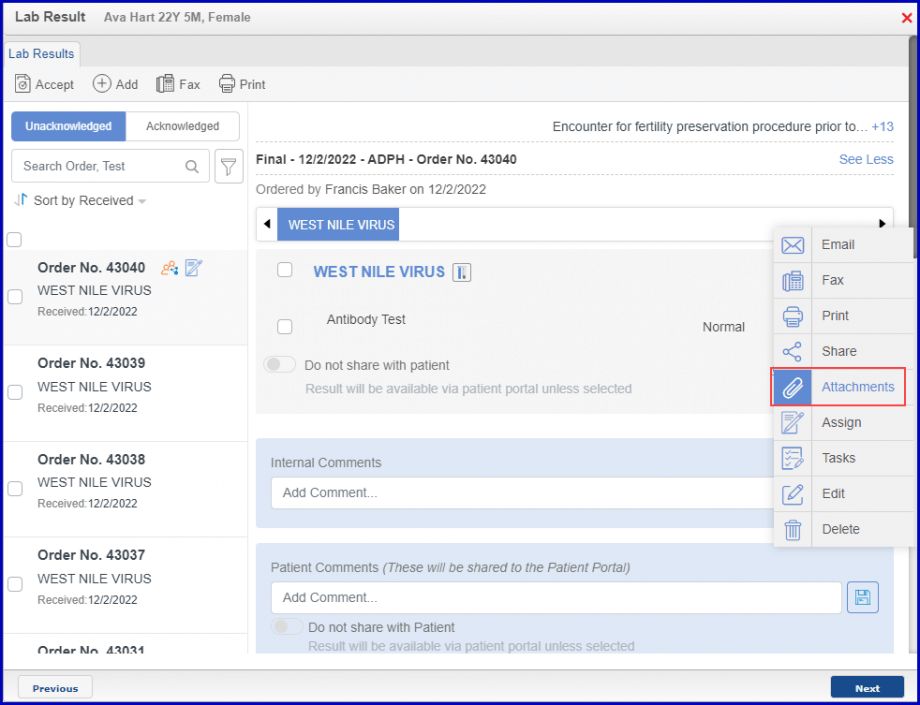
Users can use the floating menu to perform various actions.

On hovering on the floating menu, the following icon details are displayed:
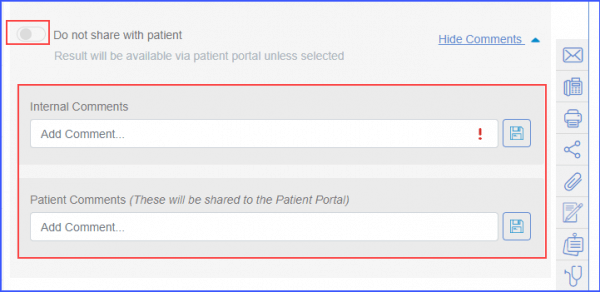
Users can add internal and patient comments on every test. The internal comments can be marked as important using the ‘![]() ’ icon. Comments that are marked important are pinned to the top.
’ icon. Comments that are marked important are pinned to the top.
Sharing for lab results has been made customizable. Sharing of tests can now be managed via toggle button provided. User can choose to share specific tests with patients.
Patient and internal comments are shown on the provider note SOAP text based on user preferences.
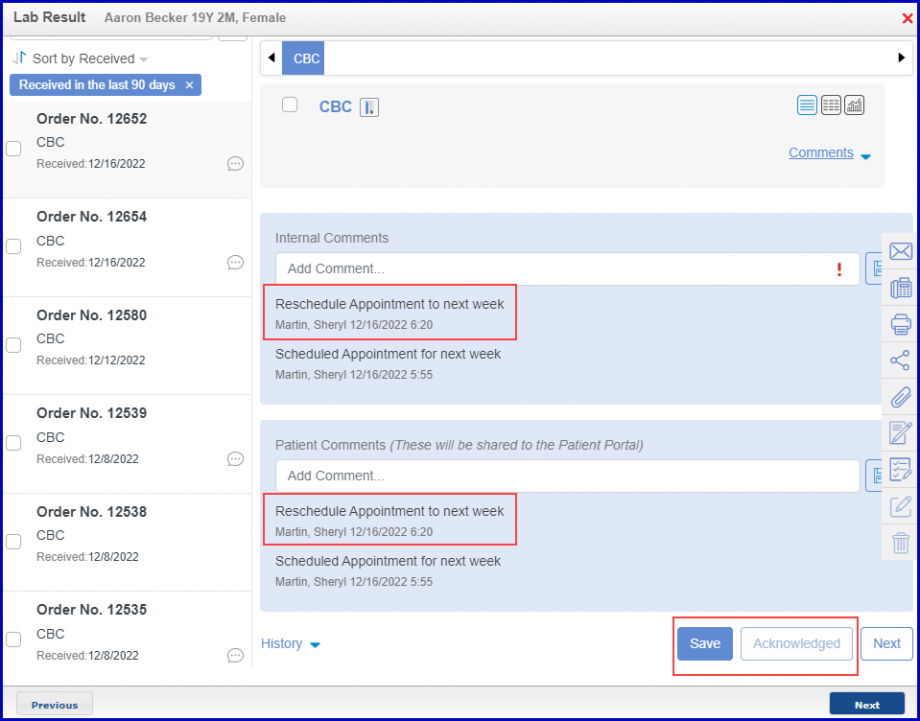
Internal and patient comments are automatically saved for a result in Beta Labs Module.![]()
This ensures retention of important comments.
The added Internal Comments and Patient Comment are auto saved if user clicks on the ‘Acknowledge’ button without clicking on the ‘Save’ button next to Internal Comments and Patient Comment.
However, if the user adds an Internal Comment or a Patient Comment and tries to navigates to the any other action, including ‘Accept’, ‘Add’, ‘Fax’, ‘Print’ or ‘Next’, the system displays a prompt alert stating: ‘The comments added are not saved. Do you still want to proceed?‘
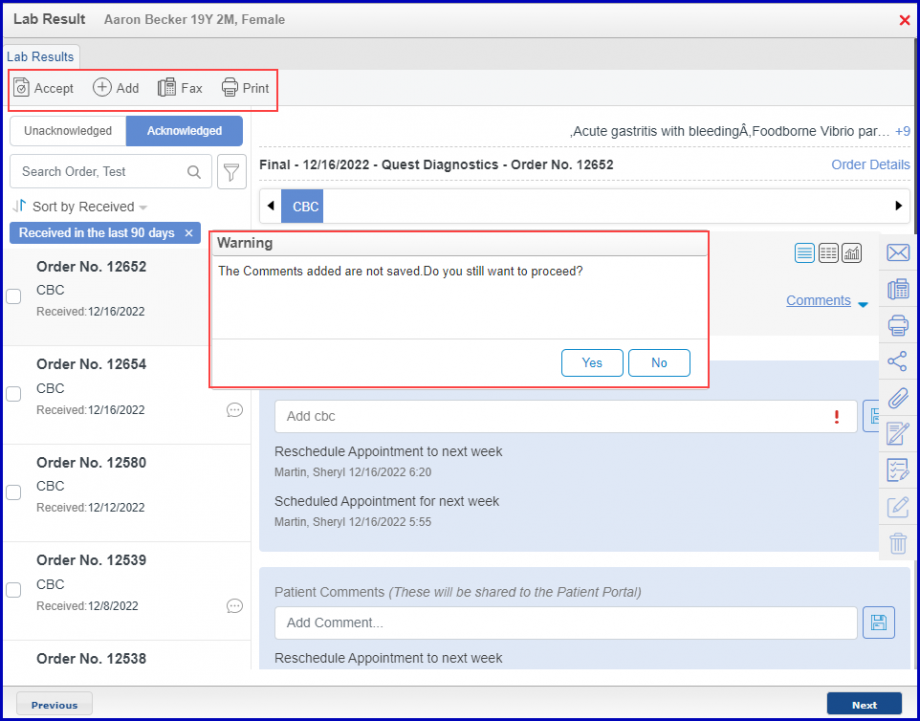
Clicking on ‘Yes’ button deletes the comment and takes user to desired page.
However, clicking on ‘No’ button allows user to return to the previous page where comments can be saved.
Click here to view a similar enhancement in the ‘Personal’ module.
Action buttons are provided at the bottom of the result.
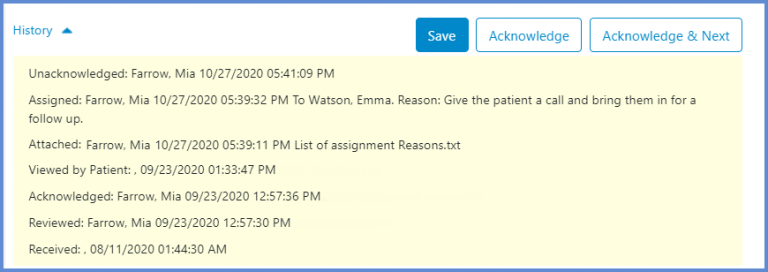
Logs are maintained for all actions performed.
Attachments can be added or deleted from the lab results in beta view.
This provides user the option to remove an incorrect attachment.
In the ‘Results’ tab, click ‘Attachments’ from the floating menu.
System displays an ‘Attachment’ window which has:
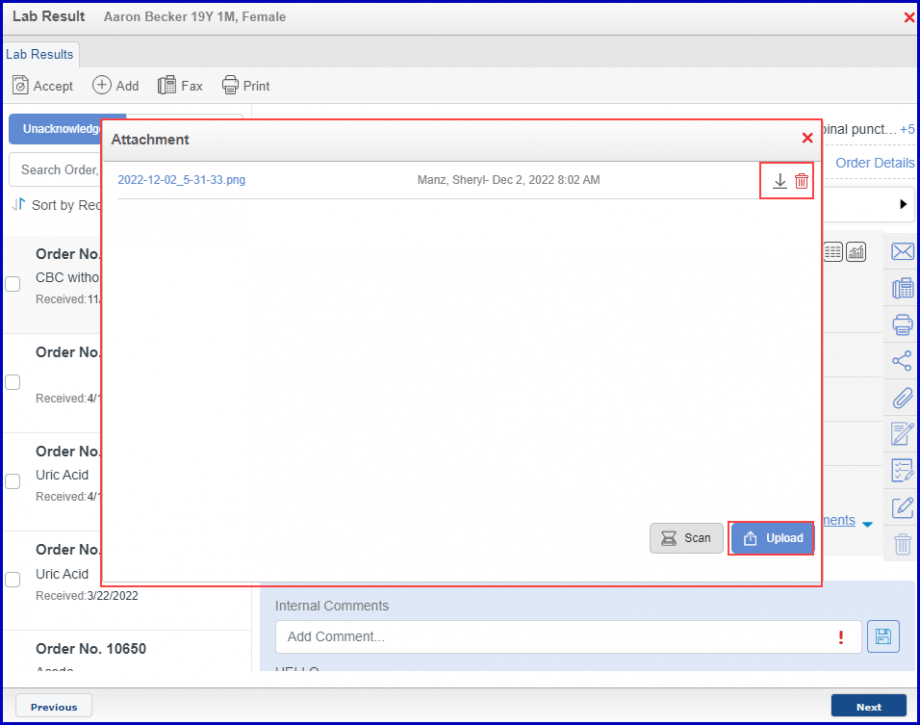
User can view a file by clicking on its hyperlink. In case the file is in unsupported format, it gets downloaded. A file can also be downloaded by clicking the ‘![]() ’ icon.
’ icon.
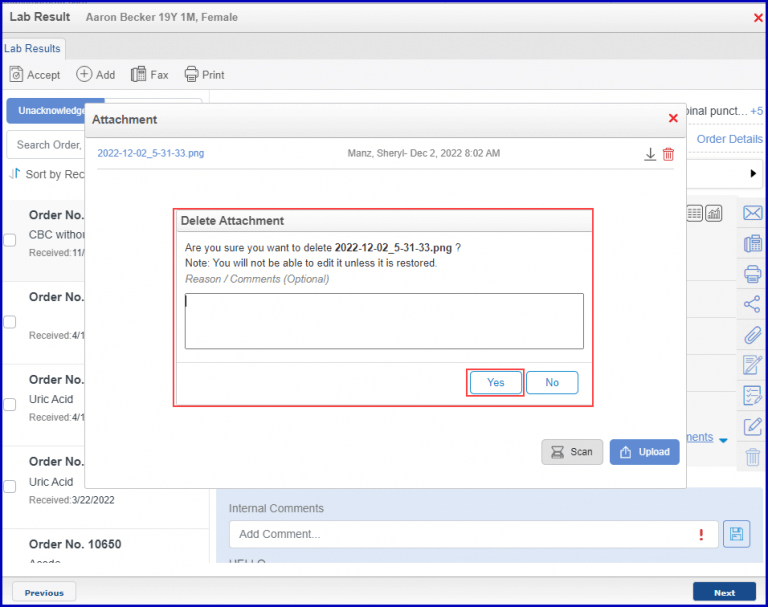
To remove a file from the attachments, click on the ‘![]() ’ icon. ‘Delete Attachment’ window appears where the user can add a Reason/Comments. Click ‘Yes’ and the file is removed.
’ icon. ‘Delete Attachment’ window appears where the user can add a Reason/Comments. Click ‘Yes’ and the file is removed.
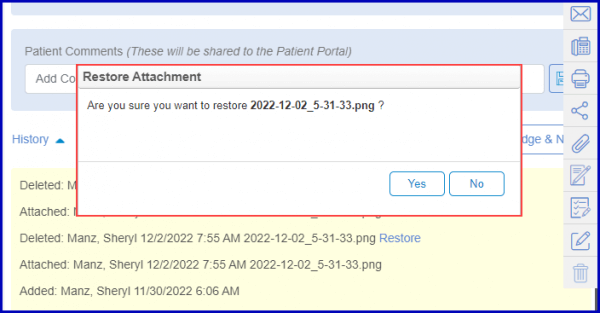
To restore a deleted file, user can navigate to ‘History’ and click ‘Restore’ hyperlink next to the file.
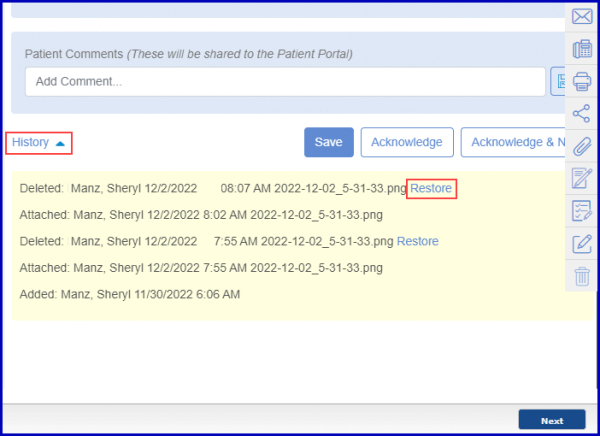
‘Restore Attachment’ window appears where the user should click ‘Yes’ and the file is moved back to the attachments.
A file can be added to the attachments by clicking the ‘Upload’ button.
If the user permission ‘Edit Lab Result’ is disabled in the ‘Settings’ module, the user can only download a file. ‘Scan’, ‘Upload’, and ‘Delete’ buttons disappear from the ‘Attachment’ window.
In order to enable ‘Edit Lab Result’ click here.
Users can select and import multiple lab results to Provider Note simultaneously in beta lab view.![]()
This reduces the manual effort involved in importing each lab result separately.
On the lab results screen, the system displays a master checkbox under ‘Sort by’ filter. Enable this master checkbox to select all lab results at once.
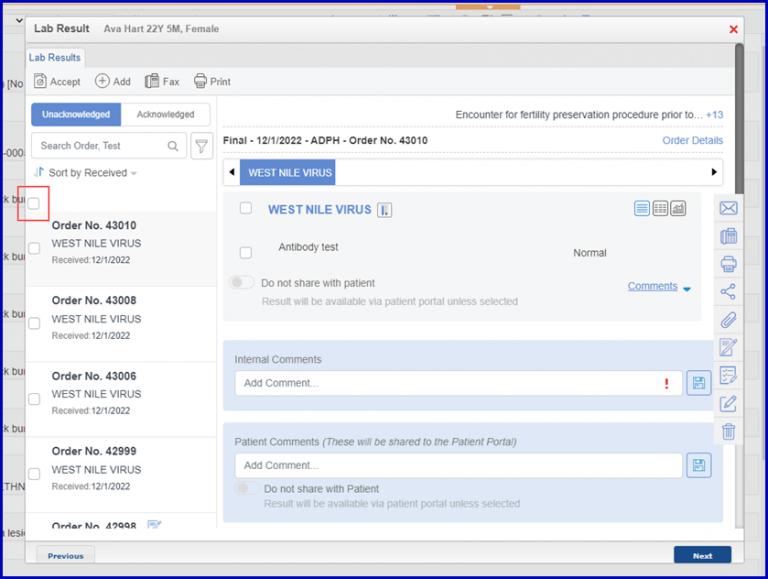
Click the ‘Accept’ button to import the selected lab results onto the Provider Note.
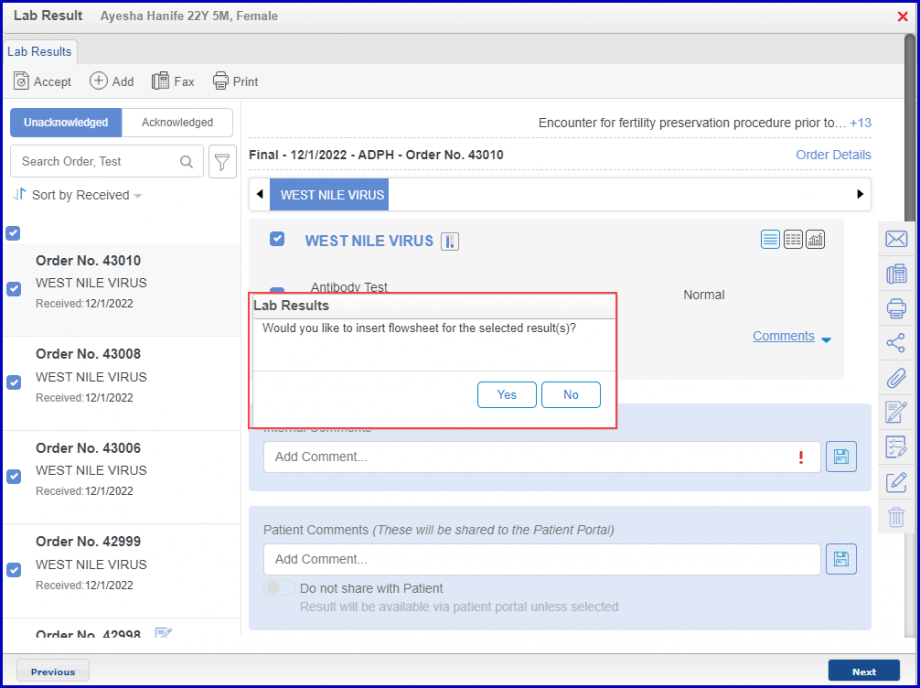
Alternatively, click the ‘Next’ button to add the lab result to the Provider Note. This displays the prompt ‘Would you like to insert flowsheet for the selected result(s)?’. The user can click on ‘Yes’ or ‘No’, as per their requirement, which imports all the lab results onto the Provider Note.
Click ‘Save’ to save the Provider Note.
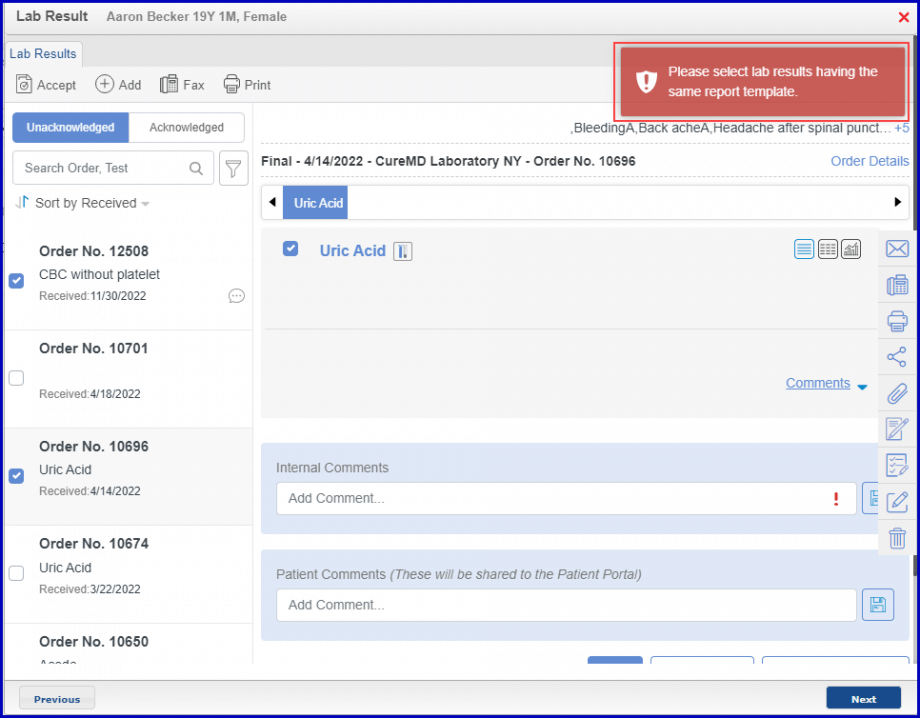
Users can print multiple lab results simultaneously.
To print the lab results, mark the checkboxes for the desired lab results. Then click ‘Print’.
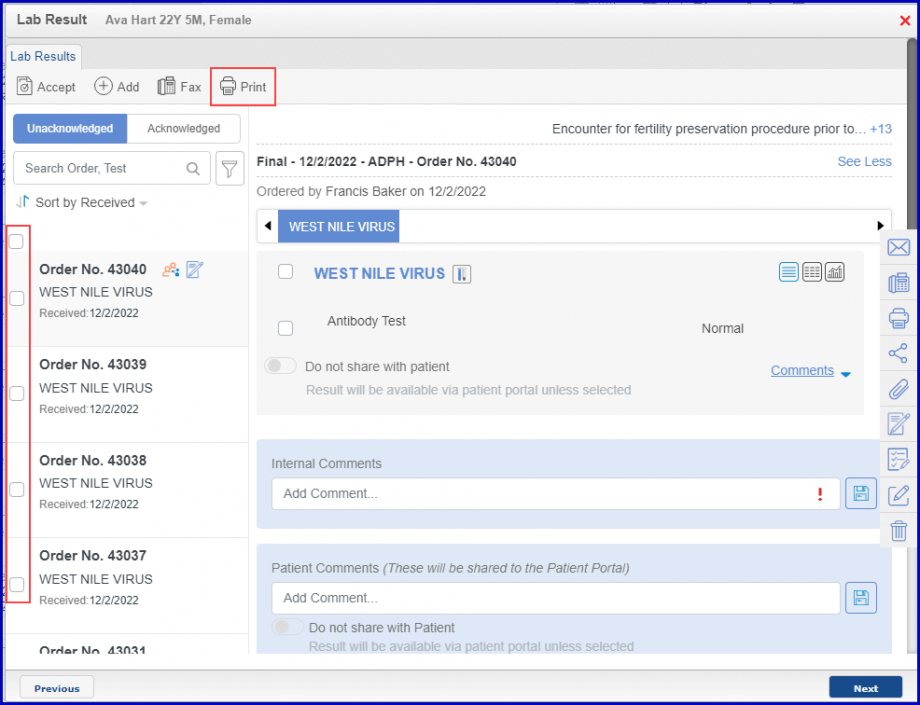
System prints multiple lab results.
Users can only print multiple lab results which have the same requisition template configured. Click here, to view how to configure requisition template.
If the user attempts to print multiple lab results which have different requisition templates configure, the system displays an error message.
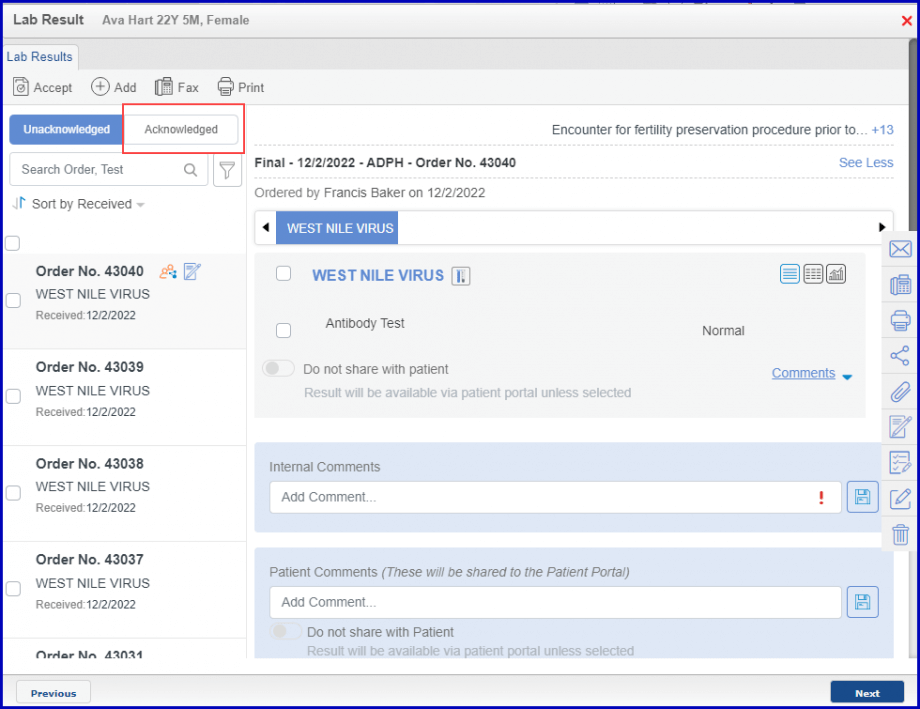
Acknowledged and unacknowledged lab results can be easily viewed in separate tabs.
By default, the system displays unacknowledged lab results.
Click the ‘Acknowledged’ tab to view the acknowledged lab results. Acknowledged badge is not displayed next to the accepted lab results.
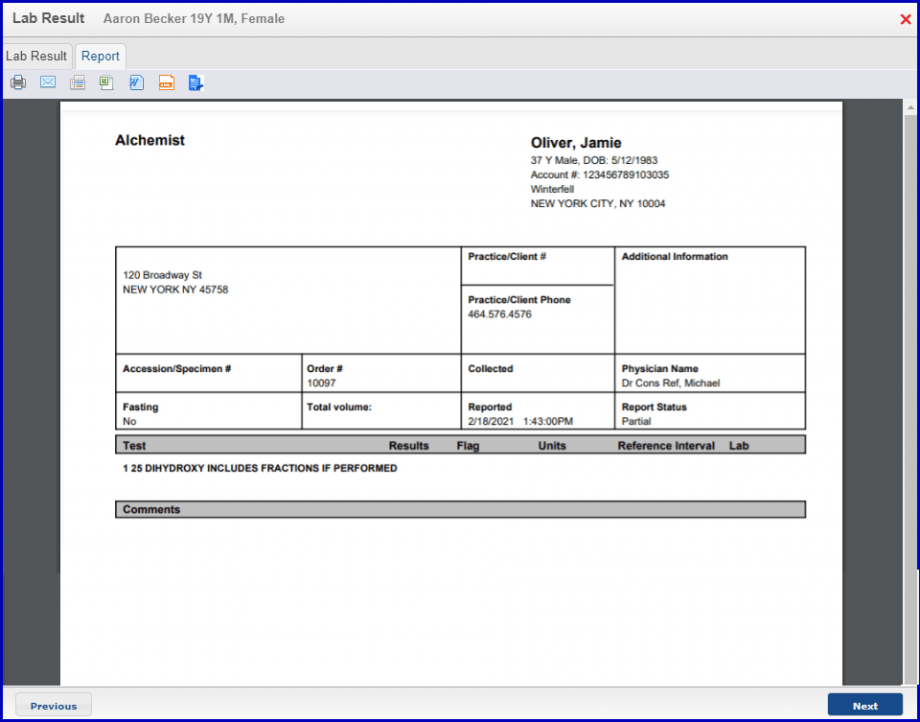
Patient comments can be printed on lab results with report template ‘LabCorp’, ‘LabCorp_LocID’, ‘SunRise’, ‘Quest’ or ‘BioReference’.
This helps users in viewing the complete information on the printed report.
To see how to select a lab report template, click here.
The users should also have enabled preference for adding patient comments on the lab report. To enable this preference, click here.
Select a lab result with patient comments added to it. Then click ‘Print’.
The system displays the patient comments on the printed lab result report.
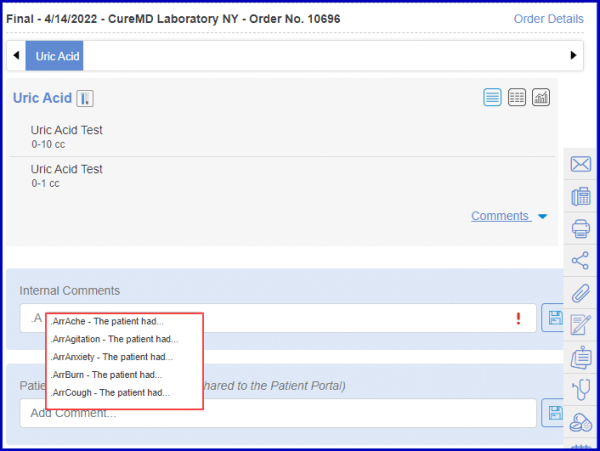
Smart phrases have been incorporated in the lab results beta view.
This allows providers to efficiently write notes/comments by using pre-defined phrases.
To view smart phrases, type (.A) in the ‘Internal Comments’ or ‘Patient Comments’ section and press Ctrl + Space.
The system displays a dropdown with top 5 results stored in alphabetical order.
The beta view of lab results is enabled by default for all newly created users.
Users can experience the enhanced interface of lab results from the beginning.
Users can disable the Beta View from the patient’s general preferences.
Disabling the Beta View would keep the old layout for the lab result page.
Click Here to learn how to disable the Beta View.

Posted On: Jul 21, 2026
Posted On: Jul 21, 2026
Posted On: Jul 14, 2026
Posted On: Jul 14, 2026
Posted On: Jul 14, 2026
Posted On: Jul 14, 2026