How to Add a New Outgoing Referral?
An outgoing referral is created when a patient is referred from the primary care provider to a specialist. This referral can be sent within or outside the practice.
In order to create a new outgoing referral, follow the workflow mentioned above to land on the ‘Referrals’ screen.
When the user clicks on the ‘New Outgoing Referral’ button, the system displays a blank referral in the right pane of the referral screen.
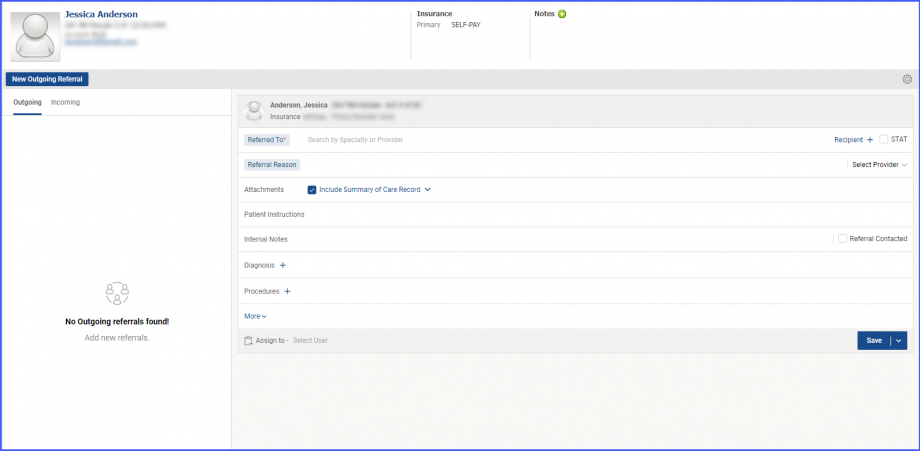
Following patient details are auto-populated on the new referral:
- Name
- Age
- Gender
- Account Number
- Primary Default Insurance
- Policy Number
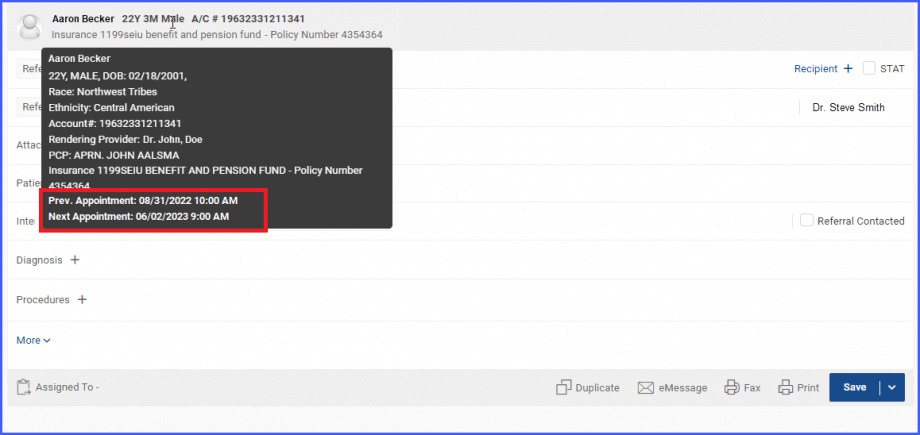
Hovering over the patient name displays a tooltip that contains complete patient information.
The patient demographics tooltip now displays the information about previous and next appointment of the patient.![]()
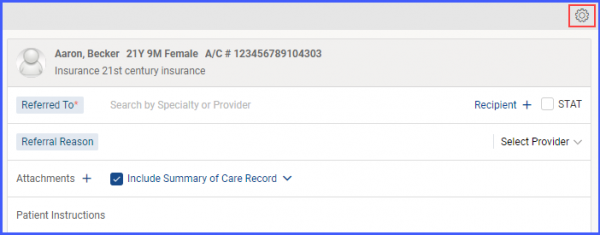
Provider Search
Users can search for a specialty, provider, or organization that they want to refer the patient to. This search is directly linked to the NPI library.
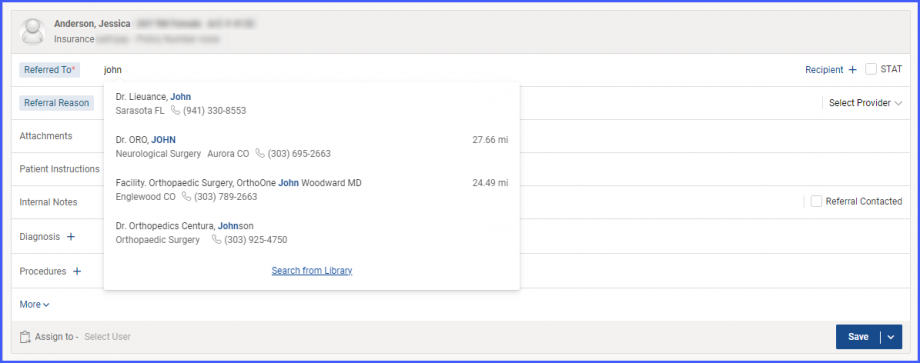
Click on the ‘Referred to’ hyperlink or the search bar next to it to add the provider or specialty in the outgoing referral. The system displays a list of five frequently used specialties and providers as shown below.
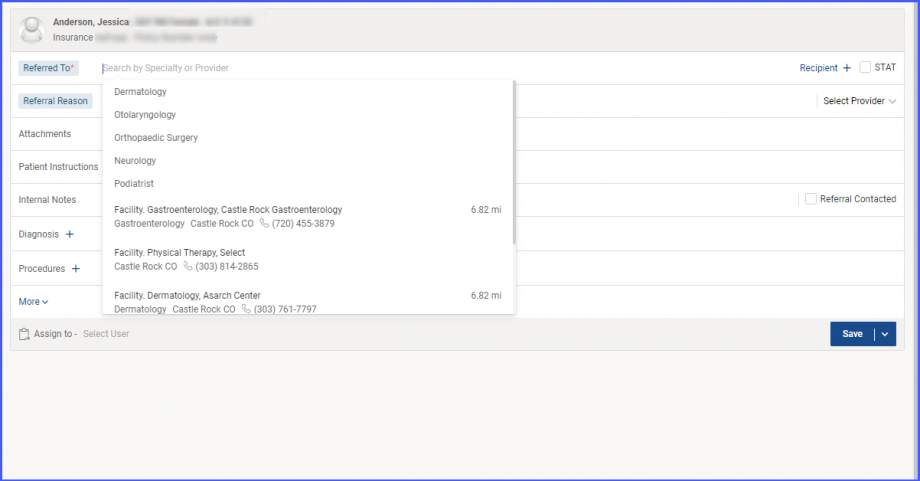
In case the required provider or an organization is not found in the system, the users have the option to search from the NPI library by clicking on the ‘Search from Library’ hyperlink.
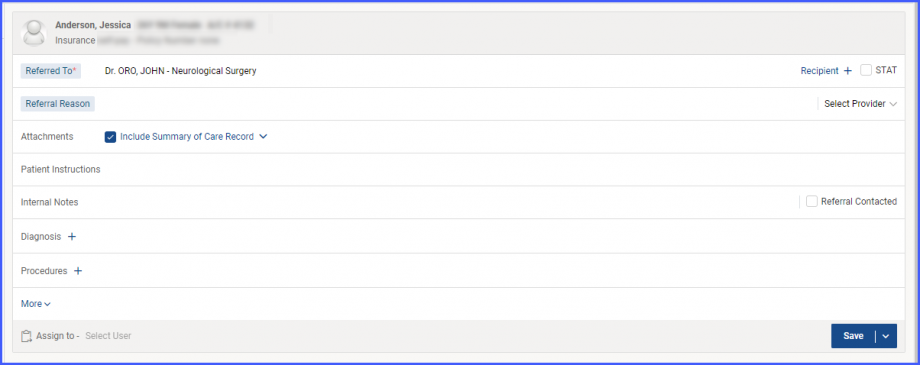
Once a provider is selected, the name of that provider is displayed along with that provider’s specialty in the ‘Referred to’ field and the selected provider/organization is imported in the Referring Provider section by default.
The user permissions for searching and importing providers from the NPI Library can be adjusted from the ‘Settings’ module.
Click here, to view how to enable or disable the ‘Search from Library’ hyperlink.
Select Multiple Recipients for a Referral
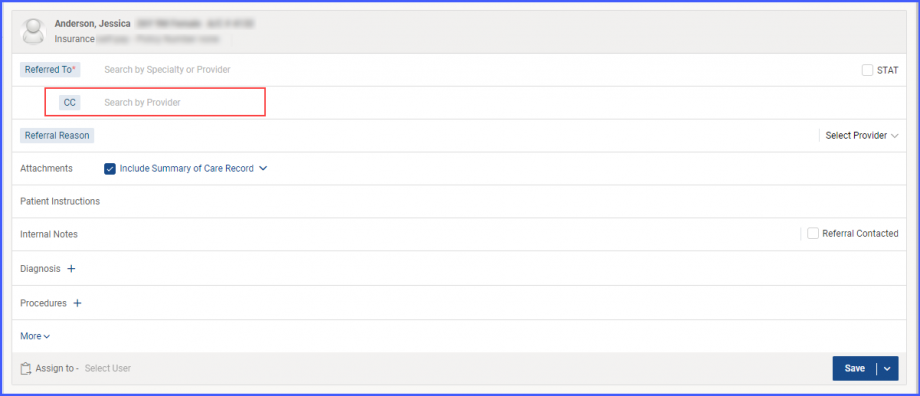
Users have the ability to send out the referral to multiple specialists for review. In order to this, click on the ‘Recipient’ hyperlink.

Once the user clicks on the ‘Recipient’ hyperlink, a new field i.e. CC is displayed under ‘Referred To’ hyperlink. User can select up to three providers in this field.
STAT Checkbox?
Users can mark the urgency of a referral by using the STAT checkbox.
If this checkbox enabled, the referral gets marked as STAT and would require immediate attention from the receiving provider. By default, this checkbox is unchecked.

Ordering Provider
In order to document the provider who is sending the referral, click on the ‘Select Provider’ dropdown present below the ‘STAT’ checkbox and the list of all practice providers is displayed. Users can also search for the provider by typing in the search box.
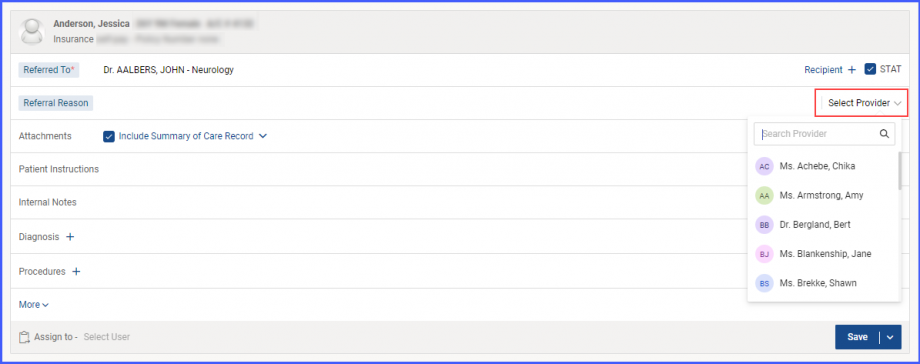
If the user who is creating the referral, is the ordering provider, or the referral is being created by the Provider Note workflow, then this field is auto-populated.
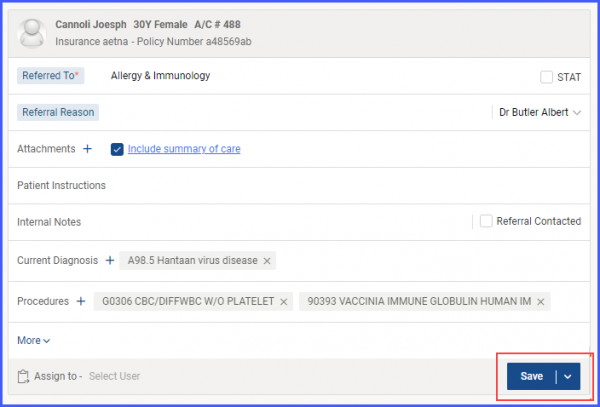
Referral Reason
The reason of the referral is documented in the field named ‘Referral Reason’.

This is a text area where the ordering provider can explain the reason and need of the referral. The character limit of this field is 2000 characters.
Attachments
The attachments section can be used to attach all patient records including labs, summary of care, history, allergies etc. with the referral.
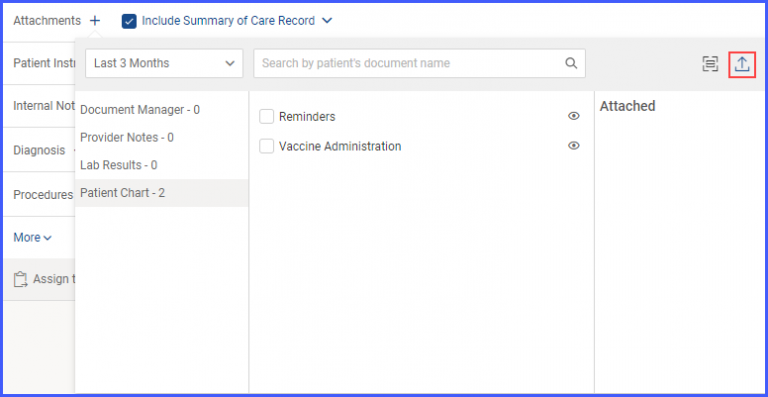
In order to attach documents with the referrals, click on the plus icon ‘+’ next the attachments label and the system displays the attachments window.
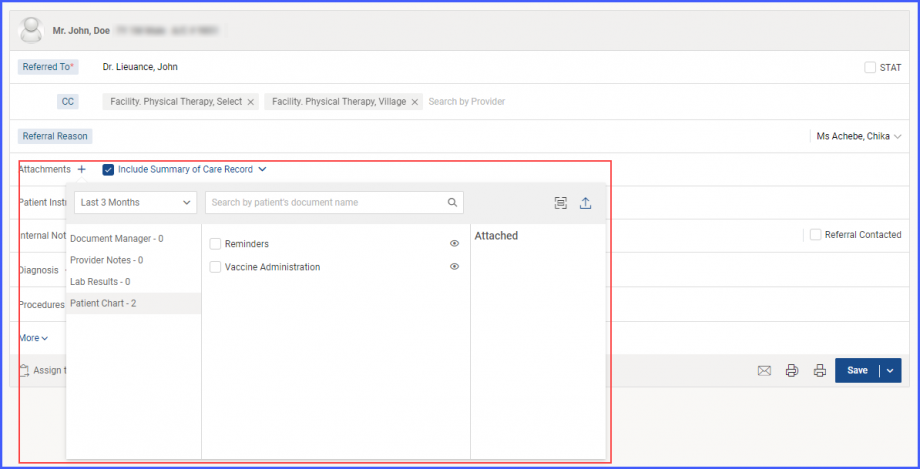
Users can attach the following documents:
- Document Manager
- Provider Notes
- Lab Results
- Patient Chart
- Letters
Click on the desired category and all the documents related to that category appear in the next section with checkboxes. Enable the checkboxes of the required documents to attach them with the referral.

Once the documents are selected, they are displayed in the rightmost panel of the attachment window.
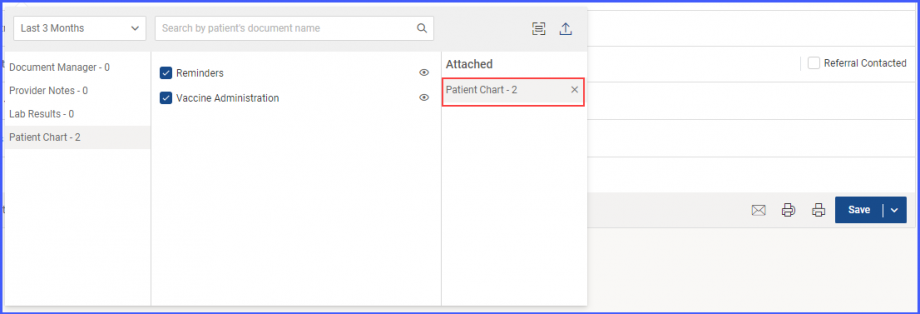
Users can preview the selected documents by clicking on the eye (Preview) icon.
In order to remove the attachment, click on the cross icon against the attached document’s name.
Scan or Upload Documents to Attach with Referrals
Users can attach a scanned document with the referrals as well.
To do that, click on the ‘Scan’ icon on top right corner of the attachments window.
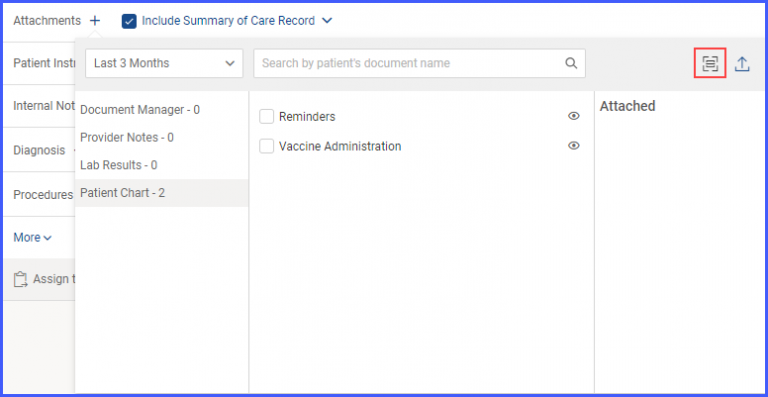
Clicking on the scan icon displays the ‘Scan Files’ popup.
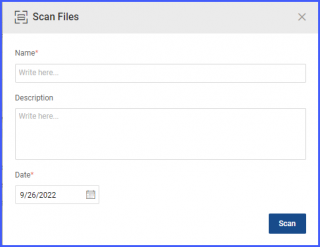
Here, the user can enter the name for the document to be scanned and proceed with the scanning. The scanned document is automatically saved in the Document Manager folder.
Similarly, user can attach documents with a referral by uploading them from their system.
To do this, click on the ‘Upload’ icon on the top right corner of the attachments window.
Clicking on the upload icon displays the ‘Upload Files’ popup window. Here, the user can browse the system for the relevant file and upload it.
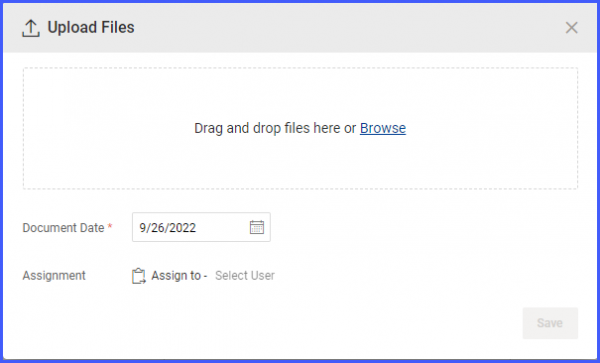
Up to four files can be uploaded at a time with maximum size of 15 MB. The uploaded files are automatically saved in the Document Manager folder.
Summary of Care
The Summary of Care is an electronic record of important patient information, which can be attached with the referrals being created.
The option to ‘Include Summary of Care (SoC)’ is enabled by default. Users can disable the SoC checkbox if it is not required to be sent with the referral.
Users have the option to preview the summary of care and specify which components are required in it. To do that, click on the ‘Include Summary of Care Record’ drop down and the system displays two options including:
- Select Summary of Care
- Preview Summary of Care
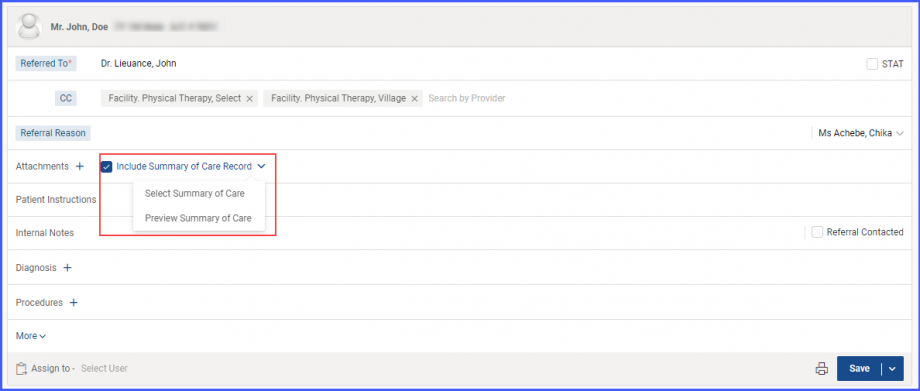
Clicking on ‘Select Summary of Care’ option displays the ‘Clinical Summary’ popup window.
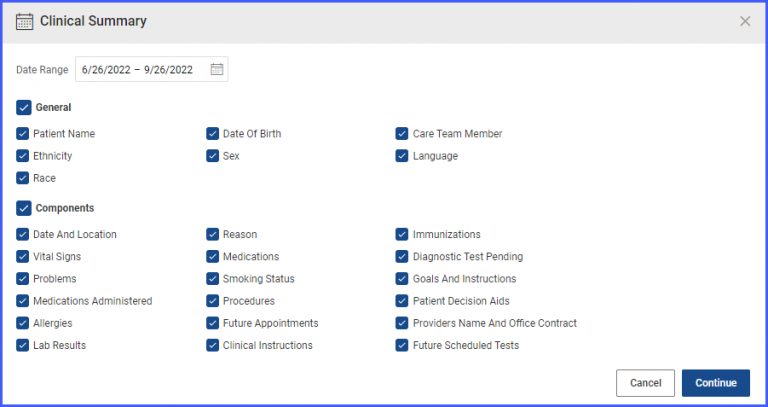
Here, users can customize the ‘Date Range’ and ‘Clinical Summary’ by unmarking the checkboxes against components that are not required. As a result, only the selected components populate on the ‘Preview Summary of Care.’
Once the required changes are done, click on the ‘Continue’ button to proceed and preview the Summary of Care.
The user can fax Summary of Care records to recipients of outgoing referrals and mark them as acknowledged upon receival.
This ensures that complete patient information is shared for improved patient care.
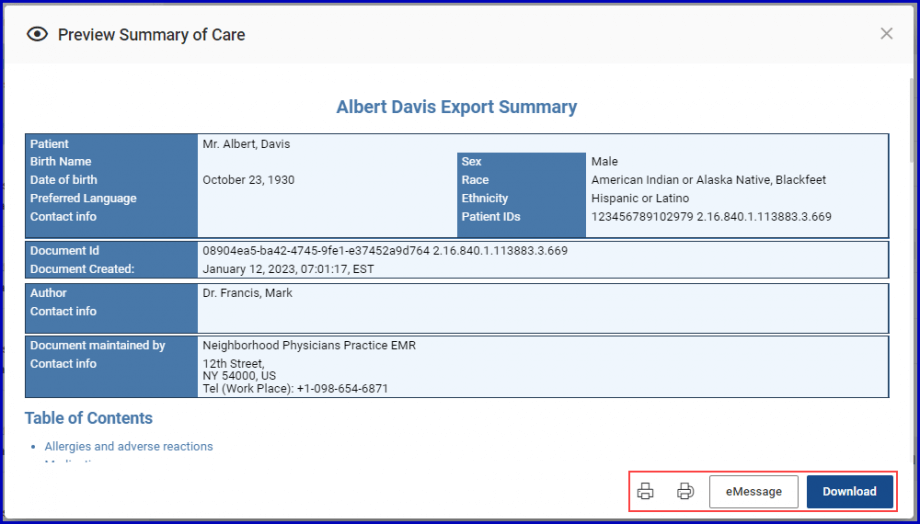
Click on ‘Preview Summary of Care’. This displays a Summary of Care report pop-up, where the user can perform any of the following actions:
- Fax
- eMessage
- Download
When the user clicks the ‘Fax’ icon, a fax pop-up appears. The user can fill in the required fields in the fax pop up and share it by clicking the ‘Send’ button.
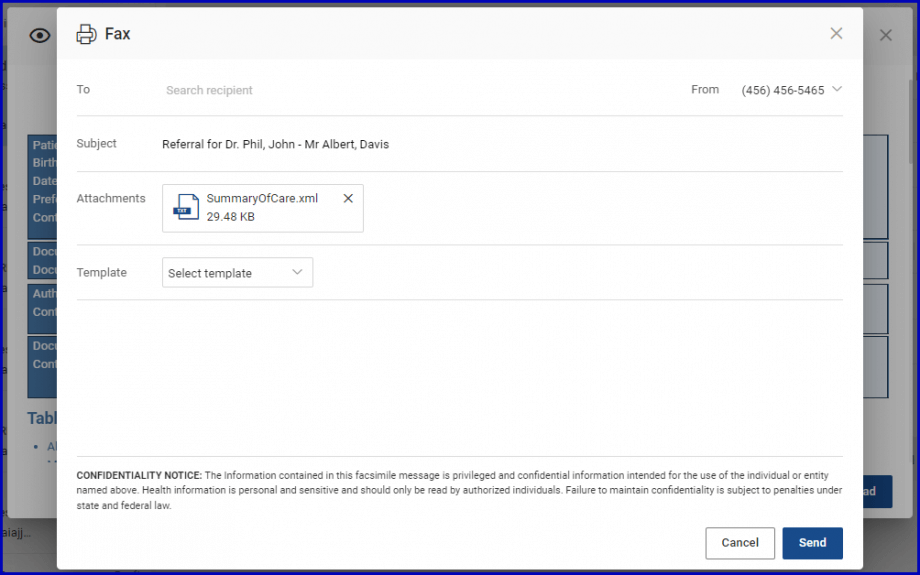
Once the user clicks ‘I Agree’ on the confidentiality notice pop-up, the system sends the fax to the recipient.
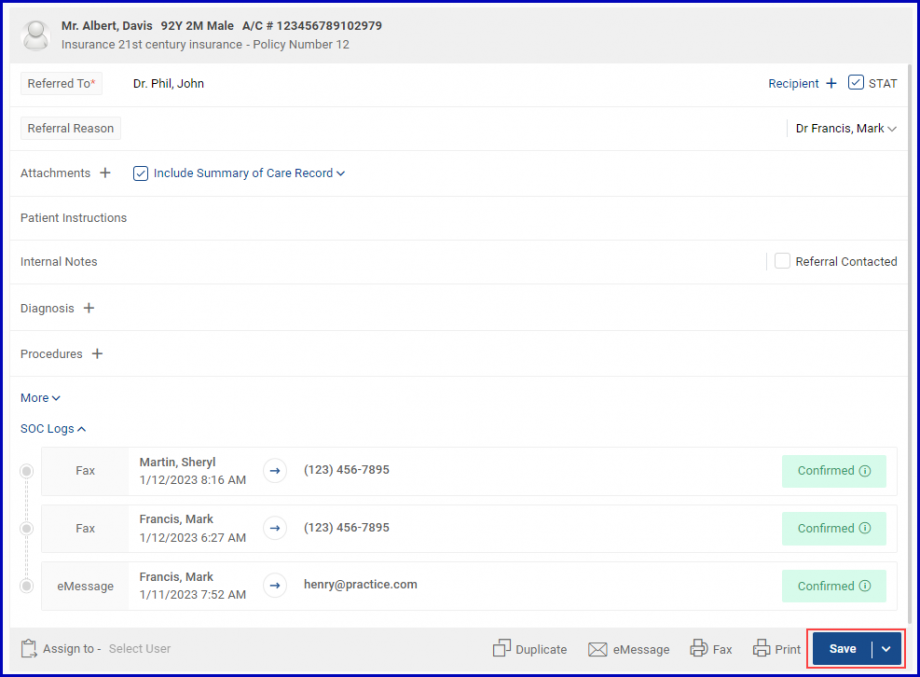
Summary of Care logs are maintained and displayed on the Advanced View for Referrals.
Any action performed on the Summary of Care records is logged by the system in the ‘SOC Logs’ drop-down.
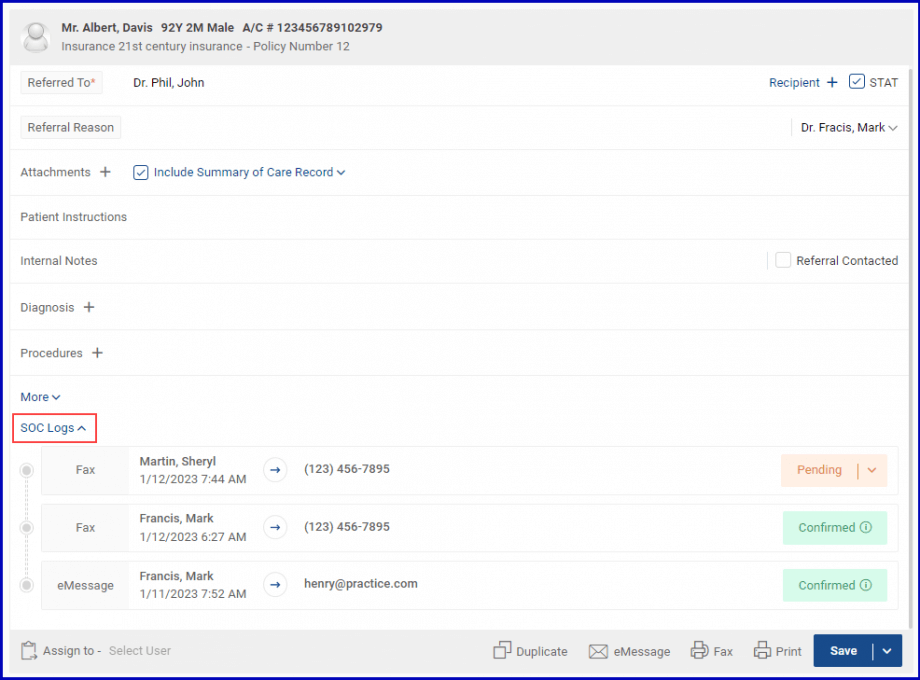
When the user clicks on ‘SOC Logs’ dropdown, the logs of all actions appear underneath.
Receival of faxes and eMessages has to be confirmed manually. Once the SOC record has been received by the recipient, click on the ‘Pending’ drop-down and select ‘Acknowledged’.
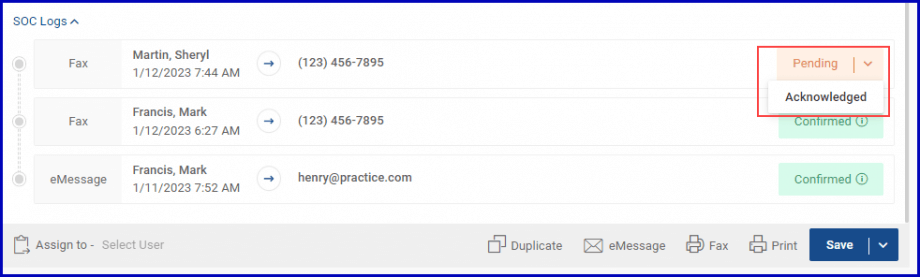
A pop-up is displayed where the user is asked to confirm if the recipient has received the SOC record. If the user has confirmed the receival of the documents with the recipient, they can click on the ‘Yes’ button to change the status to acknowledged.
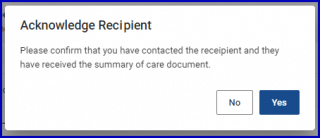
This changes the SOC Log status to ‘Confirmed’. Click on the ‘Save’ button.
Patient Instructions
Users can also add patient instructions in the outgoing referrals. To document the instructions, click on the text field next to ‘Patient Instructions’.
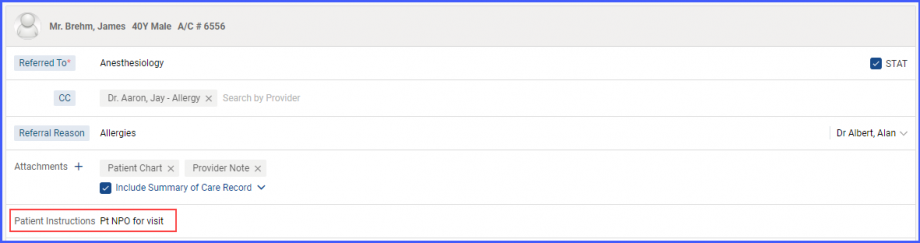
Users cannot edit or delete patient instructions once a referral is saved, however, new instructions can be added and saved with the already saved ones.
Internal Notes
Internal notes are used as a medium of communication within the practice. Users can add instructions as comments in the ‘Internal Notes’ section. These notes are displayed along with the name of the user who added the notes.

The ‘Referral Contacted’ checkbox next to ‘Internal Notes’ section is used to differentiate the referral follow up comments from the internal notes.

If the user enables this checkbox, the entered comment is categorized as Referral Contacted and vice versa.
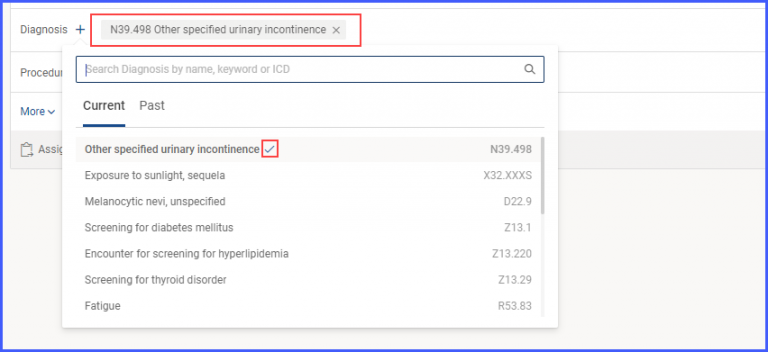
Add Diagnosis
In order to add a diagnosis with the referral, click on the plus icon ‘+’ next to the ‘Diagnosis’ label and the system displays a list of patient’s current diagnosis.
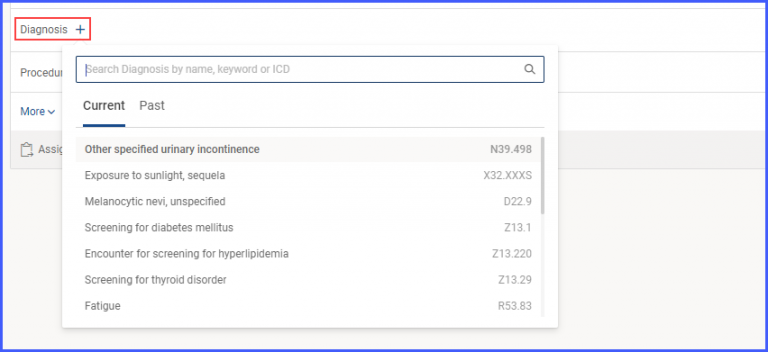
From here, users can either select a past diagnosis from the past tab or search for a new one by name, keyword or ICD code. Once the user selects a diagnosis, it is displayed as a tag in front of the diagnosis label.
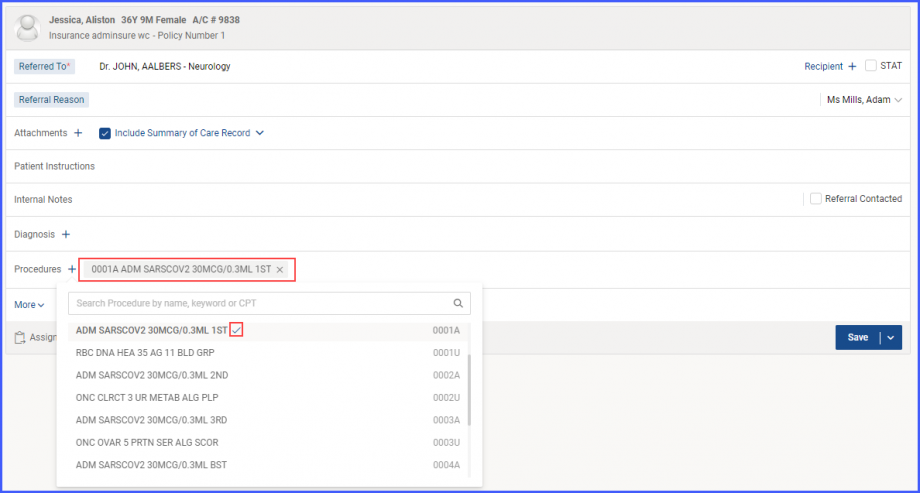
Add Procedures
In order to add procedures, click on the plus icon ‘+’ next to procedures heading and a list of all procedures along with their CPTs are displayed in a popup.
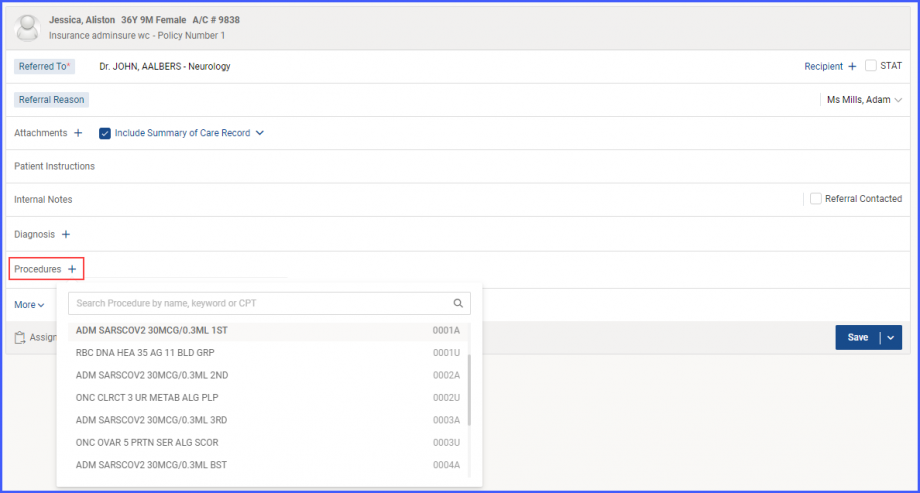
Users can click on any procedure to select it and it is displayed as a tag on the referral. Users can also search for a specific procedure by name, keyword or CPT code.
How to Assign Referral to a User or Role?
Referrals can be effectively managed by assigning them to users/roles. To assign a referral, click on the ‘Assign to’ hyperlink and the system displays a dropdown list containing user names and user roles.
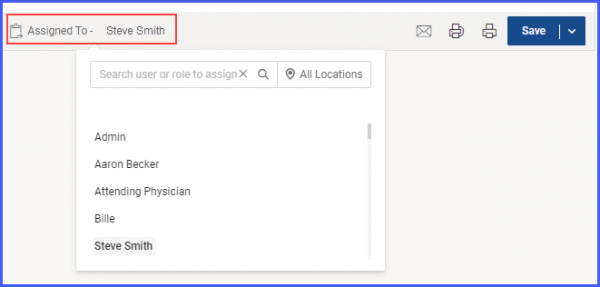
Once a user or role is selected, the system displays the name/role as a tag in the ‘Assigned To’ window. The selected user/role also appears next to ‘Assigned To’ text.

In case more than one user(s) and/or role(s) are selected, the count of the selected user(s) and/or role(s) appears next to the ‘Assigned To’ heading.
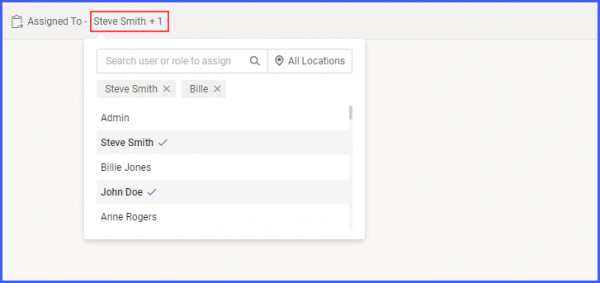
User(s) and/or role(s) can be filtered on the basis of location. Select a location from the location dropdown and the list of the users and roles are shown on the basis of the selected location.
Referral Preferences
Users have the option to select certain user(s) or role(s) as their preferred choice to whom every outgoing referral gets automatically assigned.
To select a preferred role or user, click on the ‘Gear’ icon present at the top right corner of the referral screen.
The system displays ‘Referral Preferences’ dropdown containing the ‘Assigned To’ section.
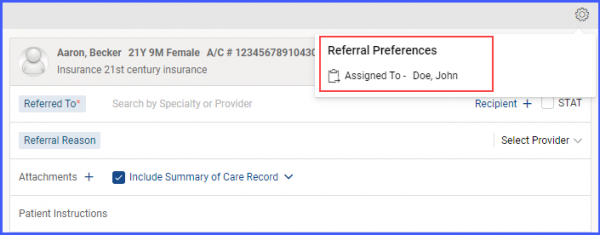
Here, user(s) or role(s) can be selected as a referral preference.
Once all the required information is entered, click on the ‘Save’ button and a new outgoing referral is created for the patient.