How to Label Print and Scan Using Chrome?
The following guide ensures Label printing and Scanning through Chrome:
ALLOW POP UPS IN GOOGLE CHROME
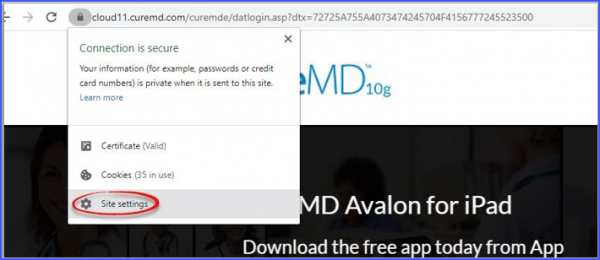
- First access the main CureMD home page (relevant CureMD cloud address i.e. Cloud11).
- Click on ‘Secure’ lock at the top left corner of Chrome.
- Click on ‘Site Settings’ shown below:
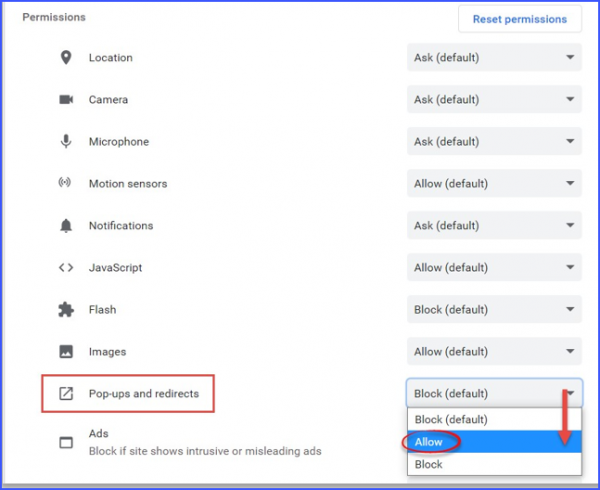
- Click on drop down menu under ‘Pop Up’ and select ‘Allow’.
STEPS TO INSTALL SCANNING AND LABEL PRINTING UTILITY
Following are the steps to install Cure Client.
Download the Cure Client setup through the direct link:
https://clientutility.mycurecloud.com/ClientInstaller/CureMDServerSetup.msi
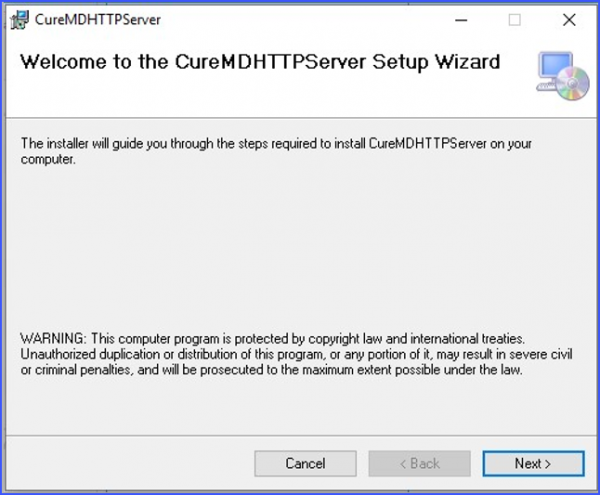
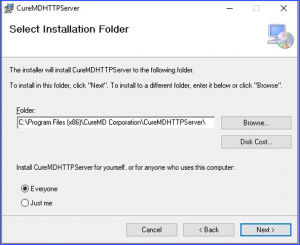
1. User is asked to choose a destination folder for installation, click Next.
2. The installer has collected all the basic information and it is ready for installation. Click Next.
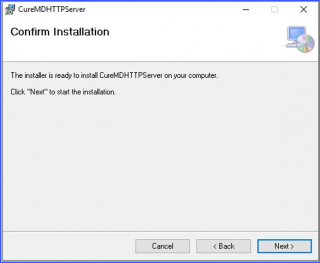
3. The installer starts installing the Cure Client utility.

4. Once the installer has done the installation process you can click close.
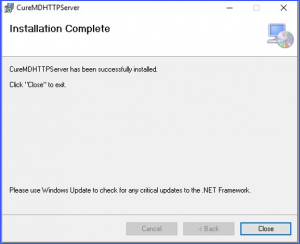
5. Once the installation is completed, users can notice a “C” Icon in the system tray which means the installation was successful.
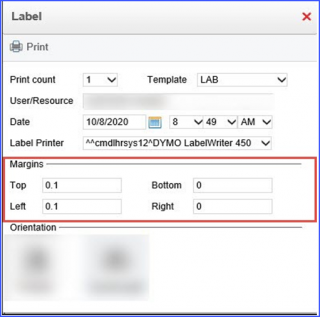
6. Please make sure to update the Margins and Orientation of label printers according to the make and model.
Label Margin Setup:
- Zebra and Dymo Margin Set:
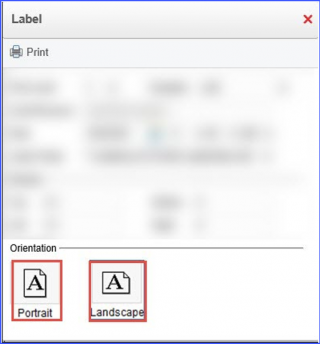
- Orientation and Recommended Per Size:
Dymo:
Paper Size: 1-1/8″ x 3-1/2″ Orientation = Landscape
Margins: Top = 0.1, Bottom = 0, Left = 0.1, Right = 0
Zebra:
Paper Size: 3/1 and 3/2 inches Orientation = Portrait
Margins: Top = 0.1, Bottom= 0, Left= 0.1, Right=: 0
- The agency requires an MDADMIN/Admin CureMD user account to customize Margins & Orientation.
- Non MDADMIN users (i.e. PMS) do not have these options.
- After Margins & Orientation are updated and printed once, the new margins are saved for all users who are going to use this label printer.
- The above work flow is required to be followed once for all label printers at the practice. (Please contact Support, or your Implementation Specialists, if you require further assistance)
7. After completing the installation and configuring the Margins and Orientation, you can Scan and Print labels.

TROUBLESHOOTING THE CURE CLIENT
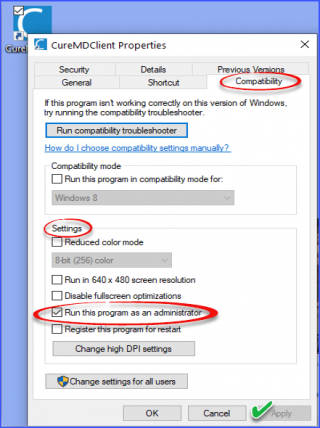
If the CureMD Client does not respond, is not visible on your application tray, or your devices do not seem to connect to CureMD, you can try running as an Administrator.
- Right click on the CureMD Client’s shortcut on your desktop screen > CureMD Client > Right Click > Properties.

- Select Compatibility > Settings > Run this program as an administrator > Apply.
CureMD Client Utility Version 5.1
- White-listed CureMD Client from false positive anti-viruses list
-
- Obfuscation of ‘cmdHTTPServer.exe’
- Digitally signed the ‘cmdHTTPServer.exe’ and dll
- Added ‘ECG/EKG’ integration capability and SDK.*
- Optimized the startup of CureMD Client to not ask for admin credentials after installation.
Note: (The fix (*) is the reason why the size of installer has increased)
CureMD Client Utility Version 6.0
Users can download and install version 6.0 of CureMD Client Utility containing the latest updates which are as follows:
- Optimized the CureMD Client utility with latest certificates
- No re-installation required this year, certificates will automatically be updated if the utility is turned on while using the CureMD application.
Note: Due to security reasons it could be a possibility that the certificates do not get updated. Kindly proceed with the re-installation process
