How to Manage Denials?
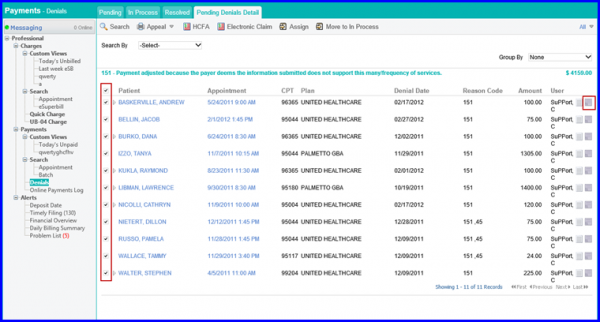
The application automatically tracks all denials, which are not already resolved, in an on screen “Task list”. The user can view institutional claims along with professional claims under denial bucket list.
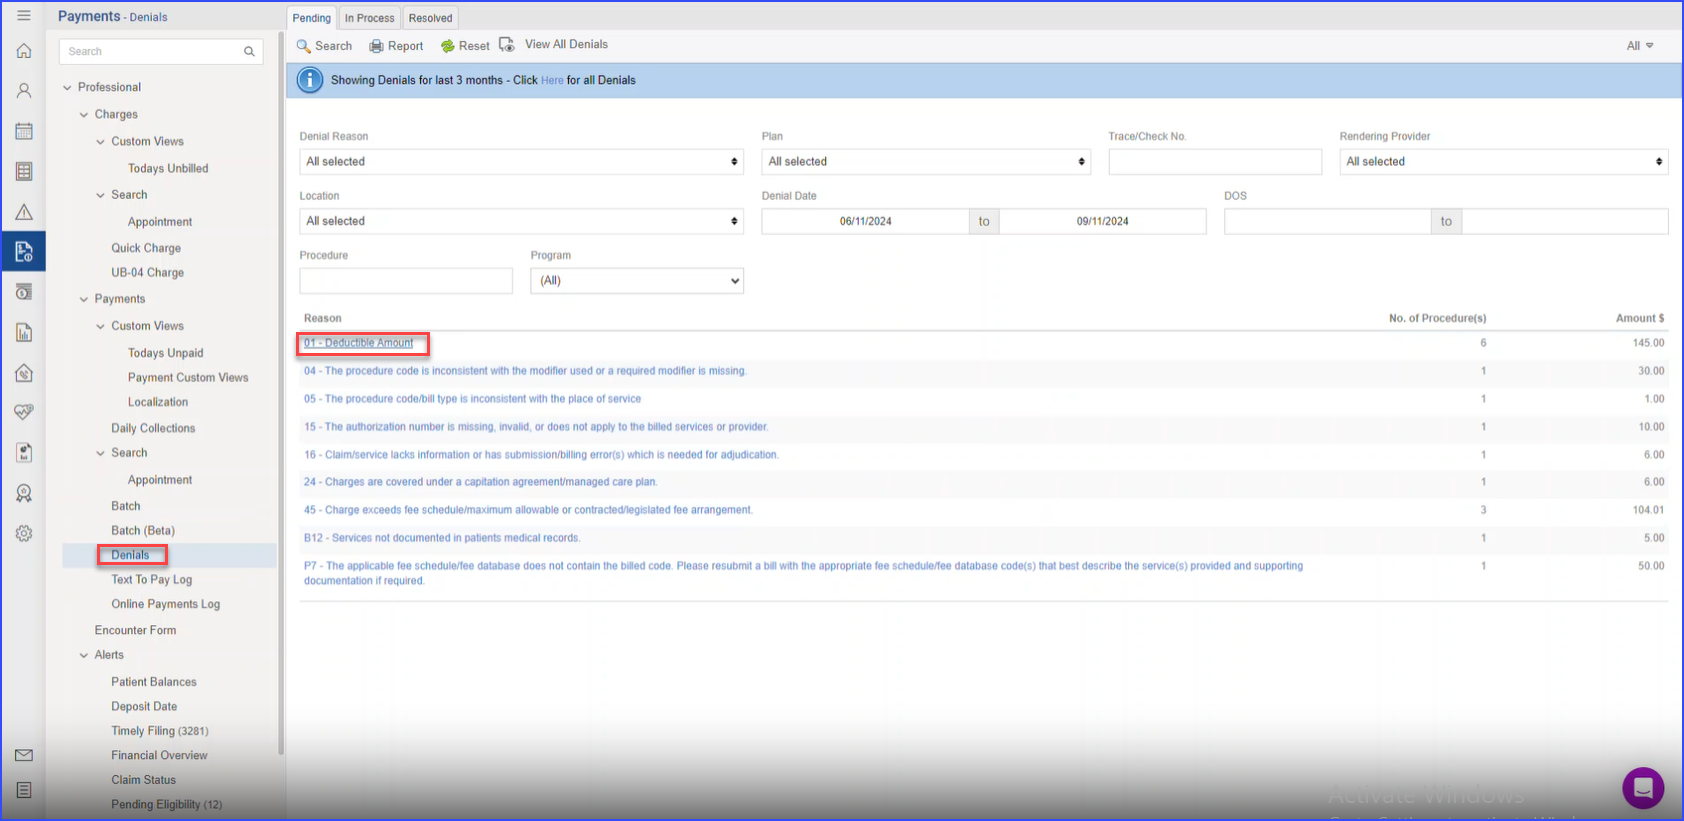
At Search By, choose Trace/Check No. and enter the check you have just posted through ERA, and then click Search. Few enhancements has been made to search that enables Practice User(s) to search for denied CPT’s with respect to their program, along with multiple criteria for increased efficiency and usability.
Users can filter search results by specifying options from:
- Denial Reason
- Plan
- Trace/Check No.
- Rendering Provider
- Location
- Denial Date Range
- DOS Range
- Program
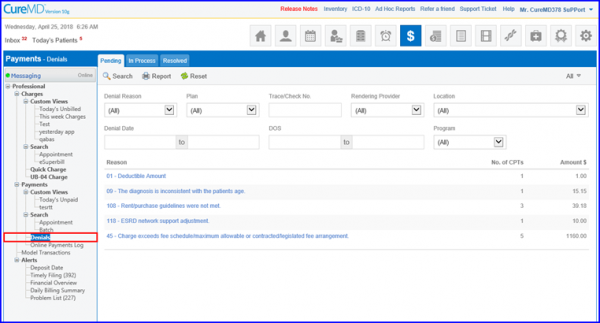
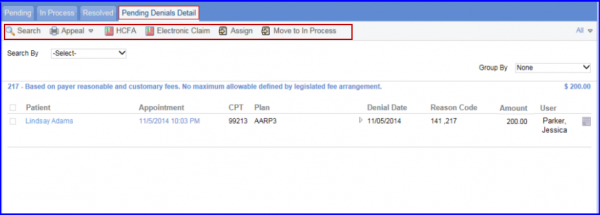
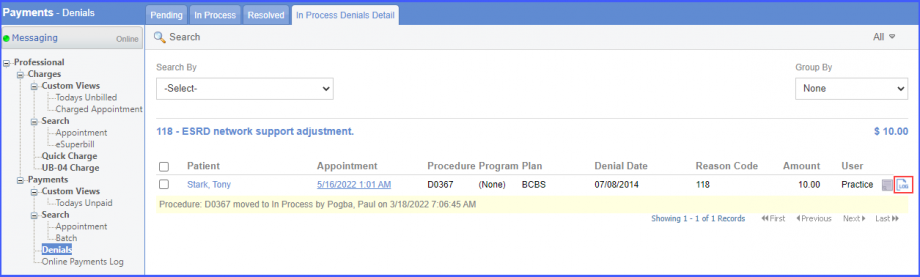
The application will show you the denial reasons and how many charges, and the dollar amounts associated with those denials, so you can work on them. Clicking on the denial reason will take you to all charges with that reason.
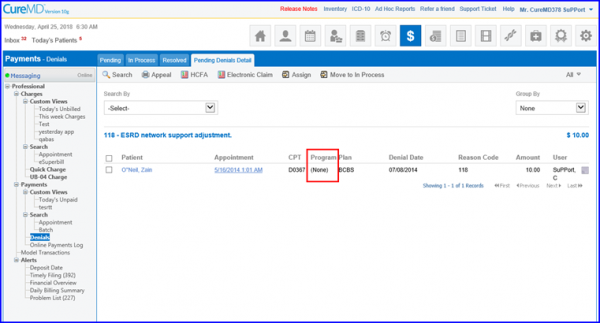
Click on a Denial Reason and a column named Program can be used to identify the required Program.
The Program column has also been added in the Denials report, which can be generated via Appeal dropdown. Lastly, this search enhancement can be used from all three tabs (Pending, In-Process & Resolved) of Denials.
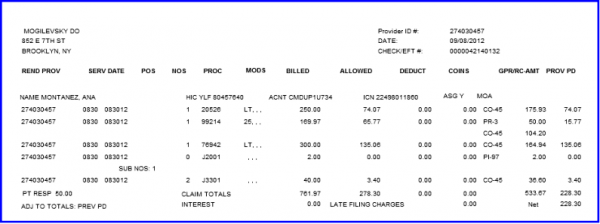
To find the items from the ERA on which you are working, check the denial date. It should match the payment date you used for the ERA. It should also show you as the user. Or, if you still can’t find it, skim down the printed EOB to find each denial.
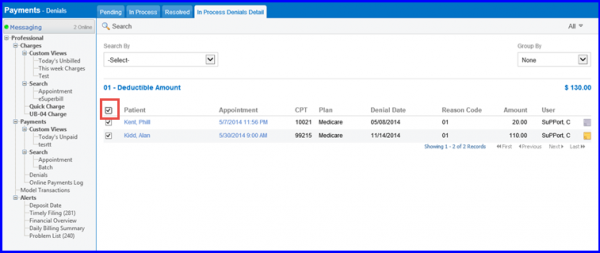
The users can now select all the records from all the pages by clicking on the master checkbox.
When you find ones from this check, you need to decide what to do with them. Is it retrievable money or does it need to be written off? Click on the appointment date/time. It should show the claim.
Some line items will have a zero balance because they are paid. Go to the one that has a balance. Click on the + next to that line item’s CPT code.
This shows the proposed payment (The orange tells you that it is tentative). As you can see, it has not affected the balance (and this charge would still show on your receivable reports). You now use your judgment to determine if it should be written off or corrected and resubmitted.
To view the EOB for this claim only, click on the EOB icon next to the Edit and Delete links on the right of the orange box.
Click on the red X to close the EOB.
Click Edit. This will highlight the CPT code in red. Click on that code and it will present this choice: Denial or Write Off.

If you are not sure what to do and want to research it some more, or leave it until you can confer with someone else, you can click Denial. This will keep the writeoff from actually affecting the charge and will keep it in the denial management system.
If you click Write-off, the application will enable the write-off on the account and it will reduce the balance. This will take if off the denial management list and your receivable reports.
Denial Options – If correction is needed on the charge, go to the Billing screen, Charges, Search Appointment to find the right charge. Correct the mistake, Save it.
Go back to the Denials screen. Click in front of that charge and click:
- Appeal – to print an appeal letter (Templates for these letters can be created in: Settings, Reports, Letter Templates.)
- HCFA – to print a claim form (or make the application think a claim is being printed)
- Assign – if you want to assign it to another person to work.
You can also resubmit claims electronically. To do this, click on the dropdown where it says Clearinghouse and choose the correct one.
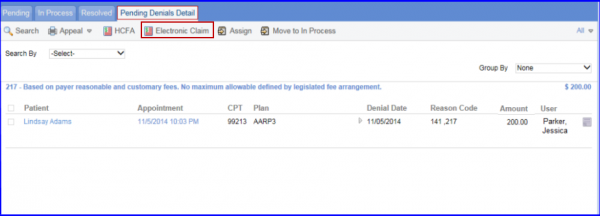
Then, click in front of the service(s) you want to resubmit and click on Electronic Claim.
Then click in front of the service(s) and click Generate Claim.
Change your claim status and click Update. Then click in front of the claim file(s) and click Upload.

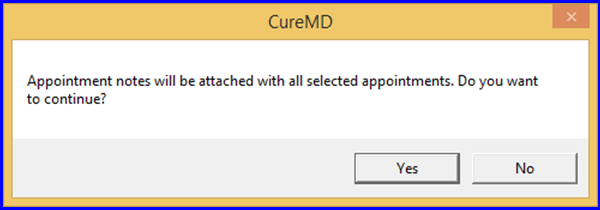
If it asks if you want to continue, click Yes.
Denials have to rebilled after correction, likewise their notes have to be updated after making all necessary changes.
Now you can attach one Appointment Note to multiple appointments.
For this, navigate to Billing, select multiple appointments from the list and click on Attach Note icon against your selected appointments.
Appointment Notes will appear here, click on Add and attach ‘Appointment Notes’.
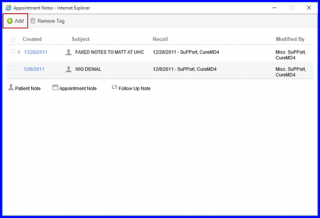
Once done click on Save.
In case you have provided incomplete information, system will show this pop-up alert.
Denials can be filtered based on procedure(s).
Users do not have to open each denial individually to find the associated procedure(s).
Enter a procedure in the ‘Procedure’ text field and click ‘Search’.
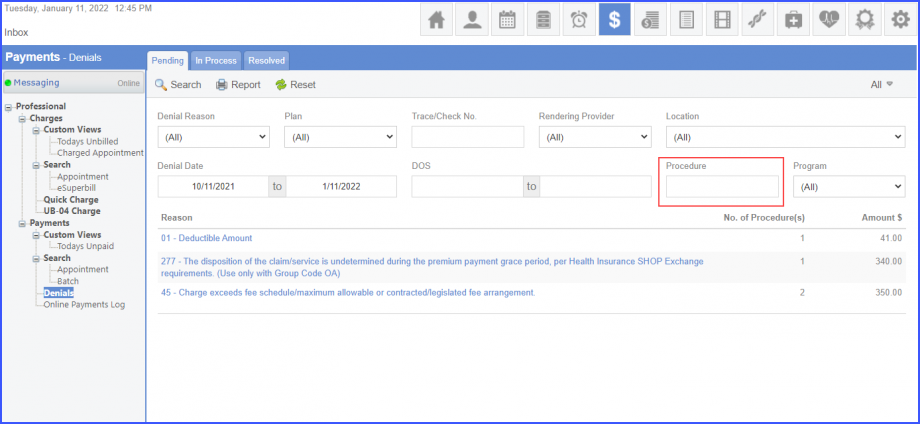
The system displays the number of procedures in the ‘No. of Procedure(s)’ column for each denial reason. This enhancement has been made in all three tabs of denials: ‘Pending’, ‘In Process’, and ‘Resolved’.
The system displays the history of user actions performed on appointments in the denials bucket.
User actions performed on claim denials can be easily tracked.
Click on a denial reason hyperlink in any of the three tabs in the denials bucket and the user is navigated to the denials detail page. If a log exists for a denial, then the log icon is displayed next to the appointment notes icon. Users can click the log icon in order to view the history of user actions performed on the selected denial.
When users attempt to save a payment without entering an amount for Paid, Transfers, Write-Off, or Copay, the system displays a prompt: “Please add paid, transfer, copay, or write-off amount to proceed.”
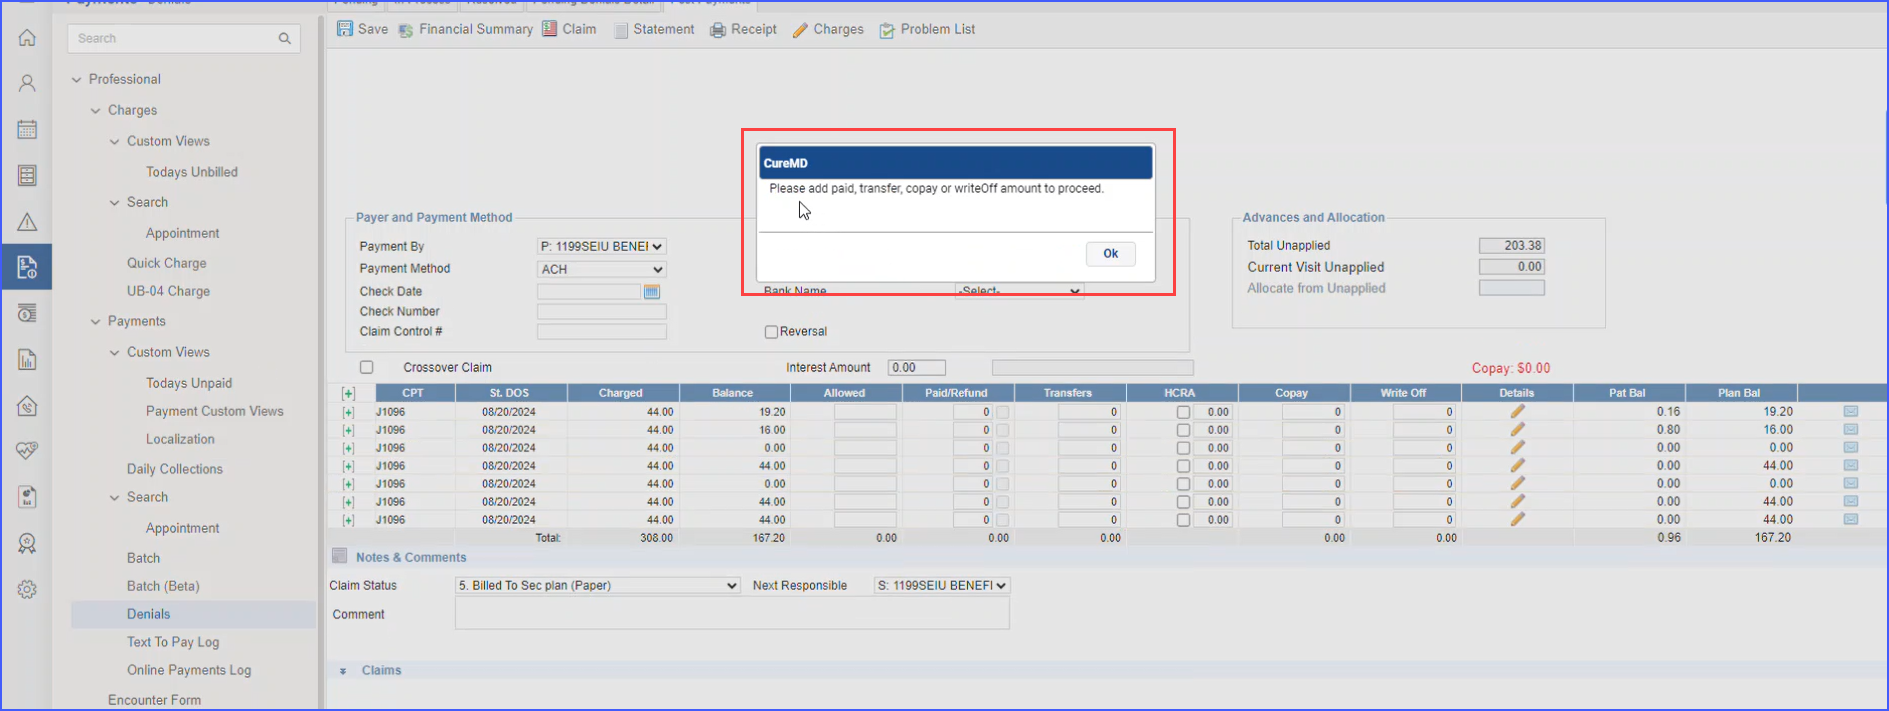
Users must enter a valid amount in at least one of these fields to save the payment successfully.
When the user navigates to the payment page and attempts to save a denial with no amounts entered for paid, transfer, write-off, or copay fields, a prompt appears. 
The system requires the user to input a value in at least one of these fields before proceeding with saving the record. If all fields are left blank, an alert message is displayed: “Please add paid, transfer, copay, or write-off amount to proceed.”
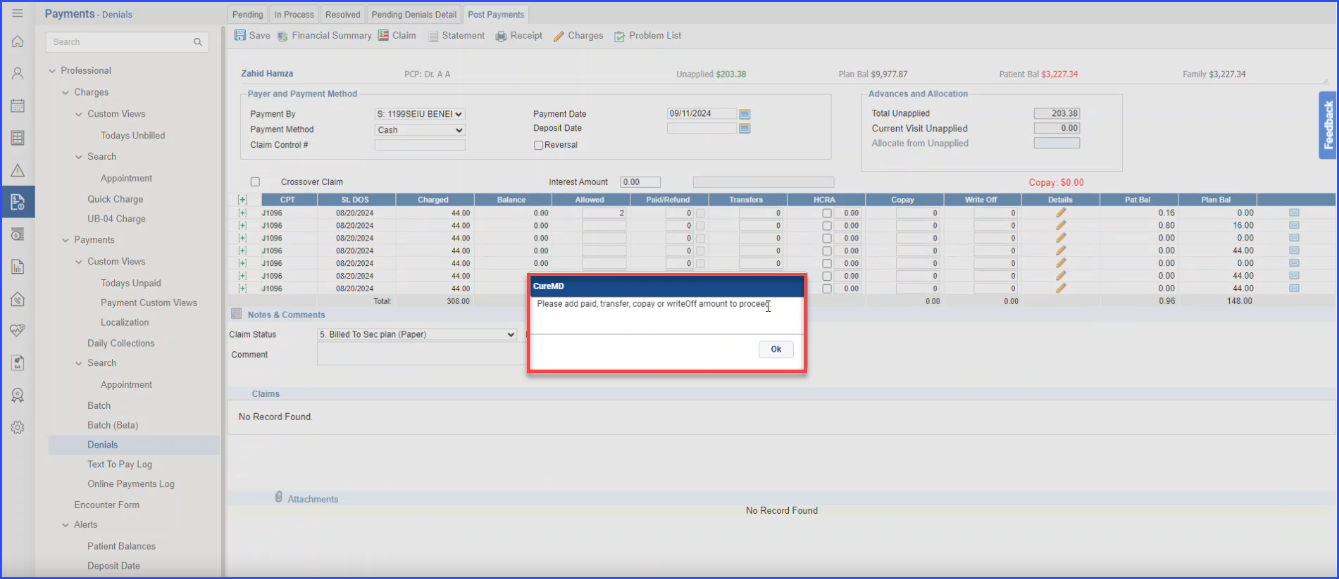
The user can only continue after selecting “OK” and filling in the necessary fields.
